Archives For November 30, 1999

restore login screen

After installing another desktop environment (e.g. KDE, MATE, Cinnamon) in Ubuntu Unity, the default login screen may be replaced after restart.

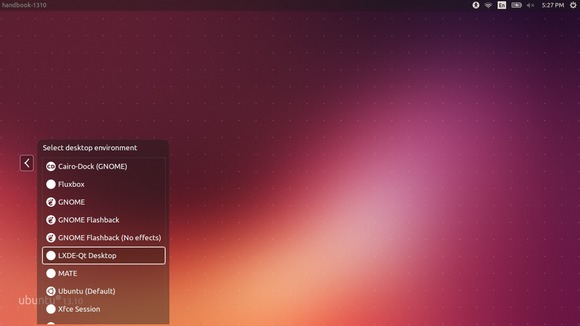
Here’s the quick tip for those who want to restore the default login screen, Unity Greeter, in Ubuntu 14.04 and/or Ubuntu 14.10, so it looks like:

LXDE-Qt desktop in Unity Login Screen

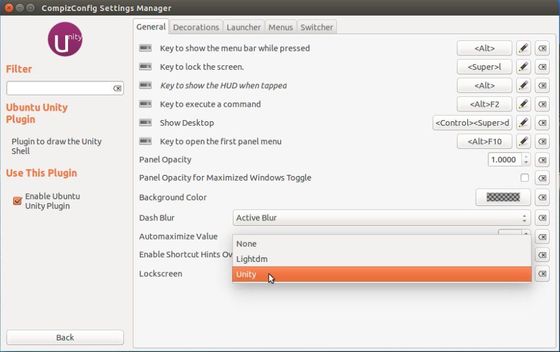
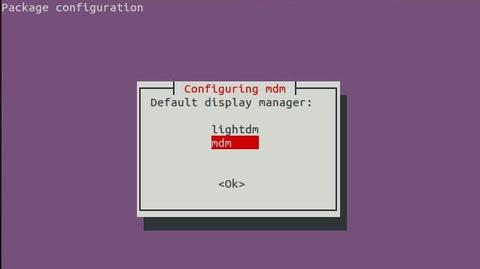
1. By default, Ubuntu Unity uses Lightdm display manager to handle its login screen. But installing Gnome Shell or Cinnamon Desktop also installs the GDM or MDM display manager.

So you may first run below command in terminal (Ctrl+Alt+T) to make sure LightDM is in use by choosing it from the prompt:

sudo dpkg-reconfigure lightdm

choose-default-display-manager

2. LightDM also supports “themes”, some DEs use LightDM-GTK-greeter instead of the default Unity-Greeter as its theme.

The easiest way to restore LightDM theme is:

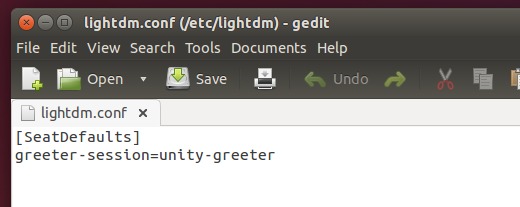
Open terminal from the Dash or by pressing Ctrl+Alt+T on keyboard. When it opens, run command to edit (or create) /etc/lightdm/lightdm.conf:

gksudo gedit /etc/lightdm/lightdm.conf

If need, install gksu from Ubuntu Software Center

When the file opens, change its content to (or paste below content):

[SeatDefaults]
greeter-session=unity-greeter

LightDM settings

Save the file and you’ll see the default login screen at next boot.

unity screen locker

Ubuntu 14.04 Unity now has its own screen locker which looks identical to the LightDM greeter – the default Unity login screen. For those who prefer the previous lockscreen used in Ubuntu 13.10 and earlier, here’s how to switch it back.

The new lockscreen, light-locker, is forked from gnome-screensaver that aims to have simple, sane, secure defaults and be well integrated with the desktop while not carrying any desktop-specific dependencies.

LightDM locker

If you would like to try this lockscreen in Ubuntu 13.10 or Ubuntu 13.04, see this post.

To restore previous Lockscreen in Ubuntu 14.04:

UPDATE: The option has been removed in Ubuntu 14.04 final release. So this tutorial won’t work anymore.

Search for and install Compizconfig-Settings-Manager in Ubuntu Software Center. Or press Ctrl+Alt+T on keyboard to open the terminal, and run the command below instead:

sudo apt-get install compizconfig-settings-manager

After that, start CCSM from Unity Dash and navigate to Ubuntu Unity Plugin -> General -> Lockscreen. Click on the drop-down box and select which screen locker to use.

change lockscreen ubuntu 14.04

That’s it. Enjoy!

capture login screen

This simple tutorial shows you how to capture screenshot of the LightDM / GDM login screen in Ubuntu, Elementary OS, or Pear OS.

Besides installing your system as Virtualbox or Vmware Guest OS, we can follow the steps below to capture and share our login screens.

1. Press Ctrl+Alt+T on your keyboard to open terminal. When it opens, run command blow to check out your display manager:

cat /etc/X11/default-display-manager
handbook@handbook-1310:~$ cat /etc/X11/default-display-manager 
/usr/sbin/lightdm

By default:

  • Ubuntu Unity and Elementary OS Luna uses LightDM
  • Pear OS 8 and Ubuntu Gnome uses GDM

2. Check out the value of $DISPLAY:

echo $DISPLAY
handbook@handbook-1310:~$ echo $DISPLAY
:0

3. Now create a simple script

echo 'sleep 20; DISPLAY=:0 XAUTHORITY=/var/run/lightdm/root/$DISPLAY xwd -root' > /tmp/shot.sh

You may change:

  • 20 : the seconds of delay.
  • :0 : the value of $DISPLAY. In my Pear OS 8, the value of $DISPLAY changes every login ($DISPLAY=$DISPAY +1).
  • lightdm : the display manager.

4. Press Ctrl+Alt+F1 and log into TTY1.

5. Run command below to start the script:

sudo bash /tmp/shot.sh >/tmp/shot.xwd

6. Return to GUI mode by pressing Ctrl+Alt+F1.

7. Logout by normal way. While you can see login screen, wait for some seconds.

8. Login by normal way. Install imagemagick if you don’t have it installed yet.

sudo apt-get install -y imagemagick

9. Run command below and finally you can check out the image under user Pictures folder.

convert /tmp/shot.xwd ~/Pictures/loginscreen.png

There’re lots of white dots on default LightDM login screen, which is quite annoying. This quick tip shows you how to remove them in Ubuntu 13.10 Saucy.

See the screenshot before and after:

login screen with white dots

login screen with white dots

login screen without white dots

login screen without white dots

To get started:

Press Ctrl+Alt+T on your keyboard to open terminal. When it opens, run:

1. Run command to allow user lightdm to create a connection to the X server:

sudo xhost +SI:localuser:lightdm

2. Then switch to user lightdm in the terminal window.

sudo su lightdm -s /bin/bash

3. Finally set draw grid (white dots) feature to false:

gsettings set com.canonical.unity-greeter draw-grid false

That’s it.

If you’re not comfortable with command console. You can use Ubuntu-Tweak, it has an option to turn off this feature under Tweaks -> Login Settings -> unlock -> turn off draw grid.

ubuntu-tweak-remove-white-dots