Archives For April 30, 2023


Looking for an alternative on-screen keyboard for Ubuntu, Fedora or other Linux with GNOME? Try GJS OSK.

The built-in on-screen keyboard in Ubuntu and other Linux with GNOME is not so good. It lacks some keys, and does not raise up in most cases in Ubuntu 22.04.

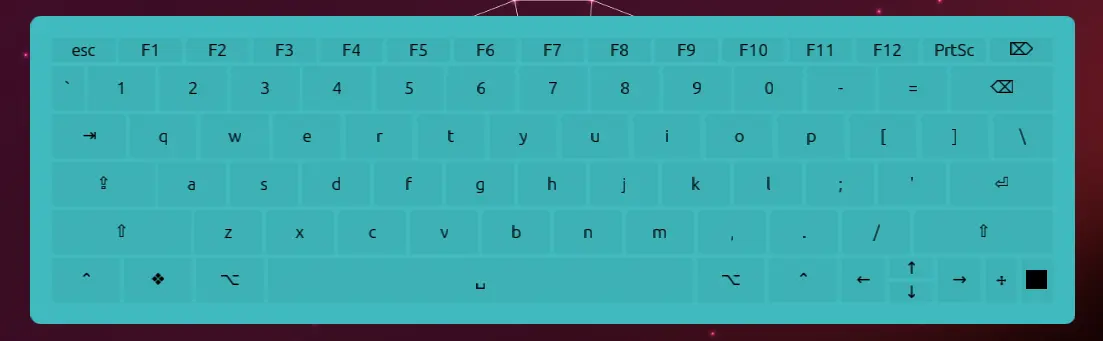
In this tutorial, I’m going to introduce a new OSK application. It’s GJS OSK written in GNOME JavaScript. The application features on-screen keyboard with even more keys, such as F1 ~ F12, number 0,1,2,…9, Arrows, Ctrl buttons, and PrintScreen.

And, without sticking to the screen bottom, user can move the keyboard anywhere around the screen. Just click on quadruple arrow icon (see screenshot below) in the OSK, then you can drag moving it just like normal applications.

GJS OSK, allows to move around the screen

Also, it has an indicator applet on panel allows to one mouse click to show or hide the keyboard.

Click show/hide the on-screen keyboard

Other features of GJS OSK include:

  • Both Wayland and X11 support.
  • Support changing landscape and portrait size, font size, but sadly can NOT change the keyboard size.
  • Allow changing keyboard color.
  • Support QWERTY, QWERTZ, AZERTY, Dvorak layout.

GJS OSK with different background color

How to Install GJS OSK

NOTE: GJS OSK is a stand-alone on-screen keyboard. You need to disable system built-in on-screen keyboard first from Settings to avoid conflict.

Option 1: Install GJS OSK from EGO

GJS OSK is available as an extension in extensions.gnome.org (aka EGO), and so far it supports for GNOME from v42 to 47 (meaning Ubuntu 22.04 ~ 24.10).

Ubuntu users may first search and install “Extension Manager” from App Center or Ubuntu Software.

Install Extension Manager in Ubuntu Software/App Center

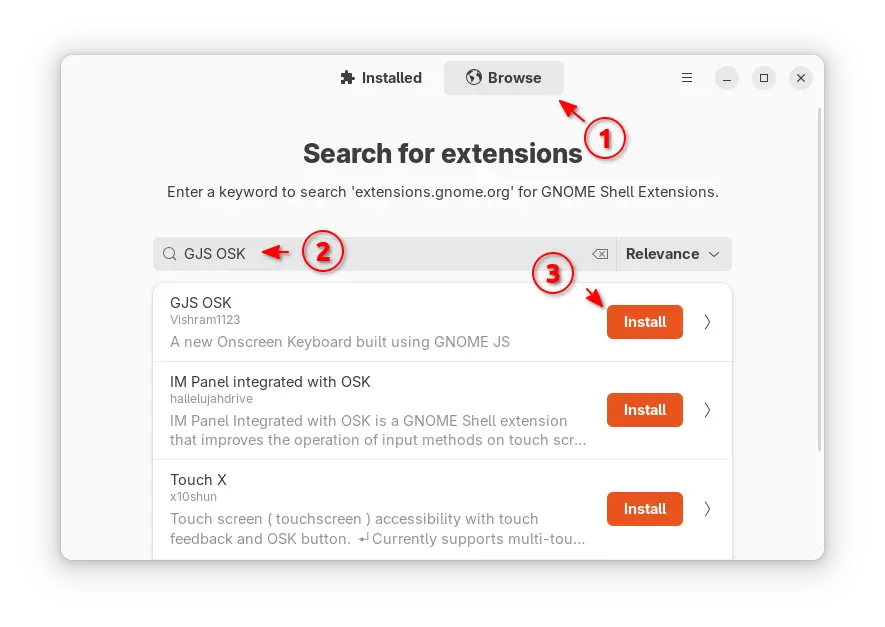
Then, launch Extension Manager and navigate to Browse tab, to search and install “GJS OSK”:

After installed the extension, you’ll see the indicator icon in top-right to toggle view/hide the on-screen keyboard.

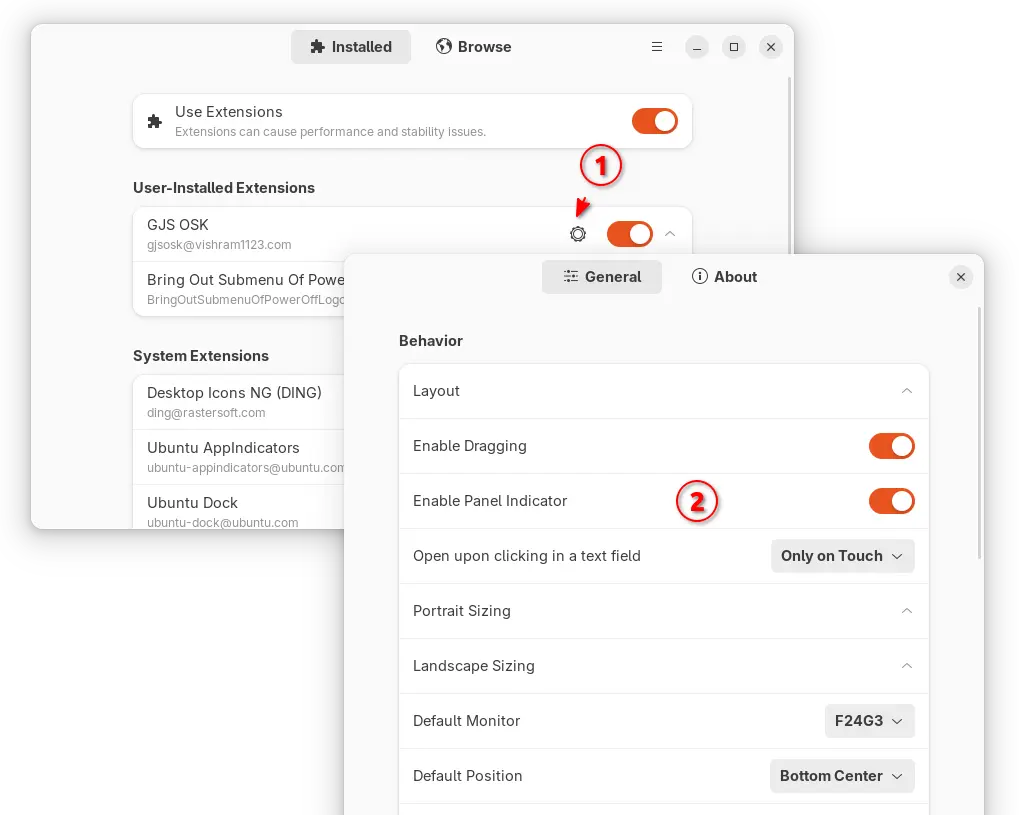
And, by switching to “Installed” tab in Extension Manager, you may click on the gear icon to open the preferences dialog, and configure the extension layout, appearance, etc.

Option 2: Install the extension from source:

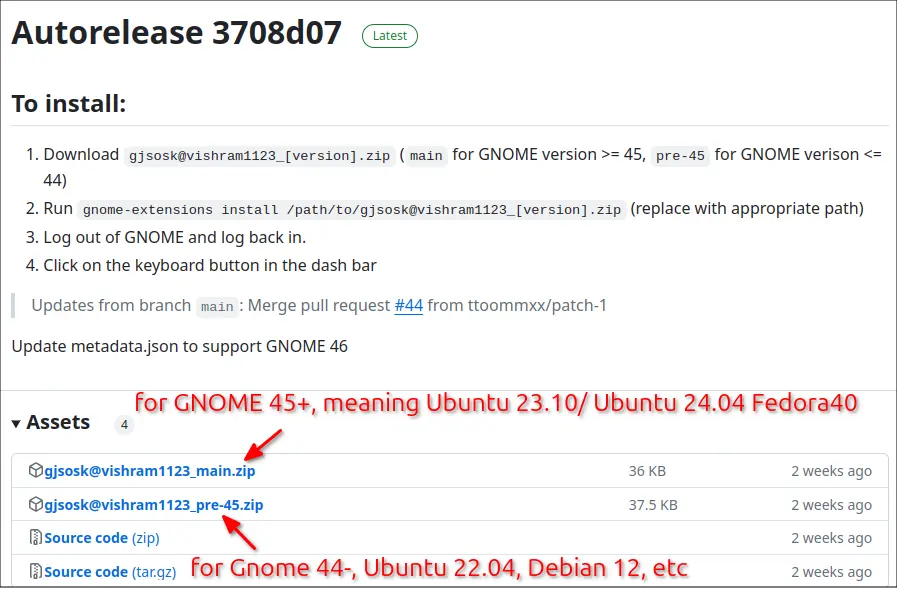
1. First, go to link below to download the source from Github release page:

For GNOME 45+, meaning Ubuntu 24.04/23.10, Fedora 39/40, Arch/Manjaro etc, select download the main.zip under ‘Assets’ section. While GNOME 44 and earlier, meaning Ubuntu 22.04, Debian 12, etc, can choose the pre-45.zip.

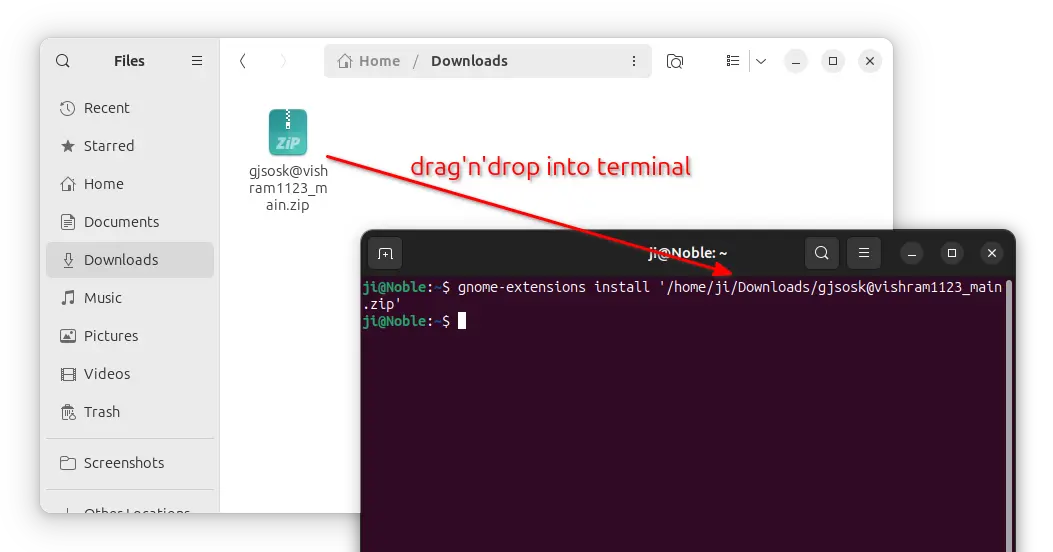
2. After downloaded the .zip package, you do NOT have to extract it. Just open up a terminal window (for Ubuntu, press Ctrl+Alt+T) and run command to install it:

gnome-extensions install /path/to/zip

Instead of typing /path/to/zip, you can just drag’n’drop it into terminal instead.

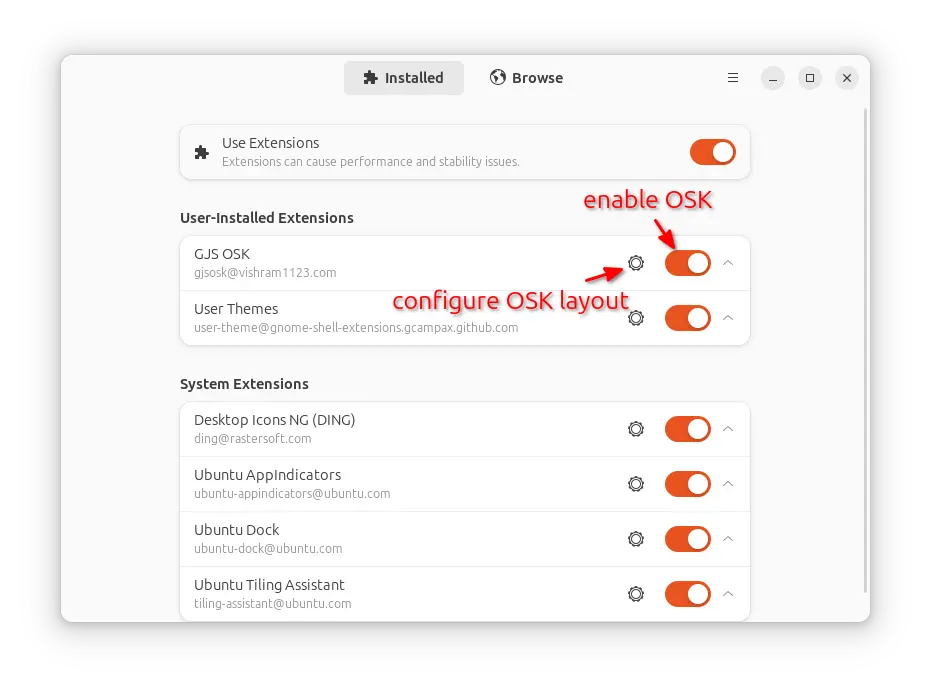
3. log out and back in. Then, launch either “GNOME Extensions” or “Extension Manager” app (both available in Ubuntu Software, App Center (filter via Debian Package), Gnome Software). Turn on the new “GJS OSK” extension, and click its gear icon to configure its layout.

Finally, click on  the top-right corner keyboard indicator applet to show/hide the new on-screen keyboard.

Uninstall GJS OSK

To remove the extension, also launch “Gnome Extensions” or “Extension Manager”, click the “⋮” or arrow icon beside the toggle switch to expand, and select “Remove” the extension.

Annotator, image annotation tool for Elementary OS, released version 1.2.0 today. Here are the new features and how to install guide for Ubuntu users.

Annotator is a free open-source image annotation tool designed for Elementary OS, but also works in other Linux. By releasing version 1.2.0, it now also supports for taking screenshot for full-screen, current window, and selection area.

User can choose to either use UI button or run command line option to take screenshot, though it so far only works on Xorg session. Meaning Ubuntu, Fedora workstation with default GNOME Wayland session need to switch back Xorg from login screen for this feature to work.

Annotator take screenshot option

When adding and adjusting shapes and arrows on images, user can now right-click on them to ‘Set as Custom’. After that, your custom shapes/arrows will be available in the drop-down menus for quick use.

The release also added a emoji picker when inserting text. Also, right-click on the text insert area to get the option.

Other features in Annotator 1.2.0 include:

  • Support for showing and hiding an item’s outline.
  • Support for reading an image to annotate from standard input on the command-line.
  • Enhance export UI and adding export options for PNG and JPEG types.
  • Remove support for elementary OS contracts
  • Several UI improvements and various bug-fixes.

How to Install Annotator (2.0 Updated) in Ubuntu

Annotator has a built-in installer script in the source code. Elementary OS can directly search for and install it from app store.

For Ubuntu, use this Ubuntu PPA that works on both X86 PC/laptop and arm64/armhf mobile devices. The PPA so far contains:

  • Annotator 2.0 for Ubuntu 24.04 and Ubuntu 24.10.
  • Annotator 1.2.0 for Ubuntu 20.04 and Ubuntu 22.04

1. Add the PPA

Press Ctrl+Alt+T on keyboard to open terminal. When it opens, run commands to add the PPA:

sudo add-apt-repository ppa:ubuntuhandbook1/annotator

Type user password (no asterisk feedback) when it asks and hit Enter to continue.

2. Update package cache

Ubuntu 20.04 and higher refresh system package cache automatically while adding PPA, but some Ubuntu based systems may not. To do it manually, run command:

sudo apt update

3. Install Annotator:

Finally, install the app using command:

sudo apt install com.github.phase1geo.annotator

Once installed, search for and open it from start menu (activities overview) and enjoy!

Remove Annotator & Ubuntu PPA:

To remove the Ubuntu PPA, use command:

sudo add-apt-repository --remove ppa:ubuntuhandbook1/annotator

And remove the annotation tool via:

sudo apt remove --autoremove com.github.phase1geo.annotator

This simple tutorial shows how to increase or decrease the touchpad 2-finger scrolling speed in Ubuntu 22.04, Ubuntu 24.04 with default GNOME on Wayland session.

GNOME, the default desktop for Ubuntu, Fedora, and optional in many other Linux, so far lacks option to configure the mouse/touchpad scroll speed.

For Ubuntu 20.04, Ubuntu 18.04, and other Linux with GNOME on classic Xorg, there’s a command line tool imwheel available to do the job. And, here’s a step by step guide show you how.

For Ubuntu 22.04 and higher and other Linux with GNOME Wayland, this tutorial may help by settings virtual touchpad size.

IMPORTANT: This tutorial is tested and works in Ubuntu 24.04 & 22.04 on my old HP & ASUS laptop. However, some users report it does NOT work. Don’t do it on production machine!

Step 1: Measure & Set virtual touchpad size

1. First, open terminal either by pressing Ctrl+Alt+T on keyboard, or by searching from ‘Activities’ overview screen.

2. When terminal opens, run command to install ‘libinput-tools’ package in case you don’t have it:

sudo apt install libinput-tools

3. Next, run command to tell your touchpad size (width and height in mm):

sudo libinput measure touchpad-size 100x100

As the screenshot shows, may laptop has touchpad with 114.6 mm width and 48.4 mm height. Once you got the value, press Ctrl+C to exit.

4. Finally, re-run the command in step 3, but with different args. For example, use 172×73 for 1.5x scroll speed (Here 172 ≈ 114.6 x 1.5, and 73 ≈ 48.4 x 1.5), run command:

sudo libinput measure touchpad-size 172x73

Or use 92×39 for 0.8x scroll-speed (92 ≈ 114.6 x 0.8, 39 ≈ 48.4 x 0.8):

sudo libinput measure touchpad-size 92x39

NOTE: You have to change the “width x height” number in command. Depends on your need to either increase or decrease scroll-speed, calculate them according the original size of your touchpad!!

Once you hit run the command, follow the terminal output to “Move one finger along all edges of the touchpad until the detected axis range stops changing.  You’ll see the little ‘0’ in the terminal output moves correspondingly when you moving finger on touchpad.

5. When done, press Ctrl+C to stop it. And, you should get similar output as the screenshot shows, if you’ve done correctly.

And, you need to copy the lines between the 2 “-8<————–” lines (in my case, the section with white background).

Step 2: Apply Changes

1. Now, open terminal (Ctrl+Alt+T) and run command to edit the config file:

sudo gedit /etc/udev/hwdb.d/61-evdev-local.hwdb

Replace gedit in command with gnome-text-editor for Ubuntu 24.04 and Fedora, or use nano instead that works in all desktops.

When file opens, paste the lines you just copied in ‘Step 1’ and save it.

2. Finally, update hardware database by running command:

sudo systemd-hwdb update

And, reload udev rules by running command:

sudo udevadm trigger /dev/input/event*

When everything’s done. Restart your computer to see the effect!

As the steps above also increase or decrease the cursor movement speed, you may also need to open “Settings -> Mouse & Touchpad” and adjust ‘Touchpad Speed’ slider-bar.

How to Restore

To undo the changes you made via the previous steps, first open terminal (Ctrl+Alt+T) and run command to delete the config file:

sudo rm /etc/udev/hwdb.d/61-evdev-local.hwdb

Then update database and reload udev rules by running 2 commands one by one:

sudo systemd-hwdb update
sudo udevadm trigger /dev/input/event*

Finally, restart your computer and done.

via: reddit thread.