


![]()
This tutorial shows how to disable USB, either the full sub-system or for certain USB ports, in Ubuntu 24.04 or Ubuntu 22.04.
For server or production machines, disable USB can be useful for data privacy, virus protection, and other security reasons. For Ubuntu and most other Linux, here I’m going to show you how to disable USB via 3 ways:
- Disable whole USB sub-system
- Disable USB storage only – Only disable access for USB flash drive and other storage devices.
- Disable specific USB port
Option 1: Disable USB Sub-system in Ubuntu and other Linux
Linux Kernel has a parameter to disable the whole USB sub-system. When boot with the Kernel parameter, USB keyboard, mouse, flash drive, and built-in USB devices, such as webcam, fingerprint reader, bluetooth will be all disabled. And, USB ports have no power for charging.
This is great for server security, but you have to use either remote login or PS2 keyboard and mouse to interact with the Linux machine. And, USB still works before booting the kernel in Grub menu entry. If you want to disable it on power button press, go configure it in BIOS settings.
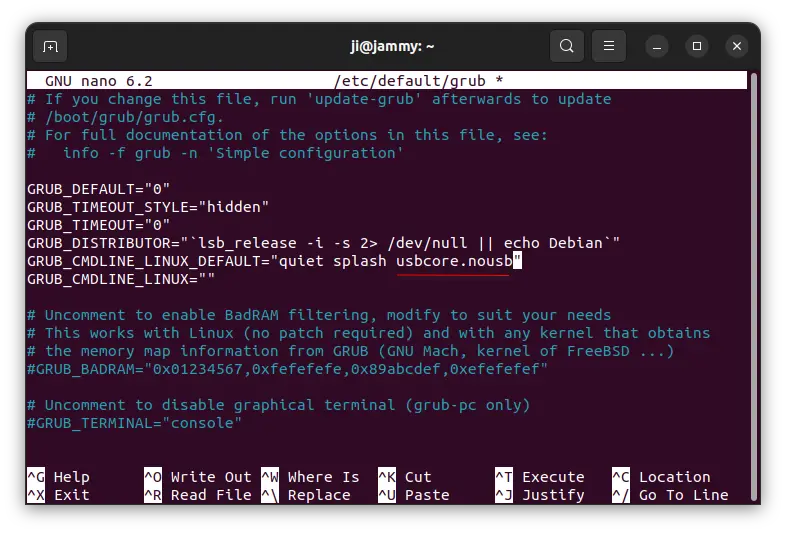
1. First, either connect to your Ubuntu server, or press Ctrl+Alt+T on Ubuntu Desktop to open terminal. When it opens, run command to edit the config file for Grub boot-loader:
sudo nano /etc/default/grub
For Desktop edition, you may replace nano with gedit for Ubuntu 22.04 and earlier with GNOME, gnome-text-editor for 24.04 with default GNOME, pluma for MATE, or mousepad for XFCE.
When file opens, add usbcore.nousb to value of GRUB_CMDLINE_LINUX_DEFAULT. Then press Ctrl+S to save, and Ctrl+X to exit nano text editor.
2. Next, run command to update grub configuration:
sudo update-grub
NOTE: This command may vary for other Linux. When done, restart your computer to apply!
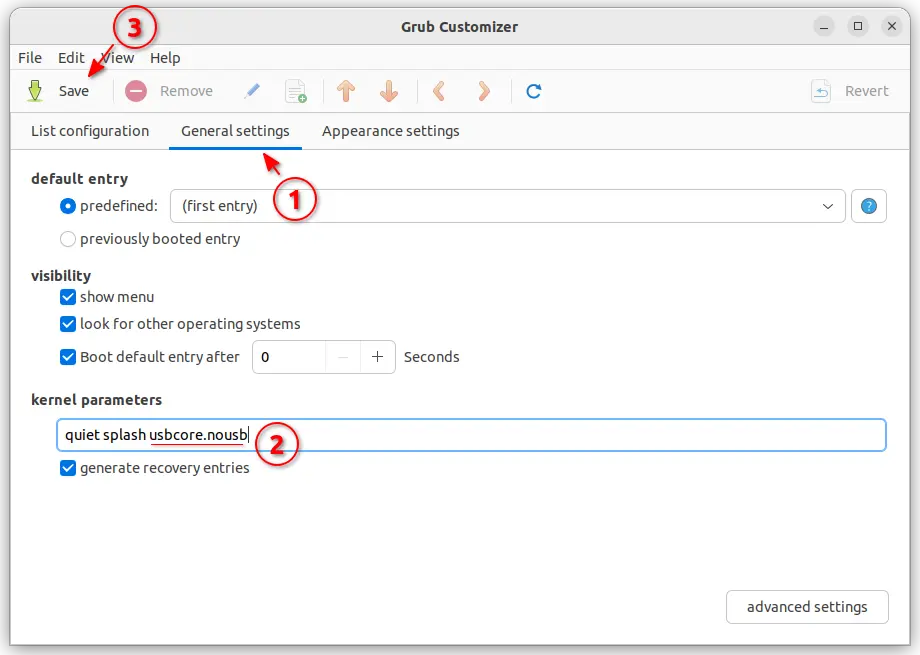
For Ubuntu Desktop with Grub-Customizer installed, user can also launch the graphical app, and add the kernel parameter by navigating to “General Settings” tab.
Option 2: Disable USB Storage Device only
Besides blocking kernel module, user can choose to only disable USB flash drive and other USB storage devices, leave keyboard, mouse, and other built-in USB devices still working.
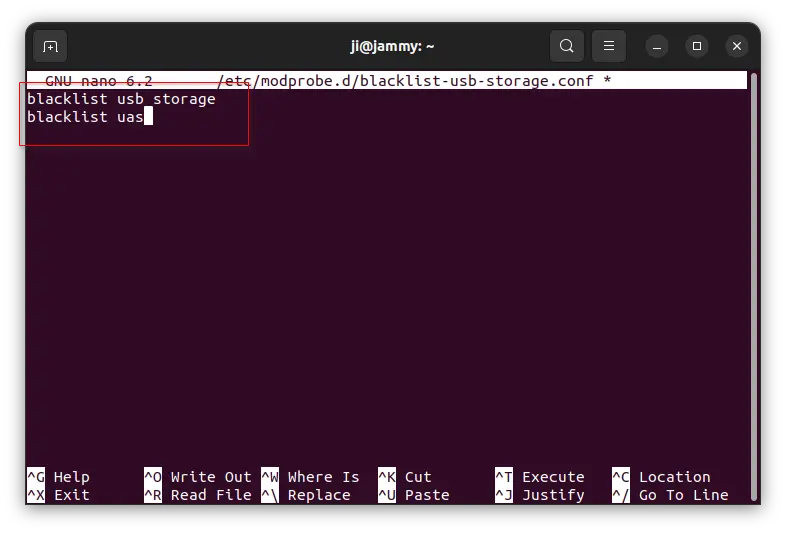
1. First, open terminal (Ctrl+Alt+T) or connect to server, and run command to create & edit the config file:
sudo nano /etc/modprobe.d/blacklist-usb-storage.conf
Also, you may replace nano to your favorite text editor. When file opens, add following 2 lines:
blacklist usb_storage
blacklist uas
Then press Ctrl+S to save, and Ctrl+X to exit nano text editor.
2. After that, run command to update the initramfs.
sudo update-initramfs -u
Finally, reboot your machine. Your system will read the blacklist-usb-storage.conf config file on startup, and block loading the 2 kernel modules (usb_storage and uas) for accessing USB storage devices.
Option 3: Disable Specific USB Port
Under /sys/bus/usb/devices directory, there are a list of sub-folders that contain the files to configure USB ports and connected devices. By setting to always suspend or using usbguard service, user can “disable” the associated USB ports.
Step 1: Find out the sys device directory for your USB Port
The /sys/bus/usb/devices directory has quite a few sub-folders, you have to find out which one is for your USB port first.
1. First, plug in a USB device (keyboard, mouse, or flash drive) into the USB port, so it will automatically generate a corresponding sub-folder in that directory.
2. Then open terminal (Ctrl+Alt+T) and run command:
lsusb
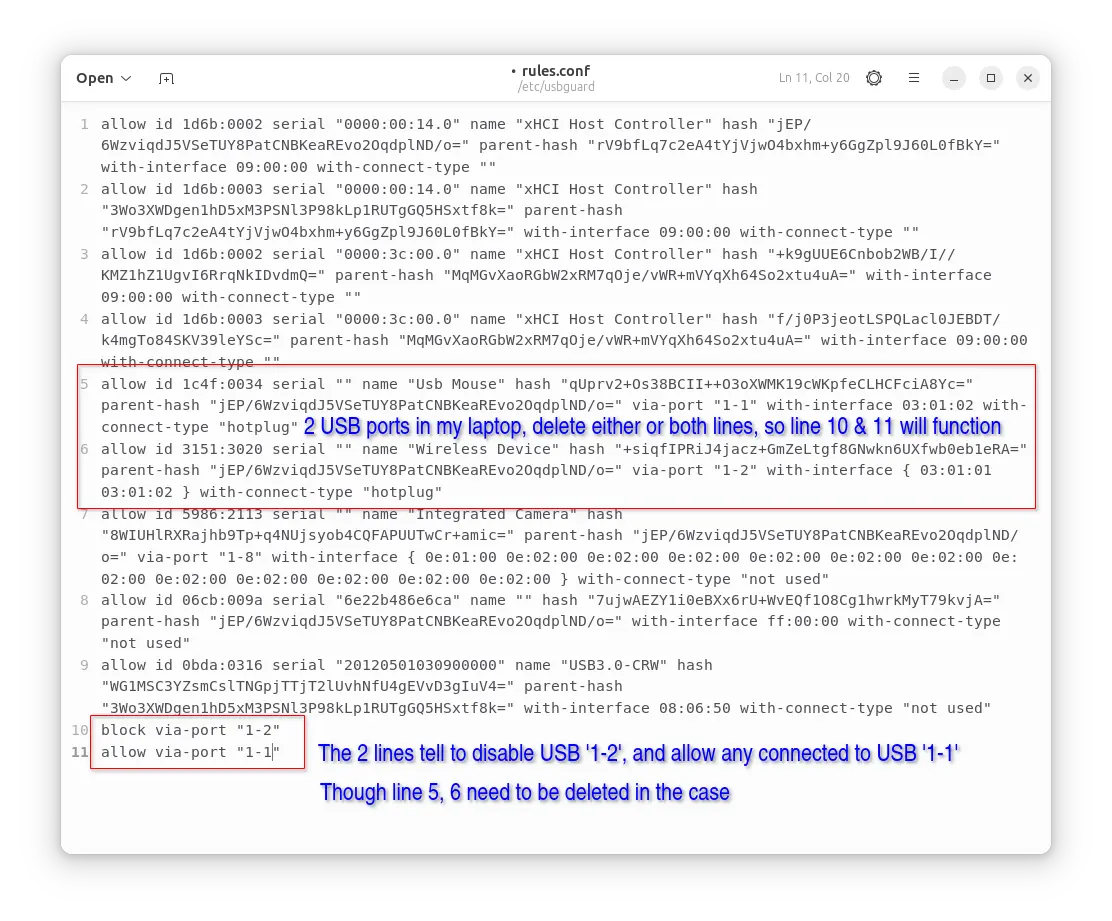
In the output, you can identify your USB device according to the text description. In my case, I have only wireless keyboard (3151:3020) and mouse(1c4f:0034) connected.
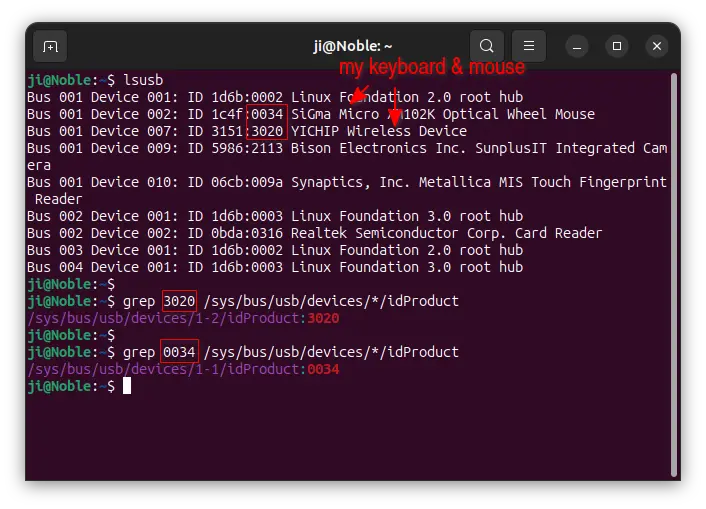
According to the device’s product ID (the 4 numbers after colon), we can find out the device folder via command:
grep 3020 /sys/bus/usb/devices/*/idProduct
Re-run the last command with different product ID (replace 3020), then you’ll get all the ‘sys’ directories for the USB devices. In my case (see last screenshot) they are:
/sys/bus/usb/devices/1-1/– the one connected with USB mouse./sys/bus/usb/devices/1-2/– which connected with wireless keyboard.
Step 2: (Optional) Auto-Suspend the USB device
In the last step 1, I’ve found out the corresponding sub-folders (1-1 and 1-2) for my 2 USB ports.
For choice, you may set to auto-suspend the certain USB port, 1-1 for example, and set delay to 0 ms, so it will be always suspend.
echo 0 | sudo tee /sys/bus/usb/devices/1-1/power/autosuspend_delay_ms
echo "auto" | sudo tee /sys/bus/usb/devices/1-1/power/control
However, the change only works until you un-plug and re-plug device into the USB port. Because, once unplug the USB device, the corresponding config folder (1-1 in the case) will be disappeared. When you plug-in again, that folder is created automatically again, but with all settings reset.
Meaning this method only works when the USB device is keeping connected to the port. Unless, you managed to auto-run the 2 commands above on every plug-in.
Step 2: (Better Choice) Use USBGuard
Most Linux includes a usbguard package in system repository. It runs a systemd service in the background to implement basic USB whitelisting and blacklisting capabilities.
1. First, open terminal and run command to install the package:
sudo apt install usbguard
2. Then, run command to edit the config file for this service:
sudo nano /etc/usbguard/rules.conf
For GNOME, replace nano with gedit (22.04 and earlier), gnome-text-editor (24.04), mousepad for XFCE, pluma for MATE, ….
When file opens, it should contains some lines for default rules. If EMPTY, close the file. Wait a moment to let it auto-generate the rules, then re-edit it.
3. Before editing the file, it’s better to make a copy of default content. So, you can easily restore the changes!
When the file opens, delete the line for your specific USB port/device (identify by the ID, name, etc), finally add new rules, e.g., block via-port “1-2” to disable that USB port 1-2, and block via-port “1-1” to allow any connected to USB 1-1.
4. Finally, restart the service.
systemctl restart usbguard.service
And, the change will be applied a few moment later.
To undo this change, use commands to stop the services, then uninstall usbguard:
sudo systemctl disable --now usbguard.service
sudo systemctl stop usbguard-dbus.service
sudo apt remove --purge usbguard
Finally, remove the config files under /etc directory:
sudo rm -rf /etc/usbguard/


