Archives For Howtos

GIMP extra color palettes

The second point release for GIMP 2.10 was released a day ago with new features and various bug-fixes.

GIMP 2.10.4 release highlights:

  • Add simple horizon straightening option in the Measure tool
  • Asynchronous fonts loading to improve startup time.
  • Add fonts tagging support.
  • Add new features to the Dashboard dockable dialog that help debugging or finetune the use of cache and swap.
  • Load PSD file saved with “Maximize Compatibility” option enabled in Photoshop.
  • Improved Recursive Transform operation, allow multiple transformations to be applied simultaneously

GIMP 2.10 Splash

How to Install GIMP 2.10.4 in Ubuntu:

The best way to install the latest GIMP in Ubuntu is using the otto-kesselgulasch’s PPA, as the PPA maintainer promised the PPA will never die and the most recent packages will for ever be.

The PPA contains the most recent packages for Ubuntu 18.04 and Ubuntu 17.10, though GIMP 2.10.4 is not available at the moment (there are always one or two days delay).

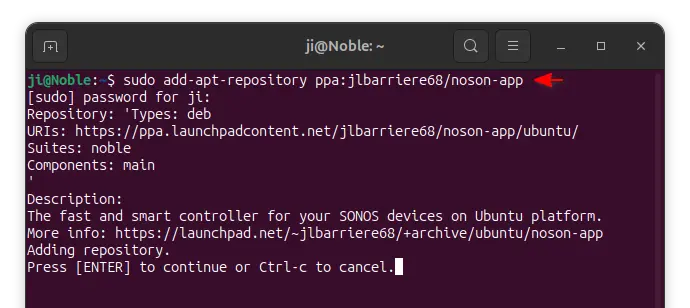
1. Open terminal either via Ctrl+Alt+T keyboard shortcuts, or by searching for ‘Terminal’ from app launcher. When it opens, run command to add the PPA:

sudo add-apt-repository ppa:otto-kesselgulasch/gimp

Type your password (no visual feedback) when it prompts and hit Enter to continue.

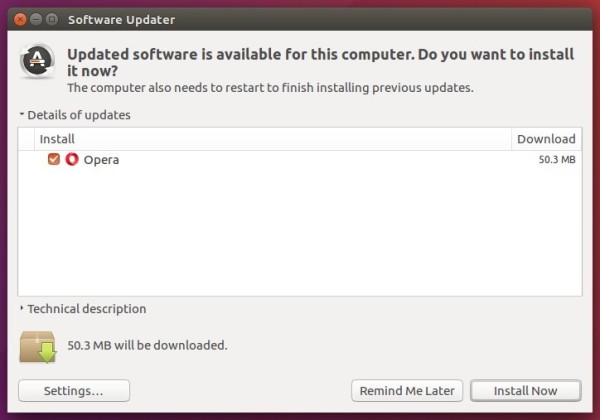
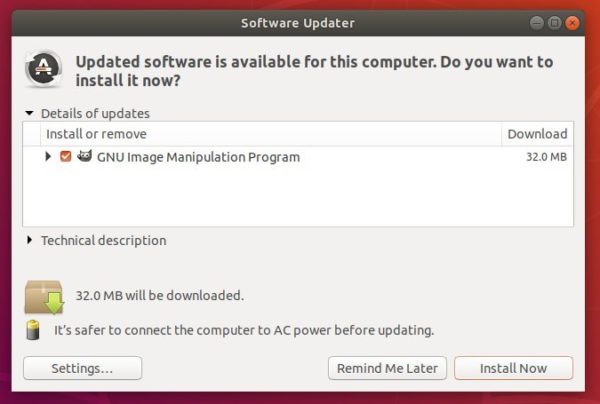
2. After added the PPA, you can upgrade to GIMP 2.10.4 once it’s published via Software Updater (Update Manager):

Or run following commands one by one in terminal to install or upgrade GIMP image editor:

sudo apt-get update

sudo apt-get install gimp

How to Restore:

For any reason, you can downgrade to the stock version of GIMP by running following command in terminal to purge the PPA:

sudo apt-get install ppa-purge && sudo ppa-purge ppa:otto-kesselgulasch/gimp

In addition to Ubuntu 16.04 users who want to install the latest GIMP 2.10.4, run following commands one by one to install the flatpak app:

1. Run commands to install Flatpak framework in Ubuntu 16.04:

sudo add-apt-repository ppa:alexlarsson/flatpak

sudo apt-get update

sudo apt-get install flatpak

2. Install GIMP flatpak application via command:

flatpak install https://flathub.org/repo/appstream/org.gimp.GIMP.flatpakref

Once installed, it will be made available exactly the same way as other applications.

Eclipse 4.8 Photon was released a week ago. You can now install it in Ubuntu 18.04, Ubuntu 17.10, Ubuntu 16.04 easily via snap package.

Eclipse Photon release highlights:

  • Full Eclipse IDE user experience for building, debugging, running and packaging Rust applications.
  • Expanded C# editing and debug capabilities, including syntax coloring, autocomplete suggestions, code diagnostics, and code navigation tools.
  • Java 9, Java 10 and JUnit 5 support.
  • Dark theme improvements in text colors, background color, popup dialogs, mark occurrences, and more.

How to Install Eclipse 4.8 Photon in Ubuntu:

The community has built the snap package of Eclipse Photon. It’s an universal Linux package format that bundles all its dependencies, and auto-updates itself once a new release is published.

The Eclipse 4.8.0 snap can by easily installed in Ubuntu Software:

Note that there are two versions of Eclipse in Ubuntu Software. Take a look at the version number before installing the package.

You can also install the snap by running command in terminal:

snap install --classic eclipse

In addition:

1. For Ubuntu 16.04 users never installed a snap package, make sure snapd daemon is installed via command:

sudo apt-get install snapd snapd-xdg-open

2. For Java environment, either install the OpenJDK via command:

sudo apt-get install default-jre

For Oracle Java 8 or Java 10, see this how to tutorial.

Free and open-source planetarium software, Stellarium 0.18.1, was released 2 days ago with new features, many improvements and lots of bug-fixes.

The major changes in Stellarium 0.18.1 include:

  • Improvements and fixes for Hierarchical Progressive Surveys [HiPS] support
  • Updated the main UI, code of plugins, code and data.
  • Updated GPS handling
  • Added rise, transit and set times for celestial objects
  • Added dithering support
  • Many other improvements and various bug-fixes.
  • See the release note for details.

How to Install Stellarium 0.18.0 in Ubuntu:

The software has an official PPA repository that contains the latest Stellarium packages for Ubuntu 16.04, Ubuntu 17.10, Ubuntu 18.04.

1. Open terminal either via Ctrl+Alt+T or by searching ‘terminal’ from app launcher. When it opens, run command to add the PPA:

sudo add-apt-repository ppa:stellarium/stellarium-releases

Input your password (no visual asterisks feedback while typing) when it prompts and hit Enter.

2. Then upgrade Stellarium from an existing release with Software Updater utility:

Or run following commands to install the software for the first time:

sudo apt-get update

sudo apt-get install stellarium

Uninstall:

To remove the software, either use your system package manager or run command:

sudo apt-get remove --autoremove stellarium

And remove the PPA via “Software & Updates” utility under Other Software tab.

For Ubuntu 18.04 users sticking to open-source graphics drivers, the latest Mesa 18.1.3 graphics library now is available to install via X-Updates PPA.

Mesa 18.1.3 was released a few days ago with several fixes to the RADV Vulkan driver, Meson and Autotools build systems updates, fixes within the common NIR and GLSL compiler code paths, a few Intel driver fixes, and more.

To enjoy some Linux games while using the open source RadeonSI / RADV / Intel / Nouveau drivers, you may follow below steps to install Mesa 18.1.3 in Ubuntu 18.04:

1. Open terminal either via Ctrl+Alt+T or by searching for ‘Terminal’ from software launcher. When it opens, run command:

sudo add-apt-repository ppa:ubuntu-x-swat/updates

Type your password (no asterisks feedback while typing) when it prompts and hit Enter to continue.

2. After adding the PPA, do system update via command:

sudo apt-get dist-upgrade

apt-get update is not required any more in Ubuntu 18.04 since adding PPA automatically refreshes system repositories.

3. Finally check your driver version via command:

glxinfo | grep "OpenGL version"

Uninstall:

To restore changes and downgrade to the default drives shipped in Ubuntu 18.04, run command:

sudo apt-get install ppa-purge && sudo ppa-purge ppa:ubuntu-x-swat/updates

OpenShot Video Editor

OpenShot video editor 2.4.2 was released a day ago with exciting new effects, tons of bug fixes, and performance improvements.

OpenShot 2.4.2 release highlights:

  • 7 New Effects (Crop, Hue, Color Shift, Pixelate, Bars, Wave, Shift)
  • Auto audio mixing strategy per clip (average, reduce, or none)
  • Auto-Rotates any Clip with Reader metadata ‘rotate’ attribute.
  • Experimental codecs now supported in FFmpeg/LibAV
  • Many improvements for Audio playback, stability, export dialog, etc.
  • And numerous bug-fixes. See release note for details.

How to Install OpenShot 2.4.2 in Ubuntu:

OpenShot’s official PPA now contains the 2.4.2 release packages for Ubuntu 14.04, Ubuntu 16.04, and Ubuntu 17.10, and Ubuntu 18.04.

1. Open terminal (either via Ctrl+Alt+T or by searching for ‘terminal’ from app launcher) and run command to add the PPA:

sudo add-apt-repository ppa:openshot.developers/ppa

Input your password (no visual asterisks feedback while typing) when it prompts and hit Enter.

2. Then upgrade the editor via “Software Updater”, if you have a previous openshot-qt package installed.

Or run commands to check updates and install / upgrade OpenShot:

sudo apt-get update

sudo apt-get install openshot-qt libopenshot*

Uninstall:

To uninstall openshot video editor, run following command in terminal:

sudo apt-get remove --autoremove openshot-qt

And remove the PPA by launching “Software & Updates” and navigating to Other Software tab.

Free and open-source musical notation software MuseScore 2.3 was released with new features and numerous bug fixes.

MuseScore 2.3 release highlights:

  • Implement extensions to provide an easy way to install soundfont, templates and instruments.xml
  • Add buzz roll tremolo stem
  • Add a more flexible way to choose noteheads in drumset for percussion instrument
  • Implement filters in Zerberus
  • Add ability to have a different MIDI pitch for drum instrument based on articulation or tremolo
  • Implemented flams and crush notation for unpitched percussion

And there are lots of bug-fixes, see the release note for details.

Install MuseScore via PPA in Ubuntu:

The software has a stable PPA contains the most recent MuseScore packages for all current Ubuntu releases.

Open terminal (either via Ctrl+Alt+T or by searching for terminal from app launcher) and run command to add the PPA:

sudo add-apt-repository ppa:mscore-ubuntu/mscore-stable

Then you can upgrade the software via Software Updater, or run command to install the latest MuseScore:

sudo apt-get update

sudo apt-get install musescore

For more details, see this how to tutorial.

Install MuseScore snap package in Ubuntu:

The software offers official snap package. Snap is an universal Linux package format that runs in sandbox and it auto-updates itself once a new release is published in snappy store.

The snap application can be easily installed in Ubuntu Software:

Download MuseScore appimage:

While PPA and Snap packages are always delayed for a few days, MuseScore 2.3 Appimages, single executable to run the software, are available for download:

MuseScore Appimage (64-bit)

MuseScore Appimage (32-bit)

Select download the appimage matches your OS type, and:

  1. go file Properties -> Permissions tab.
  2. check the box says “Allow executing file as program
  3. finally click Run the appimage to launch MuseScore.

opera web browser

Opera 54 stable was released today with some new features. Here’s how to install it in Ubuntu.

Opera 54 release highlights:

  • Display news feed below your regular Speed Dial folders (enable it in Easy setup).
  • Add “Update and Recovery” in Opera Menu to check browser updates, and reset browser settings.
  • Updated to Chromium version 67.0.3396.87.

How to Install Opera 54 in Ubuntu:

The opera website offers official .deb binaries for Ubuntu Linux, available for download at the link below:

Download Opera for Linux

If you have a previous release installed, and enabled the official Opera Linux repository, upgrade it via Software Updater:

To manually add the Opera for Linux repository, open terminal via Ctrl+Alt+T or from app launcher, when it opens, run commands:

1. Add the opera repository:

sudo sh -c 'echo "deb http://deb.opera.com/opera-stable/ stable non-free" >> /etc/apt/sources.list.d/opera.list'

2. Get the key:

wget -O - http://deb.opera.com/archive.key | sudo apt-key add -

Finally either install Opera via following command or upgrade the browser via Software Updater:

sudo apt-get update

sudo apt-get install opera-stable

This tutorial shows how to disable your laptop’s built-in webcam in Ubuntu 24.04, Ubuntu 22.04, Ubuntu 20.04, and Ubuntu 18.04.

If you rarely use the webcam in your laptop, then it’s a good choice to disable it for privacy and security reasons. Some laptops have physical buttons to do the job, but most others do NOT.

Besides covering your webcam with a sticky note, here’s how to configure your Ubuntu to soft-block using Kernel module option.

Continue Reading…

Looking to control music from your Sonos devices in Ubuntu? Noson is a fast and smart controller for your SONOS devices that is written with QML/C++.

With Noson app, you can browse your music library and play track or radio on any zones. You can manage grouping zones, queue, and playlists, and fully control the playback.

Install Noson from Ubuntu Software or App Center:

The snap package of Noson, universal Linux package format runs in sandbox, is available in Ubuntu Software:

For those who hate Ubuntu Software, run command in terminal (Ctrl+Alt+T) to install Noson snap:

snap install noson

Install Noson in Ubuntu via PPA:

For those who prefer traditional .deb package, Noson is also available to install via in the PPA repository for Ubuntu 18.04, Ubuntu 20.04, Ubuntu 22.04, Ubuntu 24.04, and Ubuntu 24.10 on Intel/AMD CPU platform.

1. Open terminal either via Ctrl+Alt+T or by searching for ‘terminal’ from app launcher. When it opens, run command to add the PPA:

sudo add-apt-repository ppa:jlbarriere68/noson-app

type your password (no asterisk feedback while typing) when it prompts and hit Enter to continue.

2. Then check updates and install the software either via Synaptic package manager or by running commands in terminal:

sudo apt-get update

sudo apt-get install noson-app

Once installed, launch the software and it automatically searches for your Sonos devices.

Uninstall:

To remove Noson Sonos controller, run command in terminal:

sudo apt-get remove --autoremove noson-app

To remove the PPA, launch Software & Updates and navigate to Other Software tab, then remove the source line and reload.

Handbrake 1.1.1, the first bug-fix release for Handbrake 1.1 series, was released yesterday.

Handbrake 1.1.1 release highlights:

  • Fixed a potential crash in the comb detection filter
  • Fixed a potential crash in the padding filter
  • Fixed decoding certain very high bit rate ultra-high definition sources with extra large packets
  • Fixed last frame in source video missing in output
  • Fixed crash when decoding an empty audio track
  • Updated libraries: libvpx 1.7.0 (VP8/VP9 video encoding), x264 155 r2901 (H.264/AVC video encoding)
  • Fixed issues occurring when running multiple HandBrake instances simultaneously
  • Miscellaneous bug fixes and improvements

How to Install HandBrake 1.1.1 in Ubuntu:

The official HandBrake PPA has built the 1.1.1 release for Ubuntu 18.04, Ubuntu 17.10.

The Ubuntu 16.04 and Ubuntu 14.04 builds are broken at the moment, check the PPA link before getting started.

1. Open terminal either via Ctrl+Alt+T or by searching “terminal” from app launcher. When it opens, run command to add the PPA:

sudo add-apt-repository ppa:stebbins/handbrake-releases

Input your password (no visual feedback while typing due to security reason) when it prompts and hit Enter to continue.

2. Then use Synaptic package manager or run following commands to install the video transcoder:

sudo apt-get update

sudo apt-get install handbrake-gtk handbrake-cli

Note: If you installed the distribution build of HandBrake from Ubuntu Software, you need to remove it before installing the new release from PPA.

Uninstall:

To remove the software, simply run command in terminal:

sudo apt-get remove --autoremove handbrake-gtk handbrake-cli

And launch “Software & Updates -> Other Software” to remove PPAs.