Archives For November 30, 1999

This simple tutorial shows how to set custom names for your desktop workspaces, and replace “Activities” in the top-left with the current workspace name you specified.

Today’s desktop operating systems mostly have multiple desktops to group app windows in different screen. These virtual desktops in GNOME (default desktop environment in Ubuntu/Fedora Workstation) are called workspaces. And, each workspace can have its own name.

Step 1: Set custom names for your workspaces

1. First, search for and install “Dconf Editor” if you don’t have it from Ubuntu Software (or GNOME Software).

2. Next, search for and open the Dconf Editor tool from ‘Activities’ overview screen.

When it opens, navigate to “org/gnome/desktop/vm/preferences“. Scroll down and click on “workspace-names” to get into the setting page.

Finally, turn off the default value, and type your desired named in ‘custom value’ box.

NOTE: GNOME by default has 2 workspaces. It adds/removes workspaces automatically to keep only one extra empty workspace. To set fixed number of workspaces, open “Settings” and navigate to “Multi-tasking > Workspaces”

For those familiar with Linux commands, this can be done simply by running the command below in terminal:

gsettings set org.gnome.desktop.wm.preferences workspace-names "['name1', 'name2', 'name3', 'name4']"

Step 2: Replace “Activities” with current workspace name

By replacing “Activities”, you can take a glance at top-left to make sure which workspace you’re working on. Though the name changes, it’s still working like before. By clicking on it will open the overview screen.

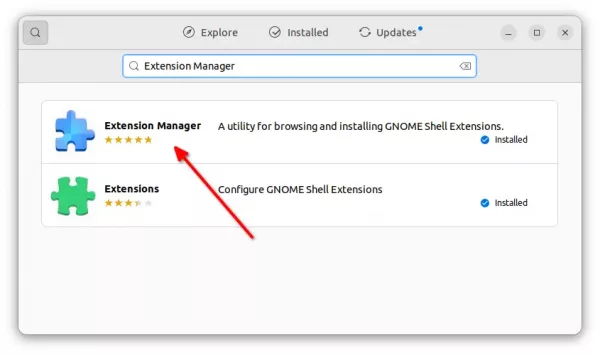
1.) First, search for and install “Extension Manager” from Ubuntu Software.

Install Extension Manager in Ubuntu 22.04

2.) Then, search for and launch the tool you just installed from overview screen:

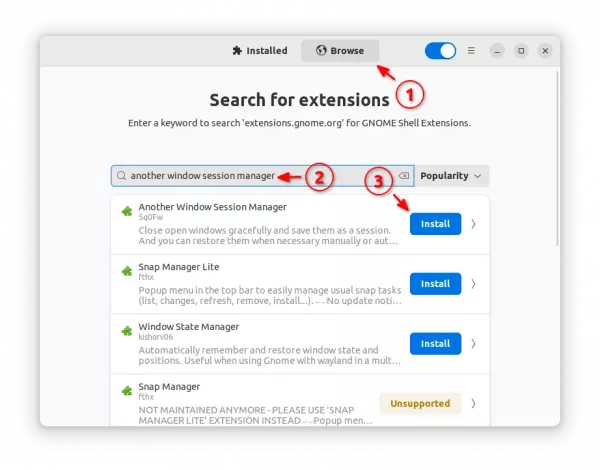
3.) Finally, navigate to “Browse” tab, search for and install the “Activities Workspace Name” extension.

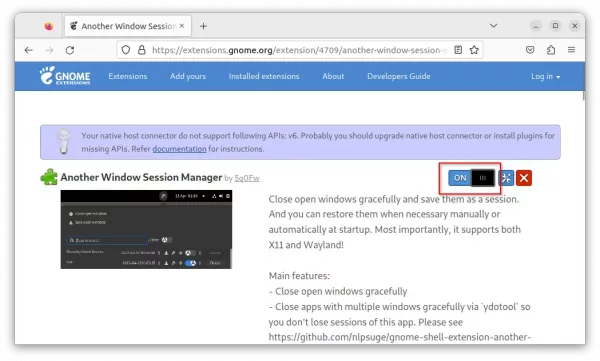
For Fedora 36 user, just go to the extension web page and use the ON/OFF switch to install it:

NOTE: If you set workspace names after installed the extension, restart GNOME Shell it required to make it work. To do so, press Alt+F2, type ‘r’ and hit Enter on Xorg session, or log out and back in on default Wayland.

Ubuntu 20.04 LTS just got a new point release with hardware enablement stacks for use on newer hardware.

The new Ubuntu 20.04.5 features Kernel 5.15 backported from Ubuntu 22.04 LTS, which enables newer hardware support.

It also updates the NVIDIA 390, 470, 510 driver series, as well adds initial support of NVIDIA 515 driver. For HP machines, it adds mic mute key support for HP Elite x360 series, and adds more hp dmi to unblock intel-hid event. Also, add HP EliteBook 630/830 13 inch dmi string to intel-hid allowlist.

The system hangs and display mode switching issues when external HDMI is plugged have been fixed. Firefox should be possible to open downloads folder when AppArmor enabled. And, many OEM meta packages have been added for Lenovo Thinkpad laptops.

For more changes about Ubuntu 20.04.5, see the change summary in this page.

How to Get Ubuntu 20.04.5:

If you’re already running Ubuntu 20.04 in your machine, just check out the “About” page in System Settings, as you should have the new point release.

Or, run the single command in terminal to verify:

cat /etc/issue

To download Ubuntu 20.04.5 (though 22.04.1 is recommended now), go to:

Free open-source video capturing, recording and live streaming software, OBS Studio, just got a big update with exciting new features!

It’s the 10th anniversary release that features 10-bit & HDR video encoding support! Thought, the new feature so far works only with AV1 and HEVC encoders, and 10-bit HEVC encoding requires NVIDIA 10-series, AMD 5000 series, or newer GPU.

OBS Studio 28.0 also adds native Apple Silicon support, many third-party plugins may not yet be ready for the native build.

The release is also porting to Qt6. Except for Ubuntu 20.04 PPA package, all others are now based on Qt6. Meaning many plugins may not work until the developers updated with Qt6 support. See most common plugins, that works with OBS Studio 28.0.

Ubuntu 18.04 is no longer officially supported though user may try the Flatpak package that run in sandbox.

OBS Studio HDR

Other changes in OBS Studio 28.0 include:

  • New, optimal AMD encoder for Windows.
  • Add support for CBR, CRF, and Simple Mode to Apple VT encoder
  • New default Theme “Yami”
  • Native SRT/RIST outputs
  • Send chat messages to YouTube from within OBS
  • See more in Github releases page.

How to Install OBS Studio 28.0 in Ubuntu & Other Linux:

The OBS Studio website offers the packages for Windows and macOS.

For Linux users, it offers the official packages via both Flatpak and Ubuntu PPA.

Option 1: Install OBS Studio Flatpak in most Linux

Flatpak is an universal Linux package runs in sandbox. In case you want to install the new release in Ubuntu 18.04, try the steps below.

1.) Setup Flatpak daemon

Some Linux, such as Linux Mint, Fedora, Pop! OS has Flatpak support out-of-the-box. But, most other does not, so you may first follow this setup guide to enable it for your Linux.

For Ubuntu 18.04, press Ctrl+Alt+T on keyboard to open terminal and run command to add the Flatpak PPA

sudo add-apt-repository ppa:flatpak/stable

Then update system package cache via:

sudo apt update

Finally, run the apt command to install the daemon package:

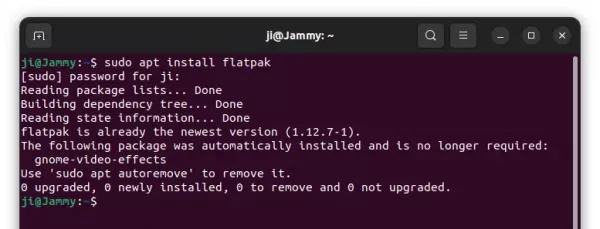
sudo apt install flatpak

2.) Install OBS Studio as Flatpak

After setup the daemon, run the single command below will install this live streaming software:

flatpak install https://dl.flathub.org/repo/appstream/com.obsproject.Studio.flatpakref

As a containerized software packages, it may also install the run-time libraries that takes more disk spaces.

Finally, launch it either by searching from “Show Applications” screen or via command below:

flatpak run com.obsproject.Studio

Option 2: Install OBS Studio via Ubuntu PPA

The official PPA has updated the packages for Ubuntu 20.04, Ubuntu 22.04, Linux Mint 20/21 based systems.

1.) First open terminal by pressing Ctrl+Alt+T on keyboard and run command to add the PPA:

sudo add-apt-repository ppa:obsproject/obs-studio

Type password (no asterisk feedback) when it asks and hit Enter to continue.

2.) Linux Mint and maybe some other Linux do not update the package cache automatically while adding PPA. So, you need to run the command below instead to do it manually:

sudo apt update

3.) Finally, either update the package via “Software Updater” (Update Manager), or run the command below to install it:

sudo apt install obs-studio

Uninstall OBS Studio:

For the Flatpak package, open terminal (press Ctrl+Alt+T on keyboard) and run command to uninstall the package:

flatpak uninstall --delete-data com.obsproject.Studio

For the Ubuntu PPA package, either install PPA purge tool and purge the PPA, which also downgrade all installed package:

sudo apt install ppa-purge && sudo ppa-purge ppa:obsproject/obs-studio

Or, remove the PPA package via apt command:

sudo apt remove --autoremove obs-studio

As well as removing the PPA repository via:

sudo add-apt-repository --remove ppa:obsproject/obs-studio

Need to access your copy & paste history quickly? Forget about GPaste or CopyQ, try Pano if your on default GNOME Desktop.

It’s a cool new clipboard manager for Ubuntu, Fedora, and other Linux with GNOME Desktop, such as Arch and Manjaro.

No system tray indicator or app window, just press your custom keyboard shortcut will bring up the bottom bar with all recent clipboard histories. And, it supports exclusions, and by default blocks tracking apps such as KeePassXC, 1Password, Gnome Secrets, etc.

The histories are displayed in blocks with different colors. It supports:

  • Code blocks with syntax highlighting.
  • Color codes (hex/rgb)
  • Images with size and resolution information.
  • Links with previews.
  • Texts
  • File Operations (Cut/Copy)

And, each block has a title indicates when it was created, as well as a little close button to delete it from the history.

As the screenshot shows, there’s a input box to search through the history. Or, you may use either left/right keyboard key or 2-finger swipe left/right gestures to browse through them.

Once you click on an item from the list, it copies the content into clipboard and close the bottom bar automatically. You may then paste it to anywhere as you prefer.

Install Pano:

1. Install Dependencies

Before installing the extension, you need to first press Ctrl+Alt+T on keyboard to open up a terminal window, and run command to install dependency libraries:

sudo apt install gir1.2-gda-5.0 gir1.2-gsound-1.0

Type user password (no visual feedback, just type in mind) when it asks and hit Enter.

2. Install Pano via Extension Manager

Pano is available as an extension which so far supports GNOME 42 ~ 45. Which means you needs either Ubuntu 22.04, and Ubuntu 23.10 users can do following steps to install:

1. Firstly, search for and install “Extension Manager” from Ubuntu Software or App Center (filtered by “Debian Package”).

Install Extension Manager in Ubuntu 22.04

2. Then, launch the tool by searching from ‘Activities’ overview screen.

3. Finally, search for and install the extension from the ‘Browse’ tab.

For Ubuntu 24.04 with GNOME 46

The extension in EGO (extensions.gnome.org) so far does NOT support GNOME 46, though the developer is working on it.

Before GNOME 46 support added to EGO, you may manually download the source from the Github project page:

Then, extract and move (or copy) the extracted folder into .local/share/gnome-shell/extensions folder.

Finally, log out and back in to apply change.

Configure Pano:

After installed the extension, go back to “Installed” tab in Extension Manager.

Then enable the extension and click on the gear button to open the configuration dialog. Finally, set the global shortcut, how many history items to remember and where to store them, etc as you want

NOTE: for loading error, try log out and back in to restart GNOME Shell.

For Fedora user, go to the extension web page in the link below and use the ON/OFF switch to install it:

And, install ‘Gnome Extensions’ app from Gnome Software for accessing the preference dialog.

UPDATE May 2024: The Extension support stuck at GNOME 42, meaning Ubuntu 22.04 only!
Want to set different wallpaper for each desktop workspace? You can now do this in Ubuntu and Fedora via a GNOME extension.

This is one of my favorite features when Ubuntu was using Unity as default desktop. After switched back to GNOME, I didn’t find an alternative method to re-implement this feature until I met this extension.

However, this method does not display different wallpapers in overview. Wallpaper applies only when you switched to that desktop (workspace). So, it may be called change wallpaper automatically when switching desktop.

Install the Extension & Set wallpapers in Ubuntu 22.04:

For Ubuntu 22.04, first search for and install “Extension Manager” from Ubuntu Software.

Install Extension Manager in Ubuntu 22.04

Next, press Super (Windows logo) key to open overview, search for and open the tool you just installed.

When it opens, navigate to “Browse” tab, search for and install “Walkpaper2” extension.

Finally, switch back to “Installed” tab, click the gear icon for the extension. In pop-up window, just click on the previous image to open dialog to set new wallpaper.

NOTE: GNOME by default has 2 desktops, and adds more dynamically. To set fixed number of desktop workspaces, go to “Settings -> Multitasking -> Workspaces”.

Set different wallpaper in other GNOME based Linux

For Fedora Workstation 36, Arch and Manjaro with GNOME, simply go the to link below and turn on the ON/OFF switch to install the extension:

In case you don’t see the ON/OFF switch, follow the link in that page to install web browser extension and refresh it.

To get the settings dialog, install and use “Gnome Extensions” app, either from Gnome Software or via pamac package manager.

There’s another extension with old GNOME support, however lack of versions support for Ubuntu 18.04 and Ubuntu 20.04.

Kdenlive video editor released version 22.08 with exciting new features. Here’s how to install it in Ubuntu via PPA.

Kdenlive 22.08 introduced initial support for styling subtitles, allows to modify the font, font size, font and outline colors, add shadows, set position and background color of subtitles.

The release also adds many new effects, including Shear, Scroll, Photosensitivity, Monochrome, Median, Kirsch, Exposure, EPX Scaler, Color Temperature, Color Overlay, Color Correct, Color Contrast, Chroma Noise Reduction, Contrast Adaptive Sharpen, Bilateral and VR360 Equirectangular to Stereo.

Styling subtitles

The audio recording interface has been overhauled. User can either use the record button in the track head or press Space-bar on keyboard to start recording. Space-bar can be also used to pause and resume recording, while Esc key is for exiting recording mode.

Other changes in Kdenlive 22.08 include:

  • Fix for NVENC and VAAPI proxy clip encoding support.
  • Faster render speeds with experimental Parallel Processing feature
  • Support AVIF, HEIF, HEIC and JPEG XL image formats, LOTTIE and RAWR animations, as well as VTT (Web Video Text Tracks) and SBV (YouTube) subtitle files.
  • Export guides as chapters for YouTube/PeerTube/Vimeo
  • Integration with Glaxnimate vector graphics animation program
  • Luma composition now supports video matte files.
  • Main effects tab now displays all audio and video effects
  • Improved clip-tagging system to easily add, edit and reorder tags in the project bin.
  • Added the ability to change the subtitle framerate.

How to Install Kdenlive 22.08 in Ubuntu:

The video editor has an official PPA contains the updated software packages for Ubuntu 22.04, Ubuntu 20.04, and their based systems, such as Linux Mint 20/21, Pop! OS 22.04, Zorin OS 16.
Add the PPA

To add the Ubuntu PPA, either press Ctrl+Alt+T on keyboard or search for and open terminal (konsole) from start menu.

When terminal opens, run command to add PPA:

sudo add-apt-repository ppa:kdenlive/kdenlive-stable

Type user password (no asterisk feedback) when it asks and hit Enter to continue.

Install / Update Kdenlive

After adding PPA, user can either open Software Updater (or Update Manager) to update the software package from an installed version:

Or run the command below to install or update the video editor:

sudo apt install kdenlive

NOTE: Linux Mint user has to run sudo apt update first to manually refresh package cache

And, if you got overwriting files issue due to the old dependencies: libmlt-data and melt, run command to remove them and then re-run the apt command above:

sudo dpkg -r melt libmlt-data

Once installed, press Super (Windows logo key) to open ‘Activities’ overview or start menu, and search for and open Kdenlive.

Uninstall Kdenlive

To remove Kdenlive, either use your system package manager or run the command below in a terminal window:

sudo apt remove --autoremove kdenlive

And remove the Ubuntu PPA either by running command in terminal:

sudo add-apt-repository --remove ppa:kdenlive/kdenlive-stable

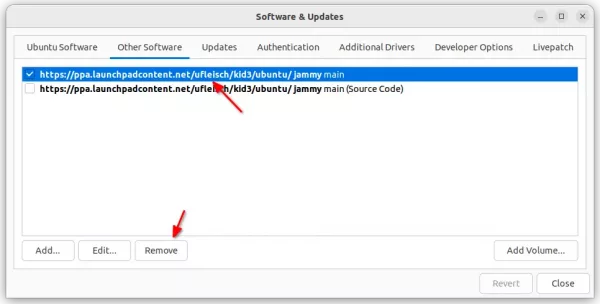
Or use “Software & Updates” utility to remove the source line under “Other Software” tab.

Mozilla Firefox got a new monthly update recently, with minor new features, performance improvements and some bug-fixes.

According to the release note, Firefox 104 adds one more video site, Disney+, for displaying subtitles in the pop-out videos (Picture-in-Picture).

Disneyplus.com in Firefox dark

When the browser is minimized or occluded, and for background tabs, the UI will now be throttled for better performance and battery usage. And, paste unformatted shortcut now works again in plain text contexts, such as input and text area.

Other changes in Firefox 104 include:

  • Support scroll-snap-stop and re-snapping properties for developers.
  • The Firefox profiler web app can analyze power usage of a website (Windows 11 and macOS only).
  • Highlight color preserved correctly in the mail composer of Yahoo Mail and Outlook.
  • Various security fixes and new policies

How to get Firefox 104:

For Ubuntu 18.04 and Ubuntu 20.04, Firefox 104 has already made into official repositories, simply launch Software Updater and install the updates to get it.

For Ubuntu 22.04 with pre-installed Firefox as Snap, you should now have v104. To verify, go to hamburger menu -> Help -> About Firefox.

For Ubuntu 22.04 users hate snap package, as well as old Ubuntu 16.04, the Mozilla Team PPA maintains the latest packages. See this step by step how to install guide.

Got some ePub and/or MOBI books in your PC? Debian / Ubuntu has recently includes a package in their repository for generating thumbnails for these files.

As you may know, Linux Mint 21 was released recently with a thumbnail generators for AppImage, ePub, MP3 and RAW files. Debian/Ubuntu now has similar tool called gnome-epub-thumbnailer, though it’s only for ePub and MOBI books.

With the package installed, the default file manager will no longer display the universal “e” image with green background for all ePub files. Instead, it shows thumbnail book covers.

Enable EPub / MOBI Thumbnails in Ubuntu 24.04

For Ubuntu 24.04 LTS, the package has been made into the system repositories.

Simply press Ctrl+Alt+T on keyboard to open up a terminal window. When it opens, run the command below to install the package:

sudo apt install gnome-epub-thumbnailer

NOTE: the package is only for the default GNOME Desktop! Install the Foliate eBook reader from system repository will also install it as recommend dependency package.

After that, just close Nautilus file manager and re-open it. Or, run nautilus -q command in terminal to apply.

Enable EPub / MOBI Thumbnails in Ubuntu 22.04 | 20.04

For the previous Ubuntu 22.04 and Ubuntu 20.04 LTS, user can either build the package from source code, or use this unofficial PPA that supports only AMD/Intel computers.

To add the PPA and install the package, press Ctrl + Alt +T on keyboard to open terminal and run 3 commands one by one:

sudo add-apt-repository ppa:ubuntuhandbook1/apps
sudo apt update
sudo apt install gnome-epub-thumbnailer

NOTE: The first command will asks for password authentication, though there’s no asterisk feedback. Just type in mind and hit Enter to continue.

Enable EPub / MOBI Thumbnails in Fedora, Arch, SUSE Linux

Most other recent Linux systems have also added the package into their official repositories. If you want to get it, open terminal and run command:

  • For Fedora, use command:
    sudo dnf install gnome-epub-thumbnailer
  • Arch and Manjaro Linux can install it via:
    sudo pacman -S gnome-epub-thumbnailer
  • And, openSUSE user may run command:
    sudo zypper install gnome-epub-thumbnailer

Uninstall the Thumbnails

Thumbnails generate automatically once you installed the package. If somehow you want to get rid of them, open terminal and run command:

sudo apt remove gnome-epub-thumbnailer

Also remove the PPA via command:

sudo add-apt-repository --remove ppa:ubuntuhandbook1/apps

Replace apt depends your system. For Arch, use sudo pacman -R gnome-epub-thumbnailer.

Removing the package won’t clear existing thumbnail images, until you removed the content under “~/.cache/thumbnails” either from file manager or by running command:

rm -R ~/.cache/thumbnails/*

By releasing v0.24, Celluloid (formerly Gnome MPV) is now a LibAwaita app. Meaning it works good on any screen sizes, including mobile or tablet devices.

Celluloid is a graphical front-end for MPV, defaults in Linux Mint. As MPV is a command line video player, Celluloid adds graphical controls and options to make the player easy to use.

Now, the app has ported to GTK4 plus LibAwaita. Which makes it look modern and stylish, and works good on small screen sizes.

MPV was just OK when it was in Ubuntu 20.04. But in Ubuntu 22.04, it lacks window border due to switch to Wayland (though there are workarounds). And, the UI looks outdated as more and more apps ported to GTK4.

If you’re going to make a switch, then Celluloid is really a good choice, especially for Gnome desktop Linux, such as Ubuntu, Fedora Workstation.

How to Install latest Celluloid in Ubuntu 22.04 / 22.10

1. Firstly, press Ctrl + Alt + T on keyboard to open terminal. When it opens, run the command below to add the official PPA:

sudo add-apt-repository ppa:xuzhen666/gnome-mpv

Type user password (no asterisk feedback) when it asks and hit Enter to continue

2. Then either use “Software Updater” (or Update Manager) to update the player if stock version was installed.

Or, run the command below to install/upgrade the app:

sudo apt update && sudo apt install celluloid

For other Linux, go to the project page.

Enable Hardware Acceleration

The player in my case does not use GPU rendering out-of-box. However, it’s easy to enable the features.

Simply click the hamburger menu and go to “Preferences”. Under “Miscellaneous” tab, add --hwdec in the ‘Extra MPV options’ box.

Uninstall Celluloid

To remove the software package, simply run command in terminal:

sudo apt remove --autoremove celluloid

And, remove the Ubuntu PPA either via the command below:

sudo add-apt-repository --remove ppa:xuzhen666/gnome-mpv

Or use the ‘Software & Updates’ utility under ‘Other Software’ tab:

Ubuntu’s default LibreOffice office suite got a big updates! See what’s new and how to install guide.

LibreOffice finally added WebP image format support by releasing the 7.4 release. As well, this release features new remote grammar checker: LanguageTool API; Calc now supports sparklines and uses 16,384 columns in spreadsheets; Show Changes mode does no longer count deleted list items, instead it now shows changes in numbering correctly.

Other changes in LibreOffice 7.4 include:

  • New optional hyphenation settings to adjust paragraph-level text flow.
  • EMZ/WMZ files support.
  • Impress now has the start of document theme support
  • Writer now supports clearing breaks from Word.
  • Experimental dark mode support for Windows 10/11
  • Help pages for the ScriptForge scripting library
  • See release note for more.

How to Install LibreOffice 7.4 in Ubuntu:

There are a few ways to get the most recent LibreOffice package for Ubuntu Linux, including:

  • Flatpak package – universal Linux package runs in sandbox.
  • Snap package – available in Ubuntu Software and run in sandbox.
  • Native DEB packages – but not well integrated with Ubuntu desktop.
  • AppImage – no installation required, just click to run.

Except the non-install AppImage package, all others will install another copy along side the system pre-installed version. Meaning you’ll have duplicated shortcut icons.

So, the LibreOffice PPA is highly recommended. Which will update the stock packages to the latest and keep it up-to-date.

1. First, press Ctrl+Alt+T on keyboard to open terminal. When it opens, run the command below to add PPA for all current Ubuntu releases:

sudo add-apt-repository ppa:libreoffice/ppa

2. Next, either open “Update Manager” to install updates, or run the command below in terminal:

sudo apt update && sudo apt upgrade

NOTE: This PPA at the moment is not updated with LibreOffice 7.4.0 package. Maintainers need time to build and test the new packages, especially for major releases.

How to Restore:

To remove the PPA as well as downgrading the office packages to stock version, run command in terminal to install ppa-purge tool and purge the PPA:

sudo apt install ppa-purge && sudo ppa-purge ppa:libreoffice/ppa