Archives For November 30, 1999

The latest stable kernel 3.10.1 has been released. All users of the 3.10 kernel series are urged to upgrade as soon as possible. Here is what’s new and how to install / upgrade kernel 3.10.1 on your system.

Linux kernel 3.10.1 is a small release that includes a few updated drivers, fixes for the HPFS and NFS file systems, as well as other small changes. See the announcement.

Kernel3.9.8

Below steps shows you how to install or upgrade this kernel:

1.) Press Ctrl+Alt+T to open terminal. Run below command to download the Deb packages

For 32-bit:

wget http://kernel.ubuntu.com/~kernel-ppa/mainline/v3.10.1-saucy/linux-headers-3.10.1-031001-generic_3.10.1-031001.201307131550_i386.deb http://kernel.ubuntu.com/~kernel-ppa/mainline/v3.10.1-saucy/linux-headers-3.10.1-031001_3.10.1-031001.201307131550_all.deb http://kernel.ubuntu.com/~kernel-ppa/mainline/v3.10.1-saucy/linux-image-3.10.1-031001-generic_3.10.1-031001.201307131550_i386.deb

For 64-bit:

wget http://kernel.ubuntu.com/~kernel-ppa/mainline/v3.10.1-saucy/linux-headers-3.10.1-031001-generic_3.10.1-031001.201307131550_amd64.deb http://kernel.ubuntu.com/~kernel-ppa/mainline/v3.10.1-saucy/linux-headers-3.10.1-031001_3.10.1-031001.201307131550_all.deb http://kernel.ubuntu.com/~kernel-ppa/mainline/v3.10.1-saucy/linux-image-3.10.1-031001-generic_3.10.1-031001.201307131550_amd64.deb

2) Install the Debs:

sudo dpkg linux-headers-3.10.1*.deb linux-image-3.10.1*.deb

After installation, update grub via:

sudo update-grub

rubyripper
This tutorial shows you how to install latest Rubyripper on Ubuntu 13.04, 12.10, 12.04, 10.04 and Linux Mint, and old versions on Ubuntu 11.10, 11.04, 10.10.

Rubyripper is a secure audiodisc ripper for Linux and OS X. It uses cdparanoia in a sophisticated way to make sure that a CD rip is done successfully and accurately. It is very similar to and inspired by EAC. Rubyripper is written in the ruby programming language.

To install it, follow the below steps:

1.) Download getdeb package, then double-click to install. It adds the getdeb repository to your system.

Download getdeb package

2.) Install Synaptic Package Manager from Ubuntu Software Center, then open it. Click on Reload button to update package lists. Finally search for and mark to install rubyripper:

rubyripper-synaptic

NOTE: For Linux Mint users, run this fix before step 2.

Go to Synaptic Package Manager -> Settings -> Repositories -> Other Software Center, scroll down to find out “http://archive.getdeb.net olivia-getdeb/apps”. Highlight this line and click edit:

Linux Mint 13: change from maya to precise-getdeg
Linux Mint 14: change from nadia to quantal-getdeb
Linux Mint 15: change from olivia to raring-getdeb

getdeb-linuxmint

This tutorial shows how to install Everpad on Ubuntu 13.04 Raring, 12.10 Quantal, 12.04 Precise and Linux Mint 13, 14, 15 via PPA repository.

Everpad is an unofficial Evernote client that is well integrated with Ubuntu Unity. It has unity lens, indicator applet, and icon on Unity Launcher. Support notes, tags, notebooks, resources, places, and en-* tags.

To install it, press Ctrl+Alt+T to open terminal, then follow the below steps:

1.) Copy and paste this command and hit enter to run. It adds the ppa to your system.

sudo add-apt-repository ppa:nvbn-rm/ppa

2.) If you’ve already installed Synaptic Package Manger, open it and click Reload button to update package lists. Search for and install everpad:

everpad-synaptic

If not, run this command instead:

sudo apt-get update; sudo apt-get install everpad

Enjoy!

ubuntu-boot-flash-screen

This simple tutorial will show you how to install and change the boot screen animation themes on Ubuntu 13.04 to replace default purple splash.

First, the boot screen animation is called Plymouth. If you’re looking a GUI tool, please refer to plymouth manager.

For manual may, follow the below steps:

1.) There are some plymouth themes available in Ubuntu Software Center by default. Search for and install what you want:

install-plymouth-themes

2.) To change the themes, press Ctrl+Alt+T to open terminal, then run this command:

sudo update-alternatives --config default.plymouth

You’ll see a list of available themes to the default, just type the selection number and hit Enter.

3.) Finally, apply the changes:

sudo update-initramfs -u

Now, restart your machine and see the magic!

Enjoy!

In this tutorial I’ll show you how to install Jdownloader on Ubuntu 13.10 Saucy, 13.04 Raring, 12.04 Precise and Linux Mint using the ppa repository.

Downloader is open source, platform independent download manager written completely in Java. It allows the automatic downloading of files and split files from one-click hosting sites such as RapidShare – not only for users with a premium account but also for users who don’t pay. It offers downloading in multiple parallel streams, captcha recognition, automatic file extraction and much more. Additionally, many “link encryption” sites are supported – so you just paste the “encrypted” links and JDownloader does the rest. JDownloader can import CCF, RSDF and DLC files.

jdownloader

There’s a ppa repository contains the installer for Ubuntu and Linux Mint users. Press Ctrl+Alt+T to open terminal, then follow the below steps:

1.) Copy and paste this command into terminal, then run to add the repository to your system:

sudo add-apt-repository ppa:jd-team/jdownloader

2.) If you installed Synaptic Package Manager, open it and click Reload button. Search for and install the jdownloader package.

Jdownloader-synaptic

If not, run following 2 commands instead:

sudo apt-get update

sudo apt-get install jdownloader-installer jdownloader

Enjoy!

In this tutorial I’ll show you how to install the PeerGuardian Linux (pgl) on Ubuntu 13.10 Saucy, 13.04 Raring, 12.04 Precise using ppa repository.

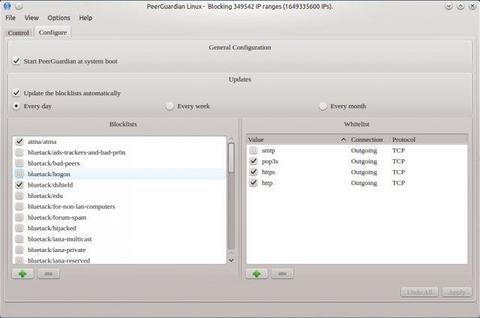
PeerGuardian Linux (pgl) is a privacy oriented firewall application. It blocks connections to and from hosts specified in huge blocklists (thousands or millions of IP ranges). Its origin seeds in targeting aggressive IPs while you use P2P.

peerGuardian

PeerGuardian Linux is actively developed. However the team is very small and with few spare time. Contributors are welcome! Check out http://peerguardian.sourceforge.net.

A ppa repository has been created to make it easy to install for Ubuntu and Linux Mint users. Press Ctrl+Alt+T to open terminal, then follow the below steps:

1.) Run this command in terminal to add the ppa repository:

sudo add-apt-repository ppa:jre-phoenix/ppa

2.) Update the package lists to make it available:

sudo apt-get update

3.) Finally instal it:

sudo apt-get install pgld pglcmd pglgui

Want to change the MAC address of your network card? In this tutorial I’ll show you how to do this in Ubuntu as easy as a few commands in terminal.

My laptop has two cards on eth0 and wlan0, here I’m going to change the card on eth0.

Press Ctrl+Alt+T to open up a terminal, then get started with below steps:

1.) You may run command to check you network cards, and backup original MAC address for easy to revert back.

ifconfig

2.) Turn the network card down.

sudo ifconfig eth0 down

3.) Change MAC Address:

sudo ifconfig eth0 hw ether 00:AA:BB:CC:DD:EE

4.) Start your network card:

sudo ifconfig eth0 up

That’s it!

How to Install WordPress on Ubuntu 13.04 Server

Last updated: November 3, 2013

Wordpress
Already installed LAMP or LEMP (Nginx with PHP, Mysql) on your Ubuntu Server? This time I’m going to show you how to install WordPress CMS.

WordPress is a popular blogging tool and a content management system (CMS) based on PHP and MySQL. It’s free and open-source.

To install WordPress, first login your Ubuntu Server as root, then follow the steps below:

1.) Create Mysql Database and User for WordPress.

  • First log into Mysql as root user:
    mysql -u root -p
  • Type in the root password to get past.

  • Create a database. Change database-name in code to whatever you want.
    CREATE DATABASE database-name;
  • Create an user. Change database-user in code to whatever you want.
    CREATE USER database-user@localhost;
  • Give a password to the user just created. Change password-here in code.
    SET PASSWORD FOR database-user@localhost= PASSWORD("password-here");
  • Grant all privileges to the new user.
    GRANT ALL PRIVILEGES ON database-name.* TO database-user@localhost IDENTIFIED BY 'password-here';
  • f.) Finally, refresh Mysql:
    FLUSH PRIVILEGES;
  • g.) Exit Mysql sell
    exit

2.) Download WordPress and setup the configuration.

  • Download the latest wordpress:
    wget http://wordpress.org/latest.tar.gz

    Then extract:

    tar -xzvf latest.tar.gz
  • Copy the sample configuration file to make a backup.
    cd wordpress && cp wp-config-sample.php wp-config.php
  • Edit the configuration file:
    vi wp-config.php

    Press I to start editing, Esc to stop editing. Press :, then type wq to save and exit, type q! to exit without save.

    Then change the section of database-name, database-user, password-here.

    // ** MySQL settings – You can get this info from your web host ** //
    /** The name of the database for WordPress */
    define(‘DB_NAME’, ‘database-name’);

    /** MySQL database username */
    define(‘DB_USER’, ‘database-user’);

    /** MySQL database password */
    define(‘DB_PASSWORD’, ‘password-here’);

3.) Setup the permissions.

    Give ownership of the directory to the apache or nginx user by running following commands one by one:

    sudo rsync -avP ~/wordpress/ /var/www/
    cd /var/www/
    sudo chown www-data:www-data * -R 
    sudo usermod -a -G www-data username

4.) Finally in your browser go to IP or domain/wp-admin/install.php and start installing.

Enjoy!