Archives For November 30, 1999

This simple tutorial shows how to install Adobe Acrobat Reader 9.5.5 in Ubuntu 24.04, Ubuntu 22.04, Ubuntu 20.04, and most other Linux.

Adobe has discontinued Linux support for its Acrobat PDF reader for many years! There are now many free open-source Linux apps for reading and/or editing PDF files.

However, if you like, the old Adobe Acrobat Reader 9.5.5 is still can be installed in current Ubuntu and other Linux, though it’s unmaintained and may contain security vulnerabilities.

NOTE: Adobe Reader 9.5.5 discontinued in 2013, it may have bugs and security issues! Install and use it at your own risk!

Thanks to @Ray Schumacher (see the comment below), Adobe website still provide native .deb package for the v9.5.5 version. It did install in my case in Ubuntu 24.04, however refused to launch due to the error below:

/opt/Adobe/Reader9/Reader/intellinux/bin/acroread: error while loading shared libraries: libgdk_pixbuf_xlib-2.0.so.0: cannot open shared object file: No such file or directory

The libgdk-pixbuf-2.0-0:i386 package offers the missing library, but it somehow refused to install in my test. So, this tutorial shows you how to install the Flatpak package instead, which works in all current Ubuntu releases, Fedora, Debian, Arch, and most other Linux.

Install Abode Reader 9.5.5 via Flatpak package

Flatpak is an universal Linux package format that runs in sandbox environment. It takes more disk space due to shared run-time libraries, however can be more safe since it runs in container.

1. Enable Flatpak Support

Ubuntu does NOT support Flatpak out-of-the-box, due to favor of Snap. It’s however easy to add it support by doing the steps below one by one.

1. (Ubuntu 16.04|18.04 only) For the old Ubuntu 16.04 and Ubuntu 18.04, press Ctrl+Alt+T on keyboard to open terminal. And, run command to add the Flatpak official PPA.

sudo add-apt-repository ppa:flatpak/stable

Then, update system package cache via:

sudo apt update

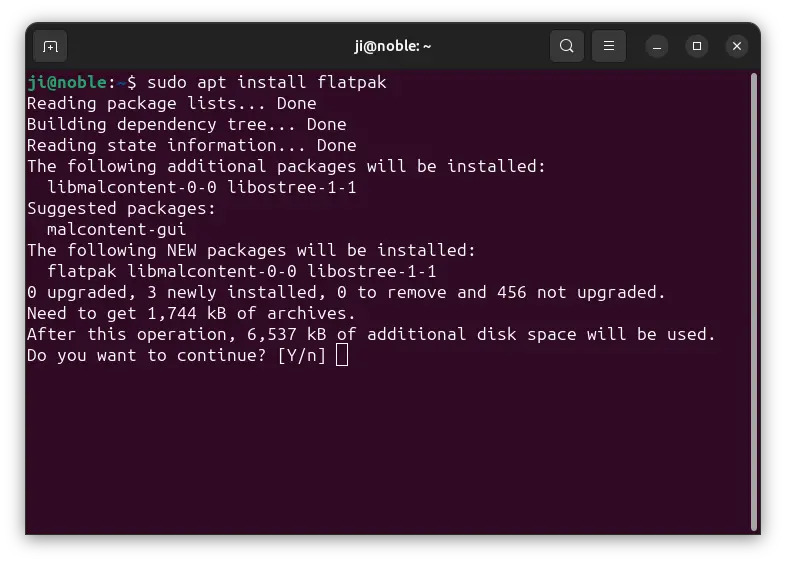
2. Press Ctrl+Alt+T on keyboard to open terminal. When terminal opens, run command to enable Flatpak support:

sudo apt install flatpak

For other Linux, follow this official setup guide instead for Flatpak support.

2. Install Adobe Reader Flatpak package

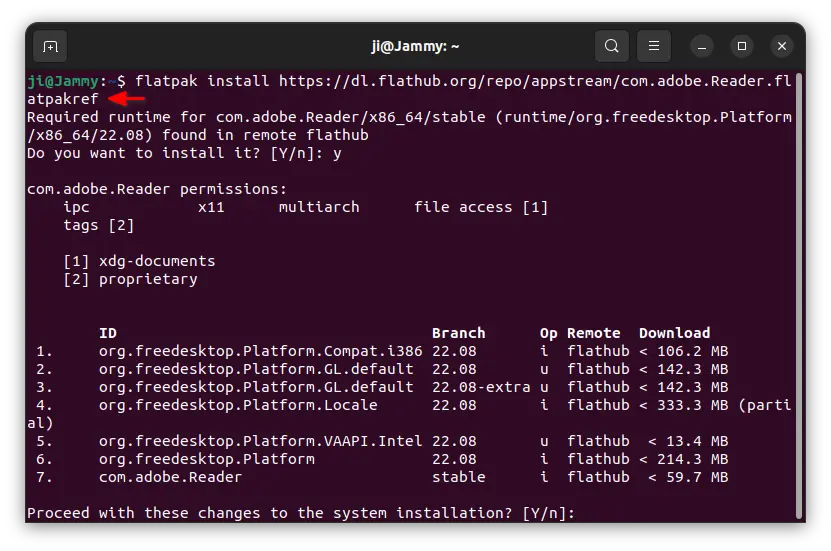
Once you got the file format support, then run the command below to install the Flatpak app package:

flatpak install https://dl.flathub.org/repo/appstream/com.adobe.Reader.flatpakref

Flatpak runs in sandbox. Though, the PDF reader itself only takes 59 MB, it needs also download & install hundred of MB run-time libraries.

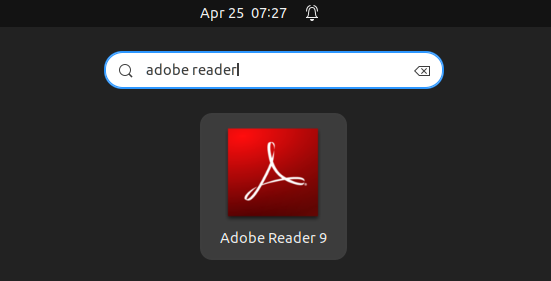
Once installed, either right-click on your PDF file and select “Open With Other Application” to choose Adobe Reader, or just search for and launch it from the overview screen.

NOTE: If this is the first app installed as Flatpak package in your system, you may need to log out and back in to make app icon visible.

3. Add Printer Support & Grant other Permissions

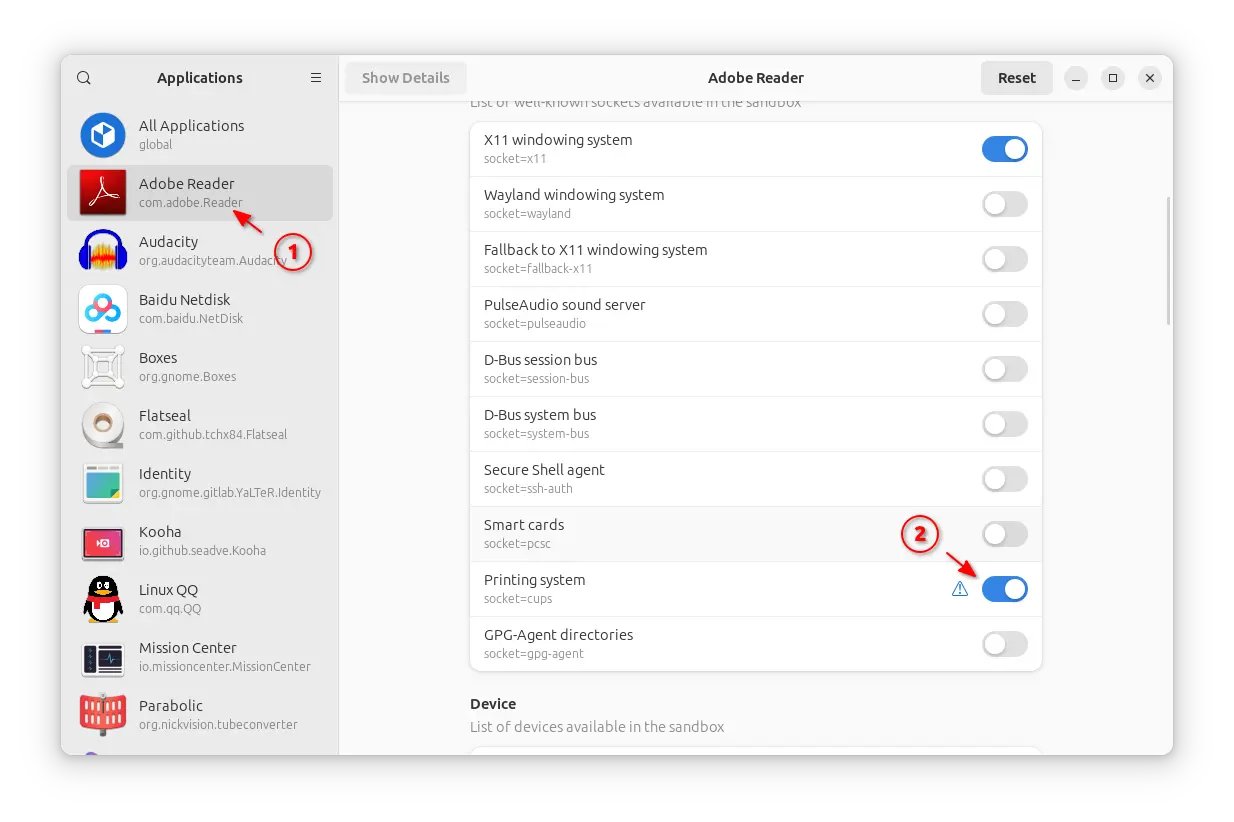
As mentioned, the Flatpak package runs in sandbox environment, which has NO permission by default to access printing system.

To enable this feature, first, open terminal (Ctrl+Alt+T) and run command to install Flatseal app:

flatpak install https://dl.flathub.org/repo/appstream/com.github.tchx84.Flatseal.flatpakref

Then, launch the “Flatseal” app, navigate to “Adobe Reader” in left pane of the pop-up app window, finally scroll down in right, find-out and turn on the toggle option for “Printing system”.

NOTE: If you intent to use network printer, then you also need to enable “Network” toggle option for this app package.

Uninstall Adobe Reader

To remove the software package, also open terminal (Ctrl+Alt+T) and run command:

flatpak uninstall --delete-data com.adobe.Reader

You may also run command to remove unused runtime libraries to free up disk space.

flatpak uninstall --unused

How to Install Adobe Reader in Ubuntu 14.10

Last updated: October 2, 2014

adobe reader ubuntu 14.10

Adobe Reader for Linux is no longer available for download from Adobe website. But we can still install it in Ubuntu through the old Canonical Partners repository.

Adobe has recently removed the Linux support from its official download page. Actually the latest “AdbeRdr9.5.5-1_i386linux_enu.deb” package is still available in the official repository, but it might be removed in near future.

If you still want this PDF reader, below is how to install Adobe Reader (Acroread) 9 in Ubuntu 14.10 from the Canonical Partners repository for Precise (12.04).

1. Open up terminal by pressing Ctrl+Alt+T on keyboard. When it opens, paste the command below and hit enter to add the repository:

sudo add-apt-repository "deb http://archive.canonical.com/ precise partner"

Type in your user password when it asks. Note that there’s no visual feed back when you typing a password.

2. After you added the repository, update package lists and install the acroread package by running below commands one by one:

sudo apt-get update

sudo apt-get install acroread

Install Adobe Reader in Ubuntu 14.10

Once installed, you should be able to open it from Unity dash or Application menu.

3 After properly installed Adobe Reader, don’t forget to remove the Canonical Partners repository for Precise:

sudo add-apt-repository -r "deb http://archive.canonical.com/ precise partner"

sudo apt-get update

4. How to Set Adobe Reader as default PDF reader:

Run command below in terminal to edit the config file:

sudo gedit /etc/gnome/defaults.list

When the file opens, do:

  • Find out and change the line

    application/pdf=evince.desktop

    into:

    application/pdf=acroread.desktop

  • Add below line into the end:

    application/fdf=acroread.desktop
    application/xdp=acroread.desktop
    application/xfdf=acroread.desktop
    application/pdx=acroread.desktop

Finally save the file and restart nautilus (run command nautilus -q in terminal) to apply changes.

adobe reader ubuntu 14.04

Adobe Reader was available in Canonical Partners repository then dropped since Ubuntu 13.10 Saucy. This tutorial will show you how to install Adobe PDF Reader in Ubuntu 14.04 LTS from the official package.

UPDATE 2024: This tutorial is outdated! For all current Ubuntu releases, see this one instead!

Tutorial Objectives:

  • Install Adobe Reader in Ubuntu 14.04
  • Enjoy!
The tutorial and Canonical Partner repository does no longer work in Ubuntu 16.04 and later releases

To get started:

1. Download the DEB package:

Adobe Reader 9.5.5 enu

UPDATE: Adobe Reader has recently removed support for Linux. Thanks to Enkouyami, if the above link is broken, you can install Adobe Reader from Canonical Partners repository, see this post.

2. Install Gdebi to handle the DEB package. Press Ctrl+Alt+T on keyboard to open the terminal. When it opens, paste the command below and run:

sudo apt-get install gdebi

3. Now install the package via Gdebi. It’ll also install the dependencies.

cd ~/Downloads && sudo gdebi AdbeRdr9.5.5-1_i386linux_enu.deb

4. If Adobe Reader is still missing libraries after installation. Run the command below to install them:

sudo apt-get install libgtk2.0-0:i386 libnss3-1d:i386 libnspr4-0d:i386 lib32nss-mdns* libxml2:i386 libxslt1.1:i386 libstdc++6:i386

That’s it. Enjoy!

adobe reader on ubuntu 14.04

(Optional) To remove Adobe Reader:

sudo apt-get remove acroread; sudo apt-get autoremove

adobe reader ubuntu 13.10

This quick tip is going to show beginners how to install Adobe Reader 9 in Ubuntu 13.10 Saucy Salamander.

Adobe Reader is available in Canonical Partners repository for Ubuntu 13.04 Raring and earlier. At the moment the repository is not ready for Ubuntu 13.10. So this tutorial will show you how to install it via the official DEB package.

1.) Click to download the DEB for Adobe Reader

2.) Press Ctrl+Alt+T on your keyboard to open terminal. When it opens, run below command to install it:

For 32-bit system:

sudo dpkg -i ~/Downloads/AdbeRdr9.5.5-1_i386linux_enu.deb; sudo apt-get -f install

For 64-bit system:

UPDATE: the easier way to install Adobe Reader DEB on 64 bit Ubuntu is using Gdebi, which will automatically install all dependencies.

sudo apt-get install gdebi

sudo gdebi AdbeRdr9.5.5-1_i386linux_enu.deb

Once installed, open Adobe Reader from Unity Dash or right-click your PDF files to open it via Adobe Reader.

adobe reader on ubuntu 13.10

UPDATE 1: Thanks for your comments! I’ve rewritten a clean tutorial about how to install this in Ubuntu 14.04 Trusty.

If you’ve already followed previous steps, run the below command to install required libraries should make the Adobe Reader work (Thanks to osman):

sudo apt-get install libgtk2.0-0:i386 libnss3-1d:i386 libnspr4-0d:i386 lib32nss-mdns libxml2:i386 libxslt1.1:i386 libstdc++6:i386