NOTE: This post is outdated. Please read this new tutorial about compiling GNU Emacs from the source.
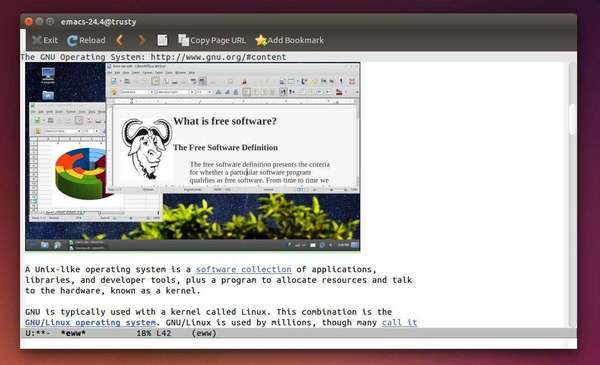
GNU Emacs has finally reached version 24.4 with many new features and improvements. The most notable is that the text editor brings a built-in web browser.
GNU Emacs is the most popular and most ported Emacs text editor, and it was created by Richard Stallman for the GNU Project.
The latest release Emacs 24.4 was released a few hours ago. The new release features:
- A built-in web browser (M-x eww)
- Improved multi-monitor and fullscreen support
- “Electric” indentation is enabled by default
- Support for saving and restoring the state of frames and windows
- Emacs Lisp packages can now be digitally signed
- A new “advice” mechanism for Emacs Lisp
- File notification support
- Pixel-based resizing for frames and windows
- Support for menus in text terminals
- A new rectangular mark mode (C-x SPC)
How to Install Emacs 24.4 in Ubuntu:
At the moment of writing this tutorial, there’s no PPA repository that contains Emacs 24.4. Fortunately, it’s not hard to build it from the source tarball. I’ve done it successfully in 64-bit Ubuntu 14.04 LTS. Below steps will show you how:
1. If have the old Emacs 24.3 installed, you may first remove it from Ubuntu Software Center so that you can install the new version over it.
2. Press Ctrl+Alt+T on keyboard to open terminal, or open it from the Unity Dash.
3. Run command below to install the build-essential:
sudo apt-get install build-essential
4. Install the required dependencies:
sudo apt-get build-dep emacs
While the installing process, you’ll be asked to configure the Postfix.
5. Now download Emacs 24.4 from its official FTP download page.
Emacs FTP download Page
6. Extract the source and go into the result folder in terminal:
cd ~/Downloads && tar -xf emacs-24.4.tar.* && cd emacs-24.4
7. Finally compile the package by running commands below one by one.
./configure

make

sudo make install
Once done, you should be able to launch Emacs by running emacs or emacs-24.4 in terminal and lock the shortcut to the Unity Launcher.
To create a launcher for Emacs 24.4. Thanks to Emad Khoury, run command to create a .desktop file and edit it with Gedit text editor:
sudo gedit /usr/share/applications/Emacs-24.desktop
When the file opens, paste below into it and save the file.
[Desktop Entry]
Version=1.0
Name=Emacs-24
Exec=env UBUNTU_MENUPROXY=0 /usr/local/bin/emacs
Terminal=false
Icon=emacs
Type=Application
Categories=IDE
X-Ayatana-Desktop-Shortcuts=NewWindow
[NewWindow Shortcut Group]
Name=New Window
TargetEnvironment=Unity
Depends on where you install Emacs 24, you may replace the value of Exec and Icon to the path to executable and shortcut icon file.