Archives For November 30, 1999

This simple tutorial shows how to change the computer name (aka hostname) in your Ubuntu (Ubuntu 24.04 Noble Numbat updated) without a system restart.

The methods here are universal ways that works in not only default Ubuntu release but also its flavors (e.g., KUbuntu, XUbuntu), and even other Linux.

NOTE: A hostname can be a single word or phrase, including letters, number, periods, or hyphen with 253 characters length limit, with NO space.

Change Computer Name for Temporary Use

If possible to change the name for temporary use. So, the new name will work until you restart the system.

  • To do so, simply open terminal or connect to command console and run command:
    sudo hostname NEW_NAME_HERE

Replace ‘NEW_NAME_HERE’ and type user password (no asterisk feedback) to authenticate. And, you may need to restart terminal or console to see effect.

Change Computer Name by Editing Config file

The classic way to permanently change your system hostname is just edit the configuration file!

So, here I’m going to use the universal nano command line text editor to open the configuration file.

  • To do so, open terminal and run command:
    sudo nano /etc/hostname

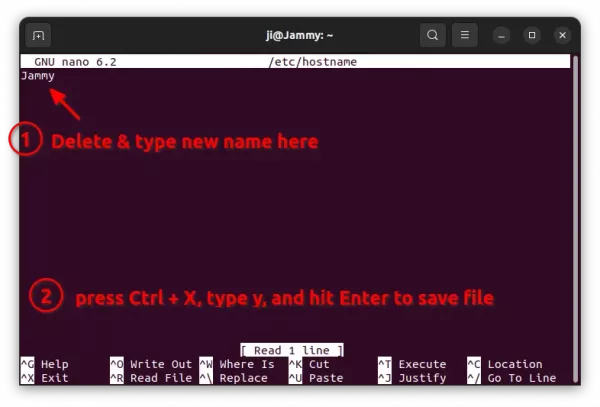
When file opens in terminal, delete the old name and type a new one. Finally, press Ctrl+X, type y and hit Enter to save change.

This method however need a system restart if you’re running with default Wayland session. If you switched back Xorg session, run the command below to make it work without restart.

sudo systemctl restart systemd-logind.service

Use ‘hostnamectl’ to change computer name

The hostnamectl command is a good choice today to permanently change your computer name without system start.

  • As easy as the first method, just run command in command/console:
    hostnamectl hostname NEW_NAME_HERE

The change takes effect immediately, though you may need to restart terminal window.

Use new name in ‘/etc/hosts’

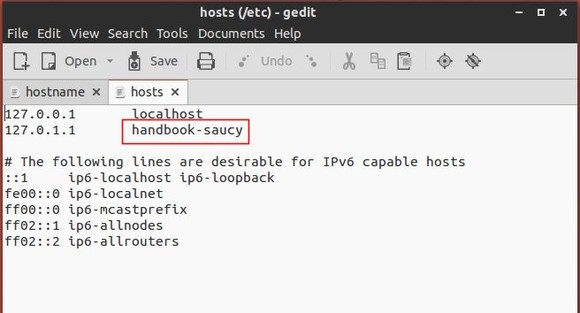
To avoid network issues, it’s HIGHLY recommend to also edit ‘/etc/hosts’ and replace all old names with new ones.

  • Open terminal and run command to edit the file:
    sudo nano /etc/hosts

When file opens in terminal, delete all the old hostname and insert the new name you set. Also, press Ctrl+X, type y and hit Enter to save change.

computer name ubuntu 16.04

Quick tutorial for those who want to change the Hostname (Computer name) in Ubuntu 16.04 Server or Desktop without a restart.

1. To change hostname temporarily so it works until you reboot the machine:

In terminal / command console, run the command:

sudo hostname NEW_NAME_HERE

2. To permanently change your computer name, you may edit the “/etc/hostname” and “/etc/hosts” files.

Open terminal and run command:

gksudo gedit /etc/hostname /etc/hosts

You may need to install gksu first via command sudo apt install gksu.

For Ubuntu Server, use two nano commands instead (Press Ctrl+X, followed by Y, and then Enter to save changes):

sudo nano /etc/hostname
sudo nano /etc/hosts

edit-hostname

When the files open, set the new hostname:

  • /etc/hostname is a simple one line file, change the name to whatever your want.
  • /etc/hosts maps IP addresses to host names, change the name in second line and make it SAME to the name in /etc/hostname.

Without restarting your machine, just run the command below to restart hostname service to apply changes:

systemctl restart systemd-logind.service

3. There’s also hostnamectl command with set-hostname flag, which will alter the pretty, the static, and the transient hostname alike:

hostnamectl set-hostname NEW_NAME_HERE

ISSUE: After changing hostname, gedit and other graphical apps use X11/Mir protocol won’t launch from terminal via gksudo, you’ll get something like below:

Failed to connect to Mir: Failed to connect to server socket: No such file or directory
Unable to init server: Could not connect: Connection refused

(gedit:20511): Gtk-WARNING **: cannot open display: :0

To fix it:

run xauth list command to check authentication cookie.
add a matching cookie for the new hostname:

xauth add "NEW_HOSTNAME/unix:0" MIT-MAGIC-COOKIE-1 cookie-id-here

add-xauth

ubuntu 14.04 change hostname

This simple and brief tutorial is going to show you how to change the Hostname / Computer name in Ubuntu 14.04 Trusty Tahr.

The default name was set when you were installing Ubuntu. You can easily change it to whatever you want in both Desktop & Server by editing the hosts and hostname files. Below is how:

1. Press Ctrl+Alt+T on keyboard to open the terminal. When it opens, run the below command:

hostname NEW_NAME_HERE

This will change the hostname until next reboot. The change won’t be visible immediately in your current terminal. Start a new terminal to see the new hostname.

2. To change the name permanently, run command to edit the host files:

sudo gedit /etc/hostname /etc/hosts

For Ubuntu server without a GUI, run sudo vi /etc/hostname and sudo vi /etc/hosts and edit them one by one.

In both files, change the name to what you want and save them.

change Computer name ubuntu

change Computer name ubuntu

Finally, restart your computer to apply the changes.

This simple tutorial shows you how to change the hostname (also known as computer name) in Ubuntu 21.10 Impish Idri.

The computer name is a unique identifier given to each computer. It’s not a big deal for small home networks or single use home computers. It matters however in larger organizations where you need to be able to identify servers. The name is a single word with no spaces, it has only letters, numbers or a hyphen with up to 253 characters.

The default name was set during installing the Ubuntu system. You can however change it at anytime as you want. And here’s the universal way to do the trick in either Ubuntu desktop or server editions.

Tutorial Objectives:

  • Change Computer Name / Hostname in Ubuntu 21.10
  • Enjoy!

Change computer name until reboot:

To get started, first either connect to your Ubuntu server or open terminal by pressing Ctrl+Alt+T on keyboard or searching from the overview screen. When it opens, run command:

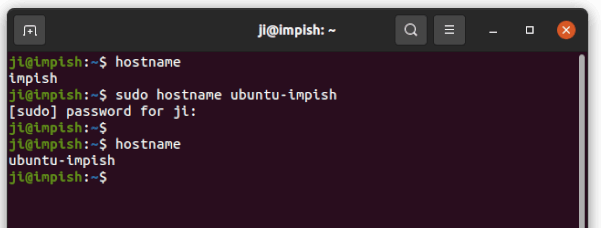
sudo hostname NEW_NAME

Replace ‘NEW_NAME’ in command with your desired computer name. And it will take place until reboot.

NOTE: the new name takes effect immediately but not visible until you start a new terminal window.

Change computer name permanently:

In most Linux distributions, you can edit the “/etc/hostname” configuration file to set new computer name.

1.) To do so, open terminal from start menu or connect to the command console of remote server, then run command:

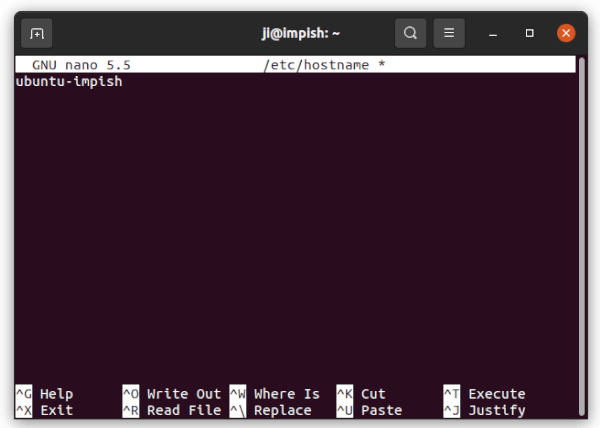
sudo nano /etc/hostname

This command will edit the config file via nano, the universal command line text editor. You may replace it with your favorite text editor, such as gedit for GNOME desktop.

When the file opens, delete the old name and type a new one. And press Ctrl+X, then type y, and hit Enter to save changes!

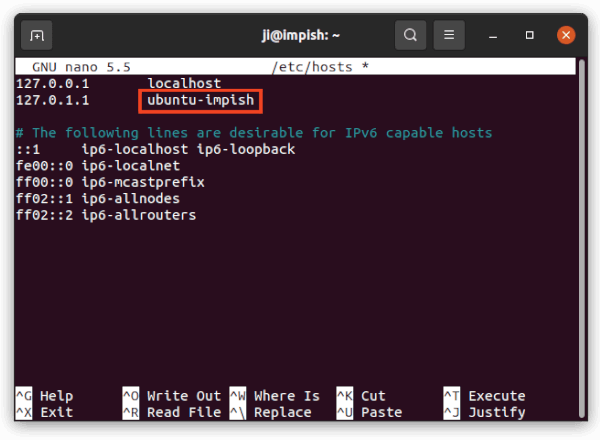
2.) It’s important to edit /etc/hosts file to map the new name to 127.0.1.1 and/or the permanent IP address if any.

sudo nano /etc/hosts

NOTE: you have to set same name in both /etc/hosts and /etc/hostname to avoid networking issues. And save file by pressing Ctrl+X, type y, and hit Enter.

Finally reboot to apply change and enjoy!