Archives For November 30, 1999

Remote Access Ubuntu 16.04

This tutorial is going to show beginners how to easily setup a VNC server in Ubuntu 16.04 so to connect from remote machines.

1.) Ubuntu desktop provides vino VNC server out-of-the-box with a simple UI called Desktop Sharing.

Desktop Sharing

2.) After launching the utility, you can easily enable VNC server in Ubuntu by checking the boxes that says:

  • Allow other users to view your desktop
  • Allow other users to control your desktop (Optional)

Enable Vino VNC server

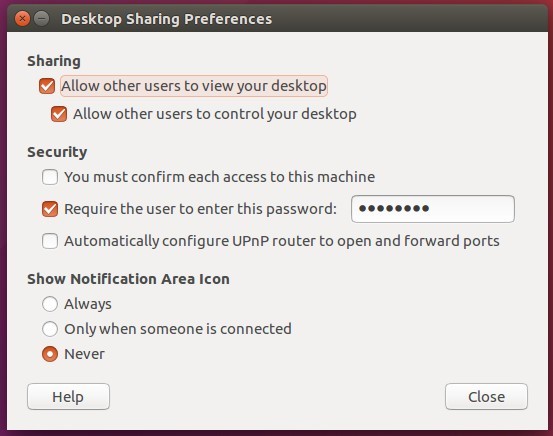
For security options:

  • If you want to be able to choose whether to allow someone to access your desktop, enable the first box.
  • To require other people to type a password when connecting to your desktop, enable the second one and set a password.
  • If your router supports UPnP and it’s enabled, you can allow people not in local network to connect by selecting “Automatically configure UPnP router to open and forward ports”

After setting up the VNC server, just close the utility.

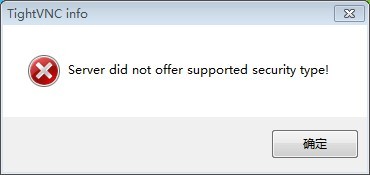
3.) Disable encryption.

Due to this bug, the common used TigerVNC, TightVNC viewer does not support vino’s security type. You’ll get the error below when you try to connect:

security-notsupported

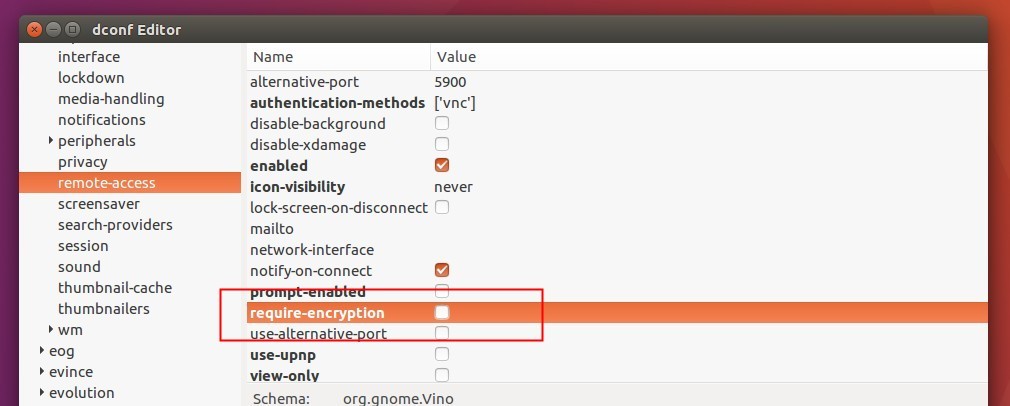
A workaround is to disable encryption requirement. To do so, install dconf Editor from Ubuntu Software (or via sudo apt install dconf-editor command in terminal), and launch it.

When it opens, navigate to org -> gnome -> desktop -> remote-access, and uncheck the value of “require-encryption” in right.

vino disable encryption

Finally connect to this desktop on remote machine by typing the IP and password using a VNC client!

 remote access ubuntu 14.04 server

Want to remotely access your Ubuntu Server with a graphical interface? Well, here’s a simple guide shows you how to do it with X2Go, an implementation of NX remote desktop protocol.

All you need to do is install X2Go Server package as well as the Desktop Environment in remote server side and install X2Go client in the client side.

On Ubuntu Server Side:

The latest X2Go server is available in Ubuntu 14.04 LTS, Ubuntu 12.04 LTS, and Ubuntu 10.04 LTS via PPA. Just connect to your Ubuntu server and run below commands to add the PPA and install the server packages:

Before adding the PPA, you have to install add-apt-repository:

sudo apt-get install python-software-properties software-properties-common

To add PPA, run:

sudo apt-add-repository -y ppa:x2go/stable

Refresh system package lists:

sudo apt-get update

Install X2Go Server:

sudo apt-get install x2goserver x2goserver-xsession

In this case I’m going to access the XFCE4 Desktop of remote Ubuntu server, so also install the Xfce4:

sudo apt-get install xfce4

Finally restart the server by running reboot command.

If you have not set a hostname in your Ubuntu server, run below command to set it up, or you’ll get error connecting to the Ubuntu server. Replace plato with the hostname of your choice

echo "plato" > /etc/hostname

hostname -F /etc/hostname

On Client Side:

For Windows and/or Mac OS X, see this how to install wiki.

For Ubuntu 12.04, Ubuntu 10.04, Ubuntu 14.04, and Ubuntu 14.10 you can get the latest client from PPA by running below commands one by one in a terminal window (or you can install an old version directly from Ubuntu Software Center):

sudo apt-add-repository ppa:x2go/stable

sudo apt-get update

sudo apt-get install x2goclient

The first time you start the client, it prompts you to create a session with:

  • a session name of your choice
  • an icon of your choice
  • remote server ip
  • the login name
  • ssh port (default is 22)
  • select session type (XFCE in the case)

x2go create session

After that, you can see the session available in the right pane of the client window. Go to menu session -> new session if you have more that one remote server to connect.

x2go client window

Click a session from the right pane and type in remote user password to connect:

x2go Login

Once connected, you can operate on the remote desktop in a new window:

remote-ubuntu-server-desktop

That’s it. Enjoy!

Remote Control Clementine

Want to remotely control the desktop PC music playback via your phone? Clementine music player has a built-in feature allows to remotely control player using Android mobile over LAN (or WAN).

All you need to do is enable this feature in the desktop player and install the official app ‘Clementine Remote’ on your phone.

1. For Ubuntu 14.04 and earlier editions, you have to upgrade to the latest Clementine release by installing the package from the official link below:

Clementine Player Download Page

32-bit or 64-bit? Check it out at System Settings -> Details.

The downloaded package is .deb file, just double-click on it to open with Ubuntu Software Center and click install button to install the player.

Tip: Restart your computer if you were upgrading Clementine from a previous version.

2. Open the music player and go to menu “Tools -> Preferences”. Select Network Remote in the left pane, then do:

  • Enable remote control by ticking the box ‘Use a network remote control’
  • Depends on your need, leave the port default or change it.
  • Set LAN only or both LAN & WAN access
  • Set an authentication code, so that clients need to type the code to connect.
  • Tick ‘Allow downloads’ if you want to download songs from Clementine to Android.

Clementine Network Remote Settings

3. Now on your Android device, install the ‘Clementine Remote’ app from Google Play.

Once installed, start the app, type in the IP of the remote machine and click connect.

clementine-connect clementine-remote-playback-control

That’s it. Enjoy!