![]()
Your preferred screen resolution is not available in the Display settings? Well, here I’m going to show you how to add a custom screen resolution in your Ubuntu desktop.
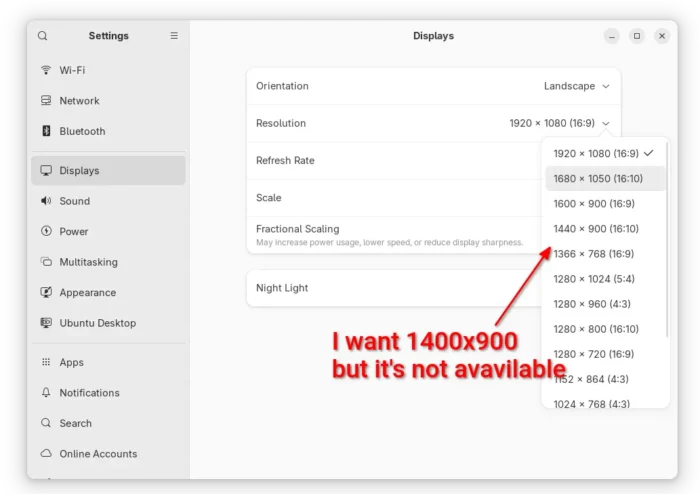
On my Ubuntu Desktop, the default 1920X1080 (16:9) resolution is kinda high for me. Though there are options to scale for menu, title bars, and text, I prefer 1400X900 (3:2) which however is not available to choose from display setting panel.
To do the job, I found 2 solutions that work in all current Ubuntu releases:
- add Kernel parameter at startup, which works in both Wayland and Xorg sessions.
- use xrandr, but it works for X11/Xorg session only.
And they are tested and work in my case in Ubuntu 18.04, 20.04, 22.04, 24.04, and 25.04.
Method 1: Add custom screen resolution as Kernel parameter
1. Find out display device name.
Before getting started, you need to find out the device name of your displays.
For X11/Xorg session, simply press Ctrl+Alt+T to open terminal. Then, run the command below:
xrandr
It will output all connected displays as well as available screen resolutions. Here you need to find out and remember the display names. In my case as the screenshot shows, it’s DP-1.
For Wayland, which is the default session since Ubuntu 22.04, open terminal and run the command below instead:
for p in /sys/class/drm/*/status; do con=${p%/status}; echo -n "${con#*/card?-}: "; cat $p; done
This command will look for all devices under /sys/class/drm directory, print the names and their status (connected or not). In my case, I have 2 displays connected. They are eDP-1 laptop built-in display, and DP-1 external display.
2. Add Kernel Parameter.
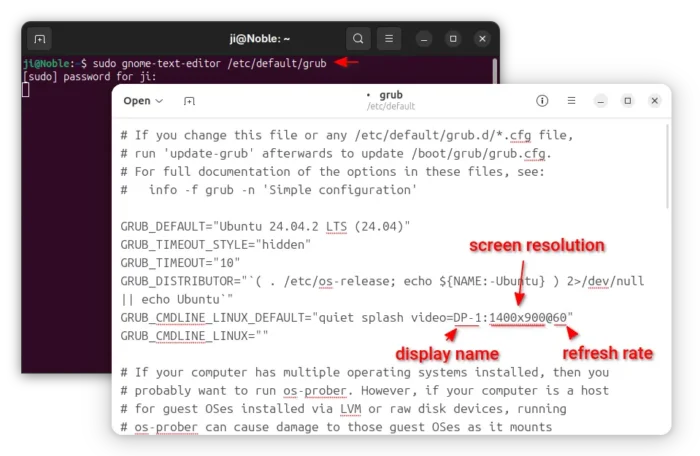
For Ubuntu booted with its built-in Grub boot-loader, user can edit the /etc/default/grub file to add kernel parameters.
First, press Ctrl+Alt+T on keyboard to open terminal, and run command to edit that file:
sudo gnome-text-editor /etc/default/grub
For non-GNOME desktop, replace gnome-text-editor with your desktop text editor, or use nano cli tool that works in most Linux
When file opens, add video=DP-1:1400×900@60 value for GRUB_CMDLINE_LINUX_DEFAULT. And, here:
- DP-1 is the device name of target display.
- 1400×900 is the desired screen resolution.
- 60 is the refresh rate.
NOTE: You can’t set a resolution higher than the one your physical display can handle.
And, for multiple display, add either:
video=1400x900@60(skip device name) that works for all connected displays,- or
video=eDP-1:1360x700@60 video=DP-1:1600x900@60to set video size separately.
3. Update Grub to apply change
After edited the file, save it (for nano press Ctrl+S to save, then Ctrl+X to exit), and run the command below to apply change:
sudo update-grub
Finally, restart computer and go “Display” setting page for the new screen resolution.
Tips: For users who have Grub Customizer installed, then just launch the tool and navigate to General Settings page to add kernel parameters.
Method 2: Use xrandr command
For the classic X11/Xorg session, that’s default in current MATE, XFCE, etc desktop environments, there’s a built-in xrandr command line tool to set screen size.
1. First open terminal by pressing Ctrl+Alt+T key combination on keyboard. When it opens, run command:
xrandr
As mentioned above, this command output all connected displays as well as their screen resolutions. You need to find out and remember the target display name
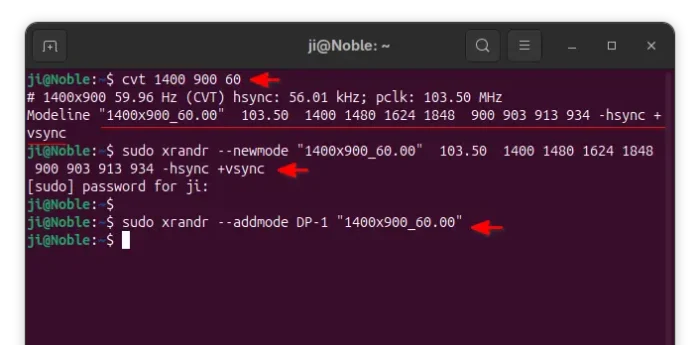
2. Run command to calculate VESA CVT mode lines by given resolution:
cvt 1400 900 60
Here replace 1400 900 with your desired screen resolution. The refresh rate 60 is optional, though you may replace it with yours.
3. Copy the Modeline in the last command output, and run command to add new mode:
sudo xrandr --newmode "1400x900_60.00" 103.50 1400 1480 1624 1848 900 903 913 934 -hsync +vsync
NOTE here you need to replace the section in red after --newmode with the output in last command.
4. Finally add the new created mode for your display device:
sudo xrandr --addmode DP-1 "1600x900_60.00"
Replace DP-1 (see step1) and "1400x900_60.00" (Step 2 or 3) in the command.
After that, you can open Settings and navigate to Display pane, finally choose the new “1400×900” screen resolution and apply.
5. The steps above work only for current login.
To make it permanent, open HOME folder and press Ctrl+H to show hidden files. Next, find out and click edit .profile file.
When the file opens, add the commands in step 3 & 4 (skip sudo) and save.


