Archives For to

This simple guide shows how to install latest LightZone 4.0 on Ubuntu 13.04 Raring, 12.10 Quantal, 12.04 Precise, and Linux Mint from its official repository.

LightZone 4.0 from official repository

LightZone is professional-level digital darkroom software for Windows, Mac OS X, and Linux. Rather than using layers as many other photo editors do, LightZone lets the user build up a stack of tools which can be rearranged, turned off and on, and removed from the stack. It’s a non-destructive editor, where any of the tools can be re-adjusted or modified later — even in a different editing session. A tool stack can be copied to a batch of photos at one time. LightZone operates in a 16-bit linear color space with the wide gamut of ProPhoto RGB.

LightZone 4 Main Window

Features:

  • edit both RAW and JPEG format images.
  • has ability to create and apply pre-determined image transformations, called “styles”, to an entire batch of images in a single operation.
  • It’s a non-destructive RAW editor. It treats the digital image original (typically a RAW file) as precious and non-editable.
  • outputs JPEG files which contain metadata references to the original image file location and a record of the transformations applied during editing.
  • Because the JPEG output files contains the entire transformation history, edits can always be undone in a new edit session, long after they were saved
  • Read more on Wikipedia

Install LightZone 4 via Official Repository

UPDATE: Thanks to Otto Meier, now LightZone is available in PPA for Ubuntu 14.04 Trusty, Ubuntu 13.10 Saucy, Ubuntu 13.04, Ubuntu 12.10, Ubuntu 13.04, Ubuntu 12.04 and their derivatives. Just run below commands one by one in terminal.

sudo add-apt-repository ppa:otto-kesselgulasch/lightzone
sudo apt-get update
sudo apt-get install lightzone

1.) Press Ctrl+Alt+T on your keyboard to open terminal. When it opens, run below command to add the repository and install keyring:

For Ubuntu 13.04, 12.10 and Linux Mint 14, 15

sudo sh -c "echo 'deb http://download.opensuse.org/repositories/home:/ktgw0316:/LightZone/xUbuntu_13.04/ ./' > /etc/apt/sources.list.d/lightzone.list"

wget -O - http://download.opensuse.org/repositories/home:/ktgw0316:/LightZone/xUbuntu_13.04/Release.key | sudo apt-key add - 

For Ubuntu 12.04 and Linux Mint 13

sudo sh -c "echo 'deb http://download.opensuse.org/repositories/home:/ktgw0316:/LightZone/xUbuntu_12.04/ ./' > /etc/apt/sources.list.d/lightzone.list"

wget -O - http://download.opensuse.org/repositories/home:/ktgw0316:/LightZone/xUbuntu_12.04/Release.key | sudo apt-key add -

2.) Update package lists and install the software:

sudo apt-get update; sudo apt-get install lightzone

For other Linux distributions, install LightZone photo editor 4.0 from the GitHub.

Getdeb is an unofficial project which provides the latest open-source and freeware applications for Ubuntu Linux, and PlayDeb provides games. As Ubuntu based Linux distribution, Linux Mint users are available to install software from this repository.

Objectives:

  • Install / add / enable GetDeb & PlayDeb repository on Linux Mint
  • Enjoy!

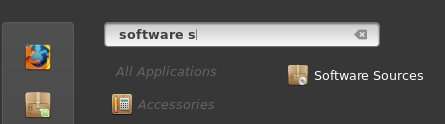
To get started, go to Start menu, search and open Software Sources

software-sources

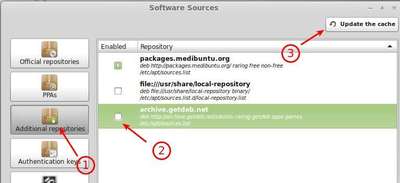
Navigate to Additional repositories, check the box where it says ‘archive getdeb.net’. Click ‘update the cache’ button to update package lists.

enable getdeb repository

That’s it!

If it is not there in your Linux Mint edition, click ‘Add a new repository’ and type in

deb http://archive.getdeb.net/ubuntu raring-getdeb apps games

In the line, change raring to yours based Ubuntu release code name.

Linux Mint 14 Nadia based on Ubuntu 12.10 quantal
Linux Mint 13 Maya based on Ubuntu 12.04 precise
Linux Mint 12 Lisa based on Ubuntu 11.10 oneiric
Linux Mint 11 Katya based on Ubuntu 11.04 natty
Linux Mint 10 Julia based on Ubuntu 10.10 maverick
Linux Mint 9 Isadora based on Ubuntu 10.04 lucid

And get the key by running below commands in terminal (Ctrl+Alt+T):

wget -q -O- http://archive.getdeb.net/getdeb-archive.key | sudo apt-key add -

Enjoy!

‘Users and Groups’ was the default user management tool before Ubuntu turned to Unity. It’s powerful than the current ‘User Accounts’ utility in my opinion.

If you want to get this users and groups management tool, search for and install gnome-system-tools from Ubuntu Software Center

install-gnome-system-tools

Then you can find it in Unity dash:

users-and-groups-unity

Here are the screenshots:

User-Settings

Group-settings

Advance User Settings

Enjoy!

office2010
This brief tutorial will show you how to install Microsoft Office suite 2010 on Ubuntu 13.04 Raring Ringtail and Linux Mint using Wine.

Wine is a free and open-source software that allows to run Windows applications on Ubuntu Linux. Now Microsoft Office is running good through Wine.

To get started:

1.) Press Ctrl+Alt+T to open a terminal window, and run commands to install wine:

sudo add-apt-repository ppa:ubuntu-wine/ppa

add-wine-ppa

sudo apt-get update; sudo apt-get install wine1.5

install-wine

2.) After wine is installed, you may log out and back in. Run command below to configure wine:

winecfg

Under Libraries tab, scroll down and select Riched20 library from the list and click add it. When done, click OK.

wine-configuration

3.) For better performance, run below 2 commands to force Wine to run in 32bit process:

export WINEPREFIX=$HOME/wine32 
export WINEARCH=win32

4.) Now, insert your Office CD/DVD or navigate to the Office Setup.exe on your computer. Right-click on it and select “Open With Wine Windows Program Loader”.

run-setup-with-wine

5.) Follow the wizard and you’re done!

Fotoxx, a free and open source photo editing and collection management sofware for Linux. The new version has just been released with quite a few changes.

Changes in Fotoxx 13.07:

  • The gallery navigation has been extended with new options;
  • Effects > Drawing and Effects > Outline functions have been combined;
  • Batch Add Tags and Delete Tags have been combined into a more flexible tool;
  • Edit Collections has been made easier (add/delete/cut/copy/paste images);
  • The gallery of the newest images have been added to the database.
  • full changes in official announcement

The getdeb repository has updated this new release for Ubuntu 13.04 Raring and 12.04 Precise users. You can follow the below steps to install or upgrade:

1.) Download and double-click on the getdeb package to add the repository to your system.

Download & install GetDeb repository

2.) If you installed Synaptic Package Manager, open it, then Reload and finally search and install Fotoxx package.

fotoxx-synaptic

If not, run this command in terminal (Ctrl+Alt+T):

sudo apt-get update; sudo apt-get install fotoxx

Enjoy!