Archives For Ubuntu 17.04

Ubuntu 17.04 Reaches End of Life Today

Last updated: January 13, 2018

Ubuntu 17.04

Ubuntu 17.04 Zesty Zapus reaches end of its life today on Jan 13. Ubuntu Security Notices will no longer include information or updated packages for Ubuntu 17.04.

Users can either upgrade to Ubuntu 17.10 (support will end in July 2018), or download Ubuntu 16.04, the current LTS with 5-year support cycle.

Ubuntu announced its 17.04 (Zesty Zapus) release almost 9 months ago, on April 13, 2017. As a non-LTS release, 17.04 has a 9-month support cycle and, as such, will reach end of life on Saturday, January 13th.

At that time, Ubuntu Security Notices will no longer include information or updated packages for Ubuntu 17.04.

The supported upgrade path from Ubuntu 17.04 is via Ubuntu 17.10. Instructions and caveats for the upgrade may be found at:

https://help.ubuntu.com/community/Upgrades

Note that is NOT patched against Meltdown and Spectre vulnerabilities due to the End of Life timing. Users are advised to upgrade to Ubuntu 17.10 and install the updated kernel packages.

Development of a complete response to the highly-publicized Meltdown and Spectre vulnerabilities is ongoing, and due to the timing with respect to this End of Life, we will not be providing updated Linux kernel packages for Ubuntu 17.04. We advise users to upgrade to Ubuntu 17.10 and install the updated kernel packages for that release when they become available.

Read the announcement for more details.

Ubuntu 17.10

Ubuntu 17.10 Artful Aardvark will be released soon today. Here’s how you can upgrade from the Ubuntu 17.04 desktop.

Ubuntu 17.10 replaces Unity with Gnome Shell as its default desktop environment. It’s powered by 4.13 Kernel and runs Gnome on Wayland by default. Xorg is also available for choice.

A fresh install of Ubuntu 17.10 is recommended. But for those who want to upgrade from Ubuntu 17.04, do:

1. First is always backup your important data, bookmarks, and other user documents.

2. Launch Software & Updates utility from application launcher,

  • in first tab, choose “Download from” Main server
  • in Other Software tab, remove/disable all third-party repositories.
  • in Additional Drivers tab, choose an open-source driver if a proprietary one is in use.

3. Remove other desktop environments (KDE, Cinnamon, etc). Upgrading desktop packages may take a few more minutes in the upgrading process.

4. Make you system up-to-date by running command in terminal (Ctrl+Alt+T):

sudo apt update && sudo apt upgrade

5. Finally launch Software Updater to get the upgrade option. Or run following command (-d is required before it’s officially announced):

sudo update-manager -d

Click the Upgrade button and confirm in the next release note dialog to start the upgrading wizard.

Note: while the upgrading process, you need a few clicks to confirm installing or removing some packages.

It’s 2023 now! Ubuntu is still lacking the option to create new documents in the default Nautilus file manager. Though, the GNOME developer team is working on this function.

It’s easy to enable the option in Nautilus context menu. As it prompts in Templates folder, simply create an empty document in Templates, the file name will be displayed as sub-menu option of ‘New Document’ menu.

Meaning all you need to do is create an empty file and save it under user’s “Template” folder.

Method 1: Use Text editor

First, press Super (the Windows logo) key on keyboard to open ‘Activities’ overview. Then search for and open text editor.

When the text editor opens, you don’t have to input anything. Just press Ctrl+Shift+S to open the “save as” dialog:

  • Type filename, which will display as sub-menu option for ‘New Documents’ menu.
  • Choose location – Templates folder.
  • Finally, click Save.

Method 2: Run a single command

For those familiar with Linux command, this can also be done by running a single command.

Firstly, press Ctrl+Alt+T on keyboard to open a terminal window. When it opens, run command:

touch ~/Templates/Untitled\ Document

This command creates an empty file called ‘Untitled Document‘ in the Templates folder.

Tip: the backslash in the code tells that the space following it is part of the filename since the shell treats whatever comes after a space as a separate argument.

Finally, right-click on blank area in your file manager and see the magic!

Ubuntu 17.04

The final release of Ubuntu 17.04 Zesty Zapus was available for download earlier today on April 13.

After installing the new fresh Ubuntu Desktop, you may have some top things to do before it’s ready to use. And here are some of what I did.

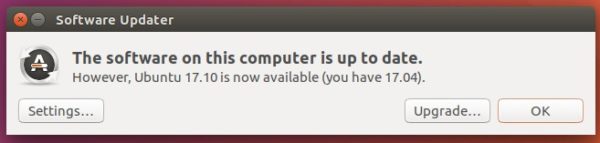
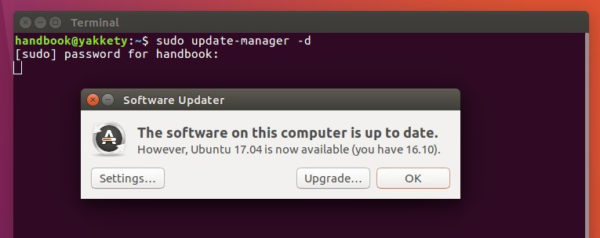
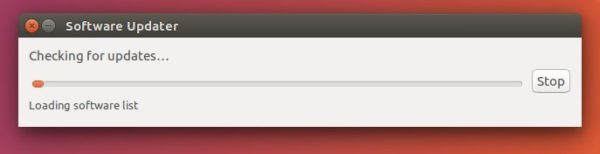
1. Check for updates

First of first, check for updates via Software Updater and install kernel patches, security updates, and other system updates.

check updates

2. Install Media Codecs

Due to legal reasons, Ubuntu does not include some media codecs to play video and audio files via the default Totem media player and Rhythmbox music player.

Besides installing VLC, mplayer, MPV, or other media player that come with built-in codecs, you can manually install the multimedia codecs via command (open terminal via Ctrl+Alt+T):

sudo apt install ubuntu-restricted-extras

3. Enable DVD Playback

The previous codecs will enable playing normal DVDs. To play encrypted DVDs via VLC, run command to automatically download and install libdvdcss2 library:

sudo apt install libdvd-pkg && sudo dpkg-reconfigure libdvd-pkg

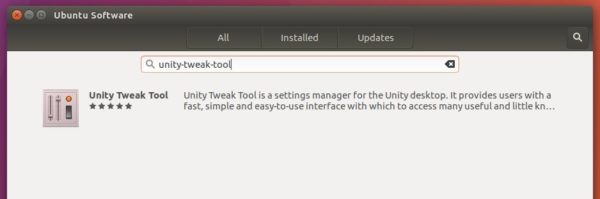
4. Install Unity Tweak Tool.

Unity Tweak Tool is the best and easy to use Unity Desktop configuration tool. It’s one of the must install applications available in Ubuntu Software App.

5. Some Unity Desktop Tweaks

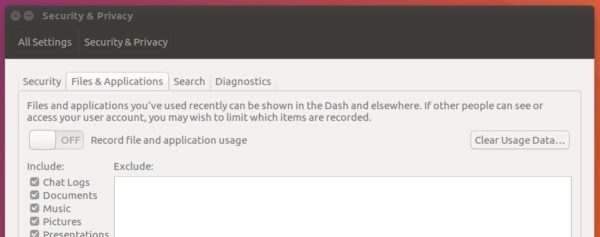
  • Disable recording file and application usage.

    Go to System Settings -> Security & Privacy. At Files & Applications tab, switch off the option to record file and application usage, which will be available in the search dash.

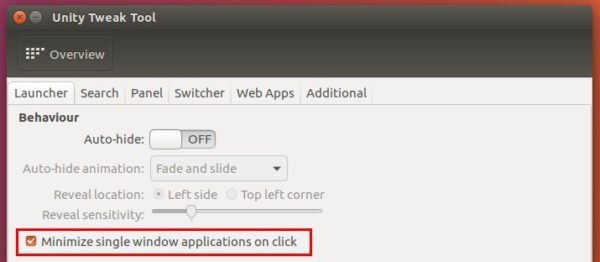
  • Minimize Application when click on its icon in the Left launcher.

    Go to Unity Tweak Tool -> Launcher, check the box says “Minimize single window applications on click”

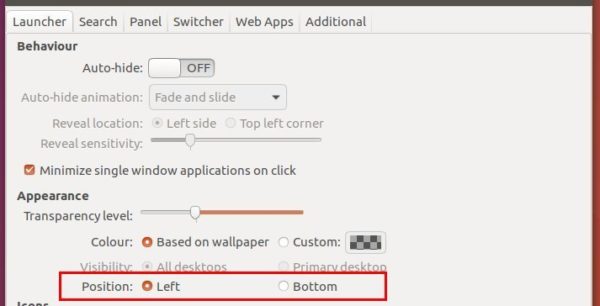
  • Move the Left Launcher to Bottom.

    Since Ubuntu 16.10, the Unity launcher can be moved from Left to Bottom. Also do this in Unity Tweak Tool -> Launcher:

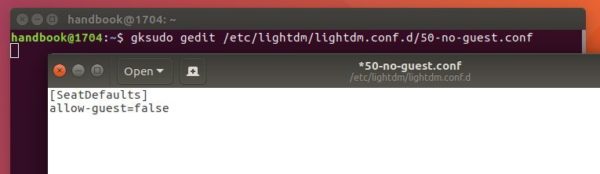
6. Disable Guest Session from Login Screen

For my personal computer, I don’t need the Guest account. Simply remove it via command (open terminal via Ctrl+Alt+T):

sudo apt install gksu && gksudo gedit /etc/lightdm/lightdm.conf.d/50-no-guest.conf

Paste following lines when the command opens an empty file and save it. Restart to apply changes.

[SeatDefaults]
allow-guest=false

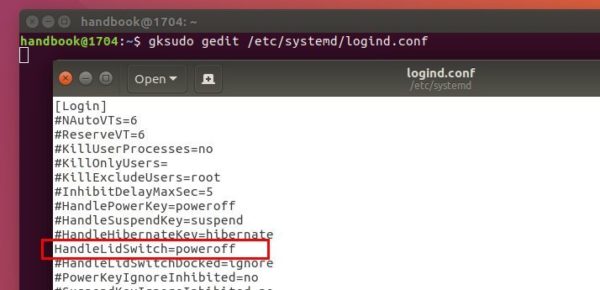
7. Auto power off when laptop lid is closed

There’s only “Suspend” and “Do nothing” options for laptop close actions. I’m always want to shutdown Ubuntu when I close the lid, so I edited the logind.conf file via command:

sudo apt install gksu && gksudo gedit /etc/systemd/logind.conf

Uncomment the line #HandleLidSwitch=suspend and change it to HandleLidSwitch=poweroff.

Tip: you can also change the value to HandleLidSwitch=hibernate to hibernate Ubuntu when lid is closed.

Restart or run command to apply the change:

systemctl restart systemd-logind.service

8. Install some useful applications:

  • MPV media player, available in Ubuntu Software.
  • GIMP, An advanced image editor, available in Ubuntu Software
  • Corebird, and GTK3 twitter client.
  • Shutter – Screenshot & annotation tool
  • And more and more…

upgrade Ubuntu 17.04

This is a quick tip for Ubuntu 16.10 desktop users how to upgrade to Ubuntu 17.04 Zesty Zapus.

Before getting started, you need to do some preparations:

1. Always make a backup of important data, bookmarks, and other user documents.

2. Remove or disable third-party repositories.

Launch Software & Updates utility, navigate to Other Software tab, and remove /disable all third-party repositories.

3. Restore to open-source drivers.

Also in Software & Updates utility, Additional Drivers tab, switch to the open-source drivers if proprietary drivers are in use. (Need restore after applied changes)

4. And it’s better to choose download from ‘Main Server’ in Software & Updates utility.

5. Make your system up-to-date by running command in terminal:

May need to restart if you have not update your system for a long time.

6. (Optional) Useless packages and software libraries may take a few more minutes upgrading your system. For me, Ubuntu Kylin and Plasma Desktop libraries take quite a few minutes in the upgrading process.

After all, launch Update Manager via the command below and it will prompt that Ubuntu 17.04 is available after checking for updates:

sudo update-manager -d

Click the Upgrade and confirm in the next dialog, follow the wizard util done.