 The latest Long Lived Nvidia driver has reached 319.49, which added support for new GPUs and fix a few bugs. Here’s how to install or upgrade it in Ubuntu 13.04, Ubuntu 12.10, Ubuntu 12.04.
What’s new in Nvidia 319.49:
Added support for the following GPUs: GeForce GT 740A, GeForce GT 745A, GeForce GT 755M, GeForce GT 625, GeForce GTX 645, GRID K340, GRID K350, NVS 315, Quadro K500M
Fixed a bug that caused DisplayPort monitors connected to Quadro FX 3800, 4800, or 5800 to remain off after DPMS.
Added the NVIDIA OpenGL-based Inband Frame Readback (NvIFROpenGL) library to the Linux driver package. This library provides a high performance, low latency interface to capture and optionally encode an individual OpenGL framebuffer. NvIFROpenGL captures pixels rendered by OpenGL only and is ideally suited to application capture and remoting.
Fixed a bug that caused applications using CUDA-GL interop to crash when run on X servers with Xinerama enabled.
Fixed a bug that could prevent some double-bit ECC errors from being properly reported.
Fixed a bug which could cause a blank screen when changing house sync settings on Quadro Kepler GPUs with Quadro Sync boards.
Fixed a bug that prevented nested loops with identical loop conditions in GLSL shaders from terminating correctly. This could cause hangs in applications such as Exa PowerVIZ.
Fixed a bug that resulted in corrupt texels when a previously empty texture image was specified with glXBindTexImageEXT. In GNOME 3, this caused gnome-screenshot to produce garbled window screenshots.
Fixed a bug that caused the X server to crash when querying the current mode of disabled displays.
Download & Install Nvidia Driver:
NOTE 1: At the moment when you’re reading this tutorial, you may check out the latest version of Nvidia driver for Linux at this page.
NOTE 2: Below installation guide works for all Nvidia Linux Drivers (.run file) downloaded from the Official Website.
1.) Download the driver:
Download Nvidia 319.49 for Linux 32-bit
Download Nvidia 319.49 for Linux 64-bit
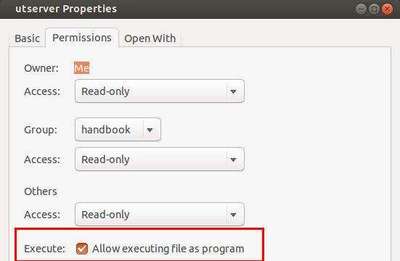
2.) Open file browser and navigate to the downloaded package. Right-click on it and go to its Properties window. In Permissions tab, check the box where is says “allow executing file as program”
3.) Now, you need to switch to command console by pressing Ctrl+Alt+F1. Log in with your username and password. When login, stop the graphic session by running below command.
sudo stop lightdm
4.) Finally, start the installer and follow the on screen prompts. Change the filename to yours if you’re going to install another version.
sudo sh ~/Downloads/NVIDIA-Linux-*-319.49.run
When done, restart your computer by sudo reboot command.
If for some reason the new drivers do not work properly, re-do step 3.) and followed by below command to unintall the Nvidia Driver:
sudo ~/Downloads/NVIDIA-Linux-*-319.49.run --uninstall
Enjoy!
Enable this blog? Please spread the world :)


Thank You
6 attempts to install later and no luck. nvidia module is already loaded apparantly even though I killed it.
Why exactly do I have to mess around with this stuff when in Windows, I would’ve been done by now?
Any chance you could let the noobs know how to patch this driver?
Thanks. I installed the 319.49 driver on two different systems using the instructions above. The first install started with Ubantu using the Nouveau drivers, as the new driver installs it writes a script into /etc/modprobe.d to black list the Nouveau driver and has you reboot and restart the 319.49 install. All works from that point on.
The other system did not proceed as smoothly. This system was already using NVIDIA proprietary driver 3.13. The install proceeds smoothly but Ubuntu wouldn’t start correctly, halting at a blinking cursor. Using an alternate boot option as Grub comes up, I am dual booting win7/ubuntu, I was able to uninstall the NVIDIA 319.49 driver but this left the system without GUI. Rather than spend x hours fixing it at this point I simply re-installed Ubuntu as it was a new install and repeated the steps on the first system and all worked like a charm.
Bottom line, start your install without having another version of the proprietary Nvidia driver installed. Of course the question remains, the uninstall didn’t leave me with a working system and therefore what to do when the latest driver is updated?