Archives For November 30, 1999

Ubuntu 12.04 LTS Has Reached the End of Life

Last updated: April 29, 2017

Ubuntu 12.04

Ubuntu 12.04 Precise Pangolin LTS (Long-Support Term) reached the end of its life yesterday on April 28 2017.

The news team announced on the Ubuntu Fridge a month ago:

Ubuntu announced its 12.04 (Precise Pangolin) release almost 5 years ago, on April 26, 2012. As with the earlier LTS releases, Ubuntu committed to ongoing security and critical fixes for a period of 5 years. The support period is now nearing its end and Ubuntu 12.04 will reach end of life on Friday, April 28th. At that time, Ubuntu Security Notices will no longer include information or updated packages for Ubuntu 12.04.

If you want to upgrade your Ubuntu 12.04 LTS installation, you may first upgrade to Ubuntu 14.04 LTS, supported until April 2019, and then to Ubuntu 16.04 LTS, supported supported until April 2021.

For users who can’t upgrade immediately, Canonical has announced an extended support package for Ubuntu Advantage customers:

Following the end-of-life of Ubuntu 12.04 LTS, Canonical is offering Ubuntu 12.04 ESM (Extended Security Maintenance), which provides important security fixes for the kernel and the most essential user space packages in Ubuntu 12.04. These updates are delivered in a secure, private archive exclusively available to Ubuntu Advantage customers.

All Ubuntu 12.04 LTS users are encouraged to upgrade to Ubuntu 14.04 LTS or Ubuntu 16.04 LTS. But for those who cannot upgrade immediately, Ubuntu 12.04 ESM updates will help ensure the on-going security and integrity of Ubuntu 12.04 systems.

Users interested in Ubuntu 12.04 ESM updates can purchase Ubuntu Advantage at http://buy.ubuntu.com/

Tomahawk Music Player

The PPA repository for Tomahawk Music Player finally made the latest 0.8.x release available for Ubuntu 12.04 Precise. Now the PPA provides the latest packages for Ubuntu 14.10, Ubuntu 14.04, Ubuntu 12.04 and derivatives.

For those who have never heard of Tomahawk, it is a music player that not only plays your local collection, but also streams from SoundCloud, Beats, Spotify, Google Play Music, YouTube and many more. You can even connect Tomahawk with your friends via Jabber / GTalk and share your playlists and collections.

Tomahawk Music Player 0.8 in Ubuntu

Tomahawk 0.8 was released a month ago with redesigned UI and new music services support and various fixes. Here’s the release highlights:

  • New UI and Icons
  • Drag and drop support for iTunes, Deezer, Beats Music, Rdio, Spotify, SoundCloud links (into Tomahawk) for playlists/tracks/artists/album links.
  • Added Google Play Music and Beats Music support.
  • Now Playing notifications
  • Support rtmp:// streams.
  • Add support for Opus codec (requires TagLib 1.9). Ubuntu 12.04 is not supported because it’s built with Taglib 1.8

For more details, see the github page.

Install Latest Tomahawk in Ubuntu:

First open terminal from the Dash or by pressing Ctrl+Alt+T on keyboard. When it opens, run the command below to add Tomahawk PPA:

sudo add-apt-repository ppa:tomahawk/ppa

Tomahawk PPA

Type in your password when it asks and hit Enter to continue.

After that, you can upgrade your music player through Software Updater after checking for updates. Or install it by running below commands one by one:

sudo apt-get update

sudo apt-get install tomahawk

That’s it. Enjoy!

Tor Browser Ubuntu

Tor Browser 4.0 has been released recently with important security updates to Firefox and SSLv3 disabled due to the POODLE attack.

The first release of the 4.0 series is available from the Tor Browser Project page and also from our distribution directory.

This release features important security updates to Firefox. Additionally, due to the POODLE attack, we have also disabled SSLv3 in this release.

The primary user-facing change since the 3.6 series is the transition to Firefox 31-ESR.

More importantly for censored users who were using 3.6, the 4.0 series also features the addition of three versions of the meek pluggable transport.

via the official announcement

Tor Browser 4.0 in ubuntu

Thanks to Web Upd8 Team, the binary packages have been made into PPA, available for Ubuntu 14.10, Ubuntu 14.04, Ubuntu 12.04 and their derivatives.

To install Tor Browser, press Ctrl+Alt+T to open terminal. When it opens, run the commands below one by one:

sudo add-apt-repository -y ppa:webupd8team/tor-browser 

sudo apt-get update

sudo apt-get install tor-browser

If you don’t want to add the PPA, grab the .deb installer directly from the Launchpad page.

Install Tor Browser from PPA

Once installed, open Tor Browser from Unity Dash or menu and enjoy!

Latest 0 A.D. in Ubuntu

0 A.D. Alpha 17 Quercus, an open-source game of ancient warfare, has been released recently. Here’s how to install it from the official PPA and receive future updates.

0 A.D. is a free, open-source, cross-platform real-time strategy game under development by Wildfire Games. It is a historical war and economy game focusing on the years between 500 B.C. and A.D. 500. The game aims to be entirely free and open-source, using the GPL 2+ license for the game engine and the CC-BY-SA for the game art.

0 A.D. Alpha 17 Quercus features a major gameplay rebalance, units on walls, trigger support, improved mod support and more!

For the detailed changes, see the official release note.

How to Install & Upgrade 0 A.D. in Ubuntu:

An official Ubuntu PPA has been created for Ubuntu 14.10, Ubuntu 14.04, Ubuntu 12.04, Linux Mint 13, and Linux Mint 17.

To add the PPA and install 0 A.D., press Ctrl+Alt+T to open terminal and run below commands one by one:

sudo add-apt-repository -y ppa:wfg/0ad

sudo apt-get update

sudo apt-get install 0ad

Install 0 A.D. from PPA

After that, you can receive future updates by running regular updates via Software Updater utility.

Install Quassel irc client ubuntu

This quick tutorial shows you how to install the latest release of Quassel IRC client in Ubuntu 14.10, Ubuntu 14.04, Ubuntu 12.04 and derivatives via PPA.

Quassel is a modern, cross-platform, distributed KDE / Qt IRC client. One (or multiple) client(s) can attach to and detach from a central core. It’s much like the popular combination of screen and a text-based IRC client such as WeeChat, but graphical.

Quassel Irc Client

While Ubuntu 14.04 Software Center provides Quassel 0.10, the latest release has recently reached 0.11. See what’s new:

changes in v0.10.1:

  • Fix buffer hotlist sorting

  • Split CTCP messages if they’re too long

  • Make database problems more obvious

  • Fix backlog loading for QuasselDroid

  • Properly save the toolbar state on Mac OSX

  • Fix a crash with KDE’s network detection

  • Various other fixes

changes in v0.11.0:

  • New build requirements: C++11 capable compiler (gcc 4.7+, clang 3.3+, MSVC 2013+), cmake 2.8.9+

  • Full support for Qt 5.2+ in addition to Qt 4.6+

  • Completely revamp the build system, making use of “new” CMake features

Install Quassel IRC Clien via PPA:

Thanks to Michael Marley, a PPA repository has been created with the latest stable builds of Quassel packages for Ubuntu 14.10, Ubuntu 14.04, Ubuntu 12.04 and derivatives.

1. Press Ctrl+Alt+T on keyboard to open terminal. When it opens, run the command below to add the PPA:

sudo add-apt-repository ppa:mamarley/quassel

Type in your user password when it asks. Note that there is no visual feed back when you’re typing a password.

2. Then update and install the client:

For KDE build, run:

sudo apt-get update; sudo apt-get install quassel

For Qt build, run:

sudo apt-get update; sudo apt-get install quassel-qt4

Install Quassel IRC Client

Once installed, open the irc client from Unity dash or application menu and you can receive future updates by running regular update via Software Updater.

Nvidia 343.22 ubuntu 14.04

Nvidia has just announced a new version of graphics driver 343.22 for Linux with new GPUs support and various fixes.

According to the release highlights, Nvidia 343.22 added support for GeForce GTX 970 and GTX 980, removed support for G8x, G9x, and GT2xx GPUs, and motherboard chipsets based on them. Ongoing support for new Linux kernels and X servers, as well as fixes for critical bugs, will be included in 340.* legacy releases through the end of 2019.

The new drive contains various fixes and/or new features:

  • Fixed a bug that prevented the “sync to vblank” setting from being honored for EGL applications.
  • Fixed a bug that could cause some OpenGL programs to encounter out of memory during a mode switch.
  • Fixed a bug that prevented the NVIDIA OpenGL driver from honoring the __GL_SHADER_DISK_CACHE_PATH environment variable.
  • Fixed a bug that caused disabled displays to be implicitly included in the target selection for some queries and assignments on the nvidia-settings command line interface, in the absence of any explicit target selection.
  • Added a new attribute to the NV-CONTROL API to query the current utilization of the video decode engine.
  • Fixed a bug where the Exchange Stereo Eyes setting in nvidia-settings didn’t work in certain stereo configurations.
  • Worked around a Unigine Heaven 3.0 shader bug which could cause corruption when tessellation is enabled by implementing an application profile that uses the “GLIgnoreGLSLExtReqs” setting.  See the documentation for the __GL_IGNORE_GLSL_EXT_REQS environment variable for more details.
  • Fixed a memory leak when destroying EGL surfaces.
  • Added support for multiple simultaneous EGL displays.
  • Fixed a bug that could cause nvidia-installer to unsuccessfully attempt to delete the directory containing precompiled kernel module interfaces, on packages prepared with –add-this-kernel.
  • Updated nvidia-installer to log uninstallation to a separate file from the installation log, and to attempt uninstalling previous driver installations using the installer program from the previous installation, when available.

Install or Upgrade to Nvidia 343.22 in Ubuntu:

NOTE: Ubuntu provides “nvidia-current” driver, available in Software Center, which may interact better with your distribution’s framework, and you may want to use this rather than NVIDIA’s official package.

There are two ways installing this driver in your Ubuntu system, using the official .run installer or a third-party PPA repository.

To install Nvidia 343.22 via official installer:

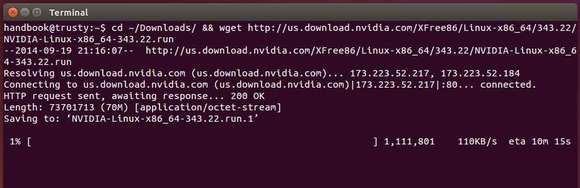
1. Press Ctrl+Alt+T to open terminal, run command below to download the driver:

For 32-bit system, run:

cd ~/Downloads/ && wget http://us.download.nvidia.com/XFree86/Linux-x86/343.22/NVIDIA-Linux-x86-343.22.run

For 64-bit system, run:

cd ~/Downloads/ && wget http://us.download.nvidia.com/XFree86/Linux-x86_64/343.22/NVIDIA-Linux-x86_64-343.22.run

download-nvidia

2. , run command to remove the previous driver and install latest update-dev package:

sudo apt-get purge nvidia*; sudo apt-get install nvidia-331-updates-dev

When done, restart your computer.

3. When back, press Ctrl+Alt+F1 (or F2~F6) to switch to command console and log in with your user name and password.
There will no visual feedback when typing a password, just type in mind and hit enter.

4. When you’re logged into command console, stop the graphics session by running the command below:

sudo service lightdm stop

For Ubuntu Gnome edition and Linux Mint, you may replace ligthdm with gdm or mdm

5. After the graphics session closed, you can now starts the official Nvidia installer, by running below commands:

chmod +x ~/Downloads/NVIDIA-Linux-*-343.22.run && sudo sh ~/Downloads/NVIDIA-Linux-*-343.22.run

Follow the onscreen prompt and done!

6. (Optional) To uninstall this driver, run below command in console:

sudo sh ~/Downloads/NVIDIA-Linux-*-343.22.run --uninstall

To install the driver from PPA repository (easier way):

First check out the PPA page to see if the packages are ready: xorg-edgers PPA. Check out the package version of “nvidia-graphics-drivers-343”.

Once the driver is made into the PPA, you can run below commands one by one to install it in Ubuntu 14.04 or Ubuntu 14.10:

sudo add-apt-repository ppa:xorg-edgers/ppa

sudo apt-get update

sudo apt-get install nvidia-343

That’s it. Enjoy!

QuiteRSS newspaper view

QuiteRSS news reader now is at version 0.17.0. The new release allows to browse feeds in newspaper layout.

QuiteRSS is a free and open source RSS/Atom feed reader available for Windows, Mac OS X, and Linux. It aims to be quite fast and comfortable to user, and features embedded browser (Webkit core), Unity indicator, adblock, click to flash, and more.

QuiteRSS in Newspaper mode

According to the release note, since QuiteRSS 0.17.0 it allows to switch between the classic and newspaper layout mode through menu View -> Layout.

QuiteRSS switch layout

It has been found that the newspaper mode has an issue on news deletion. The developer commented that it will be fixed in next release.

Besides the newspaper mode, this release contains:

  • Added: Socks5 proxy support
  • Changed: News opening in external browser
  • Fixed: Sorting by feed title in news list

Install / Upgrade QuiteRSS in Ubuntu:

The latest release has been made into the official PPA repository, available for Ubuntu 14.04, Ubuntu 12.04 and derivatives.

Press Ctrl+Alt+T on keyboard to open the terminal. When it opens, paste the commands below and run one by one will add the PPA and install the latest QuiteRSS packages:

sudo add-apt-repository ppa:quiterss/quiterss

sudo apt-get update

sudo apt-get install quiterss

install-quiterss-from-ppa

After added the PPA, you can receive future updates by running regular system updates via Software Updater.

Don’t want to add PPA? Grab the .deb directly from the Launchpad Page and install it via Software Center.

Mega Cloud Storage Sync Client for Ubuntu

MEGA, a cloud storage and file hosting service, now provides an official sync client for Linux Desktop. So far, Ubuntu 14.04, Ubuntu 12.04, Ubuntu 13.10, Ubuntu 12.10 and Nautilus integration are supported.

MEGA features that all files are encrypted client-side using the AES algorithm before they are uploaded. Since Mega does not know the encryption keys to uploaded files, they cannot decrypt and view the content. It provides 50 GB of storage space are available for free and up to 4 TB for paid accounts.

More about MEGA at wikipedia

Recently, MEGA has provided an official sync client for Linux desktops, available for Debian, Fedora, openSUSE, and Ubuntu.

The new client for Ubuntu, MEGAsync features:

  • an Unity indicator
  • Sync with MEGA folder in Nautilus browser with full drag & drop support
  • System notification support.
  • Select sync full or single folder of your MEGA account.
  • Select upload to MEGA via file folders’ context menu
MEGA client: Unity indicator & sync folder in Nautilus

MEGA client: Unity indicator & sync folder in Nautilus

MEGAsync status

MEGAsync status

Upload to MEGA via Context Menu

Upload to MEGA via Context Menu

Download & Install MEGA sync client:

First you may check out your OS type, 32-bit or 64-bit via System Settings -> Details.

Go to the official page via the link below:

Download MEGAsync

Navigate to Your OS edition -> OS Type: amd64 = 64-bit, i386 = 32-bit -> For Ubuntu download both .deb packages.

Select your OS type and click ‘Free Download for Linux’ and also MEGA Nautilus extension.

Finally double-click the package to open it with Ubuntu Software Center and click install, in below order:

  1. megasync_x.x.xx_amd64/i386.deb
  2. nautilus-megasync_x.x.xx_amd64/i386.deb

Once installed, open the client from Unity Dash. Follow the setup wizard to sign in or sign up and select sync full account or single folder.

mega sync client

That’s it. Enjoy!

Install Gnoduino IDE Ubuntu

This simple tutorial shows how to install Gnoduino IDE, implementation of well-known Arduino IDE for GNOME, in Ubuntu 14.04 & Ubuntu 12.04.

Why Gnoduino?

The original Arduino IDE is written in Java however, and that makes for poor integration on the Linux platform, particularly with Ubuntu Unity. Luckily enough someone has been busy to do a simple rewrite of the original IDE in Python and GTK, making a fully Linux native IDE, and it’s called Gnoduino. This implementation is targeted at GNOME and its purpose is to be light.

Gnoduino IDE

How to Install Gnoduino IDE in Ubuntu:

Besides building from source, the IDE is available in PPA for Ubuntu 14.04 and Ubuntu 12.04.

Press Ctrl+Alt+T on keyboard to open the terminal. When it opens, paste the command below and hit enter to run. Type in your password when prompt.

sudo add-apt-repository ppa:pmjdebruijn/gnoduino-release

This will add the Gnoduino PPA into your system.

Add Gnoduino IDE PPA

After that, run commands below to update package lists and install the IDE:

sudo apt-get update; sudo apt-get install gnoduino

Once installed, open it from menu or Unity dash and enjoy!

video-editor-icon

LiVES, a free video editing system and VJ tool, now is at version 2.2.6, which updates for gtk+ >= 3.10.0.

LiVES is designed to be simple to use, yet powerful. It is small in size, yet it has many advanced features.

  • cross-platforms.
  • Support multiple video formats via mplayer, mplayer2.
  • Extendable video and audio effects via plugins.
  • Support for remote control via OSC protocol.
  • Video capture from FireWire cameras and TV cards.
  • Lossless backup and crash recovery.

LiVES video editing system

The latest release 2.2.6 was released on Aug 16, with below changes:

  • Fix startup bug (regression) creating config file incorrectly.
  • Libav compatibility fixes.
  • Updates for gtk+ >= 3.10.0
  • Show warning when configured with gtk+ 3.10.x
  • Add support for freenect camera.
  • Minor code cleanups.

Install / Upgrade to LiVES 2.2.6 in Ubuntu:

For Ubuntu 14.04, Ubuntu 12.04 and their derivatives, press Ctrl+Alt+T on keyboard to open terminal. When it opens, run the commands below one by one to get this release from PPA:

sudo add-apt-repository ppa:ubuntuhandbook1/lives

sudo apt-get update

sudo apt-get install lives

(Optional) If for some reason you want to remove it, run below commands one by one:

sudo apt-get remove lives

sudo add-apt-repository -r ppa:ubuntuhandbook1/lives

sudo apt-get update

Above commands will remove LiVES as well as the PPA from your system and update the package lists.