


![]()
This quick tutorial will show you how to make your Ubuntu mount partitions automatically on start up.
1. Search and open Disks utility from Unity dash.
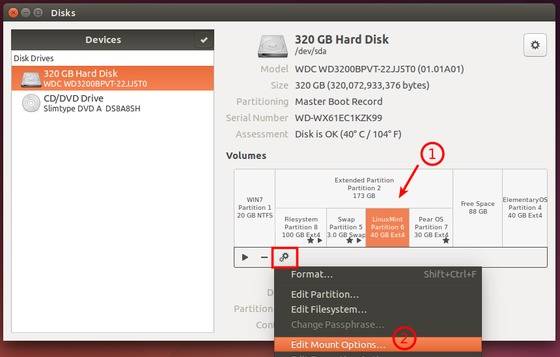
2. When it opens, choose the hard disk and highlight the partition your want to mount automatically. Then click the gear icon and select “Edit Mount Options…”
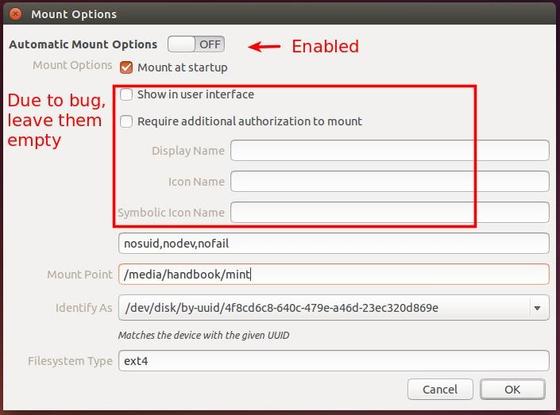
3. In next window do:
- Turn on “Automatic Mount Options”
- Due to bug, un-check “Show in user interface”. Also leave “Display Name, Icon Name, Symbolic Icon Name” empty.
- (Optional) Edit Mount Point, usually we can use “/mnt/xxx” or “/media/USER_NAME/xxx” or “/media/xxx”.
- Filesystem Type: find it in the above picture.
Re-do previous steps on other partitions and done!


Sir actually i am using a laptop having AMD processor and raedon graphics card .. i face a lot of problems with linux in my laptop like ubuntu dont even boot & and kali linux after installing heats the system alot!! Now what to do with my laptop?? So that i can use linux in it ??
Try manjaro, when it come to full AMD it’s the best combo i found
It’s only for Ubuntu but not Kubuntu.
Hello master Ji m
I would like to ask you something..
I already installed Ubuntu 14.04 for replacing windows xp(no dual boot option)
and there was have three partition such as C, D,E and certain for installation destination is C as default.
After finished installed, I can’t see my other partition (D and E). are they was destroy by Ubuntu 14.04 ?
how I can see again if nothing destroy this partition?
Thanks before
Other partitions should be listed in your File Browser window -> left pane -> under Devices.
If you don’t see them, install Gparted partition manager from Ubuntu Software Center, then check out your drive partitions.
I guess Ubuntu has deleted your other partitions and taken the whole drive :)
Hi there, thanks for your description … tried it, but it didnt work – unfortunately… this pops up instead: “Not authorized to perform operation (udisks-error-quark, 4)” … any suggestions, how to solve the problem? thanks in advance!!!
After following this thread everything was working fine but after few days (probably after some updates) that NTFS partition was not accessible. I don’t know why but it was rectified after undoing these changes. I’m using Ubuntu 14.04 in Sony Vaio VPCEH25EN.
Hi all,
Today i installed ubuntu14.04 in 1st partition(200GB), 2nd partition did through window10(700GB-GPT format), after installed ubuntu i needed to install package: gnome-disk-utility
i got my windows partition