


![]()
This simple tutorial shows you how to install the latest FileZilla Client in all versions of Ubuntu currently supported on the desktop. So far, they are Ubuntu 14.04, Ubuntu 13.10, Ubuntu 12.10, and Ubuntu 12.04.
The current FileZilla release is version 3.7.4. It comes with below new features and bug fixes:
- Added SOCKS4 support
- Added Corsican and Kabyle translations
- SFTP now supports the hmac-sha2-256 algorithm
- Additional bugfix for site-specific bookmarks
- Improve compatibility with servers sending directory listings in Polish language or in EBCDIC encoding
- Handle set user id bit when populating permissions dialog.
- MSW: Show local timestamps for old files using the correct daylight saving time (DST) offset.
- Fix loading of transfer queue if starting FileZilla while another instance is in the process of shutting down
- Fix interaction between site-specific bookmarks and multiple tabs
- Don’t resume uploads when there’s zero octets left to transfer
- Improve symbolic link detection when using MLSD
- If processing a queue with files queued on multiple servers and not storing passwords, the password was not always asked prior to switching servers
- Use the correct name element when importing sites
- MSW: Show actual Windows version in about dialog regardless of app-compat settings
Install FileZilla:
If you don’t like PPAs, you can always follow the steps below to install the latest FileZilla Client in Ubuntu.
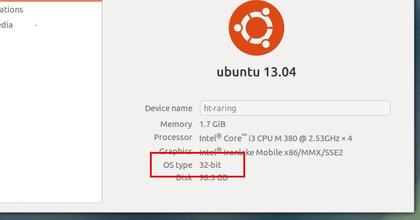
1. First go to System Settings -> Details and check out your OS type: 32 bit or 64 bit
2. Download FileZilla from the official download page.
- 32 bit system download the “FileZilla_x.x.x_i586-linux-gnu.tar.bz2”
- 64 bit system download the “FileZilla_x.x.x_x86_64-linux-gnu.tar.bz2”
3. Press Ctrl+Alt+T on your keyboard to open the terminal. When it opens, run the command below to extract FilaZilla to /opt/.
cd /opt/ && sudo tar jvxf FileZilla_*-linux-gnu.tar.bz2
In the code, you may replace the file name to yours!
4. Change the ownership of extracted folder:
cd /opt/ && sudo chown -R root:root FileZill*
5. Now, you’re able to launch FileZilla Client via the command below:
/opt/FileZill*/bin/filezilla
6. To create a launcher. Run the command below to edit the config file:
sudo gedit /usr/share/applications/filezilla.desktop
Copy and paste below lines into the file and save it.
[Desktop Entry]
Name=FileZilla
GenericName=FTP client
GenericName[de]=FTP-Client
GenericName[fr]=Client FTP
Comment=Download and upload files via FTP, FTPS and SFTP
Comment[de]=Dateien über FTP, FTPS und SFTP übertragen
Comment[fr]=Transférer des fichiers via FTP, FTPS et SFTP
Exec=/opt/FileZilla3/bin/filezilla
Terminal=false
Icon=filezilla
Type=Application
Categories=Network;FileTransfer;
Version=1.0
Change the FileZilla3 to the exact folder name and done.


Thanks for the easy to follow instructions, saved loads of time.