Archives For November 30, 2019

Open Surge, a fun 2D retro platformer inspired by Sonic games, available to install in Ubuntu Software easily via Snap package.

Open Surge is also a game creation system that lets you unleash your creativity! It’s free, open-source, and written from the ground up in C language, using the Allegro game programming library.

You can play the using a keyboard or a joystick.

  • Arrows: Move
  • Space: Jump
  • Enter: Pause
  • Esc: Quit
  • Left Ctrl: Switch character
  • Equals: Take snapshot
  • F12: Open the editor

And the game features:

  • A base game called Surge the Rabbit
  • A built-in level editor
  • Ready to use items, scripts, and more
  • Free to use game assets under Creative Commons licenses
  • See more in Github source page.

Install Open Surge in Ubuntu:

Open Surge has been made available as Snap package (runs in sandbox), Ubuntu 18.04 and higher users can easily install it from Ubuntu Software or App Center:

For choice, you may press Ctrl+Alt+T on keyboard to open terminal, run the command below instead to install the game package:

After installation, either search for and launch it from overview screen (or start menu depends on your desktop environment):

Or run snap run opensurge command to start game from terminal.

Uninstall Open Surge:

To uninstall the game, either use Ubuntu Software (App Center) or run command below in terminal:

snap remove --purge opensurge

Music Notation Software MuseScore 3.4 Released!

Last updated: January 25, 2020

Music notation software MuseScore 3.4 was released a day ago with new features, UX improvements, and dozens of bug fixes.

MuseScore 3.4 release highlights:

  • Single click to apply palette elements if there is a selection in the score
  • Allow dragging notes horizontally
  • Slurs, hairpins and other elements can be edited after single click
  • Add middle adjustment handle for beams, for moving whole beam vertically
  • Introduce section break properties, bend properties, tremolo bar properties in the Inspector
  • Allow access to several properties window in the Inspector
  • Name of the newly created custom palette can be specified
  • Accessibility: improve speech for elements with spanners

Download / Install MuseScore 3.4 in Ubuntu:

64-bit Appimage has been updated, available for download:

MuseScore Appimage

Right-click on the Appimage, then go to Properties -> Permissions, check the box ‘Allow executing file as program’. Finally run the Appimage to launch MuseScore 3.4 and enjoy!

MuseScore also available as Snap (runs in sandbox), which can be installed directly from Ubuntu Software, though it’s still v3.3.4 at the moment.

Also the flathub repository contains MuseScore flatpak package, check the package version in the page bottom

Kid3 audio tag editor released version 3.8.2 a few days ago. Here’s how to install it in Ubuntu 16.04, Ubuntu 18.04, and Ubuntu 19.10.

Kid3 3.8.2 is a small but important release for those who have a lot of M4A files. The release fixes a crash that happens when frames are removed from M4A files. Additionally it brings new Catalan, Portuguese and Ukrainian translations.

How to Install Kid3 3.8.2 in Ubuntu:

The official Kid3 PPA has built the packages for Ubuntu 16.04, Ubuntu 18.04, and, Ubuntu 19.10.

1. Open terminal either from application launcher or by pressing Ctrl+Alt+T on keyboard. When it opens, run command to add the PPA:

sudo add-apt-repository ppa:ufleisch/kid3

Type user password (no asterisk feedback) when it prompts and hit Enter to continue.

2. If an old version was installed, upgrade Kid3 using Software Updater:

upgrade kid3 via software updater

or run commands one by one in terminal to install or upgrade to the latest tag editor:

sudo apt update

sudo apt install kid3-qt

You may replace kid3-qt with kid3 in the code for KDE integration, or with kid3-cli for the command-line interface

Uninstall

To remove the PPA repository, either open Software & Updates -> Other Software tab, or run command:

sudo add-apt-repository --remove ppa:ufleisch/kid3

To remove the audio tag editor, either use your system package manager or run command:

sudo apt remove --auto-remove kid3 kid3-*

Wine Stable

Wine 5.0 stable was released 2 days ago with a large number of improvements. Here’s how to install it in Ubuntu 18.04, Ubuntu 19.10 (fix dependenices).

Wine 5.0 is dedicated to the memory of Józef Kucia, who passed away in August 2019 at the young age of 30. Józef was a major contributor to Wine’s Direct3D implementation, and the lead developer of the vkd3d project. His skills and his kindness are sorely missed by all of us.

UPDATE 2024: THIS TUTORIAL IS OUTDATED! Please see this new one instead of current Ubuntu releases!

Wine 5.0 features:

  • Builtin modules in PE format.
  • Multi-monitor support.
  • XAudio2 reimplementation.
  • Vulkan 1.1 support.

How to Install Wine 5.0 in Ubuntu:

The official wine apt repository has made the packages for Ubuntu 16.04, Ubuntu 18.04, Ubuntu 19.04, and Ubuntu 19.10.

To get out of WINE DEPENDENCY HELL:

I’ve successfully installed Wine 5.0 in Ubuntu 19.10 via following steps without any dependency issue.

Ubuntu 18.04 however run into unmet dependencies issue even after purging graphics drivers PPA, kisak-mesa PPA, etc. And sudo aptitude install wine-stable command output hundreds of package conflicts with no workaround.

THANKS to lutris, I’ve finally got out of the Wine Dependency hell in Ubuntu 18.04 by running command:

sudo apt-get install libgnutls30:i386 libldap-2.4-2:i386 libgpg-error0:i386 libxml2:i386 libasound2-plugins:i386 libsdl2-2.0-0:i386 libfreetype6:i386 libdbus-1-3:i386 libsqlite3-0:i386

Open terminal either by pressing Ctrl+Alt+T on keyboard, or by searching for ‘terminal’ from application menu. When it opens, run following commands one by one.

1.) Run command to enable 32 bit architecture:

sudo dpkg --add-architecture i386

Type user password (no asterisk feedback) when it prompts and hit Enter to continue.

2.) Download and install the repository key via command:

wget -nc https://dl.winehq.org/wine-builds/winehq.key; sudo apt-key add winehq.key

3.) Add wine repository via command (for Ubuntu 19.10):

sudo apt-add-repository 'deb https://dl.winehq.org/wine-builds/ubuntu/ eoan main'

NOTE: You may replace eoan in the code with:

  • bionic for Ubuntu 18.04 and Linux Mint 19.x
  • xenial for Ubuntu 16.04 and Linux Mint 18.x

4.) Add PPA for the required libfaudio0 library:

For Ubuntu 18.04, Linux Mint 19.x, and Ubuntu 19.04 only, as higher Ubuntu releases already have libfaudio0 in the main repositories.

sudo add-apt-repository ppa:cybermax-dexter/sdl2-backport

5.) Finally install Wine 5.0 stable via command:

sudo apt update && sudo apt install --install-recommends winehq-stable

(Optional) After successfully installed Wine 5.0, you may remove the PPAs by launching Software & Updates utility and navigating to Other Software tab.

KeePass2 2.44 Released with True Key 4 CSV Import

Last updated: January 10, 2021

KeePass2

KeePass 2.44 was released a days ago as the latest stable mono password manager. Users of any previous 2.x version are recommended to upgrade.

KeePass Password Safe was a Windows only password manager. Through the use of Mono, KeePass 2.x works on Linux and Mac OS.

KeePass 2.44 comes with many new features including:

  • New commands to find database files
  • New ‘Edit’ menu in the internal text editor
  • Support for importing True Key 4 CSV files.
  • Add an auto-type event for plugins.
  • New command line options for adding/removing scheme-specific URL overrides.

There are also improvements to the internal text editor, HTML export and printing, and XSL files. See the release note for more details.

How to Install KeePass 2.44 in Ubuntu:

The Julian Taylor’s PP maintains KeePass2 packages for Ubuntu 14.04, Ubuntu 16.04, Ubuntu 18.04, Ubuntu 19.04, and Ubuntu 19.10, and the 2.44 packages will be available in a few days.

1. Open terminal either via Ctrl+Alt+T or by searching for “Terminal” from app launcher. When it opens, run command to add the PPA:

sudo add-apt-repository ppa:ubuntuhandbook1/keepass2

Type user password (no visual feedback due to security reason) when it asks and hit Enter.

2. Then upgrade KeePass password safe via Software Updater if you have a previous version installed:

upgrade KeePass2

Or run commands to install / upgrade the software:

sudo apt-get update && sudo apt-get install keepass2

Uninstall:

The PPA repository can be removed via Software & Updates utility under Other Software tab. To remove KeePass password safe, simply run command:

sudo apt-get remove --autoremove keepass2

KeePassX 2 YubiKey support

KeePassXC password manager 2.5.3 was released today with stability improvements and new feature: browser extension for Chromium-based Edge browser.

KeePassXC 2.5.3 changelog:

  • Fix possible database lockout when removing a YubiKey from a KDBX 3.1 database
  • Fix crash if Auto-Type is performed on a new entry
  • Fix crash when all entries are deleted from a group
  • Improve the reliability of clipboard clearing on Gnome
  • Do not check cmd:// URLs for valid URL syntax anymore
  • Prevent unnecessary merges for databases on network shares
  • Browser: Prevent native messaging proxy from blocking application shutdown
  • Browser: Improve website URL matching

How to Install KeePassXC 2.5.3 in Ubuntu:

For Ubuntu 18.04 and higher, KeePassXC Snap package (runs in sandbox) can be easily installed via Ubuntu Software.

For those prefer native Ubuntu .deb package, open terminal from application menu or press Ctrl+Alt+T on keyboard, and run following commands one by one:

1.) Run command to add the official PPA, which so far supports for Ubuntu 16.04, Ubuntu 18.04, Ubuntu 19.04, and Ubuntu 19.10.

sudo add-apt-repository ppa:phoerious/keepassxc

Type user password (no asterisk feedback due to security reason) when it prompts and hit Enter to continue.

2. Then upgrade KeePassXC from previous release via Software Updater:

or run commands one by one in terminal to install the password manager:

sudo apt update

sudo apt install keepassxc

Uninstall:

To remove the PPA, open Software & Updates and navigate to Other Software tab.

To remove KeePassXC .deb package, run command in terminal:

sudo apt-get remove --autoremove keepassxc

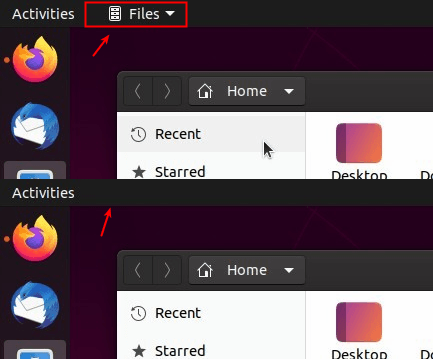
GNOME, the default desktop, shows focused app menu in the top bar next to the upper left Activities button.

Users may use the menu to open or switch between windows of the same app, launch preferences dialog, or close the app window. The design is great, but some may not use the menu and find it useless.

So here’s how to disable this feature in all current Ubuntu releases, e.g., Ubuntu 18.04, Ubuntu 20.04 and Ubuntu 22.04, that running the default GNOME desktop.

UPDATE: In Ubuntu 24.04, there’s no longer app menu in top-bar, due to GNOME feature change.

Disable Top bar App menu in Ubuntu 18.04:

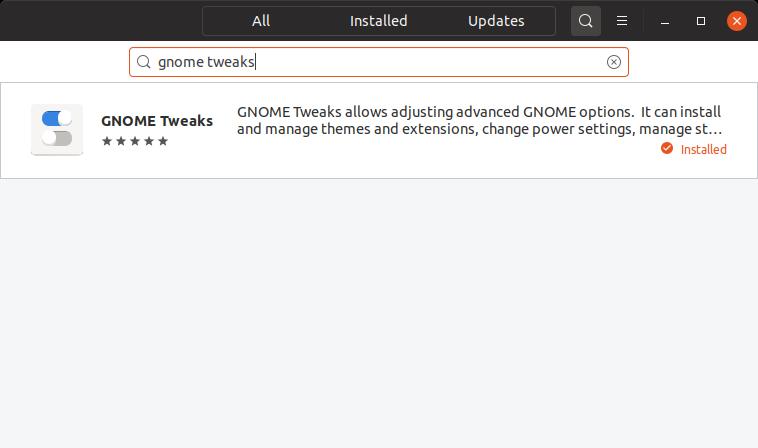
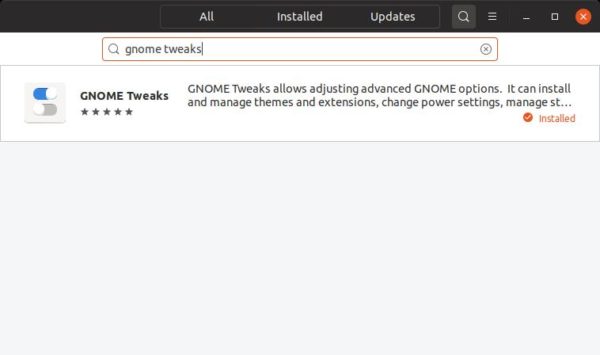
For Ubuntu 18.04, it’s easy to get rid of the menu since the popular “GNOME Tweaks” tool has an option to toggle it.

1.) Firstly, search for and install Gnome Tweaks from Ubuntu Software if you don’t have it.

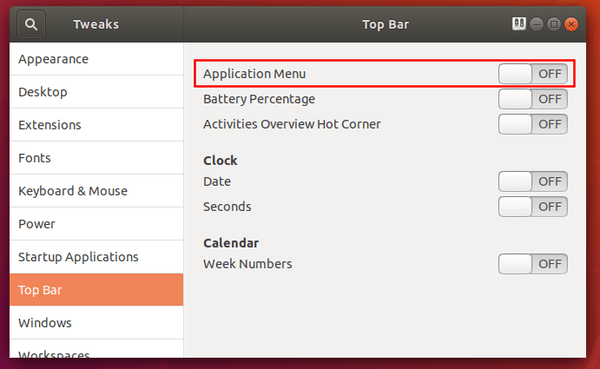
2.) Next launch the configuration tool by searching from the Activities overview screen. When it opens, navigate to “Top Bar” in the left pane, then you’ll see the option to turn on/off the App menu.

Remove Top bar App menu in Ubuntu 20.04 & 22.04:

For any reason, GNOME Tweaks removed the option to toggle the function in recent Ubuntu releases. However, there are quite a few GNOME extensions can do the job! And here’s the one that works on GNOME from version 3.36 to 44.

Which means Linux distributions include Debian 11/12, Ubuntu 20.04, Ubuntu 22.04, Fedora 37/38 can install the extension to remove the top bar app-menu.

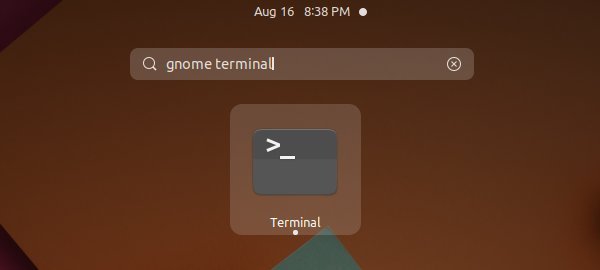
1.) Firstly open terminal either by pressing Ctrl+Alt+T on keyboard or by searching from the ‘Activities’ overview.

2.) When terminal opens, run command to install chrome-gnome-shell package if you don’t have it:

sudo apt install chrome-gnome-shell

The package makes it possible to install GNOME extension from ‘extensions.gnome.org’ via your web browser.

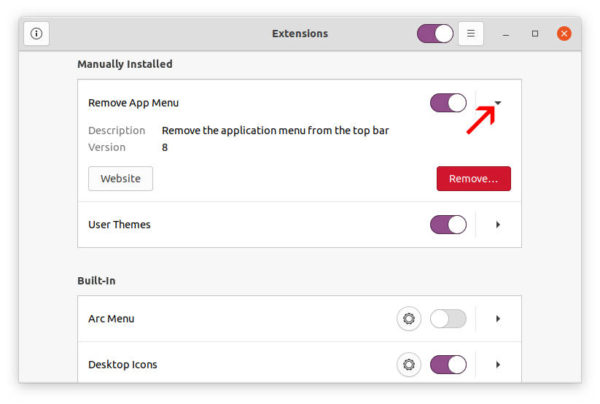
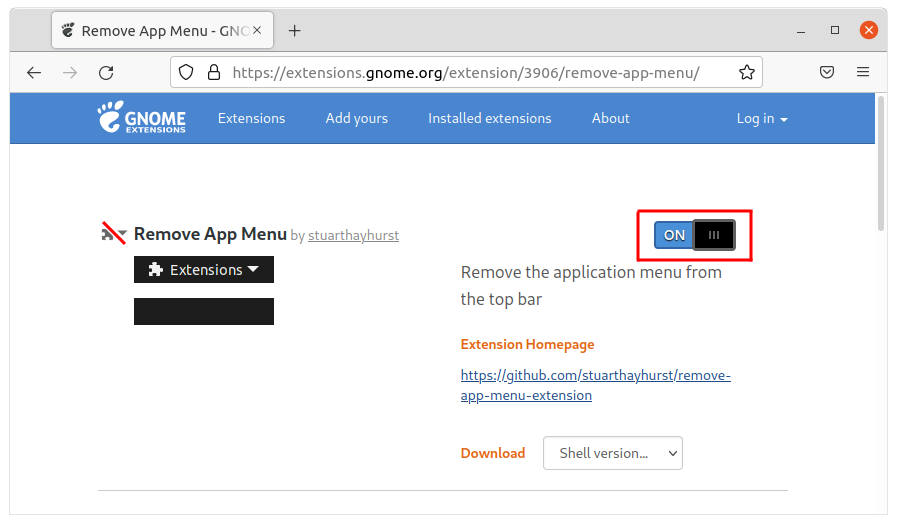
3.) Finally click the link button below to go to the ‘Remove App Menu’ extension page, and turn on the slider icon to install it.

Turn on the toggle icon to install Remove App Menu extension

Don’t worry if you don’t see the slider icon, install browser extension via ‘Click here to install the browser extension‘ link and REFRESH the web page will make it visible.

After installed the extension, the top bar app menu disappears immediately in my case. If not, try restart Gnome Shell (press Alt+F2, type r and hit Enter) or log out and back in.

Restore the App Menu

If you change your mind, simply go to the extension web page again and turn off the toggle icon will remove it.

Or, install the ‘Gnome Extensions‘ app by pressing Ctrl+Alt+T on keyboard and running command in pop-up terminal:

sudo apt install gnome-shell-extension-prefs

Then launch the tool and you’ll see the options to toggle all installed extensions. By clicking on the little triangle icon at the end of each line, you may also remove that extension.

The open-source LaTeX text editor TeXstudio 2.12.20 was released today as a new bug-fix release for the 2.12 series.

Most notably changes in TeXstudio 2.12.20 include fix bug when replacing highlighted search results, and add \text{} to amsmath.cwl.

How to Install TexStudio 2.12.20 in Ubuntu:

The official PPA has made the new release packages for Ubuntu 16.04, Ubuntu 18.04,
Ubuntu 19.10, Ubuntu 20.04, and their derivatives.

1. Open terminal either by pressing Ctrl+Alt+T on keyboard or by searching for ‘terminal’ from software launcher. When it opens, run command:

sudo add-apt-repository ppa:sunderme/texstudio

Type user password (no asterisk feedback) when it asks and hit Enter to add the PPA.

2. If an old version was installed in your system, remove the texstudio-doc, texstudio-l10n (if any) package before upgrading the software:

sudo apt-get remove texstudio-doc texstudio-l10n

3. After adding the PPA, you can either upgrade it via Software Updater:

or run commands in terminal to install or upgrade the software:

sudo apt-get update && sudo apt-get install texstudio

Uninstall:

To remove the LaTeX editor, run command in terminal:

sudo apt-get remove --autoremove texstudio

And go to Software & Updates -> Other Software to remove PPA repositories.

Cawbird DISCONTINUED since 2023! It does not longer work. See the archive in Github page.

Cawbird is a fork of the Corebird GTK twitter client that continues to work with Twitter on Linux.

Corebird became unsupported after Twitter disabled the streaming API. Cawbird takes up the job to work with the new APIs and includes a few fixes and modifications.

Cawbird 1.0.4 was released today as the latest version including following changes::

  • Reduce bespoke themeing and make the main bar use native colors
  • Import favourited images from Corebird
  • Fixed crash caused by Twitter sending invalid entity positions in tweet
  • Fixed tweet length error with counting prime marks (quotes)
  • Update Italian translation

How to Install Cawbird in Ubuntu:

The community maintained Cawbird Snap package, which runs in sandbox, can be easily installed from Ubuntu Software:

For those prefer native .deb package, go to the developer maintained repository at the link below:

Select Ubuntu, then click ‘Grab binary packages directly‘ and download the .deb package for your system.

Finally install the .deb via Gdebi package installer (available in Ubuntu Software) and enjoy!