Archives For November 30, 2022

The popular Alacritty terminal emulator got a new release few days ago. Here are the new features and how to install guide for Ubuntu Linux.

Alacritty is a free open-source GPU-accelerated terminal emulator written in Rust programming language. It features Vi mode motion and selection via keyboard, Vi search/normal search, hints, etc.

The new 0.12.0 release features fractional scaling support on Wayland session via wp-fractional-scale protocol. It also added touchscreen input support for click, scroll, select, zoom actions.

Other changes include:

  • Support for horizontal scrolling in mouse mode and alternative scrolling modes
  • Support for running on GLES context
  • New window.resize_increments config option, which is disabled by default
  • New -T flag, short form for --title.
  • Always use sRGB color space on macOS.
  • Resize increments are now set on macOS and X11 to resize by cell sizes.
  • Proper hint about window transparency in Wayland and macOS.
  • Change window.decorations_theme_variant to use Dark, Light, and None values

They are as well various other changes and bug-fixes, see the Github releases page for details.

How to Install Alacritty terminal emulator in Ubuntu Linux

This app is not available in Ubuntu system repository until the next Ubuntu 23.04. User can install it via 2 methods: cargo package manager, or third-party Ubuntu PPA.

Option 1: Install Alacritty via cargo package manager

Cargo is the command line package manager for Rust, like Pip for Python. User can use the tool to install Alacritty terminal emulator in most Linux, though user needs to MANUALLY setup PATH variable and create shortcut icon.

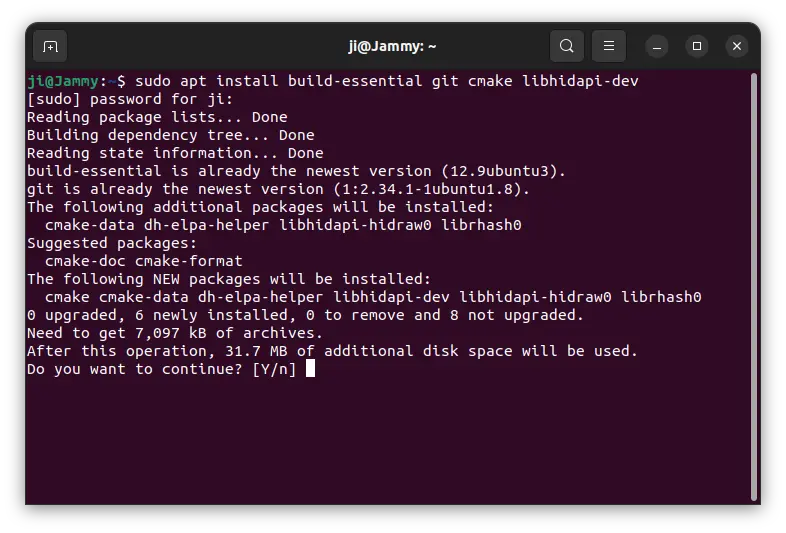
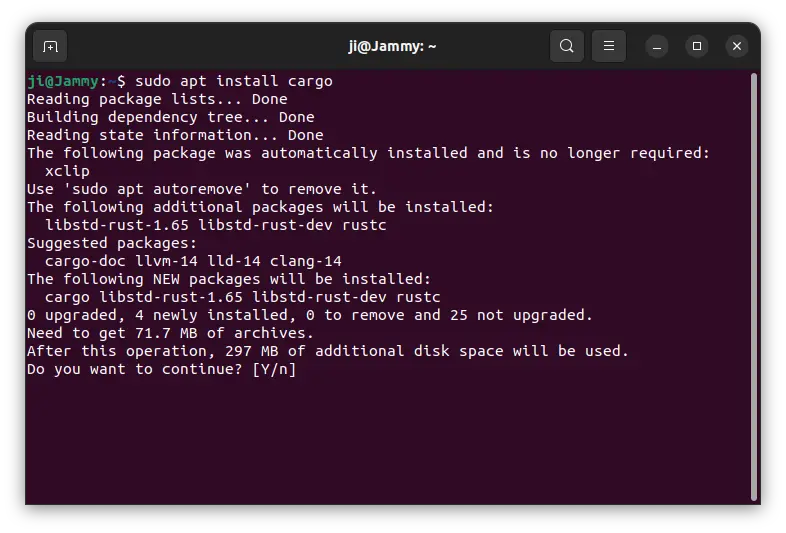
1. First, press Ctrl+Alt+T on keyboard to open terminal. When it opens, run command to install cargo:

sudo apt install cargo

Type user password (no asterisk feedback) when it asks and hit Enter to continue.

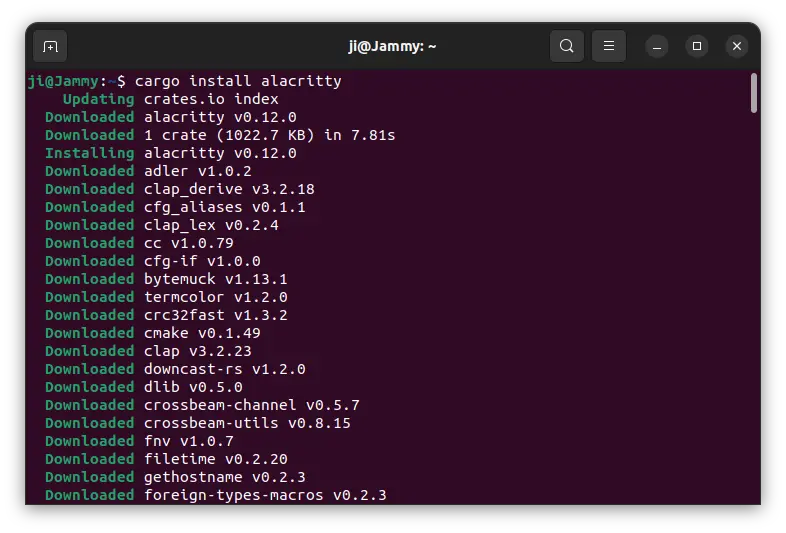
2. Then, install Alacritty for current user only by running command:

cargo install alacritty

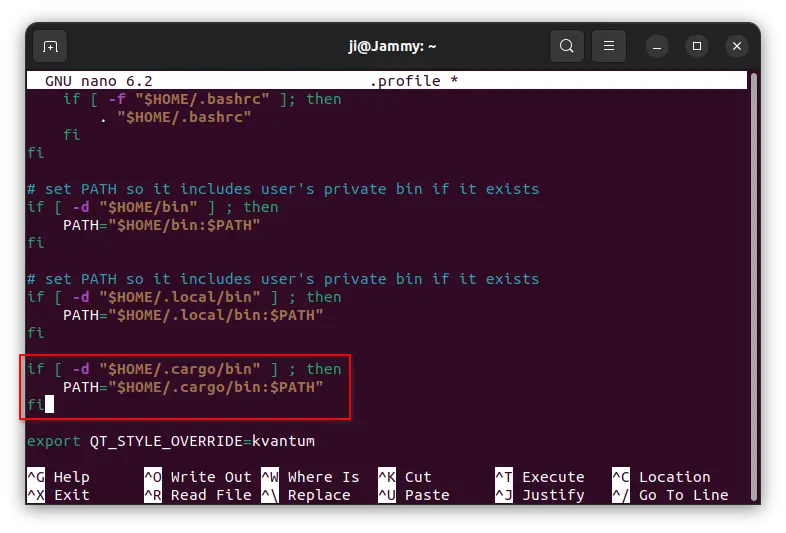
3. As mentioned, cargo package does not add PATH variable by default. You can verify by running $PATH command and see if “/home/USERNAME/.cargo/bin” present in the output.

To add it into user PATH, run command nano ~/.profile to edit user profile and add following lines:

if [ -d "$HOME/.cargo/bin" ] ; then
    PATH="$HOME/.cargo/bin:$PATH"
fi

When done, press Ctrl+X, type y and hit Enter to save change! NOTE: user PATH changes take effect at next login.

4. The cargo package also does not create shortcut icons. Meaning you need to manually create one by running command:

nano ~/.local/share/applications/alacritty.desktop

Then paste following lines and save it:

[Desktop Entry]
Type=Application
TryExec=alacritty
Exec=alacritty
Icon=Alacritty
Terminal=false
Categories=System;TerminalEmulator;

Name=Alacritty
GenericName=Terminal
Comment=A fast, cross-platform, OpenGL terminal emulator
StartupWMClass=Alacritty
Actions=New;

[Desktop Action New]
Name=New Terminal
Exec=alacritty

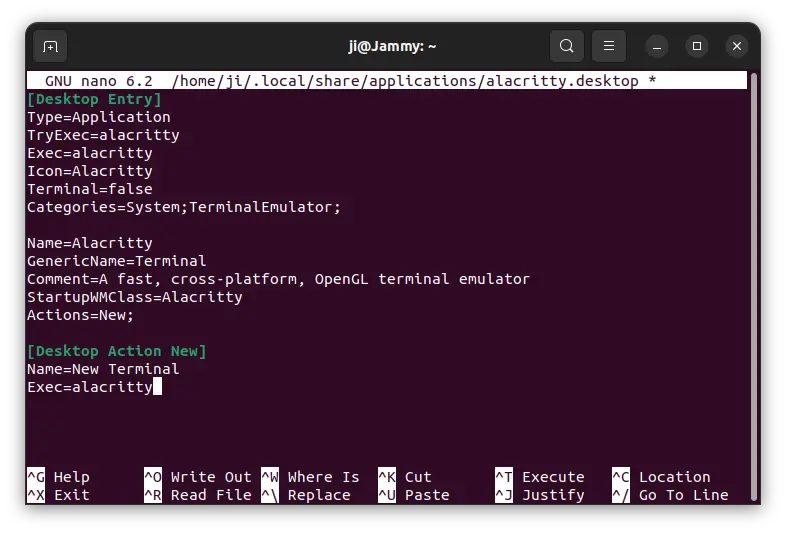
Finally, either use alacritty command or search for and launch it from start menu (or ‘Activities’ overview).

Option 2: Install Alacritty in Ubuntu via PPA

An Ubuntu PPA can be more easy to install the terminal emulator for beginners. Though, it seems to be unofficial.

NOTE: The PPA package at the moment includes Alacritty 0.13.0 development, though the package name marked as 0.12.0 stable.

So far the PPA supports for Ubuntu 20.04, Ubuntu 22.04, Ubuntu 23.10, Ubuntu 24.04 and their based systems.

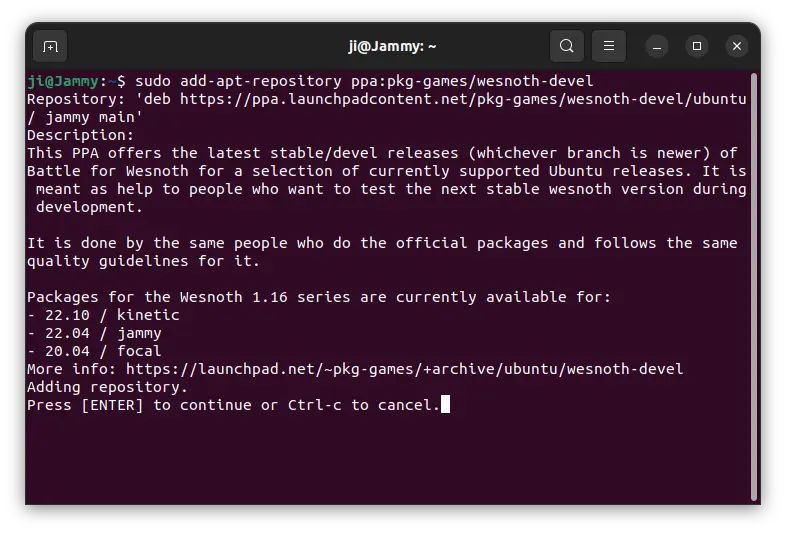
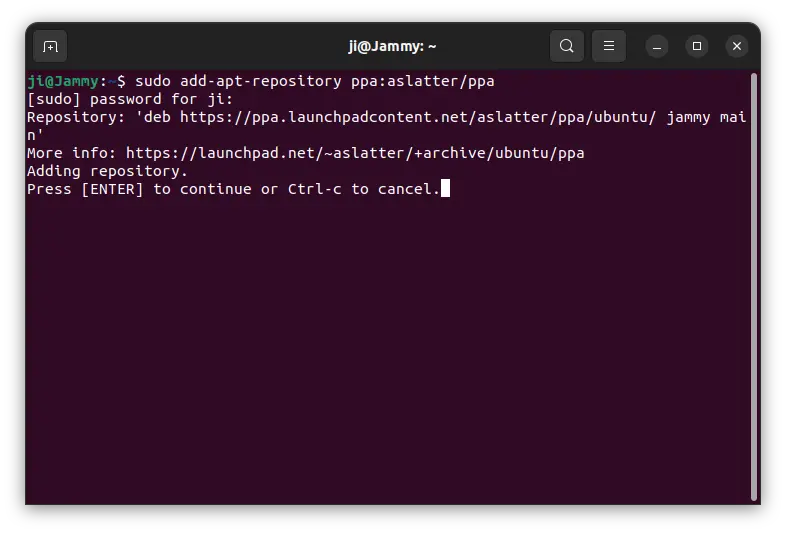
1. First, open a terminal window and run command to add the Ubuntu PPA:

sudo add-apt-repository ppa:aslatter/ppa

Type user password (no asterisk feedback) when it asks and hit Enter to continue.

2. Linux Mint and few Ubuntu based systems may need to manually update the package index, though it’s done automatically in Ubuntu since 20.04:

sudo apt update

3. Finally, install Alacritty terminal emulator via command:

sudo apt install alacritty

Once installed, search for and launch it from start menu or ‘Activities’ overview, or by running alacritty command.

Uninstall Alacritty terminal emulator

To remove the package installed via Cargo, open terminal and run command:

cargo uninstall alacritty

Also remove the shortcut icon if added via command:

rm ~/.local/share/applications/alacritty.desktop

For choice, you may also remove the Cargo package manager, though other apps installed through Cargo will also be removed:

sudo apt remove cargo

To remove the package installed from Ubuntu PPA, use command:

sudo apt remove --autoremove alacritty

Also remove the Ubuntu PPA via command:

sudo add-apt-repository --remove ppa:aslatter/ppa

That’s all. Enjoy!

This simple tutorial shows how to install the Budgie Desktop (10.8 so far) in Ubuntu 22.04 LTS.

Ubuntu Budgie is one of the official Ubuntu flavors features the Budgie desktop. While Ubuntu Budgie 22.04 ships with Budgie Desktop 10.6.1, the latest version has reached v10.9.

For those who want to get the latest features, but don’t want to upgrade the whole system. The developers team maintains an Ubuntu PPA contains the most recent desktop packages  for Ubuntu 22.04 LTS.

NOTE: The PPA so far contains Budgie desktop 10.8! According to the PPA description, it will include the latest 10.9 release.

1. First, search for and open “terminal” from application menu. When it opens, run command to add the PPA:

sudo add-apt-repository ppa:ubuntubudgie/backports-budgie

Type user password (no asterisk feedback) when it asks and hit Enter to continue.

2. After adding the PPA, install all available package updates by running command in Ubuntu Budgie 22.04:

sudo apt update && sudo apt upgrade

Ubuntu 22.04 and other flavors can also install this desktop environment by running command:

sudo apt install budgie-desktop-environment

How to restore:

To revert back to the original Budgie 10.6.1, open terminal and run command to install ppa-purge tool:

sudo apt install ppa-purge

Then, purge the PPA via the tool which also downgrade all install packages:

sudo ppa-purge ppa:ubuntubudgie/backports-budgie

Finally, restart your computer and enjoy!

The Ubuntu team announced the 6th point release for Ubuntu 20.04 LTS. According to the release note, Ubuntu 20.04.6 fixed the Secure Boot issue for the amd64 installer:

Unlike previous point releases, 20.04.6 is a refresh of the amd64 installer media after recent key revocations, re-enabling their usage on Secure Boot enabled systems.

The release also includes many security updates, and backports from Ubuntu 22.04 LTS. The “Software & Updates” has been updated to replace Livepatch tab with Ubuntu Pro.

Other changes include:

  • add meta package to improve support for Lenovo ThinkCentre M70t/M80t Gen 3, Lenovo ThinkPad P14s/T14 Gen 2a, Lenovo ThinkPad T14s/X13 Gen 2a, etc devices.
  • fix slow refresh rate with AMD GPU Screen output in reverse prime mode.
  • add GSettings power management keys for AD SYStem integration.
  • fix samba interoperability with Windows 22H2 client.
  • fix issue that starting a salted session fails when using an RSA key in FIPS mode
  • add support for open kernel module or driver in nvidia-515
  • support EM120/160 firmware update
  • add sdio firmware for qca9377 wifi module

See the changelog for more changes in Ubuntu 20.04.6.

Download Ubuntu 20.04.6

For earlier version of Ubuntu 20.04, just open Software Updater and install all available updates will bring you to the new Ubuntu 20.04.6. For the .iso image, just go to this page.

Got a Logitech or SteelSeries headset? This app may help to adjust sidetone, get battery state, toggle LED, and set inactive time in Ubuntu Linux.

It’s HeadsetControl, a free and open-source application that supports:

  • Logitech G430, G432, G433, G533, G535, G633, G635, G733, G930, G933, G935, G Pro.
  • Logitech Zone Wired/Zone 750
  • SteelSeries Arctis 1, Arctis 1 for XBox, Arctis (7 and Pro), Arctis 7+, Arctis Nova 7, Arctis 9, Arctis Pro wireless.
  • HyperX Cloud Flight Wireless
  • Corsair Void (Every void-version*, regardless whether Elite, Pro, HS70 Wireless)
  • Roccat Elo 7.1 Air

The application is a command line tool, though it has a graphical interface for GNOME 42+ (Ubuntu 22.04 / Fedora 35 and higher).

Image borrowed from extension web page, as I don’t have a headset at hand

How to Install the HeadsetControl app

The app so far does not have binary package for Ubuntu Linux, though it’s not hard to build it from source. The following steps is tested and works in my case in Ubuntu 22.04 LTS.

1. First, press Ctrl+Alt+T on keyboard to open a terminal window. When it opens, run command to install build dependencies:

sudo apt install build-essential git cmake libhidapi-dev

2. Then, clone the source by running the git command in terminal, and then navigate to the source folder:

git clone https://github.com/Sapd/HeadsetControl && cd HeadsetControl

3. Create ‘build’ sub-folder, navigate to that sub-folder and start building it:

mkdir build && cd build && cmake ../

4. Finally, run make and then make install to build and install the tool:

make -j4
sudo make install

Once successfully installed, it will output that ‘/usr/local/bin/headsetcontrol‘ and ‘/usr/local/lib/udev/rules.d/70-headsets.rules‘ installed.

How to Install the Extension for graphical UI

For Ubuntu 22.04 and higher, first search for and install “Extension Manager” from Ubuntu Software.

Install Extension Manager in Ubuntu 22.04+

Then, use “Extension Manager” to search and install the ‘HeadsetControl’ extension under ‘Browse’ tab.

Once installed, it should show the indicator applet in system tray area immediately with menu options to control your headset! Other Linux can go to this page to use ON/OFF switch to install the extension.

Uninstall:

To remove the extension, either go to the link page above and use ON/OFF switch, or use “Extension Manager” or Gnome Extensions tool.

To remove the command line application, open terminal and run command:

sudo rm /usr/local/bin/headsetcontrol /usr/local/lib/udev/rules.d/70-headsets.rules

This simple tutorial is going to show beginners how to install the latest stable Battle for Wesnoth (so far 1.18.4) via PPA in Ubuntu 24.04, Ubuntu 22.04, Linux Mint 22/21.

The Battle for Wesnoth is an open source, turn-based strategy game features both single player and online multiplayer combat.

Ubuntu includes the game package in its system repository but always old. User can choose to install the official Flatpak package, by running 2 commands one by one in a terminal window (Ctrl+Alt+T).

sudo apt install flatpak
flatpak install https://dl.flathub.org/repo/appstream/org.wesnoth.Wesnoth.flatpakref

Though, it’s universal Linux package format that runs in sandbox.

For users who prefer the classic .deb package format, The Debian/Ubuntu Games Team maintains an Ubuntu PPA with the latest stable/devel release (1.18.x stable at the moment) of the game packages. Which, so far supports Ubuntu 24.04, Ubuntu 22.04, Ubuntu 24.10, and their derivatives.

1. First, either search for and open a terminal from start menu or press Ctrl+Alt+T on keyboard to open terminal.

2. When terminal opens, paste the command below and hit Enter to add the PPA repository.

sudo add-apt-repository ppa:pkg-games/wesnoth-devel

Type user password (no asterisk feedback) when it asks for sudo authentication, and hit Enter to continue.

3. If a previous 1.18.x version of the game package was installed on your system, launch “Software Updater” (or Update Manager) to upgrade the game:

Or, run command in terminal to install/upgrade the game package:

sudo apt instatll wesnoth

NOTE: Linux Mint user may first run sudo apt update to refresh package index.

Once installed, search for and launch the game either from start menu or ‘Activities’ overview depends on your DE and enjoy!

Uninstall:

To download the game to the stock version available in system repository, open terminal (Ctrl+Alt+T) and run command:

sudo apt install ppa-purge && sudo ppa-purge ppa:pkg-games/wesnoth-devel

This command will install ppa-purge tool and purge the PPA, which also downgrade installed packages.

To simply uninstall the game package, use command:

sudo apt remove --autoremove wesnoth-1.18 wesnoth

Also remove the PPA, either via “Software & Updates” under Other Software tab in Ubuntu, or use “Software Sources” tool in Linux Mint, or run command:

sudo add-apt-repository --remove ppa:pkg-games/wesnoth-devel

That’s all. Enjoy!

For sports fans who want to keep a watchful eye on live scores for favorite teams, here’s an indicator applet for Ubuntu, Fedora, and other Linux with GNOME.

It’s colosseum, which displays an indicator in top-panel system tray area. By clicking on it will show the menu with live scores for your favorite sports teams.

So far, it supports 12 sports leagues:

  • Bundesliga
  • 2. Bundesliga
  • English Premier League
  • La Liga
  • Ligue 1
  • Major League Baseball
  • National Basketball Association
  • National Football League
  • National Hockey League
  • Serie A
  • UEFA Champions League
  • Women’s National Basketball Association

There are also 5 supported tournaments, including

  • CONCACAF Gold Cup
  • Copa America
  • FIFA World Cup
  • UEFA Champions League
  • UEFA European Championship

How to Install this live scores indicator

This indicator is available as an extension, which so far supports GNOME v40, 41, 42 and 43. Meaning, you can install and use it in Ubuntu 22.04+, Fedora 35+, Arch, Manjaro, Rocky Linux, etc with GNOME desktop.

1. For Ubuntu 22.04 and higher, first search for and install “Extension Manager” from Ubuntu Software.

Install Extension Manager in Ubuntu 22.04+

2. Then open the extension manager tool, navigate to “Browse” tab. Finally, search and install “colosseum” extension.

3. Once installed, switch back to “Installed” tab, and click on gear icon for that extension to open the configuration page.

There, set the refresh time interval, turn on the toggle buttons for your favorite sports leagues and/or tournaments. New configuration tabs will appear, where you can follow your favorite teams.

TIP: If the indicator applet does not appear in panel, try to turn off and then turn on again the extension, or just log out and log back to restart Gnome Shell.

For other Linux, go to this page and use ON/OFF switch to install the extension. And, install and use “Gnome Extensions” app to manager extensions’ configurations.

Ksnip, the popular free open-source screenshot and annotation tool, released 1.10.1 version yesterday.

Ksnip is a Qt based screenshot tool with editing features, that works in Windows, macOS, and Linux on both Wayland and Xorg. It’s one of my top favorite applications for adding annotations in screenshot.

The app just released version 1.10.1 one day ago as the first point release for the 1.10 release series. It’s a small release with a new feature: KDE support for scale factor. Meaning it’s now working better in KDE desktop (such as KUbuntu, Ubuntu Studio) with different scaling factor.

Other changes include:

  • Fix drag and drop issue for Ksnip installed as Snap.
  • Fix sticker resizing issue when bounding rect flipped.
  • Show tab tooltips on initial tabs.
  • Fix for unnecessary scrollbars when a screenshot has a smaller size than the previous one
  • Fix that loading image from stdin single instance client runner side doesn’t work

How to Install KSnip 1.10.1 in Ubuntu / Linux Mint

Option 1: Snap package

The easiest way to install the tool in Ubuntu is using the official Snap packages. Simply open Ubuntu Software, then you can search for and install it via few clicks.

Install Ksnip via Ubuntu Software

Option 2: AppImage / Deb

The software project page also provides AppImage and Deb packages, as well as Windows and Mac OS packages for download under ‘Assets’ section:

For most Linux, you may download the non-install AppImage package, make it executable via right-click menu “Properties” dialog -> “Permissions” tab, and finally click run the package to launch it.

For Debian and Ubuntu based system, download the .deb package and install it by running command in terminal (press Ctrl+Alt+T to open terminal):

sudo apt install ~/Downloads/ksnip-*.deb

NOTE for Ubuntu 22.04, double-click installing this local deb via “Software Install” option may not work properly. It refers to the Snap package, rather than installing the local package.

Option 3: Ubuntu PPA (unofficial)

For those prefer Ubuntu PPA, here’s an unofficial repository with Ubuntu 20.04, Ubuntu 22.04, Ubuntu 22.10 and Ubuntu 23.04 support.

Simply press Ctrl+Alt+T on keyboard to open terminal, and run the commands below one by one will add the PPA and install the screenshot tool from it.

sudo add-apt-repository ppa:ubuntuhandbook1/ksnip
sudo apt update
sudo apt install ksnip libkimageannotator0 libkcolorpicker0

Install the OCR plugin:

The OCR plugin is available to install as a separate package. It’s available to download at the link below:

Click to expand the ‘Assets‘ section, download & install the .deb package for Debian and Ubuntu based system.

Uninstall Ksnip

For the snap package, simply click ‘uninstall’ button in Ubuntu Software.

For deb package, press Ctrl+Alt+T on keyboard and run the command below to remove it:

sudo apt remove --autoremove ksnip libkimageannotator0

And, remove the Ubuntu PPA (if added) by running command:

sudo add-apt-repository --remove ppa:ubuntuhandbook1/ksnip

Transmission BitTorrent client got another bug-fix release for the new major 4.0.0 that was released a month ago.

The new Transmission 4.0.2 fixed the bug that some torrents thought they were magnet links, auto-add watch folder issue for macOS, broken speed limits for utp peers, and using announce-list when creating single-tracker private torrents.

The release also restored support for path.utf-8 keys in torrent info dictionaries, fixed potential crash when downloading from webseeds or receiving malformed piece data from peers.

There are also various other bug-fixes, including:

  • Fixed value of TR_TIME_LOCALTIME environment variable in torrent scripts.
  • Fixed display of IPv6 tracker URLs.
  • Added up / down arrows to upload / download badge info for macOS UI.
  • Fixed “Unrecognized colorspace number -1” error messages from macOS
  • Fixed per-torrent ratio display in main window in QT UI.
  • Fixed 4.0.0 ignoring -m/–minimized command line option.
  • See more about the changes, see github releases page.

How to Install Transmission 4.0.2 in Ubuntu / Linux Mint

Transmission does not provide official binary packages for Linux. Besides building from the source tarball, user can either use the universal Flatpak package or an Ubuntu PPA.

For those prefer the classic .deb package, this unofficial PPA has been updated with the latest packages for Ubuntu 20.04, Ubuntu 22.04, and Ubuntu 22.10.

The new web user interface depends on NPM (Node.js package manager). It requires internet connection while building process, but launchpad build farm does NOT have. Meaning so far the PPA package does not include new web UI via JavaScript, but the old web user interface for remote control is stilling working.

1. First, press Ctrl+Alt+T on keyboard to open a terminal window. When it opens, run command to add the PPA:

sudo add-apt-repository ppa:ubuntuhandbook1/transmission

Type user password (no asterisk feedback) when it asks and hit Enter to continue.

2. After adding the PPA, you can then launch Software Updater (Update Manager) and upgrade the system pre-installed transmission package to the new 4.0.2 release.

For Ubuntu based system without the BitTorrent client pre-installed, you may run command below to install it:

sudo apt update && sudo apt install transmission-gtk

You may replace transmission-gtk with (or add) following package:

  • transmission-qt – Qt user interface for KDE, LXQt, etc.
  • transmission-cli – command line interface.
  • transmission-daemon – the daemon for running in background, and access via webUI

Uninstall Transmission 4.0.2

You can choose to downgrade the BitTorrent client to system pre-installed version, by running command in terminal:

sudo apt install ppa-purge && sudo ppa-purge ppa:ubuntuhandbook1/transmission

Or, remove the software packages instead by running command:

sudo apt remove --autoremove transmission-gtk transmission-qt transmission-cli transmission-daemon

And remove the PPA repository either via “Software & Updates” tool by removing the source line under “Other Software” tab, or by running command:

sudo add-apt-repository --remove ppa:ubuntuhandbook1/transmission

That’s all. Enjoy!

For users of Liferea feed reader, new version 1.14.1 and 1.12.10 were released few days ago. All users are urged to upgrade due to an important security fix.

Liferea is a free open-source GTK3 feed reader that brings together all of the content from your favorite subscriptions into a simple interface. It can synchronizes with Reedah, TinyTinyRSS, and Google Reader API.

Just few days ago, it release new point releases for its 1.14 and 1.12 release series with an important security fix.

It’s CVE-2023-1350 Remote code execution on feed enrichment.

If you have enabled “Extract full content from HTML5 and Google AMP” for one or more of your feed subscriptions it is possible for a an attacker to inject a script command that would run any command on your system.

All users are recommended to upgrade to the new release with this bug-fix.

Without the upgrade, user can alternatively disable “Extract full content from HTML5 and Google AMP” for all the feeds via following steps:

  1. Close Liferea
  2. Open ~/.config/liferea/feedlist.opml in an editor
  3. Replace all occurences of html5Extract="true" with an empty string

How to Install Liferea 1.14.1 in Ubuntu:

For most Linux, Liferea is available to install as Flatpak package, that runs in sandbox.

Ubuntu users can also use the unofficial PPA, which so far supports for Ubuntu 20.04, Ubuntu 22.04, Ubuntu 22.10, Linux Mint 20/21, and their based systems.

1. First, press Ctrl+Alt+T on keyboard to open terminal. When it opens, run command to add the PPA:

sudo add-apt-repository ppa:ubuntuhandbook1/apps

Type user password (no asterisk feedback) and hit Enter to continue.

2. Then, install the Liferea package by running command:

sudo apt install liferea

Linux Mint user may have to run sudo apt update first to update cache.

Uninstall:

The PPA also contains some other software packages, so you may remove it immediately after installed Liferea.

To do so, either run the command below in terminal, or remove the source line under “Other Software” tab in Software & Updates tool.

sudo add-apt-repository --remove ppa:ubuntuhandbook1/apps

To remove the feed reader package, simply run command:

sudo apt remove --autoremove liferea-data liferea

That’s all. Enjoy!

The first point release of Kodi 20 ‘Nexus’ is out today after almost 2 months of development.

As the title said, the new Kodi 20.1 includes mainly bug-fixes. It introduced a new algorithm to look to overcome some audio issues on Android devices. Fixed DVD playback folder structures over network sources (e.g. SMB/NFS/HTTP, etc.)

Other changes include:

  • Assorted fixes to the new Savestate Manager to improve usability.
  • An assortment of OSD improvements
  • A number of performance improvements (memory reads, faster dialogs/savestates).
  • Input fixes allow resetting multitap controller inputs
  • Sync of some of the common controller types
  • Fixes various overflows when using new chrono infrastructure.
  • A fix for an issue on 32-bit systems that affected the sorting of items.
  • Resolve PVR Channel Groups to correctly show channels ordered as provided by a PVR backend.
  • A couple of fixes for WebVTT subtitles

How to Install Kode 20.1 in Ubuntu

Kodi website provides the downloads for all supported platforms.

For Ubuntu and Linux Mint users, the official PPA repository is one of the best choices to install the media play. So far, it supports Ubuntu 20.04, Ubuntu 22.04, Ubuntu 22.10, Ubuntu 23.04, Linux Mint 20/21.

1. First, open terminal by pressing Ctrl+Alt+T on keyboard. When it opens, run command to add the PPA:

sudo add-apt-repository ppa:team-xbmc/ppa

Type user password (no asterisk feedback) when it asks and hit Enter to continue.

2. Software Updater may not upgrade the media center if an old version was installed in Ubuntu 22.04. Instead it show ‘Partial Updates’ issue.

As a workaround, either run apt install command below:

sudo apt install kodi kodi-bin

Or run sudo apt full-upgrade to install all available updates (you may still need to install kodi-bin manually). For Linux Mint, run sudo apt update before doing updates!

How to Uninstall:

For choice, you can either run command in terminal to purge the PPA, which will downgrade Kodi to stock version in system repository:

sudo apt install ppa-purge && ppa:team-xbmc/ppa

Or manually remove the software package via command:

sudo apt remove kodi kodi-bin --autoremove

And remove the PPA via command as you prefer:

sudo add-apt-repository --remove ppa:team-xbmc/ppa