


![]()
This tutorial shows how to turn off your laptop’s built-in display for using external monitors in Ubuntu Desktop.
When working with multiple monitors, it can be useful to disable the built-in screen for saving power. You can set lid close action to do nothing then just close the laptop lid.
However, the lid close action may not work properly in some laptops, or you need to use the built-in keyboard and touch-pad. In the cases, here are a few other ways to do the job.
Method 1: Use System Settings
If you have only one external monitor connected, and want to use that one instead of the built-in display, then Gnome Control Center (aka, System Settings) has the option to do the job under Displays panel.
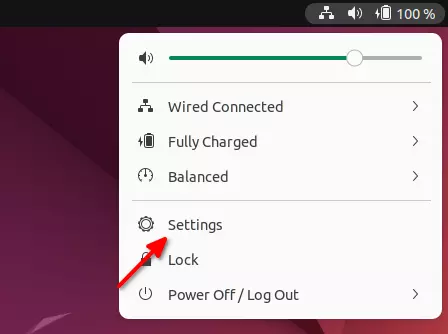
First, open Settings from either top-right corner system status menu or ‘Show Applications’ screen.
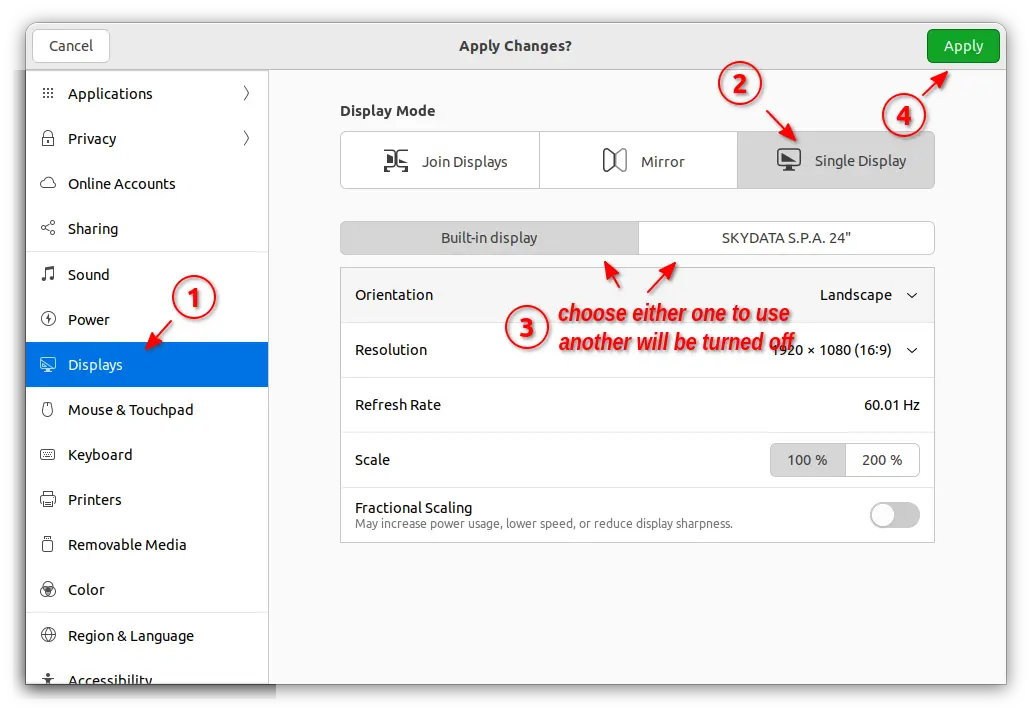
When it opens, navigate to “Displays” in left. (For Ubuntu 22.04) Then, click Single Display under Display Mode settings. Finally, click to choose any one of the monitors for use. All others will be turned off, once you clicked on “Apply” button.
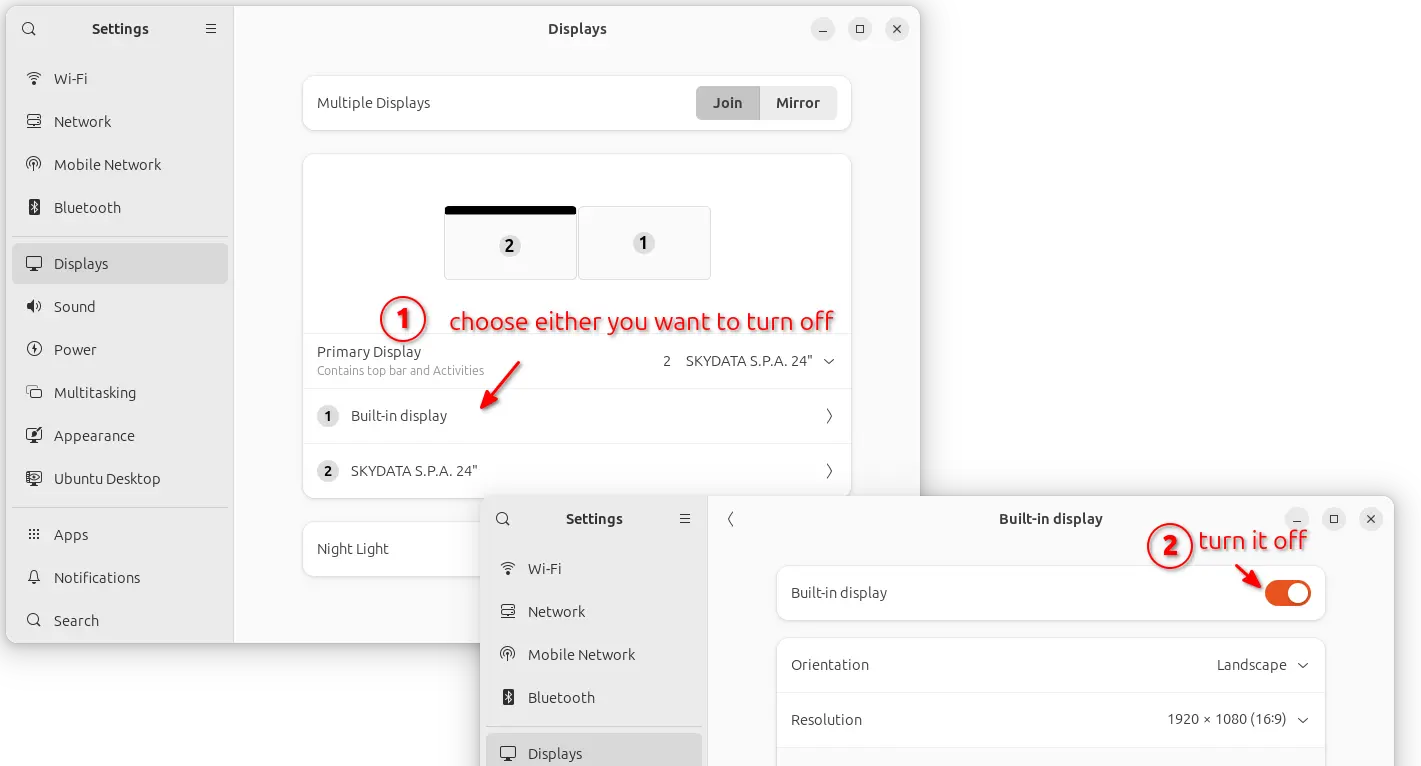
For Ubuntu 24.04, go to Settings -> Displays, then choose the display you want to turn off in right to go to its individual settings page. Finally, turn off the toggle switch to disable it.
Other Desktops, such as MATE and XFCE, also have options to turn off connected monitors, just open “Displays” settings dialog for the toggle option.
Method 2: Use Kernel parameter to disable monitor on startup
If the built-in display is broken, or you rarely use it, there’s a kernel parameter to disable it on system startup. This can be useful when you have more than one external monitors connected, and want to use them while leaving only the built-in one turned off.
NOTE: After applied this method, your laptop built-in screen will be turn off automatically on every boot after Grub boot-menu. To restore, either connect an external monitor, and undo the changes, or when boot into Grub boot-menu, press ‘e’ and delete the kernel parameter, then undo changes after boot-up.
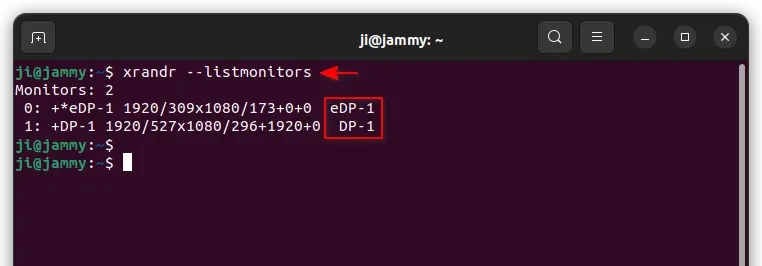
1. Find out the device name of connected monitors
First, press Ctrl+Alt+T on keyboard to open terminal. When terminal opens, run command to tell your monitor device names:
- For classic Xorg session, that’s default so far in XFCE, MATE, Gnome on Ubuntu 20.04, etc, just use command:
xrandr --listmonitors
In the output, the
DP-1,eDP-1,HDMI-1, etc, are usually the device names for your monitors.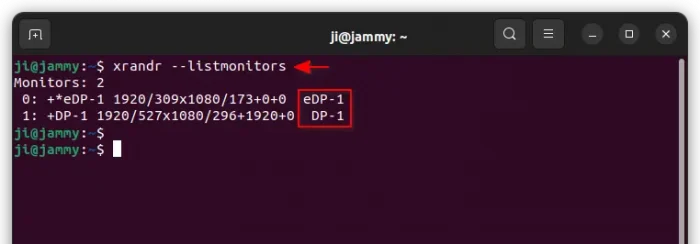
- For Wayland, the default session since Ubuntu 22.04 with default GNOME:
for folder in /sys/class/drm/*/status; do content=${folder%/status}; echo -n "${content#*/card?-}: "; cat $folder; doneIn terminal output, look for the ‘connected’ names (also
eDP-1,HDMI-1, etc).

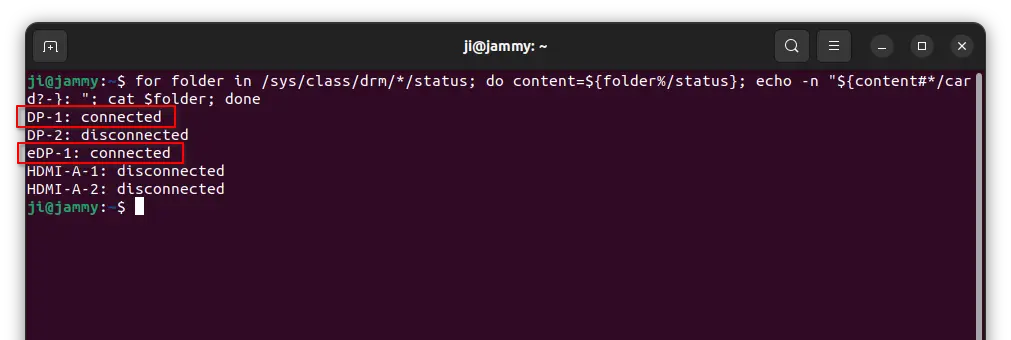
Usually eDP-1 is the built-in monitor device name for your laptop. If NOT sure, just disconnected all external monitors, then run one of the previous commands accordingly.
2. Add Kernel Parameter to Disable Monitor on Startup
For Ubuntu and most other Linux, user can edit the config file for Grub boot-loader to add kernel parameters.
1.) First, press Ctrl+Alt+T on keyboard to open terminal. When it opens, run command to edit the Grub boot-loader config file:
sudo nano /etc/default/grub
NOTE: nano is a command line text editor works in most desktop, you may replace it in command with gedit for Ubuntu 22.04 & 20.04, gnome-text-editor for Ubuntu 23.10 & 24.04, mousepad for XFCE, pluma for MATE, or other editor depends on your desktop environment.
When file opens, scroll down and add video=eDP-1:d to value of GRUB_CMDLINE_LINUX_DEFAULT, after “quiet splash”. Here eDP-1 is the device name of the monitor, d tells to disable the device.
For choice, you may add more kernel parameters (separate with space) with other options including:
- e – force the display to be enabled (override the detection). For example,
video=HDMI-1:eto force enable HDMI-1. - D – force enable a display with digital output. useful for outputs have both analog and digital signals (e.g. HDMI and DVI-I).
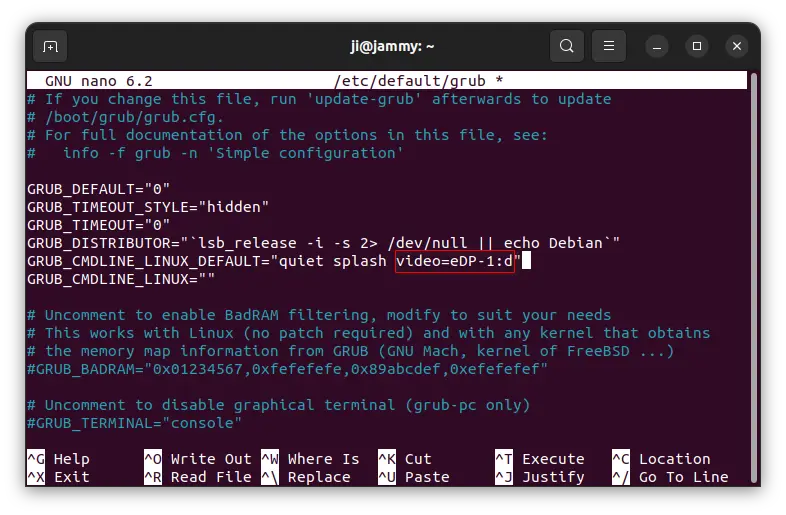
When done editing the file, press Ctrl+S to save changes, and Ctrl+X to exit.
2.) Finally, update the Grub config via command:
sudo update-grub
NOTE: this command varies on non-Ubuntu Linux distributions.
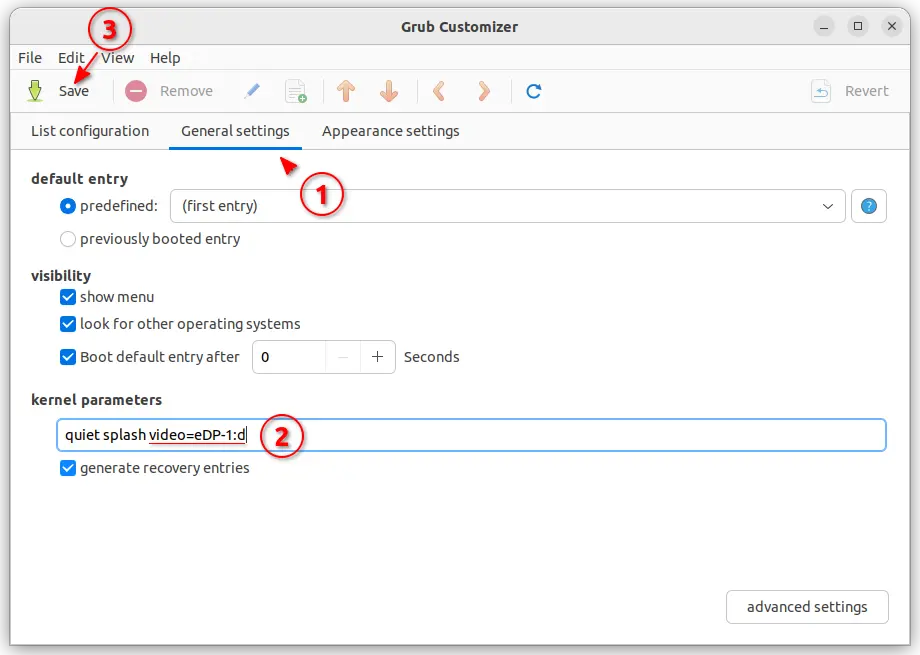
For those who have Grub Customizer installed, launch the app and navigate to “General Settings” tab, then add the kernel parameter and finally click Save.
Method 3: use third-party tool: gnome-monitor-config
For GNOME, the default desktop for Ubuntu/Fedora, there’s also a third-party command-line tool called gnome-monitor-config, which provides a more flexible way to manage multi-monitors.
1. Install gnome-monitor-config
The tool does not provide any installer package so far, but it’s easy to build from source. And, here’s what I did in Ubuntu 22.04.
- First, press
Ctrl+Alt+Tto open terminal. When terminal opens, run command to install build dependency libraries:sudo apt install git libcairo2-dev cmake meson ninja-build libglib2.0-dev
- Next, run git command to clone the source code into current working directory:
git clone https://github.com/jadahl/gnome-monitor-config.git
- Then, navigate to the source folder and configure via meson:
cd gnome-monitor-config && meson build
- Finally, navigate to build folder and compile:
cd build && meson compile
If everything’s done successfully, then there will be an executable file “gnome-monitor-config” generated under
srcsub-folder.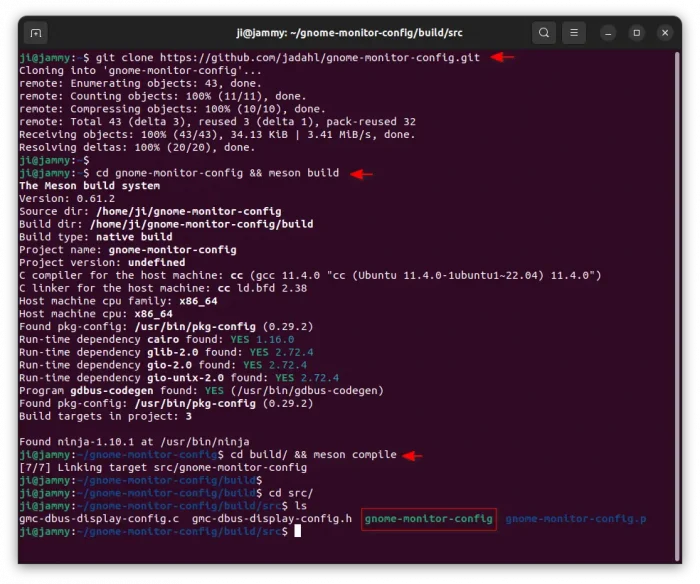
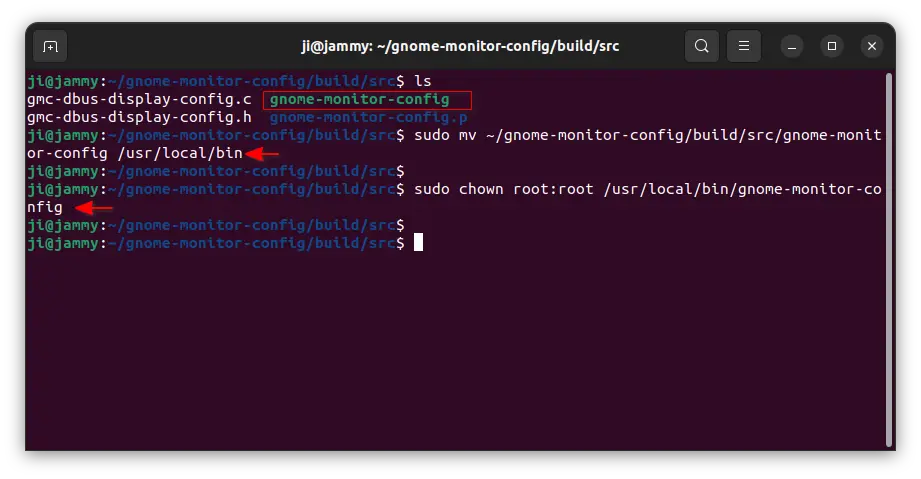
- Without typing the full path to that executable file every time. It’s a good choice to move it to local bin folder.
mv ~/gnome-monitor-config/build/src/gnome-monitor-config ~/.local/bin/
After that, you can run
gnome-monitor-configwith options to manage connected monitors.

2. Use gnome-monitor-config
To list all connected monitors (exclude the ones disabled by Kernel parameter) as well as their ON/OFF status, use command:
gnome-monitor-config list |grep Monitor
To set a primary monitor (DP-1 for example), and set its resolution as well as refresh rate, and leave all other monitors turned off, use command:
gnome-monitor-config set -LpM DP-1 -m 1920x1080@100
For choice, you may add -t left, -t right, or -t flip to change the screen orientation.
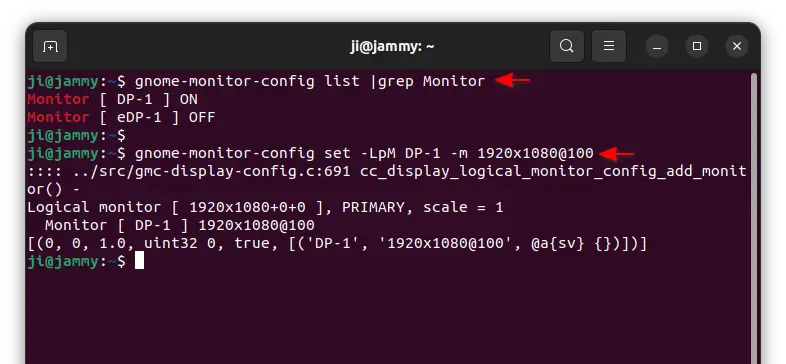
To set multiple monitors, use command:
gnome-monitor-config set -LpM DP-1 -m 1920x1080@100 -LM HDMI-1 -t left -x 1920
This command will set DP-1 as primary monitor start at [0, 0] with 1920×1080 resolution, 100 refresh rate. And, HDMI-1 as extended monitor start at [1920, 0], and left transformed (portrait). All other connected monitors (if exist) will be turned off.
For more about the tool, run gnome-monitor-config --help or go to its project page in github.
3. Bind gnome-monitor-config command to keyboard shortcut
If you’ve figured out the best command to set your external monitors, then you can bind it to keyboard shortcut.
To do so, first launch Settings, then navigate to “Keyboard -> View and Custom Shortcuts” then select “Custom Shortcuts” in pop-up dialog.
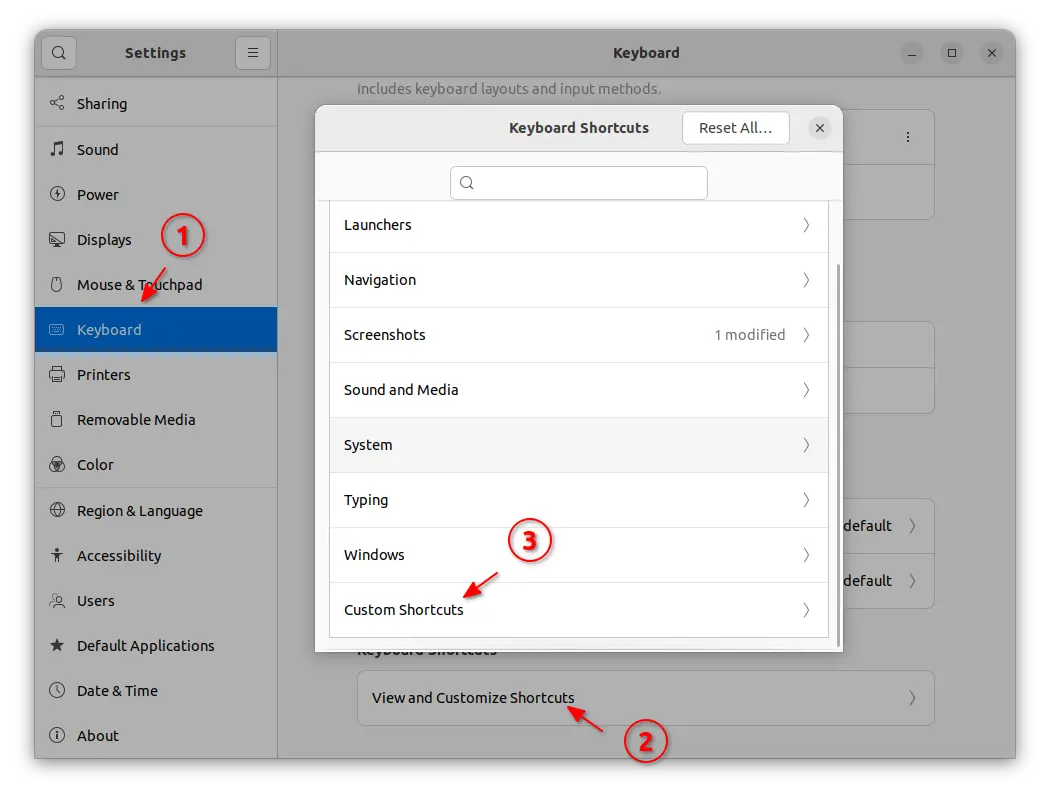
Next, click on Add or “+” icon to add a new shortcut, type the gnome-monitor-config command with your desired option in command box, and set a key combination for it, finally click Add.
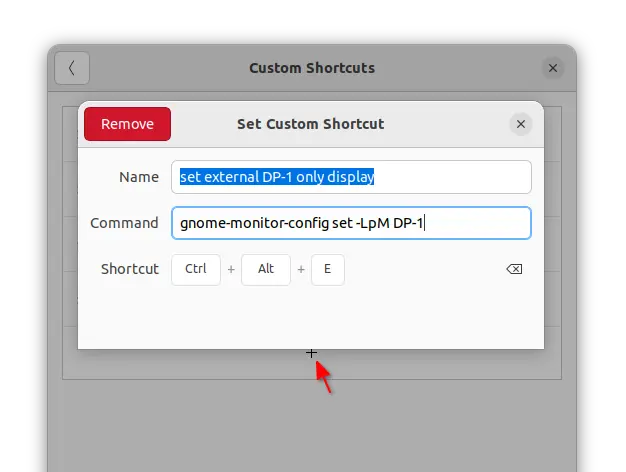
When done, try pressing the key combination on keyboard to see the magic and enjoy!


Hello, I’m pretty sure that your command mv ~/gnome-monitor-config/build/src/gnome-monitor-config ~/.local/bin/ does not what you would want it to do. It erases the bin folder that way…
Thanks for the tips though!