Sometimes after disconnected from a VPN network in Ubuntu 20.04, wireless does no longer work and even shows ‘No Adapter Found’ in the settings. If you have the same problem, this tutorial may help.
Without restarting your computer, you can try following steps to make the wireless work again.
1.) Restart Wifi network via system menu.
Try turn off wireless network from system tray menu, and turn it on again.
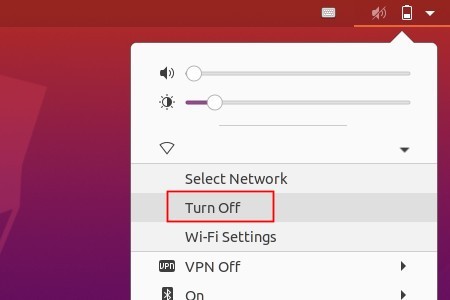
This works in the case when I disconnected from PPTP VPN server.
2.) Restart Wifi network via nmcli.
The previous step may not work sometimes. If so, try running commands in terminal (Ctrl+Alt+T) to restart networking:
nmcli networking off

nmcli networking on
And this works in the case when I disconnected from a ExpressVPN server.

3.) Restart Wireless interface via ifconfig
You may also run following 2 commands to restart the wireless network:
sudo ifconfig wlo1 down

sudo ifconfig wlo1 up
NOTE you need to replace wlo1 to your wifi network name (usually wlan0). Check it via ifconfig command.
4.) If none of the previous steps works, you may try to reload the wireless kernel module.
Open terminal (Ctrl+Alt+T) from system application menu and run command to check your wireless driver:
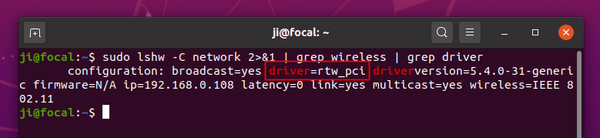
sudo lshw -C network 2>&1 | grep wireless | grep driver
As the picture shows, it’s rtw_pci in my case.
Then run command to reload the kernel module:
sudo modprobe -r MODULE_NAME && sudo modprobe MODULE_NAME
In my case the command is (rtwpci did work though it should be rtw_pci):
sudo modprobe -r rtwpci && sudo modprobe rtwpci