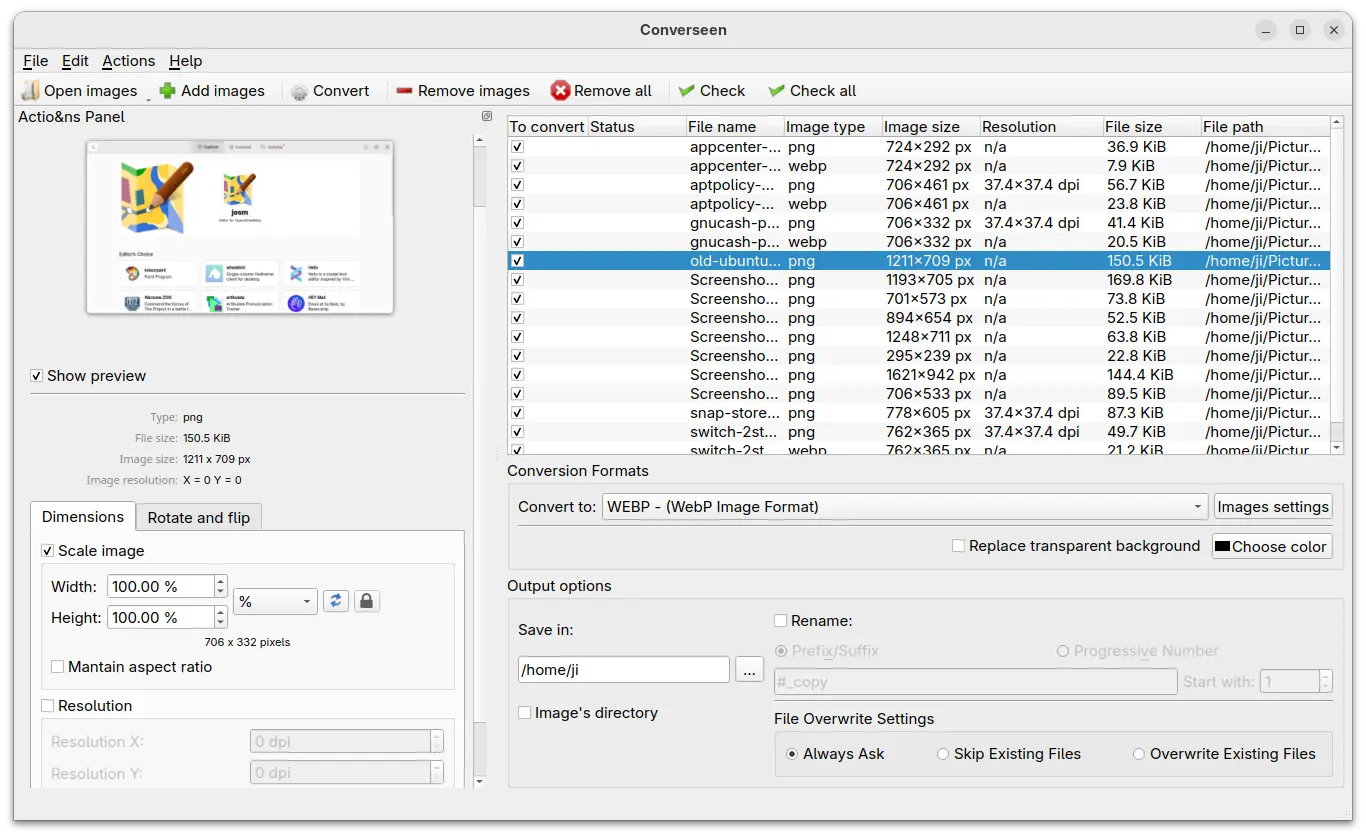
Archives For News

Free open-source software updates and Linux news

KeePass2

KeePass password manager released version 2.48 a few days ago. Here’s how to install it in Ubuntu 21.04, Ubuntu 20.04, Ubuntu 18.04 via PPA.

KeePass 2.48 introduces version 4.1 of the KDBX file format, which supports various new features, including:

  • group tags support,
  • ability to disable password quality estimation
  • remember the previous parent group when moving an entry/group into a different group
  • custom icons now have names and last modification or deletion times
  • save last modification time for custom date items.

Other changes include:

  • Add command ‘Move to Previous Parent Group’
  • Add support for loading images with Exif orientation tags.
  • Enhanced the LastPass import module to support CSV files created by the latest versions.
  • Enhanced the nPassword import module to import group tags.
  • Various user interface improvements.

How to Install KeePass 2.48 in Ubuntu via PPA:

KeePass2 is still available to install via an Ubuntu PPA. So far, the PPA supports for Ubuntu 16.04, Ubuntu 18.04, Ubuntu 20.04, Ubuntu 20.10, and Ubuntu 21.04.

1.) Open terminal and run command to add the PPA:

sudo add-apt-repository ppa:ubuntuhandbook1/keepass2

2.) Then refresh system package cache via command:

sudo apt update

3.) Finally install the mono based password safe package:

sudo apt install keepass2

Uninstall KeePass2:

To remove the software package, run command in terminal:

sudo apt remove --autoremove keepass2

And remove the Ubuntu PPA via command:

sudo add-apt-repository --remove ppa:ubuntuhandbook1/keepass2

qBittorrent

qBittorrent, free and open-source Qt5 based Bittorrent client, released version 4.3.5 a few days ago.

qBittorrent 4.3.5 is the last release in the 4.3.x series. And it’s going to drop support for Ubuntu 20.04 in the next release since it has an outdated Qt5 libraries.

Users who prefer qBittorrent can still get updates for Ubuntu 20.04 through the Flatpak package, since it’s a containerised package format bundle with most run-time libraries.

Changes in qBittorrent 4.3.5 include:

  • Move cursor to the end when autofilling URL/hash in “Download from URLs” dialog
  • Sort invalid QDateTime values after valid values
  • Fix tabChangesFocus attribute in “Edit trackers” dialog
  • Update DynDNS register url
  • Handle “not enough disk space” error more graciously
  • Correctly draw progress background with stylesheet
  • WEBUI: Fix magnet url from the search facility
  • WEBUI: Revise folder monitoring functions
  • WEBUI: Fix magnet url from the browser
  • WEBUI: Allow to specify file indexes in torrents/files API
  • WINDOWS: NSIS: Allow more strings to translated
  • WINDOWS: NSIS: Update Italian, German, Estonian, Russian, PortugueseBR translations.
  • LINUX: Fix D-Bus Notification desktop-entry field
  • MACOS: Don’t use executable name as CFBundleName value
  • Lower Qt requirement to 5.11
  • Clarify that the license is GPLv2+

How to Install qBittorrent 4.3.5 via PPA:

The official qBittorrent PPA has built the new release packages for Ubuntu 20.04, Ubuntu 20.10, and Ubuntu 21.04.

1. To add the PPA, open terminal by either pressing Ctrl+Alt+T on keyboard or searching for “Terminal” from application menu. When it opens, run command:

sudo add-apt-repository ppa:qbittorrent-team/qbittorrent-stable

Type user password (no asterisk feedback) when it prompts and hit Enter to continue.

2. If an old version was installed on your system, upgrade it via Software Updater,

upgrade qBittorrent

or run following commands to install /upgrade qBittorrent in terminal:

sudo apt update

sudo apt install qbittorrent

Uninstall:

To remove qBittorrent PPA, either go to Software & Updates -> Other Software, or run command in terminal:

sudo add-apt-repository --remove ppa:qbittorrent-team/qbittorrent-stable

To remove the bittorrent client, either use your system package manager or run command:

sudo apt-get remove --autoremove qbittorrent

Nvidia Linux driver

NVIDIA graphics driver for Linux released version 465.27 a day ago with new Laptop GPUs support and a few bug-fixes.

In NVIDIA 465.27, following new GPUs are supported:

  • T600 Laptop GPU
  • T1200 Laptop GPU
  • RTX A5000 Laptop GPU
  • RTX A4000 Laptop GPU
  • RTX A3000 Laptop GPU
  • RTX A2000 Laptop GPU

There are also some fixes in the release including:

  • Fixed a bug that could prevent a system from resuming from suspend when DisplayPort activity occurred while the system was suspended.
  • Fixed a regression that prevented eglQueryDevicesEXT from correctly enumerating GPUs on systems with multiple GPUs where access to the GPU device files was restricted for some GPUs.
  • Fixed a regression that could cause system hangs when changing display resolution on SLI Mosaic configurations.
  • Fixed a bug that could result in blank displays when driving multiple displays at the same resolution using active DisplayPort dongles.

How to Install NVIDIA 465.27 in Ubuntu:

Ubuntu now builds the latest NVIDIA drivers and pushes them via its own security & updates repositories.

Just wait! It’ll be available in next few days. At that time, launch Additional Drivers utility and you’ll see the driver available to install.

If you can’t wait, go to NVIDIA website and download the .run installer package (not recommended for beginners):

KDE’s Kdenlive video editor 21.04 was released today with lots of usability improvements and some great new features.

Kdenlive 21.04 introduced new Speech-to-Text feature which automatically transcode audio to text, and it supports for 17 languages and dialects using the official models.

The release also features new Media Browser, which can be enabled from View menu. With it, you can easily browse through file system and drag’n’drop add clips to the Bin or Timeline.

And there are new effects typewriter effect with 3 animation modes, Alpha Strobe effect to text, images, or videos, Effect Zones to apply effects to specific regions of tracks or the timeline.

Other features in Kdenlive 21.04 include:

  • Zoombars in the timeline.
  • New icons and functions for the effect’s keyframe panel.
  • New online resources widget
  • Add AV1 render profile.
  • Re-enable audio playback on reverse speed.
  • Add “unused clip” filter in Project Bin.
  • Add channel selection to audio waveform filter.
  • Add ITU 2020 colorspace in clip properties.
  • Treat GIFs as video, not as image.

How to Install Kdenlive 21.04 in Ubuntu:

The kdenlive team ppa has made the latest packages for Ubuntu 20.04, Ubuntu 20.10, Ubuntu 21.04, Linux Mint 20.

1.) Add Ubuntu PPA:

Open ‘terminal’ from your system application menu, then run command to add the PPA:

sudo add-apt-repository ppa:kdenlive/kdenlive-stable

Type your password when it asks (no asterisk feedback) and hit Enter to continue.

2. ) Install or Upgrade Kdenlive:

If an old version of kdenlive was installed, you can upgrade it via Update Manager:

Or simply run command in terminal to install the video editor:

sudo apt install kdenlive

NOTE for non-KDE users, Kdenlive will be installed along with a large list of KDE libraries.

Uninstall:

To purge the PPA as well as downgrade Kdenlive package, run command in terminal:

sudo apt install ppa-purge && sudo ppa-purge ppa:kdenlive/kdenlive-stable

To remove the PPA only, run command:

sudo add-apt-repository --remove ppa:kdenlive/kdenlive-stable

And to remove Kdenlive, run command:

sudo apt remove --autoremove kdenlive kdenlive-data

Linux Kernel

Linus Torvalds announced the release of Linux Kernel 5.12 last night. He wrote on lkml:

Thanks to everybody who made last week very calm indeed, which just makes me feel much happier about the final 5.12 release.

New Features in Kernel 5.12 include:

  • Intel VRR / Adaptive-Sync for Intel Xe.
  • Radeon RX 6800/6900 series OverDrive overclocking support.
  • Mainline support for the Nintendo 64
  • Sony PlayStation 5 DualSense controller driver.
  • CXL 2.0 Type-3 memory device support
  • Lenovo Laptop Platform Profile support.
  • Better Microsoft Surface device support.
  • And much more.

How to Install Linux Kernel 5.12:

The Ubuntu Mainline Kernel Archive provides the new kernel packages via DEB files.

The mainline build kernels do not include any Ubuntu-provided drivers or patches. They are not supported and are not appropriate for production use.

For those prefer using a graphical tool, see this tool to install the latest Kernel.

To manually download the mainline kernel packages for Linux 5.12, go to the link button:

Select generic for common system, and lowlatency for a low latency system (e.g. for recording audio):

  1. linux-headers-5.12.0-xxxxxx_all.deb
  2. linux-headers-5.12.0-xxx-generic(/lowlatency)_xxx_amd64.deb
  3. linux-modules-5.12.0-xxx-generic(/lowlatency)_xxx_amd64.deb
  4. linux-image-xxx-5.12.0-xxx-generic(/lowlatency)_xxx_amd64.deb

Alternatively you can download and install the kernel binaries via terminal commands ( open terminal via Ctrl+Alt+T):

cd /tmp/

wget -c https://kernel.ubuntu.com/~kernel-ppa/mainline/v5.12/amd64/linux-headers-5.12.0-051200_5.12.0-051200.202104252130_all.deb

wget -c https://kernel.ubuntu.com/~kernel-ppa/mainline/v5.12/amd64/linux-headers-5.12.0-051200-generic_5.12.0-051200.202104252130_amd64.deb

wget -c https://kernel.ubuntu.com/~kernel-ppa/mainline/v5.12/amd64/linux-image-unsigned-5.12.0-051200-generic_5.12.0-051200.202104252130_amd64.deb

wget -c https://kernel.ubuntu.com/~kernel-ppa/mainline/v5.12/amd64/linux-modules-5.12.0-051200-generic_5.12.0-051200.202104252130_amd64.deb

sudo dpkg -i *.deb

Once installed, restart your computer and enjoy!

Uninstall Linux Kernel 5.12:

Restart your machine and select boot with the previous kernel in boot menu ‘Grub2 -> Advanced Option for Ubuntu’. Then run command to remove Linux Kernel 5.12:

sudo dpkg --purge linux-image-unsigned-5.12.0-051200-generic

The Geary email client 40.0 was released a few days ago with UI enhancements.

Like Gnome core apps, Geary has the similar version system. After v3.38, Geary 40 was released days ago with adaptive user interface that supports for half-screen, portrait and small displays. So it finally has a Linux phone friendly UI.

Visual changes also include updated icons and improved performance for displaying large conversations.

Other changes in the release include:

  • Upgraded full-text search engine
  • Improved search for languages such as Thai and Chinese
  • Improved keyboard shortcuts
  • Improved server compatibility
  • Numerous user interface translation updates
  • Numerous bug fixes and user interface improvements

How to Install Geary 40 in Ubuntu:

The new release package so far is only available to install via flatpak package.

1.) Open terminal either from system application menu or by pressing Ctrl+Alt+T on keyboard. When it opens, run command to install the flatpak daemon if you don’t have it:

sudo apt install flatpak

2.) Add the flathub repository which hosts the flatpak package:

flatpak remote-add --if-not-exists flathub https://flathub.org/repo/flathub.flatpakrepo

3.) Finally run command to install Geary flatpak:

flatpak install flathub org.gnome.Geary

Already got an earlier version installed, you can update the package via command:

flatpak update org.gnome.Geary

NOTE: as the client may run in background, you need to kill the process or just reboot to apply updates.

(Optional) To remove the email client run command in terminal:

flatpak uninstall --delete-data org.gnome.Geary

Mozilla Firefox 88.0 was released today. For Linux users now it supports for smooth pinch-zooming using a touchpad.

Besides that, Firefox 88 introduced a new protection against privacy leaks. Now it confines the window.name property to the website that created it. And it will clear the window.name property when navigating between websites to potential privacy leakage.

For those prefer the built-in ‘Take a Screenshot’ action, the feature has been removed from the ‘three dots’ page actions menu. Instead, you can get it from the context menu.

Other changes in Firefox 88.0 include:

  • PDF forms now support JavaScript embedded in PDF files.
  • Margin units are now localized in Print.
  • Disable FTP support.
  • Various security fixes.

How to get Firefox 88 in Ubuntu:

For all current Ubuntu releases, the new Firefox package will be published in Ubuntu security & updates repositories in the next few days.

At that time, you can easily update the web browser through Software Updater (Update Manager)

For those who can’t wait, the non-install portable tarball is available to download at the link below:

Firefox FTP Download Page

gThumb, GNOME image viewer and organizer, released version 3.11.3 a few days ago. Here’s how to install it in Ubuntu 20.04, Ubuntu 18.04, Ubuntu 20.10 via PPA.

gThumb 3.11.3 adds support for JPEG XL – the next generation image coding standard.

JPEG XL (.jxl) is based on ideas from Google’s Pik format and Cloudinary’s FUIF format. It is the next-generation, general-purpose image compression codec by the JPEG committee. Some popular apps, e.g., ImageMagick, XnView MP, have already added support for the image format.

gThumb now opens the .jxl image format through the libjxl library.

Other changes in the release include:

  • Added file actions to the viewer context menu.
  • Removed facebook and picasaweb uploaders
  • Fixed issue that continuously reloads image when it is only image in folder
  • Webp can have transparency as well.
  • New and updated translations.

How to Install gThumb 3.11.3 in Ubuntu via PPA:

For Ubuntu 18.04 (64-bit), Ubuntu 20.04, Ubuntu 20.10, Ubuntu 21.04, Linux Mint 19.x, 20.x, you can install the new release packages via the unofficial PPA.

NOTE for Ubuntu 21.04: It seems to have bug (not sure) in libjxl when building against Clang 11.0.1. So gThumb packge for 21.04 was built without JPEG XL support.

1.) To add the PPA, open terminal from system application launcher, and run command:

sudo add-apt-repository ppa:ubuntuhandbook1/apps

2.) You can then either upgrade the image viewer from an old version via Update Manager (Software Updater), or run command in terminal:

sudo apt install gthumb

Uninstall gThumb & the Ubuntu PPA

To remove gThumb image viewer, run command:

sudo apt remove --autoremove gthumb gthumb-data

To remove the Ubuntu PPA, either run the apt-add-repository command with --remove flag, or use Software & Updates -> Other Software.

The CopyQ clipboard manager released version 4.0.0 a day ago. Here’s how to install it in Ubuntu 20.04, Ubuntu 21.04, Ubuntu 18.04 via PPA.

CopyQ is a free and open-source clipboard manager with editing and scripting features. The new 4.0.0 release features new script engine with some new functions, better ECMAScript support, improved performance.

The release also adds Wayland support and bash completion script. Other changes include:

  • Update synchronization plugin to keep order of new items consistent between multiple instances.
  • Search multiple words in any order
  • Use system notification popups.
  • Item rows set to 1 by default in main window and tray menu
  • Tags can be “locked” in configuration.
  • Web plugin removed.
  • New advanced options allow to set intervals and wait times for copying,
    pasting and window focus.

How to Install Copyq 4.0.0 in Ubuntu:

The official PPA repository has made the latest packages for Ubuntu 18.04, Ubuntu 20.04, and Ubuntu 20.10.

1. To add the PPA, open terminal (Ctrl+Alt+T) from application menu and run command:

sudo add-apt-repository ppa:hluk/copyq

Type user password (no asterisk feedback due to security reason) when it prompts and hit Enter to continue.

2. Then install CopyQ either via Synaptic package manager or by running commands in terminal:

sudo apt update

sudo apt install copyq

Once installed, start the clipboard manager from application menu and you’ll see the icon in system tray area.

Uninstall:

To remove the software, either use Synaptic package manager or run command:

sudo apt-get remove --autoremove copyq

To remove PPA repositories, launch Software & Updates and navigate to Other Software tab.

Wine

Wine 6.6 was released a few days ago as the latest development release of the Windows compatibility layer.

In the new release the Mono engine is updated to version 6.1.1 with upstream updates. DWrite and DnsApi libraries are now converted to PE. And it improved plug & play driver support.

Other changes in Wine 6.6 include various bug-fixes to Windows applications and games, e.g., Evil Twin, Half-life, Breath of Fire IV, Google drive, Legends of Runeterra, and more.

How to Install Wine 6.6 in Ubuntu:

The official Wine apt repository now provides the new release package for Ubuntu 18.04, Ubuntu 20.04, and Ubuntu 20.10

Open terminal either by pressing Ctrl+Alt+T on keyboard, or by searching for ‘terminal’ from system application menu. When it opens, run following steps one by one.

Install Wine Development version via following commands will replace the latest stable Wine release package if installed.

1.) Run command to enable 32 bit architecture (if you don’t have it):

sudo dpkg --add-architecture i386

Type user password (no asterisk feedback) when it asks and hit Enter to continue.

2.) Install the repository key by running command:

wget -O - https://dl.winehq.org/wine-builds/winehq.key | sudo apt-key add -

3.) Add wine repository via command:

sudo apt-add-repository 'deb https://dl.winehq.org/wine-builds/ubuntu/ focal main'

IMPORTANT: In this command, you have to replace focal with:

  • focal for Ubuntu 20.04, Linux Mint 20.x
  • groovy for Ubuntu 20.10.
  • bionic for Ubuntu 18.04 and Linux Mint 19.x

Don’t know your system edition? Run lsb_release -a command in terminal to check out.

4.) For Ubuntu 18.04 and Linux Mint 19.x only, libfaudio0 library is required to install from a third-party repository by running command:

sudo add-apt-repository ppa:cybermax-dexter/sdl2-backport

5.) Finally install Wine 6.6 via command:

sudo apt update && sudo apt install --install-recommends winehq-devel

If you get unmet dependency issue, try aptitude command instead:

sudo apt install aptitude && sudo aptitude install winehq-devel

Uninstall wine:

You may remove the PPA by launching Software & Updates utility and navigating to Other Software tab.

To remove wine 6.6, run command in terminal:

sudo apt remove --auto-remove winehq-devel