Archives For wayland

Running Ubuntu 22.04 with the default Wayland session? You can switch your web browser’s backend to get even faster and smoother experience.

Firefox, Google Chrome and Chromium based web browsers do have native Wayland support, but they still use X11 as backend in Ubuntu desktop.

Since Ubuntu 22.04 by default logs into Wayland session, user can also change the web browser’s backend to get faster and smoother browsing experiences. I didn’t run any benchmark. But after switching to Wayland, my browser now has:

  • obviously better touchpad scrolling
  • 2-finger spread/pinch gestures to zoom in/out

Enable Wayland for Chrome/Chromium

For Google Chrome, Chromium and their based web browsers, e.g., Edge, Vivaldi, just type chrome://flags/ in address bar and hit Enter.

When the page opens, search for Preferred Ozone platform and use the dropdown menu to set it value to “Wayland“. Finally, click “Relaunch” button to apply change by restarting the web browser.

Chrome enable wayland

Native Wayland for Firefox

For firefox web browser, user need to edit the “/etc/environment” config file.

First, press Ctrl+Alt+T on keyboard to open terminal. When it opens, run command to open the file via gedit text editor:

sudo gedit /etc/environment

Replace gedit with your favorite text editor, such as gnome-text-editor for next Ubuntu 22.10 & Fedora.

When the file opens in text editor, just add a new line:

MOZ_ENABLE_WAYLAND=1

As the screenshot shows, you can also add more rules into this config file:

  • MUTTER_DEBUG_ENABLE_ATOMIC_KMS=0 – to fix a slightly laggy, slightly sloppy mouse response issue.
  • CLUTTER_PAINT=disable-dynamic-max-render-time to get a smoother frame rate.

After saving the changes in the config file, restart your computer to take effect!

via: Ubuntu Discourse

Looking for how to record Ubuntu desktop in Wayland session? Here’s how to do it in Ubuntu 21.10 using Kooha.

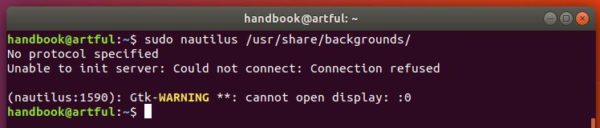
Ubuntu switched to “Wayland” session since Ubuntu 21.04. However, many apps, e.g., Kazam, Peek and vokoscreen-NG, do not support it. Some apps including OBS-Studio claim to support for Wayland, but either record blank screen or just refuse to work!

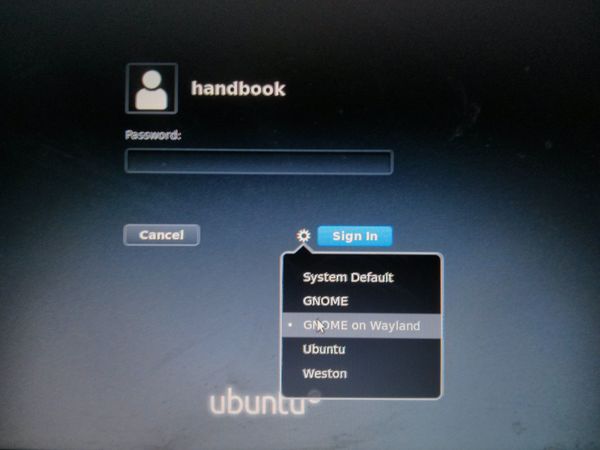
The best solution in my opinion is switch back to Xorg session. To do so, simply log out, select your user and then choose “Ubuntu on Xorg” via bottom-right gear button menu. All the apps will work once you login with Xorg.

For those sticking to the default Wayland, Kooha is one of good choices until GNOME’s “in-shell” screenshot & screencast UI is out.

Kooha screen recorder

How to Install Kooha in Ubuntu:

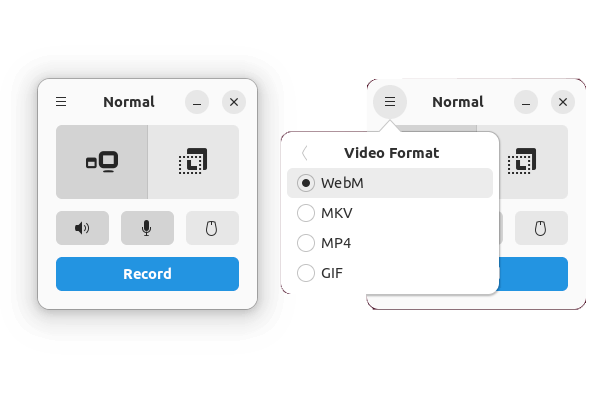
The simple screen recorder allows to capture the full-screen, selected app window, and a selection screen area. It saves video into WebM, MP4, GIF, and MKV formats.

The steps below is only recommended for Ubuntu 21.10 which has properly Pipewire support that is required by Kooha.

1. Setup Flatpak daemon:

The app is available to install as Flatpak package. So you have to first make sure he flatpak daemon is installed. Press Ctrl+Alt+T on keyboard to open terminal, then run command:

sudo apt install flatpak

Next, add the flathub repository by running command in terminal:

flatpak remote-add --if-not-exists flathub https://flathub.org/repo/flathub.flatpakrepo

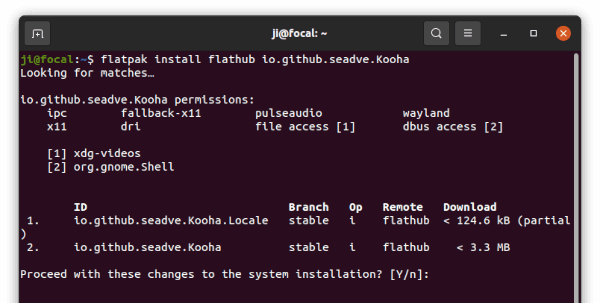
2. Install Kooha screen recorder:

After that, run the command below in terminal to install the screencast app:

flatpak install flathub io.github.seadve.Kooha

Upgrade the Pipewire service:

Kooha requires pipewire server, xdg-desktop-portal, and WebRTC (Firefox). There are properly installed and enabled in Ubuntu 21.10 out-of-the-box (at least in my case). The recorder somehow refuses to work with built-in pipewire, but the updated package from this Ubuntu PPA will make it work!

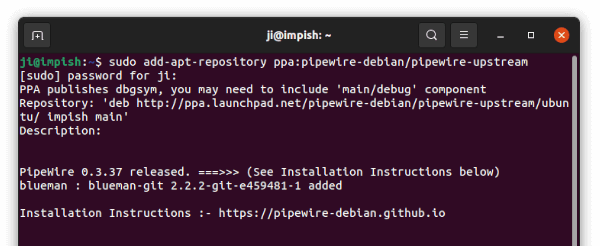
1.) Firstly, press Ctrl+Alt+T to open terminal. Then run command to add the PPA:

sudo add-apt-repository ppa:pipewire-debian/pipewire-upstream

Type user password when it asks (no asterisk feedback) and hit Enter to continue.

2.) Next, either run sudo apt upgrade to upgrade all system packages or use apt command to install the audio & video server:

sudo apt install pipewire

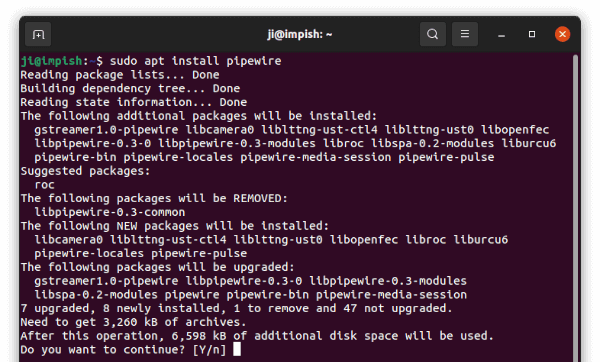
Finally, restart your computer.

Start recording via Kooha:

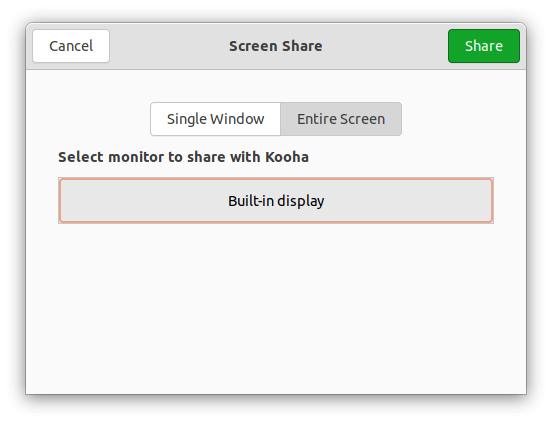
In the next boot, search for and open Kooha from activities overview screen. When it opens, toggle recording system sound, microphone, mouse cursor, and finally click on “Record” button.

It will pop-up the dialog to either choose full-screen. You need to click the “Built-in display” or other monitor (if any) and then click “Share” to start recording.

Record full-screen – Need to click select display

Or, choose “Single Window” and select between all opened app windows.

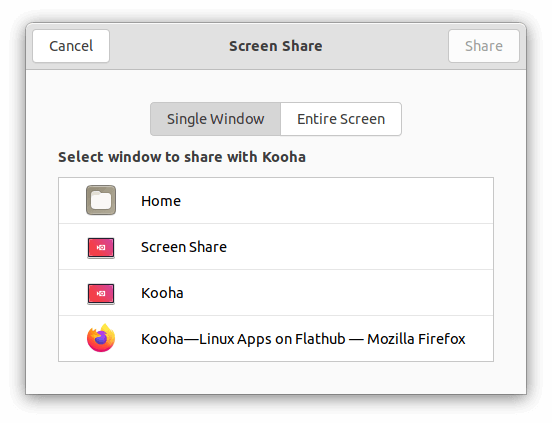
Kooha record app window

When recording starts, the app window counts up with button to stop. Though it also has keyboard shortcut Ctrl+R to toggle record.

How to Uninstall Kooha:

To remove the Kooha screen recorder app, open terminal and run command:

flatpak uninstall --delete-data io.github.seadve.Kooha

And to restore the stock pipewire system service, run command to install ppa-purge and purge the Ubuntu PPA will do the trick:

sudo apt install ppa-purge && sudo ppa-purge ppa:pipewire-debian/pipewire-upstream

That’s all. Enjoy!

Found that your desktop screen recording applications do not launch in Ubuntu 17.10 default Wayland session?

Well, try Green Recorder, the first desktop program to support Wayland display server on GNOME session.

Green Recorder is a GTK+ 3 application written in Python that features:

  • Record audio and video on almost all Linux interfaces.
  • Support mkv, avi, mp4, wmv, gif and nut (only WebM for Wayland)
  • A play button to play last recorded video.
  • Right-click system tray icon to stop recording.
  • Choose the audio input source from list.
  • Run command after recording.

How to Install Green Recorder in Ubuntu 17.10:

The latest Green Recorder 3.0.5 features a lot of small fixes and restrcutered UI. You can install it in Ubuntu 17.10, and Ubuntu 16.04, Ubuntu 14.04, Ubuntu 17.04 via its official PPA.

1. Open terminal either via Ctrl+Alt+T or by searching ‘terminal’ from app launcher. When it opens, run command to add the PPA:

sudo add-apt-repository ppa:fossproject/ppa

Input your password (no visual feedback while typing) when it prompts and hit Enter.

2. Then run commands to check repository packages and install the recorder:

sudo apt-get update

sudo apt-get install green-recorder

Uninstall:

To remove the desktop screen recorder, simply run following command in terminal:

sudo apt-get remove --autoremove green-recorder

And remove the PPA via Software & Updater utility under Other Software tab.

Ubuntu 17.10 uses Wayland in the default session and Xorg for optional. However, many graphical applications need to run as root so far does not launch in Wayland.

You’ll get following similar errors while running graphical applications via root:

  1. For some applications, e.g., Synaptic Package Manager, Grub Customizer, Gparted, and Ubuntu Tweak, they does not launch in Wayland.

    Or you may get following error when trying to launch them via gksu command:

    Failed to run *** as user root. Unable to copy the user’s Xauthorization file.

  2. Starting graphical application via sudo in terminal window will get error:

    No protocol specified. Gtk-WARNING **: Cannot open display: :0

The most straightforward workaround is to use xhost to temporarily allow the root user to access the local user’s X session.

To do so, run command:

xhost si:localuser:root

After running the command, these graphical applications can be launched from app launcher or via sudo, gksu, pkexec commands until you log out.

To make this work automatically at login, search for and launch Startup Applications utility, click the “Add” button to run the command at startup:

  • name: whatever
  • command: xhost si:localuser:root
  • comment: whatever

Wayland PPA

Daily builds of Wayland and Weston are now available in PPA for Ubuntu 14.04, Ubuntu 14.10, and Ubuntu 15.04.

Thanks to Bryce Harrington, a former Canonical developer who continues to be heavily involved in Wayland development, he has created an automatic builds PPA to make it easy to try out the newest Wayland/Weston code on Ubuntu.

To get started, open terminal from the Dash, App launcher, or by pressing Ctrl+Alt+T on keyboard. When it opens, do below steps:

1. To add the PPA, paste below command in terminal and run:

sudo add-apt-repository -y ppa:wayland.admin/daily-builds

2. After that, install the package weston and XWayland via Synaptic Package Manager or by running below commands one by one:

sudo apt-get update

sudo apt-get install weston xwayland

3. Now you should be able to start Weston within X by running command weston, which provides a Terminal along with a basic window manager functionality.

If you want you can create & edit weston.ini file via below command:

gedit ~/.config/weston.ini

Change its appearances by adding some settings like this page. Finally the weston window looks like:

weston-window

4. To running Gnome Shell session on Wayland, run command:

sudo apt-get install gnome-session-wayland

Then log out and select “Gnome on Wayland” in gdm login screen:

gnome_on_wayland

If you’re using the default LightDM display manager, you may have to do :

  1. Install Gnome Shell if don’t have Gnome session:
    sudo apt-get install gnome-shell
  2. If you’ve installed Gnome-Shell but still using LightDM, run command to select gdm:
    sudo dpkg-reconfigure lightdm
  3. Finally restart your computer and you should see the gdm login screen as above picture shows.