Archives For November 30, 1999

This is a step by step beginner’s guide shows how to install iTunes in Ubuntu 22.04 & 23.10.

Windows app is easy to install in Ubuntu & other Linux, thanks to Wine. However, it’s not so easy for beginners to install & setup Wine.

So, here I’m going to show how to install iTunes using Bottles (a wine runner) to make things as easy as possible.

NOTE that, iTunes running with wine does NOT detect iPhone, at least for me. But, it’s OK for syncing music via iCloud! For just transferring music files, VLC is a good alternative.

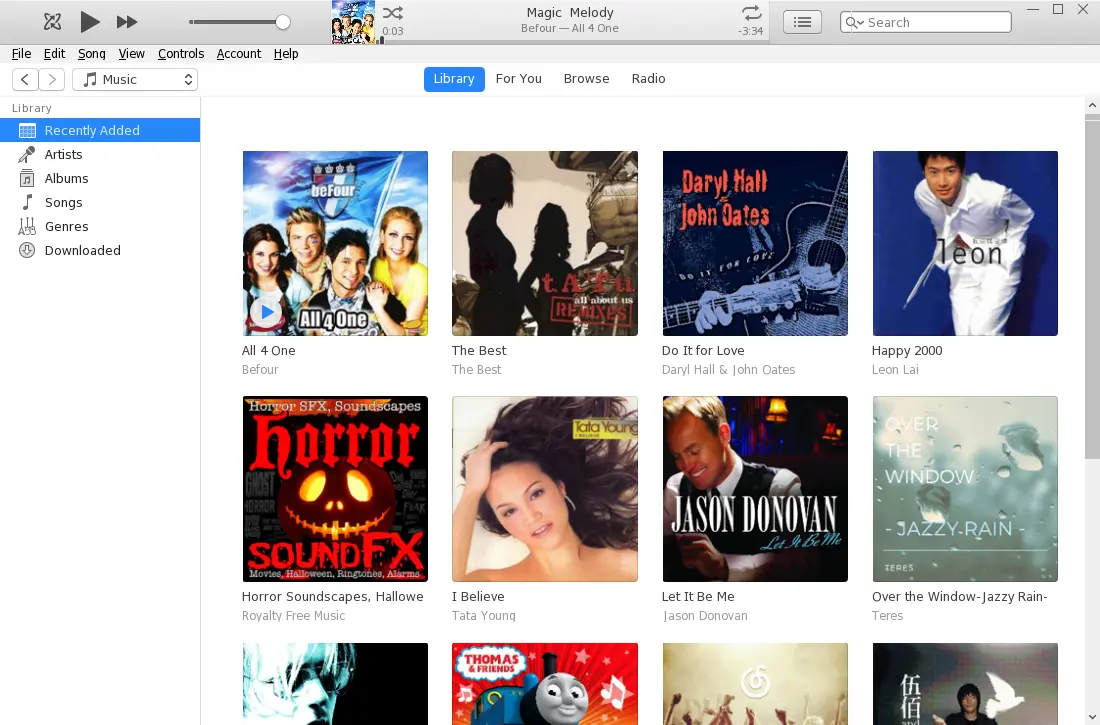
iTunes 12.8.0.150 in Ubuntu 22.04 LTS

NOTE 1: This tutorial is tested and works in Ubuntu 22.04. Though, it should work in most other Linux!

NOTE 2: In this tutorial I installed iTunes 12.8.0.150! Newer versions either crash frequently or run into blank window.

Step 1: Install Bottles

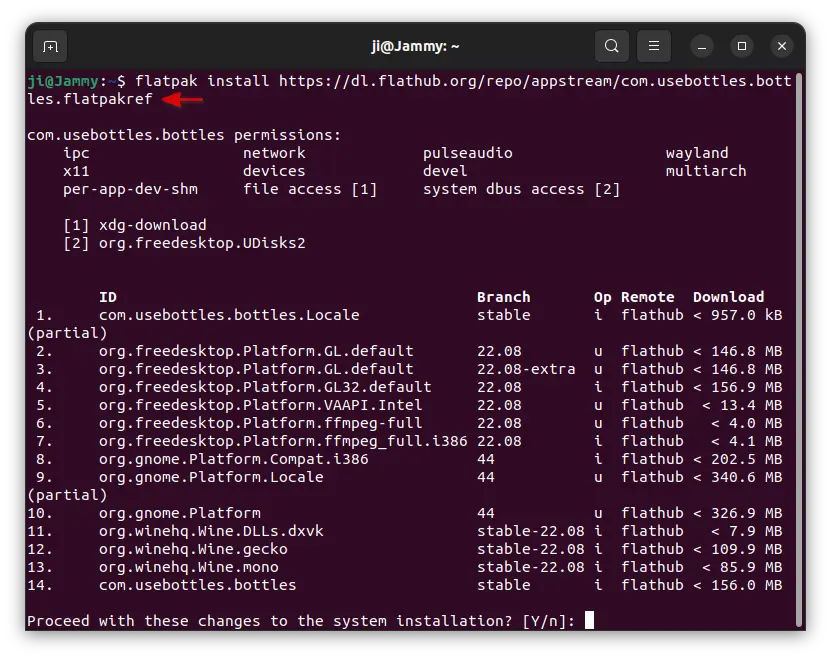
As mentioned above, Bottles is a wine runner to make running Windows apps in Linux super easy. The only downside could be that it’s only available as Flatpak runs in sandbox.

Firstly, press Ctrl+Alt+T on keyboard to open terminal. When it opens, run command to enable Flatpak support:

sudo apt install flatpak

Other Linux can follow official setup guide to enable Flatpak support.

Then, install Bottles as Flatpak by running command:

flatpak install https://dl.flathub.org/repo/appstream/com.usebottles.bottles.flatpakref

This command may have more than a thousand MB download due to run-time libraries. Don’t be worried about it. Installing Wine directly from its website will also has quite a few hundred MB files to download.


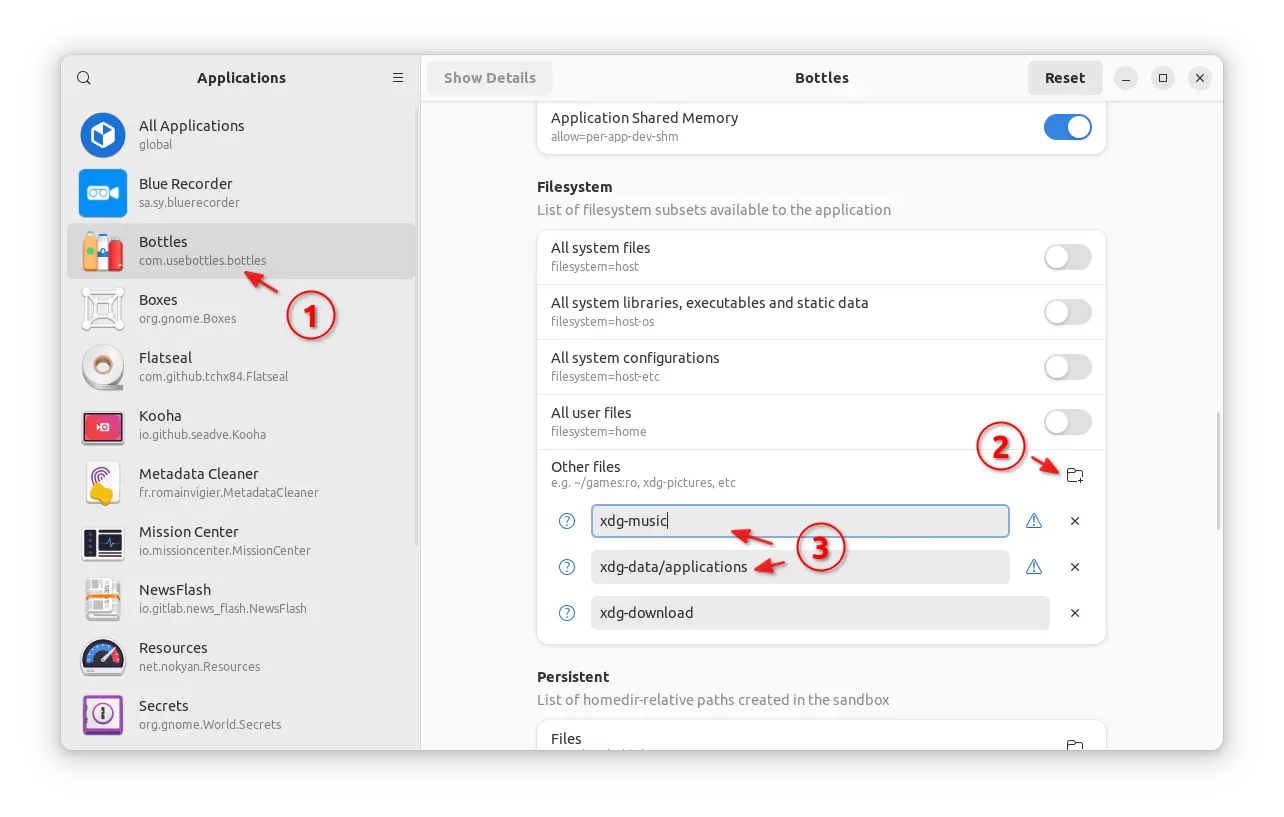
Step 2: Setup Permission for Bottles

Bottles is installed as Flatpak which runs in sandbox. By default, it has only file access to your user ‘Downloads‘ folder.

If you want to make apps, that are installed through Bottles, visible in start menu and/or dock, and access music files in other folders (such as ‘Music’ folder), then you have manually grant permissions.

Option 1: Use command to grant file access permission:

To allow Bottles to add apps into start menu, run command in terminal:

flatpak override com.usebottles.bottles --user --filesystem=xdg-data/applications

To allow Bottles (iTunes) to access your user Music folder, use command:

flatpak override com.usebottles.bottles --user --filesystem=xdg-music

Option 2: Use Flatseal, graphical tool.

Flatseal is a popular graphical tool to manage permissions for Flatpak applications.

First, open terminal (Ctrl+Alt+T) and run command to install Flatpseal:

flatpak install https://dl.flathub.org/repo/appstream/com.github.tchx84.Flatseal.flatpakref

After installed the tool, launch it. Choose “Bottles” from left, and click add “Filesystem -> Other files” permission for:

  • xdg-music
  • xdg-data/applications

Step 3: Download iTunes (exe)

Apple website only shows the download for the latest version of iTunes, which is NOT working good (even not work so far) with current version of Wine.

For the old versions, there’s a 3rd party website that provides a large list of downloads. All download URLs in that page are official (point to apple.com), the website only lists them out for you.

In my tests, iTunes 12.9.x is the most recent version that installs, which however CRASH quite often. The iTunes 12.8.0.150 is the latest that’s working good.

NOTE: Wine and Bottles keep updating with new features and bug-fixes. So, newer iTunes versions might be working in future when you see this tutorial. Try for your self.

Step 4: Install iTunes

Now, search for and launch “Bottles” from start menu or ‘Activities’ overview depends on your desktop environment.

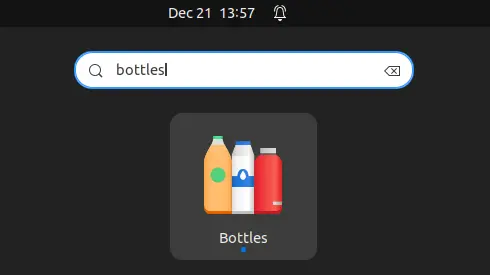
NOTE: first time installing a Flatpak app, need a log out and back in to make app icon visible in start menu. For choice, you may run flatpak run com.usebottles.bottles command to start it from terminal.

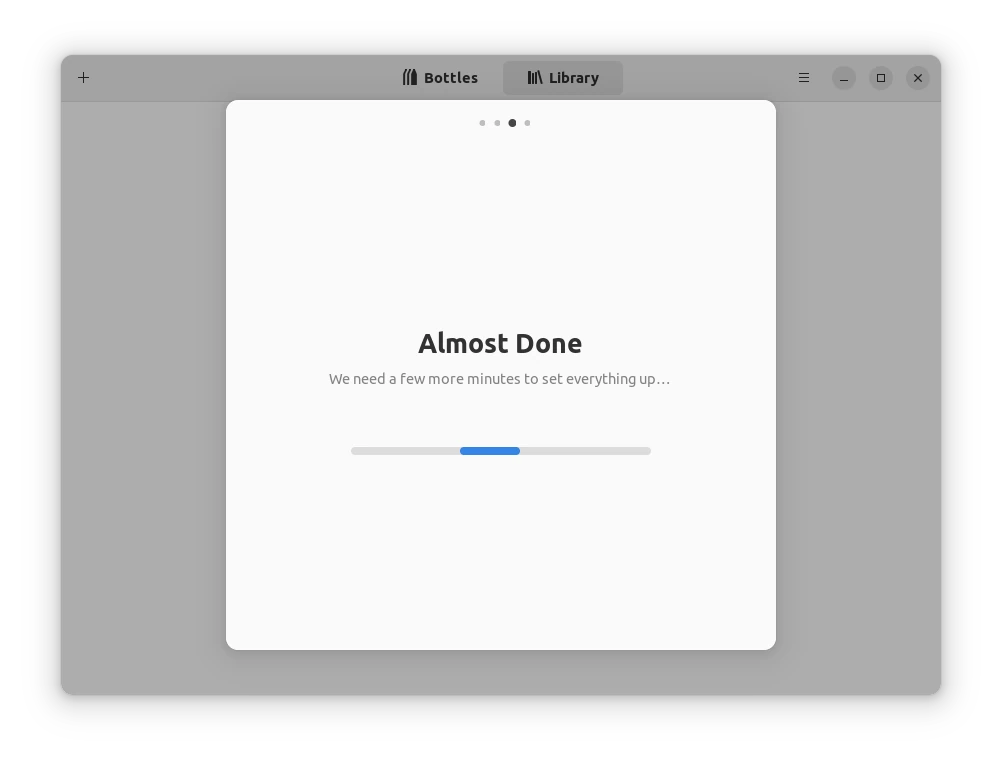
In the first launch, follow the wizard to run the initial setup.

When done, click either “Create New Bottle…” button or the top-left “+” icon to get started.
Then, in next window type a name (‘iTunes’ in the case), select “Application” as environment type, and click “Create”.

Next, it automatically generate configuration and config Wine for the new ‘Bottle’ you just created.

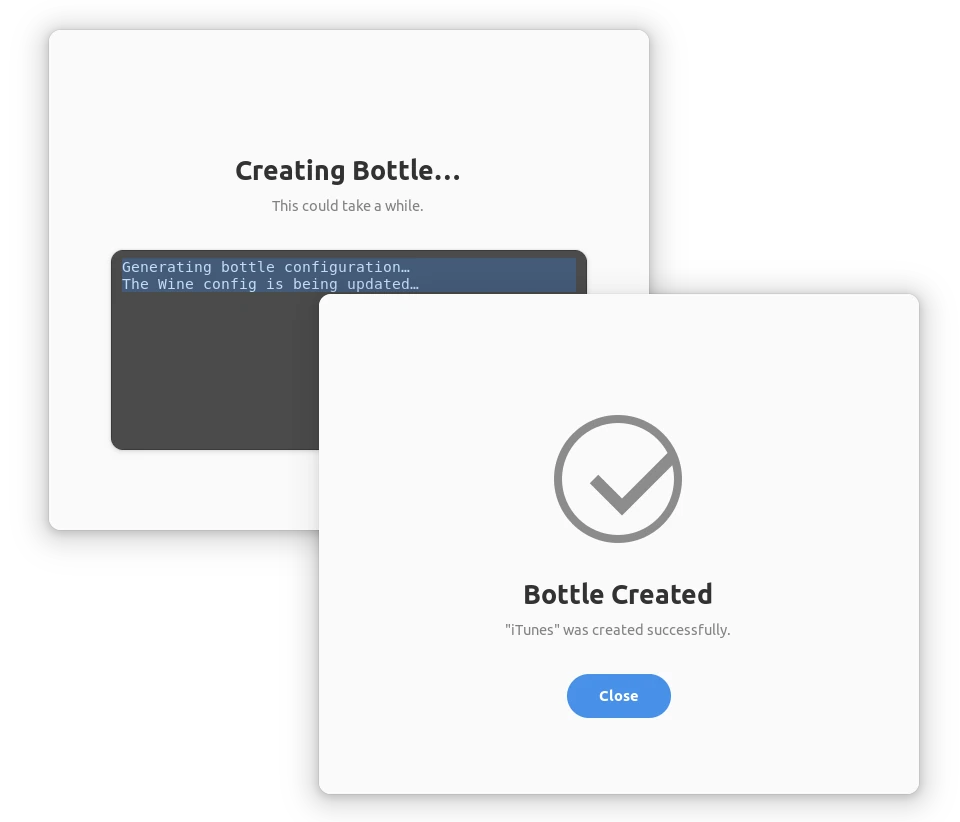
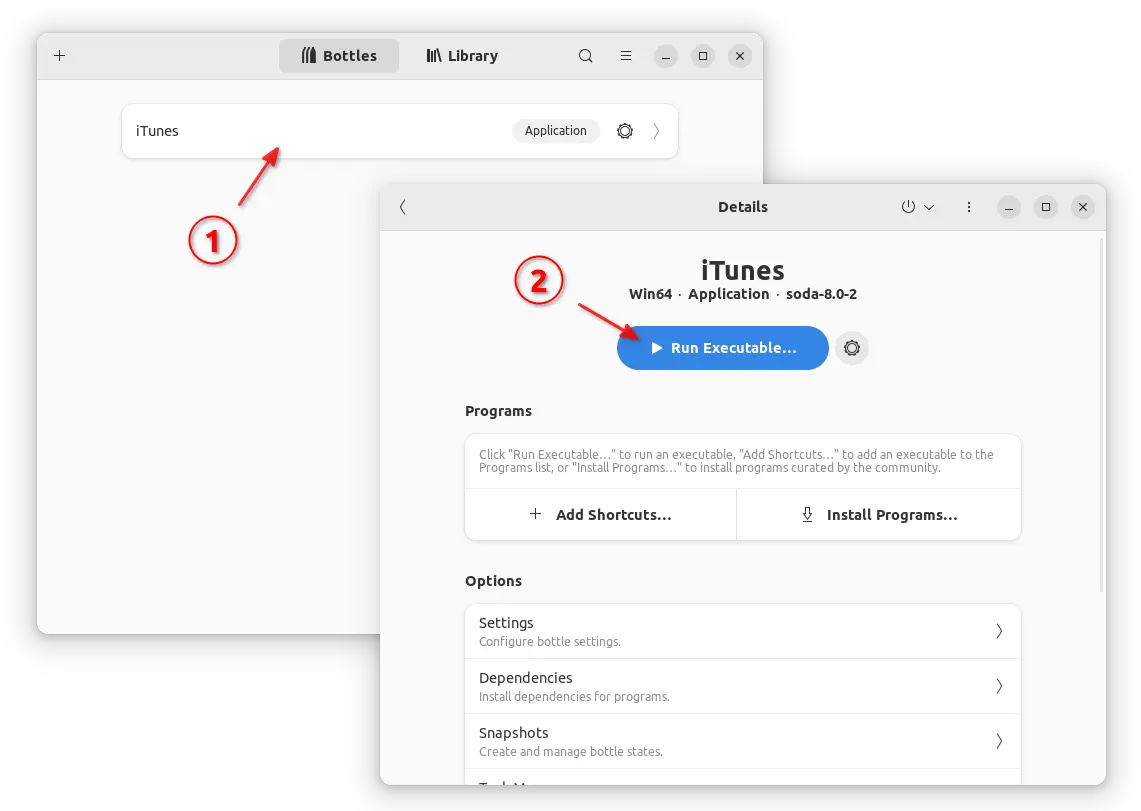
When done, click to open the ‘Details’ page for the new bottle you just created. Click on “Run Executable” button, then browse and choose the “iTunes64Setup.exe” file you downloaded in last step.

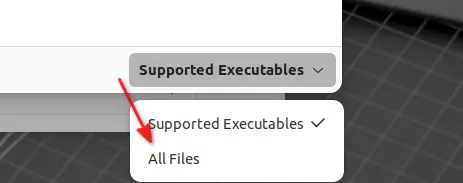
Note in the file chooser dialog, you may need to switch bottom filter to “All Files“, so to make the .exe file visible.

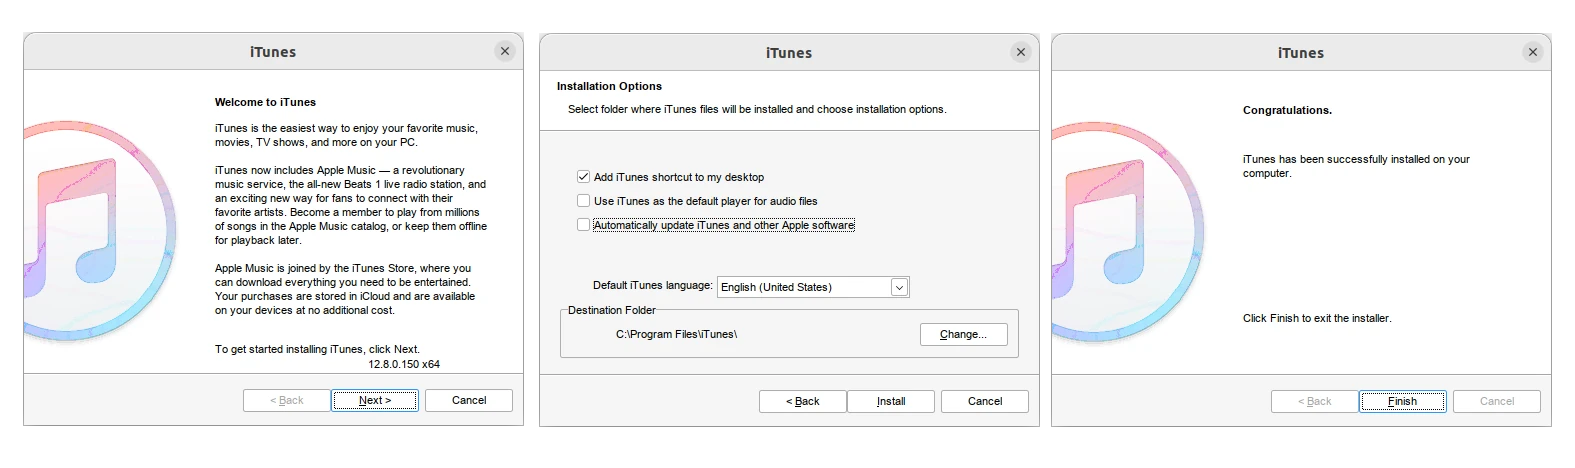
After that, the installer wizard for iTunes should start. Just follow to install it until done.

Step 5: Launch iTunes

To launch iTunes, either go to ‘Details’ page for the Bottle in Bottles, and click the triangle icon “▸”.

Or, click the 3 dots “⋮” icon right after it, and select “Add Desktop Entry” menu option (need to done Step 2 first).

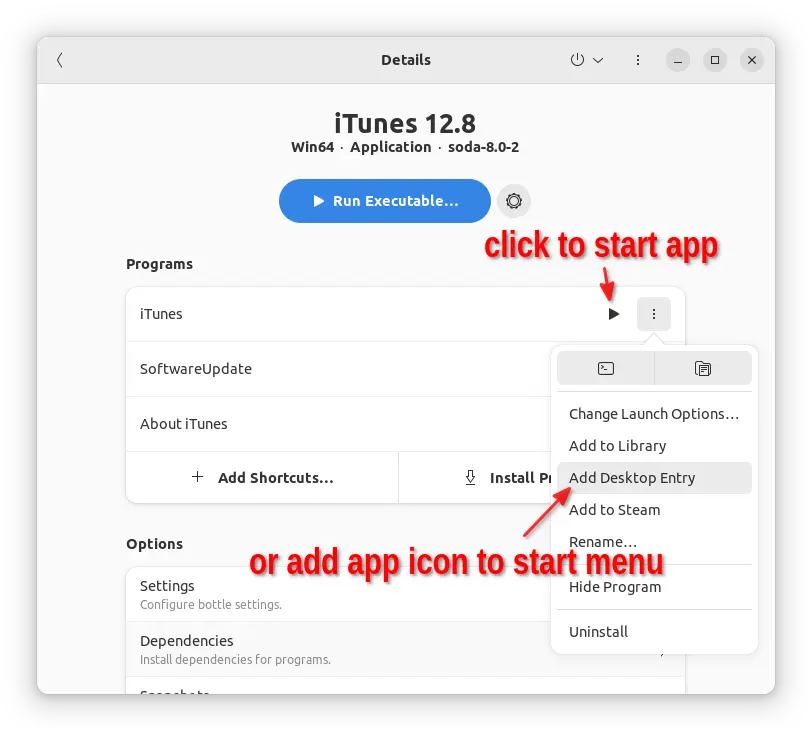
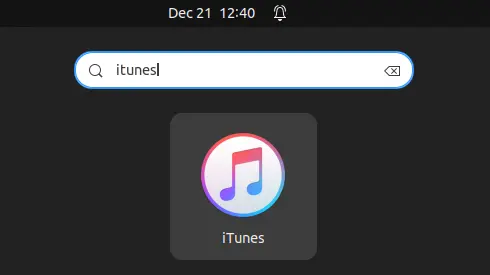
After that, you can start iTunes from start menu, just like other apps installed from Ubuntu Software.
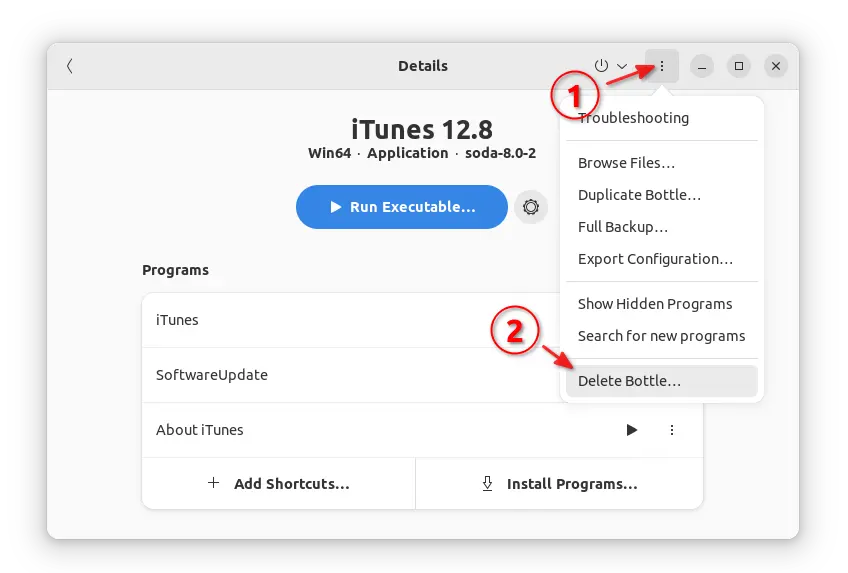
Uninstall

To remove iTunes only, simply launch ‘Bottles’ and go to Details page for iTunes. Then use the top-right corner “⋮” menu option to delete bottle.

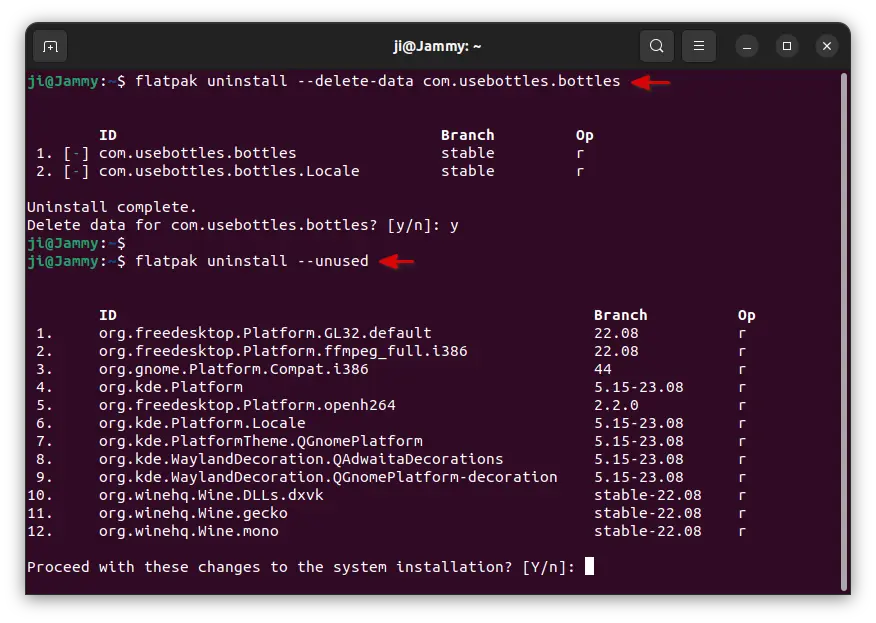
To remove Bottles app, open terminal (Ctrl+Alt+T) and run command:

flatpak uninstall --delete-data com.usebottles.bottles

In command, skip --delete-data will keep the apps installed through Bottles

After removing Bottles, also run the command to remove useless run-times to free up disk space:

flatpak uninstall --unused

For Ubuntu 23.04, Fedora 38 and other Linux with Python 3.11 as default, Pithos 1.6.1 was released today to fix the plugin support!

Pithos is a simple free open-source GTK client for Pandora music & podcasts, writing in Python programming language.

The previous versions lack plugin support for the latest Linux Distributions due to Python 3.11. When you try to open the ‘Plugins’ tab in Preferences, it just shows a blank page.

If you start it from command line, it will output something look like:

Traceback (most recent call last):
  File "/usr/share/pithos/pithos/plugin.py", line 147, in on_got_bus
    plugin = plugins[name] = load_plugin(name, window, bus)
                             
  File "/usr/share/pithos/pithos/plugin.py", line 101, in load_plugin
    module = __import__('pithos.plugins.' + name)
             
  File "/usr/share/pithos/pithos/plugins/mpris.py", line 66, in 
    class PithosMprisService(DBusServiceObject):
  File "/usr/share/pithos/pithos/plugins/mpris.py", line 647, in PithosMprisService
    @dbus_method(MEDIA_PLAYER2_IFACE)
     
  File "/usr/share/pithos/pithos/plugins/dbus_util/DBusServiceObject.py", line 138, in decorator
    in_args = _create_arginfo_list(func, in_signature)
              
  File "/usr/share/pithos/pithos/plugins/dbus_util/DBusServiceObject.py", line 123, in _create_arginfo_list
    arg_names = inspect.getargspec(func).args

To fix the issue, the new 1.6.1 was released. Which, also fixed the issue that very short songs are being labeled as advertisements.

Nothing else!

How to Install Pithos 1.6.1 in Ubuntu via PPA

For all current Ubuntu releases, including Ubuntu 18.04, Ubuntu 20.04, Ubuntu 22.04, Ubuntu 22.10, Ubuntu 23.04, and their based systems, I’ve uploaded the app package into this PPA repository.

To add the PPA and install Pithos package, do:

  1. First, press Ctrl+Alt+T key combination on keyboard to open terminal. When it opens, run the command below to add the PPA:
    sudo add-apt-repository ppa:ubuntuhandbook1/apps

    Type user password when it asks (no asterisk feedback) and hit Enter to continue.

  2. Then, run command to fresh the package cache for old Ubuntu 18.04 and Linux Mint:
    sudo apt update
  3. Finally, install or update the lightweight Pandora Radio client to listen online music:
    sudo apt install pithos

As the application does not update frequently, you may also download & install the .deb package directly from this page.

For most Linux, Pithos is also available to install as Flatpak package runs in sandbox.

Uninstall Pithos

To remove the Ubuntu PPA, open terminal and run command:

sudo add-apt-repository --remove ppa:ubuntuhandbook1/apps

Or, open ‘Software & Updates’ utility and remove the source line under ‘Other Software’ tab.

To remove Pithos, use command:

sudo apt remove --autoremove pithos

Ubuntu’s default Rhythmbox music player finally released a new version with podcast improvements, code cleanup, and various bug-fixes.

It has been more than 2 years since the last release of Rhythmbox music player. The new Rhythmbox 3.4.5 comes with improvements to the podcast support:

  • Rewritten podcast downloader with better resume and retry
  • Use podcast episode GUIDs to handle episode URL changes
  • Fixes for feed description, album art, and downloading issue.

The release also ported DAAP plugin to libdmapsharing-4.0 API, enabled UTF-8 support in metadata scanner. The app ID has been renamed to “org.gnome.Rhythmbox3”. And, it has now switched to Meson for its building system.

Other changes include:

  • Remove soundcloud plugin, mmkeys plugin, and gnome-settings-daemon MediaKeys plugin
  • Song info ui, webremote plugin, and many other fixes.
  • And, translation updates. See more here.

How to Get Rhythmbox

Ubuntu usually won’t update the package for all current Ubuntu releases. So far, the only way to get Rhythmbox is using the Linux universal Flatpak package.

1. Press Ctrl+Alt+T on keyboard to open terminal. When it opens, run the commands below to install the Flatpak daemon:

sudo apt install flatpak

Ubuntu 18.04 and Ubuntu 16.04 need to add the Flatpak PPA first.

2. Next, all current Ubuntu releases may install the player by running the command below in terminal:

flatpak install https://dl.flathub.org/repo/appstream/org.gnome.Rhythmbox3.flatpakref

To avoid duplicated app icons, you may remove the system default package via sudo apt remove rhythmbox

Uninstall Rhythmbox flatpak

For any reason, you can remove the package easily by running the command below in terminal window:

flatpak uninstall org.gnome.Rhythmbox3

And cleanup unused runtimes via flatpak uninstall --unused.

QuodLibet-icon

Quod Libet is an open-source music player, tag editor and library organizer that is able to handle libraries with over 10,000 songs.

Quod Libet is a GTK+ based audio player written in Python, using the Mutagen tagging library. The main design philosophy is that the user knows how they want to organize their music best and is built to be fully customizable and extensible using regular expressions.

The player works on Windows, Linux, and Mac OS X, it supports most of the features you’d expect from a modern media player: Unicode support, advanced tag editing, Replay Gain, podcasts & internet radio, album art support and all major audio formats.

Quodlibet Music Player

Install/Upgrade Quod Libet in Ubuntu:

While Ubuntu repositories provide an old version of this software, you can get the latest version (3.3.1 so far) from its PPA repository and receive future updates. Ubuntu 12.04, Ubuntu 14.04, Ubuntu 14.10, Ubuntu 15.04 and Linux mint are supported so far.

To add the PPA, press Ctrl+Alt+T on keyboard to open terminal and run:

sudo add-apt-repository -y ppa:lazka/ppa

Add Quod Libet PPA

After that, upgrade Quod Libet from an old version by running Software Updater and installing updates.

Or run below commands one by one to install it:

sudo apt-get update

sudo apt-get install quodlibet

audacious 3.4.3 Ubuntu

Audacious, the default audio player in Lubuntu and in Ubuntu Studio now is at version 3.4.3, which brings two important bug fixes and translation updates.

As you may know Audacious is an advanced music player with a focus on low resource usage, high audio quality, and support for a wide range of audio formats.

Audacious has below features (more about audacious at wikipedia):

  • built-in gapless playback
  • support for a wide range of audio formats
  • various plugins
  • support for Winamp 2 skins
  • accepts connections from client software, such as Conky.

The new release Audacious 3.4.3 mainly fixed below bugs:

  • Opus files are missed when opening folder (#364)
  • Exporting as cue-file produces segmentation fault (#371)

Audacious Music Player

Install Audacious:

For Ubuntu and its derivatives, we can install audacious from PPA. Supports Ubuntu 14.04, Ubuntu 13.10, Ubuntu 13.04, Ubuntu 12.10, Ubuntu 12.04.

To get started, press Ctrl+Alt+T on keyboard to open terminal. When it opens, run commands below one by one:

sudo add-apt-repository ppa:nilarimogard/webupd8

sudo apt-get update

sudo apt-get install adacious