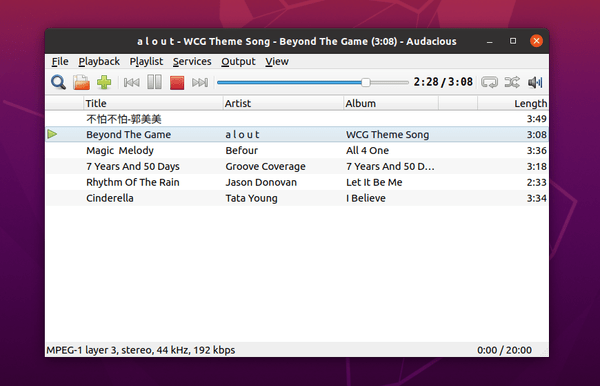
Audacious music player 4.0.4 was released 2 days ago with further improvements to the new Qt5 UI. Ubuntu PPA updated for all current Ubuntu releases.
Changes in the Qt interface include:
- Add keyboard shortcuts for Open/Add Folder
- Fix files being moved instead of copied when dragged to a file manager
For the Qt Winamp interface, some old features are added back:
- Enable window snapping to screen edges
- dragging files from file manager
There are also translation updates and more bug-fixes, see Audacious 4.0.4 release note.
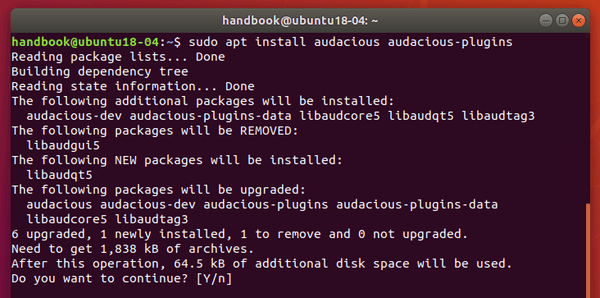
How to Install Audacious 4.0.4 in Ubuntu:
The unofficial PPA contains the latest packages for Ubuntu 16.04, Ubuntu 18.04, Ubuntu 19.10, and Ubuntu 20.04.
1. Open terminal by either pressing Ctrl+Alt+T on keyboard or searching for ‘terminal’ from application menu. When it opens, run command to add the PPA:
sudo add-apt-repository ppa:ubuntuhandbook1/apps
Type your password (no asterisk feedback) when it prompts and hit Enter to continue.

2. Then run commands one by one in terminal to install or upgrade the audio player:
sudo apt update

sudo apt install audacious audacious-plugins
Uninstall:
You can easily remove the PPA either by going to Software & Updates utility -> Other Software tab, or by running command:
sudo add-apt-repository --remove ppa:ubuntuhandbook1/apps
To remove audacious, either use your system package manager or run command:
sudo apt remove --autoremove audacious audacious-plugins