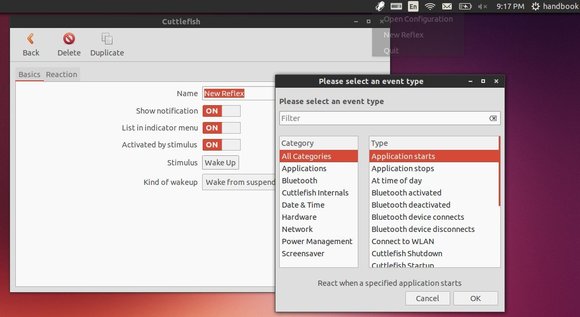
Archives For November 30, 1999

Classic Menu Indicator 0.08 Has Been Released

Last updated: August 26, 2013

After about one year and a half, Classic Menu Indicator finally released a new version 0.08. It brings a few improvements and adds support for more languages.

As you may know, ClassicMenu Indicator is a indicator applet for Unity, that provides the main menu of Gnome2/Gnome Classic.

classic menu indicator 0.08

New features in ClassicMenu indicator 0.08:

  • ClassicMenu Indicator has its own icon now
  • added support for some configuration options
  • improved handling of missing/unusable icons
  • extended “ClassicMenu Indicator” submenu
  • added Estonian, French, Croatian, Japanese, Malay, Brazilian, Portuguese, Russian, Chinese (Simplified) language support
  • changed the way commands are run

To install Classic Menu Indicator 0.08, just download and double-click to install the DEB:

ClassicMenu_indicator_0.08_all.deb

The source code is also available for downloading from here.

The Cloud Based Nuvola Music Player has reached 2.1.0. It brings new features for users as well as for service maintainers and many bug fixes.

As you may know, Nuvola Player runs a web interface of cloud music services – Google Play Music, Amazon Cloud Player, 8tracks, Grooveshark, Hype Machine, Pandora, Rido – in its own window and provides integration with a Linux desktop.

nuvola player ubuntu unity

The new release Nuvola 2.1.0 brings following changes:

  • Added information about format support.
  • New service Deezer.
  • Extensions: Almost all extensions are enabled by default.
  • Notifications extension: Added support for actions and resident notifications.
  • Last.fm extension: Added switches to disable scrobbling for particular services.
  • Added a few keyboard shortcuts: Go back Left and go forward Right.
  • Service selector is opened in a separate window and uses native GTK+ widgets instead of web view. GTK+ zoom level is respected and non-free screenshots are not loaded.
  • User interface: Added option to prefer dark GTK+ theme.
  • Context menu of a web view is populated with custom actions.
  • Removed UI modes “toolbar only” and “both toolbar and menubar”. Main menu reorganized.
  • MPRIS extension: Renamed to Remote Player Interface.
  • Install / Upgrade Nuvola Player in Ubuntu

    For Ubuntu and its derivatives, press Ctrl+Alt+T to open terminal. When it opens, run below commands one by one:

    sudo add-apt-repository ppa:nuvola-player-builders/stable
    
    sudo apt-get update
    
    sudo apt-get install nuvolaplayer

    Nvidia DriverThe latest Long Lived Nvidia driver has reached 319.49, which added support for new GPUs and fix a few bugs. Here’s how to install or upgrade it in Ubuntu 13.04, Ubuntu 12.10, Ubuntu 12.04.

    What’s new in Nvidia 319.49:

  • Added support for the following GPUs: GeForce GT 740A, GeForce GT 745A, GeForce GT 755M, GeForce GT 625, GeForce GTX 645, GRID K340, GRID K350, NVS 315, Quadro K500M
  • Fixed a bug that caused DisplayPort monitors connected to Quadro FX 3800, 4800, or 5800 to remain off after DPMS.
  • Added the NVIDIA OpenGL-based Inband Frame Readback (NvIFROpenGL) library to the Linux driver package. This library provides a high performance, low latency interface to capture and optionally encode an individual OpenGL framebuffer. NvIFROpenGL captures pixels rendered by OpenGL only and is ideally suited to application capture and remoting.
  • Fixed a bug that caused applications using CUDA-GL interop to crash when run on X servers with Xinerama enabled.
  • Fixed a bug that could prevent some double-bit ECC errors from being properly reported.
  • Fixed a bug which could cause a blank screen when changing house sync settings on Quadro Kepler GPUs with Quadro Sync boards.
  • Fixed a bug that prevented nested loops with identical loop conditions in GLSL shaders from terminating correctly. This could cause hangs in applications such as Exa PowerVIZ.
  • Fixed a bug that resulted in corrupt texels when a previously empty texture image was specified with glXBindTexImageEXT. In GNOME 3, this caused gnome-screenshot to produce garbled window screenshots.
  • Fixed a bug that caused the X server to crash when querying the current mode of disabled displays.
  • Download & Install Nvidia Driver:

    NOTE 1: At the moment when you’re reading this tutorial, you may check out the latest version of Nvidia driver for Linux at this page.

    NOTE 2: Below installation guide works for all Nvidia Linux Drivers (.run file) downloaded from the Official Website.

    1.) Download the driver:

    Download Nvidia 319.49 for Linux 32-bit

    Download Nvidia 319.49 for Linux 64-bit

    2.) Open file browser and navigate to the downloaded package. Right-click on it and go to its Properties window. In Permissions tab, check the box where is says “allow executing file as program”

    all execute as program

    3.) Now, you need to switch to command console by pressing Ctrl+Alt+F1. Log in with your username and password. When login, stop the graphic session by running below command.

    sudo stop lightdm

    4.) Finally, start the installer and follow the on screen prompts. Change the filename to yours if you’re going to install another version.

    sudo sh ~/Downloads/NVIDIA-Linux-*-319.49.run

    When done, restart your computer by sudo reboot command.

    If for some reason the new drivers do not work properly, re-do step 3.) and followed by below command to unintall the Nvidia Driver:

    sudo ~/Downloads/NVIDIA-Linux-*-319.49.run --uninstall

    Enjoy!

    R Statistical PackageIf you have problem installing R statistical package via the official document. Here’s easy guide with pictures shows you how to install R package in Ubuntu 13.04, Ubuntu 12.04, Ubuntu 12.10, Ubuntu 10.04.

    R Package is available in Ubuntu Software Center by default, but it’s old. This tutorial will install the latest verson – so far it is 3.0.1 – in Ubuntu via the via official repository.

    Add R Statistical Package Repository:

    Search for and open Software & Updates from unity dash home.

    software&updates

    Navigate to Other Software tab, click Add and paste below line in pop-up window.

    For Ubuntu 12.04: deb http://cran.stat.ucla.edu/bin/linux/ubuntu precise/

    For Ubuntu 13.04: deb http://cran.stat.ucla.edu/bin/linux/ubuntu raring/

    For Ubuntu 12.10: deb http://cran.stat.ucla.edu/bin/linux/ubuntu quantal/

    For Ubuntu 10.04: deb http://cran.stat.ucla.edu/bin/linux/ubuntu lucid/

    add r package repository

    You can change “cran.stat.ucla.edu” to other mirrors.

    Install R Statistical Package:

    After added the repository, press Ctrl+Alt+T on your keyboard to open terminal. When it opens, run below command to get the key:

    sudo apt-key adv --keyserver keyserver.ubuntu.com --recv-keys E084DAB9

    add r package keyring

    Finally, you can use Synaptic Package Manager (install it from Ubuntu Software Center) to install R Package.

    install r package ubuntu

    Indicator-terminal is an applet in Ubuntu top panel that shows a terminal window for running commands when you click on the icon.

    terminal indicator

    Install Indicator-terminal in Ubuntu:

    NOTE: This project is still in early development. It has bugs and may break you system. Use it at your own risk!

    There’s a PPA for Ubuntu 13.10 Saucy, Ubuntu 13.04 Raring, Ubuntu 12.10 Quantal. Press Ctrl+Alt+T to open terminal, when it opens, run below commands one by one:

    sudo add-apt-repository ppa:erasmo-marin/indicator-terminal
    
    sudo apt-get update
    
    sudo apt-get install indicator-terminal

    Once installed, restart you machine.

    To remove this indicator, run below commands in terminal:

    sudo apt-get install ppa-purge
    
    sudo ppa-purge ppa:erasmo-marin/indicator-terminal
    
    sudo apt-get remove indicator-terminal

    This tutorial shows how to install older & newer versions of python in Ubuntu. Felix Krull has created a PPA that contains multiple python versions:

    • python 2.4.6 for Ubuntu 10.04, Ubuntu 12.04, Ubuntu 12.10, Ubuntu 13.04, Ubuntu 11.10, Ubuntu 11.04
    • python 2.5.6 for Ubuntu 10.04, Ubuntu 12.04, Ubuntu 12.10, Ubuntu 13.04, Ubuntu 11.10, Ubuntu 11.04
    • python 2.6.8 for Ubuntu 13.04, Ubuntu 12.04, Ubuntu 12.10
    • python 2.7 for Ubuntu 10.04, Ubuntu 10.10
    • python 3.1 for Ubuntu 13.04, Ubuntu 12.10, Ubuntu 12.04, Ubuntu 11.10
    • python 3.2 for Ubuntu 13.04, Ubuntu 10.04
    • python 3.3 for Ubuntu 12.04, Ubuntu 11.10, Ubuntu 10.04

    To add the ppa, run below command in terminal:

    sudo add-apt-repository ppa:fkrull/deadsnakes

    Then update package lists:

    sudo apt-get update

    To install python 2.4 in Ubuntu 12.04, etc. run below command:

    sudo apt-get install python2.4

    To install python 2.5 in Ubuntu 12.04, etc. run:

    sudo apt-get install python2.5

    To install python 2.6 in Ubuntu 12.10, Ubuntu 12.04, run:

    sudo apt-get install python2.6

    To install python 2.7 in Ubuntu 10.04, Ubuntu 10.10

    sudo apt-get install python2.7

    To install Python 3.2 in Ubuntu 12.04:

    sudo apt-get install python3.2

    To install Python 3.3 in Ubuntu 12.04:

    sudo apt-get install python3.3

    TV capture cards.TVPVRD is a highly flexible and configurable server daemon that acts as an advanced digital TV recorder using one or several installed TV capture cards.

    The server manages scheduled recordings and provides an efficient command language interface on a dedicated TCP/IP port. As an alternative interface the daemon also comes with a basic WEB-interface through the daemons built in micro-web-server. To keep the WEB-interface simple only the most common commands are available through this interface.

    The goal with this project is to provide an advanced recording and transcoding (using ffmpeg) server without the need to configure complex databases or GUI. The daemon sits unobtrusively in the background.

    The server is self-contained and uses a plain text database (in XML format) to store and manage recordings. In addition, the server has built-in intelligence to make it as easy as possible to manage and use. Examples are highly flexible commands to specify future recordings and automatic load assessment on the server to avoid starting too many parallel transcoding jobs. The server is completely self-contained and has a small footprint.

    Install TVPVRD in Ubuntu:

    The GetDeb repository provides the latest packages for Ubuntu 13.04 Raring, Ubuntu 12.04 Precise, and a little old versions for Ubuntu 12.10, Ubuntu 11.10 and their derivatives, such as Linux Mint and Elementary OS.

    To Add GetDeb repository, just download and double-click to install the package below (For Linux Mint users, read this post).

    getdeb package

    Once done, install TVPVRD by running below commands in terminal (Ctrl+Alt+T):

    sudo apt-get update; sudo apt-get install tvpvrd

    Use TVPVRD:

    There are two main ways to use tvpvrd:

    1. via command line shell, run man tvpsh to get details
    2. via the built in Webserver (http://localhost:9301/)

    You need to enable the config file by running below command:

    cd /etc/tvpvrd; sudo mv tvpvrd.conf.full.template tvpvrd.conf

    Then edit the file by:

    sudo gedit /etc/tvpvrd/tvpvrd.conf

    There you can change the port, enable web interface by “enable_webinterface=yes” and many other settings.

    tvpvrd ubuntu

    For more, see tvpvrd manual.

    Want to customize the notification bubbles? Well, here I’ll tell you how to move its location, change text color, enable close bubble on click in Ubuntu 13.04 Raring, Ubuntu 13.10 Saucy.

    change location of notification bubble

    The default Notification Bubbles – NotifyOSD – is not customizable in Ubuntu. Leolik provides a patched (configurable) NotifyOSD in his PPA which allows to change:

    • colors
    • size of the bubbles, font size, icon size, corner radius
    • opacity
    • timeout
    • position on the screen (top-right, middle-right, bottom-right, bottom-left, middle-left, top-left)
    • disable fade out
    • click anywhere on the notification to close it

    To install this customizable notification bubbles in Ubuntu 13.04, Ubuntu 12.10, Ubuntu 12.04, Ubuntu 11.10, Ubuntu 11.04. Press Ctrl+Alt+T to open terminal, run below commands one by one:

    sudo add-apt-repository ppa:leolik/leolik 
    
    sudo apt-get update
    
    sudo apt-get install notify-osd

    Once installed, run command to restart the service:

    pkill notify-osd

    Now install a graphical tool to configure NotifyOSD. Run below commands one by one in terminal:

    sudo add-apt-repository ppa:nilarimogard/webupd8
    
    sudo apt-get update
    
    sudo apt-get install notifyosdconfig

    After that, you can use this tool to customize your notifications:

    configure notification

    To change the location, run below command in terminal:

    gsettings set com.canonical.notify-osd gravity NUMBER

    Where the NUMBER can be:

    1 – top-right corner
    2 – middle-right
    3 – bottom-right corner
    4 – bottom-left corner
    5 – middle-left
    6 – top-left corner

    Calibre 1.0 for UbuntuAfter a year since the last major release, Calibre 1.0 was released with lots of new features, such as a grid view of book covers, a new, faster database backend, the ability to convert Microsoft Word files, tools to make changes to ebooks without needing to do a full conversion, full support for font embedding and subsetting, and many more.

  • A new ‘cover grid’ view of the books in your calibre library
    Excellent for judging your books by their covers :) To use click the button with the icon of a grid in the bottom right corner of the main window. It can be configured via Preferences->Look & Feel->Cover Grid
  • A new, faster database backend
    The database backend in calibre has been re-written from scratch. The new code is smaller, more robust and much faster than the old code. The exact speedup will depend on the number of books and number and type of custom columns in your library. Users have reported calibre startup times decreasing by a factor of 2-3 times.
  • RTF Input: Add option to ignore WMF images iinstead of replacing them with a placeholder.
    Closes tickets: 1213599
  • Content server: Make virtual libraries available as searches from the start page. They work just like saved searches, clicking on a virtual library will show you all the books in that virtual library.
  • Read the official announcement

    Install Calibre 1.0 in Ubuntu

    It’s very easy to install or upgrade calibre 1.0 in Ubuntu and its derivatives, such as Linux Mint and Elementary OS.

    Press Ctrl+Alt+T on your keyboard to open terminal for running commands. Copy the code below by Ctrl+C, and paste in terminal via Ctrl+Shift+V. Finally hit enter:

    sudo python -c "import sys; py3 = sys.version_info[0] > 2; u = __import__('urllib.request' if py3 else 'urllib', fromlist=1); exec(u.urlopen('http://status.calibre-ebook.com/linux_installer').read()); main()"

    Press Enter to use the default installation directory, and it’ll automatically download calibre and install it on your system as well as the dependencies.

    install upgrade calibre ubuntu

    If you’ve using Ubuntu for a period of time, you may have old kernels that are no longer useful on your system. It may be annoying to have these kernel entries in Grub boot menu. So here’s how to remove the old kernels in Ubuntu 13.10 Saucy, Ubuntu 13.04 Raring.

    The efficient way to do the job is using the Ubuntu Tweak, which lists all un-used kernels and gives an option at right-bottom corner to clean them up.

    Remove Old Kernels

    To install Ubuntu Tweak, download the DEB package in the right sidebar of this page. Then double-click to install via Ubuntu Software Center.

    At the moment, Ubuntu Tweak is not ready for Ubuntu 13.10 Saucy. So below is the command line way:

    1.) Press Ctrl+Alt+T to open terminal for running commands. Check current running kernel version.

    uname -r

    Don’t remove this kernel!

    2.) Copy and paste below command and hit run to check list of installed Kernels on your system:

    dpkg --list | grep linux-image

    3.) Find out the kernels you want to remove, and run below command to accomplish it: Change x.x.x.x to the kernel version

    sudo apt-get purge linux-image-x.x.x.x-generic