Archives For November 30, 1999

This simple tutorial shows how to install the DVD authoring tool, DVDStyler 3.3 Beta4 (or 3.2.1 Stable for 22.04), in Ubuntu 22.04, Ubuntu 24.04, and Ubuntu 24.10.

DVDStyler is a free software for creating professional-looking DVDs. It provides many built-in buttons, templates, and file browser to make easy to burn DVDs.

I was maintaining a PPA with DVDStyler package for Ubuntu users, but stuck at v3.1.2, because of compile issue for the lastest v3.2. Now, it’s back and includes the latest DVDStyler 3.3 Beta for Ubuntu 24.10 and Ubuntu 24.04, and DVDStyler 3.2.1 for Ubuntu 20.04 and Ubuntu 22.04.

Features of DVDStyler 3.3 Beta so far include:

  • Ability to specify custom video file for buttons
  • Add object ‘Caption and rectangle’ (thanks to ecodrv)
  • Fix video frame selection dialog
  • Add setting “FFmpeg options” to specify transcoding options such as -hwaccel
  • Add menu template “wall” with text based title buttons

How to Install DVDStyler via Ubuntu PPA:

UPDATED : For Ubuntu 24.04, the PPA contains DVDStyler 3.3 Beta with latest commits until Apr 29. I can’t figure out how to built 3.2.1 stable with latest FFmpeg 6, please report bug to this page for issues.

First, press Ctrl+Alt+T on keyboard to open a terminal windows. Then, run the commands below one by one to add the PPA and install DVDStyler.

1. To add the PPA in all current Ubuntu releases (amd64 and arm64/armhf), run command:

sudo add-apt-repository ppa:ubuntuhandbook1/dvdstyler

Type user password (no asterisk feedback) when it asks and hit Enter to continue.

2. Linux Mint user need to manually refresh system package cache, though it’s done automatically in Ubuntu 20.04 and higher while adding PPA. To do so, run command:

sudo apt update

3. Finally, run command to install the software package:

sudo apt install dvdstyler

Fix ‘can’t open user configuration file’ error

In recent version, it may output an error on close of DVDStyler app window:

Failed to create a temporary file name (error 2: No such file or directory)
can’t open user configuration file.

The solution is just create the .dvdstyler folder in user’s home directory! Or, open terminal and run command:

mkdir -p ~/.dvdstyler

Uninstall DVDStyler

To remove the DVD authoring tool, open terminal (Ctrl+Alt+T) and run command:

sudo apt remove --autoremove dvdstyler

And, remove the Ubuntu PPA either by deleting source line from ‘Software & Updates‘ tool under ‘Other Software’ tab. Or, by running command in terminal:

sudo add-apt-repository --remove ppa:ubuntuhandbook1/darktable

This simple tutorial is going to introduce the new Ubuntu PPA for installing VLC media player as native .deb package format.

VLC is easy to install in Ubuntu through either Snap (available in Ubuntu Software) or Flatpak.

If you don’t like applications run in sandbox, then a third-party PPA can be a good choice besides building from the source tarball.

Rob Savoury is maintaining a PPA with most recent VLC as native .deb package. However, the dependency PPA goes private recently. So, I created a new one for choice.

Install VLC 3.0.20 from PPA:

The package in this unofficial PPA is just a backport from Debian upstream. No change except for the build and run-time libraries depends on your Ubuntu edition.

It seems working good but without well testing. So, there’s always use it as your own risk!

1. First, press Ctrl+Alt+T on keyboard to open a terminal window. When it opens, run command to add the PPA:

sudo add-apt-repository ppa:ubuntuhandbook1/vlc

Type user password (no asterisk feedback) when it asks for sudo authentication, then hit Enter to continue.

2. For Linux Mint, also run command to refresh package cache, which is done automatically while adding PPA in Ubuntu 20.04 +.

sudo apt update

3. Finally, either update VLC package using ‘Software Updater’ or install/upgrade the package directly by running apt command in terminal:

sudo apt install vlc

Uninstall:

If you found any issue about the VLC package, open terminal (Ctrl+Alt+T) and run command:

sudo apt install ppa-purge && sudo ppa-purge ppa:ubuntuhandbook1/vlc

This command will install ppa-purge tool and use it to purge the PPA, which also downgrade VLC and its dependencies to the stock versions in system repository.

For choice, you may run command to just remove VLC media player:

sudo apt remove --autoremove vlc

Then remove the PPA either from ‘Software & Updates’ -> ‘Other Software’ tab, or by running command in terminal:

sudo add-apt-repository --remove ppa:ubuntuhandbook1/vlc

Linux Kernel 6.4 was released a few days ago. Ubuntu users can now install it from Kernel Mainline PPA.

Linux Kernel 6.4 features initial Apple M2 processors support, Realtek rtl8710bu/rtl8188gu, rtl8822bs, rtl8822cs and rtl8821cs WiFi hardware support, Turtle Beach and Qanba gaming controller support, and many Kye/Genius drawing tablets, such as EasyPen M406 / M506 / M406W, EasyPen 340, MousePen 508WX / 508X, and PenSketch T609A.

There are also tablet mode switching support for Lenovo Yoga notebooks, hardware sensor support for 100+ more ASUS desktop motherboards, Apple M1/M2 keyboard backlight support, initial WiFi support for Apple M1 Pro and Apple M1 Max devices, and better MSI laptops support.

How to Install Kernel 6.4 in Ubuntu 22.04+/Linux Mint 21

NOTE: The Mainline Kernel PPA is back with Kernel 6.4 packages. However, they are not appropriate for production use. Only install it for testing purpose or for specific drivers.

The Mainline Kernel PPA has built the packages for Ubuntu and  its based systems with modern 64-bit (amd64), arm64/armhf mobile, ppc64el and s390x CPU architecture types support.

1. User can select download the packages from the link page below:

For modern 64-bit (x86_64) PC/laptop, select download the amd64 build packages:

  1. linux-headers-6.4.0-060400-xxxxxx_all.deb
  2. linux-headers-6.4.0-060400-generic_xxx_amd64.deb
  3. linux-modules-6.4.0-060400-generic_xxx_amd64.deb
  4. linux-image-unsigned-6.4.0-060400-generic_xxx_amd64.deb

2. After downloading them, right click on blank area in Downloads page and select “Open in Terminal”. Finally, install the kernel packages via command:

sudo apt install ./linux*.deb

For other CPU architecture types (run uname -m to tell), select download and install the package between arm64/armhf, ppc64el and s390x builds.

For Ubuntu server, you can download and install the kernel packages by following commands:

cd /tmp/

wget -c https://kernel.ubuntu.com/~kernel-ppa/mainline/v6.4/amd64/linux-headers-6.4.0-060400-generic_6.4.0-060400.202306271339_amd64.deb

wget -c https://kernel.ubuntu.com/~kernel-ppa/mainline/v6.4/amd64/linux-headers-6.4.0-060400_6.4.0-060400.202306271339_all.deb

wget -c https://kernel.ubuntu.com/~kernel-ppa/mainline/v6.4/amd64/linux-image-unsigned-6.4.0-060400-generic_6.4.0-060400.202306271339_amd64.deb

wget -c https://kernel.ubuntu.com/~kernel-ppa/mainline/v6.4/amd64/linux-modules-6.4.0-060400-generic_6.4.0-060400.202306271339_amd64.deb

sudo dpkg -i *.deb

Once installed, restart your computer and verify by running uname -a command in terminal!

Uninstall Linux Kernel 6.4:

Restart your machine, and select boot with the previous kernel in boot menu under ‘Grub2 -> Advanced Option for Ubuntu’. Depends on your machine, you may have to press and hold ‘Shift’ or ‘Esc’ key while booting to show the Grub boot-menu.

Then run command to remove Linux Kernel 6.4:

sudo apt remove --autoremove linux-headers-6.4.0-060400 linux-modules-6.4.0-060400-generic

Linus Torvalds announced the release of Linux Kernel 6.4 few days ago on Sunday. He wrote:

Hmm. Final week of 6.4 is done, and we’ve mainly got some netfilter fixes, some mm reverts, and a few tracing updates.

There’s random small changes elsewhere: the usual architecture noise, a number of selftest updates, some filesystem fixes (btrfs, ksmb), etc.

The new kernel brings many new devices support. They include initial Apple M2 processors support, Realtek rtl8710bu/rtl8188gu, rtl8822bs, rtl8822cs and rtl8821cs WiFi hardware support, Turtle Beach and Qanba gaming controller support, and many Kye/Genius drawing tablets, such as EasyPen M406 / M506 / M406W, EasyPen 340, MousePen 508WX / 508X, and PenSketch T609A.

For Lenovo Yoga notebooks such as Yoga 7 14AIL7, Yoga C940, Ideapad Flex 14API, Yoga 9 14IAP7, Yoga 7 14ARB7, Kernel 6.4 now has tablet mode switching support. Also, it adds hardware sensor support for 100+ more ASUS desktop motherboards.

Other notable changes in Kernel 6.4 include:

  • Install Linear Address Masking (LAM) support.
  • AMD Guided Autonomous Mode support to improve performance and power efficiency for AMD Ryzen and AMD EPYC servers
  • AMD virtual NMI support for KVM virtualization
  • Hibernation and suspend to disk support for RISC-V processors.
  • Remove Intel Thunder Bay SoC support
  • AMD CDX support for FPGA devices to be dynamically discovered and controlled by CPU/APU.
  • Qualcomm QAIC accelerator driver
  • 4K display support with the Rockchip DRM driver.
  • Concurrent I/O performance optimizations for Device Mapper.
  • Intel Lunar Lake HD audio support.
  • Initial WiFi support for Apple M1 Pro and Apple M1 Max devices.
  • Better MSI laptops support.
  • Apple M1/M2 keyboard backlight support

How to Get Linux Kernel 6.4

The source tarball for the new Kernel release is available to download at the official website:

For Ubuntu users, see Mainline Kernel PPA seems broken and their’s no Kernel 6.4 build at the moment, perhaps due to this issue. So, building from source code could be the only way so far to get the latest Kernel in Ubuntu.

For users switching from macOS, there’s an extension can replace top-left ‘Activities’ with ‘Apple Menu’ in Ubuntu 22.04 and Ubuntu 23.04.

It’s ‘Maccy Menu’, which adds a menu in top-left with following options:

  • About This PC,
  • System Preferences (Settings),
  • App Store (Ubuntu Software / Gnome Software)
  • Recent Items (Recent Files)
  • Force Quit (xkill)
  • Sleep
  • Restart
  • Shut Down
  • Log out

The menu icon can be set between logos of Apple, Ubuntu, Debian, Linux, Arch, Fedora, and Kali. And, it provides option to either show or hide ‘Activities’.

Install the ‘Maccy Menu’ extension

Don’t know why, the extension does not show in my ‘Extension Manager’ app. However, it can be installed by using the ON/OFF toggle by visiting this page:

If you don’t see the ON/OFF toggle, install the browser extension if prompted and refresh the web page.

Also, press Ctrl+Alt+T on keyboard to open terminal and run command to install the agent package:

sudo apt install chrome-gnome-shell

Once installed the extension, launch either “Extension Manager” or “Gnome Extensions” (both available to install in Ubuntu Software). Then, open the settings page for that extension to change logo, and/or toggle display ‘Activities’.

Darktable got a new major release few days ago! Here’s how to install it in Ubuntu 22.04, Ubuntu 22.10, Ubuntu 23.04 via PPA.

Darktable 4.4.0 is a big release with many new features. They include:

  • Ability to define multiple automatically-applied presets against a single processing module.
  • A global “right-click-and-drag” operation to allow image rotation to be corrected.
  • Many modules have default parameters based on image metadata or current workflow
  • Completely overhaul the Drawn Mask functionality with a large number of changes and fixes.
  • The scopes module now has 9 different color harmonies to choose from in RYB vertorscope mode.
  • Code cleanup and performance improvements (5% to 40% faster).
  • Support .dng files from software, i.e., Topaz Photo AI.

For more changes, see it in Github releases page.

How to Install Darktable 4.6.0 (Updated) in Ubuntu:

There are 4 sources to get the Darktable package in Ubuntu: Flatpak, Snap, OBS, and Ubuntu PPA.

Option 1: Snap

The easiest way to get the latest Darktable 4.6.0 in Ubuntu is using the Snap.

Ubuntu 20.04 and higher with both amd64 and arm64 CPU architecture types, can simply search for and install the package from Ubuntu Software. Though, it’s a containerized software package run in sandbox.

Option 2: Flatpak

The latest Darktable is also available to install as Flatpak, another software package run in sandbox.

Ubuntu user can install the package, by running the 2 commands below one by one:

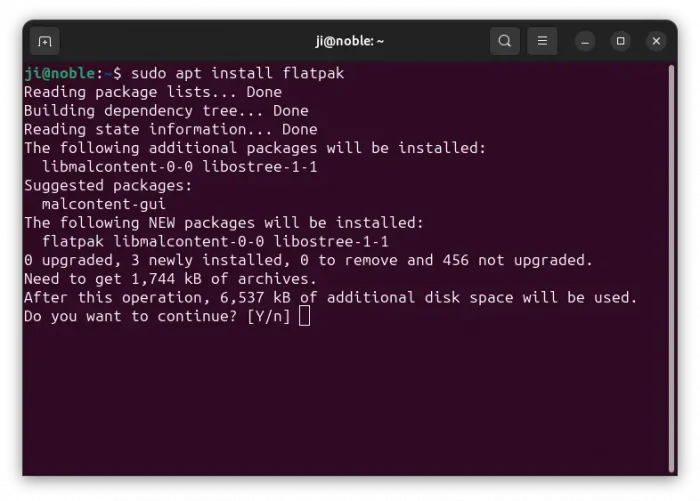
sudo apt install flatpak
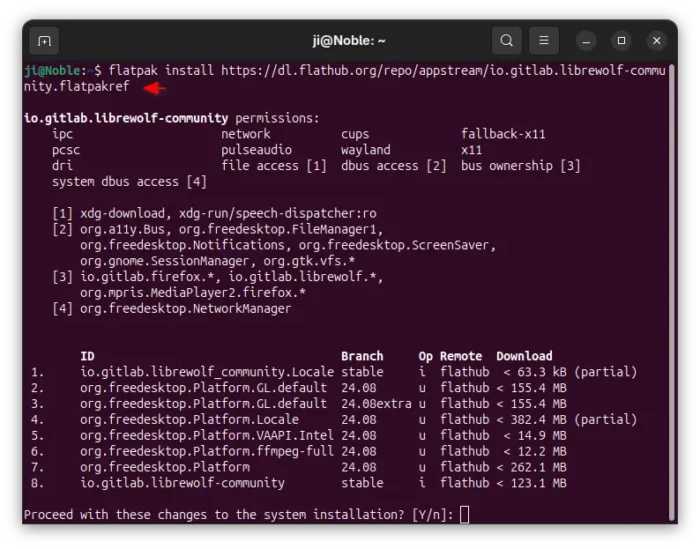
flatpak install https://dl.flathub.org/repo/appstream/org.darktable.Darktable.flatpakref

Option 3: Native .deb package via OBS (Official)

Darktable provides official packages for Debian, Fedora, openSUSE, and Ubuntu through OBS (openSUSE Build Service).

User can either grab the package directly, or add the sources repository into system via the link below:

NOTE: the OBS is not yet updated at the moment of writing.

Option 4: Ubuntu PPA

For those who prefer the classic Ubuntu PPA, I’ve upload the new release package into this PPA for Ubuntu 22.04, Ubuntu 23.10 and Ubuntu 23.04.

NOTE: Sorry for being lazy. There’s no updated package for Ubuntu 20.04 in this PPA. The new release needs gcc-12 for building the package, which is not available in 20.04.

1. First, press Ctrl+Alt+T on keyboard to open terminal. When it opens, run command to add PPA:

sudo add-apt-repository ppa:ubuntuhandbook1/darktable

2. Linux Mint needs to update system package cache manually after adding PPA:

sudo apt update

3. Finally, install Darktable via command:

sudo apt install darktable

Uninstall Darktable

Depends on which package your installed, remove Darktable via one of the commands below:

  • For Snap package, just remove it from Ubuntu Software.
  • For Flatpak package, run command:
    flatpak uninstall --delete-data org.darktable.Darktable

    Then run flatpak uninstall --unused to remove unused runtime libraries.

  • To remove official package or PPA package, run command:
    sudo apt remove --autoremove darktable

    And remove the Ubuntu PPA repository if you want via command:

    sudo add-apt-repository --remove ppa:ubuntuhandbook1/darktable

ONLYOFFICE Desktop Editors, the free and open-source offline use office suite, released new 7.4 version a few days ago.

The new releases feature a “Plugin Manager“, allows to easily install external functions support, such as ChatGPT, YouTube, OCR, and more. User can of course submit its own plugin to the market place for other user use.

ONLYOFFICE Desktop Editors 7.4 also added a “Draw” tab with a few drawing tools. So far, the tools include ‘Pen‘, ‘Highlighter‘, and ‘Eraser‘. The ‘Print’ page is improved with more options, such as page range, number of copies, and printing on both sides.


Other changes in the release include:

  • Ability to copy style between graphic objects
  • Support for Radar charts
  • Support opening new formats: MHTML, SXC, ET, ETT, SXI, DPS, DPT, SXW, STW, WPS, WPT
  • Ability to merge documents
  • Export document, spreadsheet to PNG/JPG.
  • New spreadsheet functions: SEQUENCE, XMATCH, EXPAND, FILTER, ARRAYTOTEXT, SORT

There are as well many other changes, improvements, and bug-fixes, see the Changelog page for details.

How to Install OnlyOffice Desktop Editor 7.4

For Ubuntu user, the office suite is available to install as official Snap package. Just open Ubuntu Software, then search for and install ‘onlyoffice-desktopeditors’.

NOTE: The snap is at v7.3.3 at the moment of writing. You can just install the package and wait it’s automatically been updated to v7.4.

ONLYOFFICE Snap in Ubuntu Software

For other packages, such as Flatpak, AppImage, and Windows EXE, macOS DMG, go to this download page.

This simple tutorial shows how to install the latest Cinnamon Desktop 5.8 in Ubuntu 22.04 or Ubuntu 23.04 via PPA.

The source of Cinnamon 5.8 was out a few days ago! It will be officially announced later in this month along with Linux Mint 21.2.

Cinnamon 5.8 features built-in touchpad / touchscreen gestures support! There will be new “Gestures” option in System Settings utility. Where, provides options to configure actions for 3-finger/4-finger swipe, 2-finger/3-finger/4-finger pinch, and activation thresholds.

The new release also added new theme option (prefer light, prefer dark, left app decide) to switch between light and dark mode.

How to Install Cinnamon 5.8 via Ubuntu PPA

Cinnamon 5.8 will be default in Linux Mint 21.2 coming later in this month. Ubuntu user can try my PPA repository instead.

NOTE 1: This is an unofficial PPA!
NOTE 2: The packages seem working good in my case in Ubuntu 22.04, but WITHOUT well testing! It MAY or MAY NOT WORK due to various reasons!
NOTE 3: light/dark switching feature does not work in my case. Not sure if something is missing!
NOTE 4: Do NOT install this PPA in production machine!
NOTE 5: New gestures feature seems using touchegg as background service. If the feature does not work, try installing touchegg from its official PPA.

1. First, press Ctrl+Alt+T on keyboard to open terminal. When terminal opens, run command to add the PPA:

sudo add-apt-repository ppa:ubuntuhandbook1/cinnamon

Type user password (no asterisk feedback) when it asks and hit Enter to continue.

2. While adding PPA, it should automatically refresh package cache. When done, run command to upgrade to Cinnamon 5.8 in Ubuntu Cinnamon:

sudo apt upgrade

For non-Cinnamon desktop environment, run this command instead to install it:

sudo apt install cinnamon-desktop-environment

It’s better to write down what packages it’s going to install, in case you want to completely remove Cinnamon desktop later!

After installation, restart your computer and go to “System Settings -> System Info” to check the desktop version. You need to of course switch to ‘Cinnamon’ session from login screen.

Uninstall:

To restore the original Cinnamon desktop environment, open terminal and run command:

sudo apt install ppa-purge && sudo ppa-purge ppa:ubuntuhandbook1/cinnamon

The previous command will restore Cinnamon to stock version in Ubuntu repository. To completely remove the desktop environment, use sudo apt remove package1 package2 package3 ... by replacing the package names to what you installed in previous step.

Running Ubuntu on Desktop PC or laptop with external monitor? You can add a slider in top-right system menu to control the screen brightness.

Unlike laptop’s built-in screen, most Linux today does not provide brightness control for external monitors.

Fortunately, there’s a ddcutil utility can do the job via ddc/ci protocol, which is supported in most external monitors. And, there’s an extension to add the slider control to system status menu.

brightness slider for external monitor

The extension supports all current Ubuntu releases, including Ubuntu 20.04, Ubuntu 22.04, and Ubuntu 24.04, as well as other Linux with recent Gnome desktop, such as Fedora Workstation, Debian, RHEL.

NOTE: DDC/CI is usually enabled by default. Just in case, use your monitor’s physical button to make sure the option is enabled!

1. First of all, press Ctrl+Alt+T on keyboard to open terminal. When it opens, run command to install the ddcutil utility in Ubuntu:

sudo apt install ddcutil

2. Next, add your current user to ‘i2c’ group to grant permissions:

sudo gpasswd --add $USER i2c

3. Install “Extension Manager” tool from Ubuntu Software (or App Center) for installing and managing extensions.

Install Extension Manager in Ubuntu Software/App Center

For Ubuntu 20.04, run command to install “Gnome Extensions” app instead, as well as agent package for browser integration.

sudo apt install gnome-shell-extension-prefs chrome-gnome-shell

4. Ubuntu 22.04 + can now launch “Extension Manager” and use the tool to search and install “Brightness control using ddcutil” extension.

For Ubuntu 20.04, go to this page in web browser, install browser extension if prompted (refresh after installation), and finally turn on the ON/OFF switch to install that extension.

5. The extension by default add an indicator applet in panel with brightness slider. To configure it, open ‘Installed’ tab in “Extension Manager” (or ‘Gnome Extensions’ app for Ubuntu 20.04).

Then, click on either gear button or ‘Settings’ button for that extension. Finally, set button location to “System Menu” and turn on “Hide System Indicator” for better integration.

That’s all. Enjoy!

I got a HP printer that is working good with my Ubuntu laptop. But, in new Ubuntu desktop PC, it does nothing when trying to print anything.

The printer is automatically detected and added in the settings page, and shown in the Document Viewer’s Print dialog. But, it does nothing when clicking ‘Print’ button. If you ran into similar issue, then this tutorial could help.

1. First, open “Settings” and navigate to “Printers” in the left. Then, click on “Additional Printer Settings …” button.

2. In the pop-up dialog, right-click on the printer device, and click “Properties”.

3. Next, click on “Change” button after ‘Device URI’ and make sure the correct device is selected in pop-up dialog.

4. Also, click on “Change” button for the ‘Make and Module’. It should automatically search for and select the best driver for your device. If not, try ‘Search a printer driver to download’ option. Finally, click ‘Forward’ button and follow the wizard until done.

5. If your printer’s still not working after running previous steps. Press Ctrl+Alt+T on keyboard to open terminal, then run command to install the HPLIP driver:

sudo apt install hplip

Or, go to this page to download the latest version, and follow this guide to install it.

6. Next, go to Printer settings page, click on the gear button for your printer and select “Printer Details” option.

Finally, either click ‘Search for Drivers’ or use “Select from Database” option, and choose the proper driver for your device.

That’s all. Enjoy!