Archives For November 30, 1999

There are quite a few audio tag editing applications for Linux. Tagger is a new one with modern GTK4 user interface.

Kid3, puddletag, and easytag editors are really good. But for GNOME (the default desktop environment for Ubuntu, Fedora Workstation), Tagger looks more native due to GTK4 and libadwaita.

Tagger light mode

The app provides a simple and easy to use interface that follow system light and dark color scheme. With it, you can:

  • Edit metadata and audio tag including Filename, Title, Artist, Album, Year, Track, Album Artist, Genre, and comment.
  • Insert album cover art from file.
  • Remove tag.
  • Convert filenames to tags and tags to filenames with ease
  • And download tag data from internet via MusicBrainz.

filename to tag conversion

It support multiple music file types, such as mp3, ogg, flac, wma, and wav. And, it can edit tags and album art of multiple files, even across subfolders, all at once.

Tagger Dark Mode

How to Install this Tag Editor in Ubuntu & Other Linux:

The app provides official binary package through the universal Flatpak, which works on most Linux distributions.

1. For Ubuntu, firstly press Ctrl+Alt+T on keyboard to open terminal. When terminal opens, run the command to install the Flatpak daemon:

sudo apt install flatpak

Type user password for sudo authentication, though there’s no asterisk feedback.

Fedora, Linux Mint, Pop! OS, etc have flatpak support out-of-the-box. Other Linux may follow this setup guide to get it.

2. After setup the daemon, run the single command below will install the app in your Linux:

flatpak install https://dl.flathub.org/repo/appstream/org.nickvision.tagger.flatpakref

NOTE: First time installing flatpak app will also install the Gnome run-time libraries which take more MB disk space.

Once installed, press Super (‘Windows’) key on keyboard to get into overview screen. Then search for and open the audio tagger and enjoy!

How to Remove the Audio Tag Editor:

To remove the flatpak package, open a terminal window and run command:

flatpak uninstall --delete-data org.nickvision.tagger

Also clear useless run-times if any by running flatpak uninstall --unused command.

Has a webcam connected in your Linux PC or laptop? Here’s a graphical tool to configure the camera exposure, white balance, brightness, contrast, power line frequency, gamma, etc.

It’s cameractrls, a new open-source tool that provides Python CLI and GUI (GTK, TK) to set the Camera controls in Linux. It can set the V4L2 controls and it is extendable with the non standard controls.

Currently, it has a Logitech extension (Led mode, led frequency), Kiyo Pro extension (HDR, HDR mode, FoV, AF mode, Save), Systemd extension (Save and restore controls with Systemd path+service).

Cheese and Cameractrls

As the picture shows, it has the slider bars to adjust the brightness, contrast, saturation, sharpness, and hue, which also configurable via the default Cheese app.

Basic settings page

There are as well options to switch between Aperture Priority Mode and Manual Mode to adjust camera exposure, backlight compensation, toggle HDR. White Balance temperature is also configurable in both auto and manual mode.

Advanced settings page lets you select power line frequency, toggle focus, AF mode, and adjust Pan, Tilt, Zoom, FoV if your web camera support them.

Cameractrls Advanced

How to Install the Camera Control App in Ubuntu & Other Linux:

This is a Python app that should work on all recent Linux distributions. To install it, open terminal from start menu (Ubuntu user may just press Ctrl+Alt+T on keyboard) and run the command below one by one:

1. Firstly, run command to install git in case you don’t have it:

sudo apt install git

The command is only for Debian, Ubuntu, Linux Mint based systems. Fedora user replace apt with dnf.

2. Grab the source by running command:

git clone https://github.com/soyersoyer/cameractrls.git

After downloaded the tool, run command to verify if it works for you!

./cameractrls/cameractrlsgtk.py

3. If the app launches and works, you may then run command in the same terminal window (close the app to continue) to install the app shortcut icon.

  • First, create local bin folder if not exist, and move the app folder into that directory:
    mkdir -p ~/.local/bin/ && mv cameractrls/ ~/.local/bin/
  • Navigate to the local bin:
    cd ~/.local/bin/
  • Finally, install the app shortcut (this is a single command, just copy & paste into terminal and hit run):
    cd cameractrls
    desktop-file-install --dir="$HOME/.local/share/applications" \
    --set-icon="$PWD/images/icon_256.png" \
    --set-key=Exec --set-value="$PWD/cameractrlsgtk.py" \
    --set-key=Path --set-value="$PWD" \
    cameractrls.desktop
Finally, you can search for and open the app from start menu ('Activities' overview):

How to Remove this Camera Control App:

To remove it, first open terminal and run command to remove the shortcut icon file:
rm ~/.local/share/applications/cameractrls.desktop

And remove the source folder via command:

rm -rf ~/.local/bin/cameractrls

Have your Ubuntu PC connected with multiple monitors? Here’s how to enable the top bar in all the displays.

In Ubuntu 22.04, you may easily enable the left Dock in all displays via System Settings ->Appearance -> Dock -> show on ‘All Displays’.

However, due to GNOME’s design issue, the top panel only appears in the primary display. So I’m writing this tutorial that could help.

Method 1: Multi Monitors Add-On

There was an extension called “Multi Monitors Add-On” to do the job, which however discontinued. Contributors keep forking the project with new Gnome versions support, and here’s the one for GNOME 42.

NOTE: The extension has an issue in my case that indicators and top-right system menu do not display in external display.

1. First, press Ctrl+Alt+T on keyboard to open terminal. When it opens, run command to grab the source tarball.

git clone https://github.com/realh/multi-monitors-add-on.git

Install git if you don’t have it via sudo apt install git command.

2. After cloned the source, navigate to the source folder, and install it by copy and pasting to local extension directory.

cd multi-monitors-add-on
cp -r multi-monitors-add-on@spin83 ~/.local/share/gnome-shell/extensions/

3. To avoid error in extension manager, disable the version validation check by running command:

gsettings set org.gnome.shell disable-extension-version-validation true

4. Before being able to enable the extension, you have to restart GNOME Shell. For default session, you need to log out and back in. If you’re running the classic Xorg session, press Alt + F2, type r in pop-up ‘Run a command’ box and hit Enter.

5. Finally, use either Gnome Extensions app or Extension Manager (both available to install in Ubuntu Software) to enable and configure this extension to display top panel on multi-monitors.

Method 2: use dash to panel

If you’re OK to merge the left dock and top-bar into a single panel. The popular “Dash-to-panel” extension can do the job with a simple on/off switch.

Dash to Panel

To install the extension, first press Ctrl+Alt+T on keyboard and run command in pop-up terminal to install ‘Extension Manager’:

sudo apt install gnome-shell-extension-manager

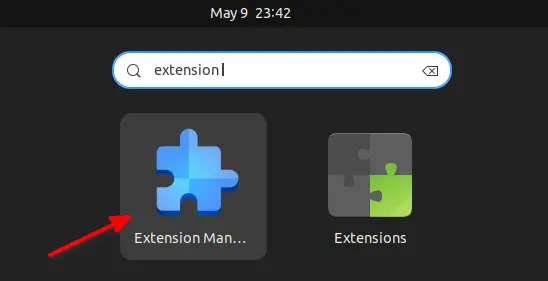
Then search for and launch extension manager in ‘Activities’ overview screen:

Finally, search for and install ‘Dash to panel’ extension from the app window under ‘Browse’ tab.

Once successfully installed the extension, your panels change automatically. And, you can right-click on panel and select the last menu option to open the configuration dialog.

GIMP image editor released a new update for its stable 2.10 release series. Here’s what’s new and how to install in Ubuntu.
GIMP 2.10.32 comes with BigTIFF file import/export support, which is an evolution of the original TIFF format allowing files bigger than 4GiB. It also supports for importing 8 and 16-bit CMYK(A) TIFF in this release.

The release also backported the JPEG XL file format support from the 2.99.8 development release. It’s so far only has import ability, though a third-party plugin is available with both import and export support.
Other changes include:

  • New “Flip the image vertically on export” on DDS export dialog.
  • Support loading transparent EPS files
  • Improved support of TGA indexed images with alpha channel
  • new PDB procedure file-bmp-save2 for plugin developer.
  • Add localized glyphs (locl) support for Text tool.
  • on-hover indicator around the eye and link toggles
  • Add “Include mouse pointer” option for Screenshot tool in Windows.

How to Install GIMP 2.10.32 in Ubuntu:

GIMP as Flatpak:

GIMP offers official Linux package via universal Flatpak package.

For, Ubuntu 20.04 and higher, simply press Ctrl+Alt+T to open terminal, and run the command below one by one to install it:

  • Install the flatpak daemon via command:
    sudo apt install flatpak
  • Then install GIMP via Flatpak using command:
    flatpak install https://dl.flathub.org/repo/appstream/org.gimp.GIMP.flatpakref

Ubuntu PPA:

For those do not like sandboxed applications, I’ve uploaded the new release package into this unofficial PPA for Ubuntu 22.04, Ubuntu 21.10, and Ubuntu 20.04 with amd64 and arm64/armhf CPU architecture types support.

1. First, press Ctrl+Alt+T on keyboard to open terminal. Then run command to add the PPA:

sudo add-apt-repository ppa:ubuntuhandbook1/gimp

Type user password (no visual feedback) when it asks for sudo authentication and hit Enter to continue.

2. Then, refresh system package cache by running command:

sudo apt update

3. And, finally install or update GIMP using command:

sudo apt install gegl gimp

Or, upgrade GIMP image editor via Software Updater after adding the PPA repository:

NOTE: Due to build failure of libjxl library for arm64. The official JPEG-XL plugin is excluded in this PPA for Ubuntu 20.04. You can however run the command below to install the third-party plugin mentioned above to get .jxl file import/export support.

sudo apt install libjxl-gimp-plugin

There are quite a few music player applications for Linux. Amberol and G4Music are two of them with really good looking UI design.

Amberol:

Amberol is a GTK4 app uses libadwaita library as well as gaussian blurred cover background for the beautiful app window.

The player aims to be as small, unintrusive, and simple as possible. No music collection or playlist management, no metadata editor, no lyrics.

It just play local music, with basic functions like shuffle and repeat, MPRIS integration, drag and drop from file manager and GNOME integration.

G4Music

G4Music is Amberol inspired music player with quite similar user interface.

It’s so far a single developer software project, while Amberol has a small group of contributors. However, it has more features, including search music from large collection, sort by album/artist/title or shuffle. And, it supports samba and any other remote protocols as well as pipewire audio sink.

How to Install Amberol or G4Music in Ubuntu & other Linux:

The players are available to install as universal Flatpak packages, which work in Ubuntu, Fedora, Debian, and most other Linux systems.

1.) Firstly, press Ctrl+Alt+T on keyboard to open terminal. Then, run the command below to install the flatpak daemon:

sudo apt install flatpak

Other Linux may follow the official setup guide to install the daemon.

2.) To install the Amberol, run the command below in terminal window:

flatpak install https://dl.flathub.org/repo/appstream/io.bassi.Amberol.flatpakref

Or install G4Music if you like the search function and pipewire audio sink. Both players will install GNOME 42 run-time libraries if not exist.

flatpak install https://dl.flathub.org/repo/appstream/com.github.neithern.g4music.flatpakref

Once installed, search for and open the music player from Activities overview and enjoy!

How to Uninstall Amberol / G4Music

To remove Amberol, open terminal and run command:

flatpak uninstall --delete-data io.bassi.Amberol

And/or remove G4Music by running command:

flatpak uninstall --delete-data com.github.neithern.g4music

To clear up useless run-time libraries, you may also run command:

flatpak uninstall --unused

This tutorial shows how to access and import your photos and videos from iPhone / iPad to Ubuntu 24.04 or Ubuntu 22.04 computer.

Ubuntu seems now have out-of-the-box support for accessing iOS photos. User can easily browse, copy, and move photo images and videos in connected iOS device using either the built-in file manager or a photo manager app (e.g., gThumb). And, here’s how to do the trick in Ubuntu step by step.
This tutorial is tested and works in my iPhone with iOS 16.1.1, and iPad with 14.4.2, along with Ubuntu 22.04, Ubuntu 24.04 with default GNOME Desktop. Thanks to @Trozpent, there’s a few tips in the comment below that may also help!
Continue Reading…

Some applications display notifications in the lock screen, which could be quite annoying!

If you want, you can disable all of them or certain app notifications easily via Gnome Control Center.

1.) Firstly, go to the top-right corner system menu. Then click on “Settings” to open system settings utility, which is also known as gnome control center.

2.) When it opens, navigate to “Notifications” from the left pane. Then, just turn off “Lock Screen Notifications” will disable all the notifications:

3.) For choice, you may scroll down to find out a certain application. Click on it, and toggle the option in the next pop-up dialog.

As you see, there are also options to turn on/off sound alerts, notification bubble, message content in per app basis.

That’s it. Enjoy!

Want to display your computer’s temperature, voltage, fan speed, memory usage, and other system resources usage in top panel? Vitals is a good choice for Ubuntu, Fedora Workstation, and other Linux with GNOME desktop.

It’s a Gnome Shell extension that can display following information on your system tray area:

  • CPU core temerature.
  • Voltage.
  • Fan speed.
  • Memory and Swap usage.
  • Processor load, frequency.
  • System load, uptime.
  • Network speed.
  • Storage usage.

A drop-down menu is available to take a glimpse of all available data. And, user may click on menu option to select which to display on panel.

There are as well bottom buttons to quickly launch system monitor utility and open the extension “Preferences” dialog. In which, you may configure the refresh interval, indicator position, as well as toggle display sensors.

How to Install Vitals Extension:

The extension supports GNOME from version 3.18 to the current 42. Which means, you may install and run it in Ubuntu 18.04, Ubuntu 20.04, Ubuntu 22.04, Fedora 34/35/36, and other Linux (e.g., Debian, Arch, Manjaro) with GNOME.

Method 1: Install the extension via browser

Ubuntu user needs to firstly press Ctrl+Alt+T on keyboard to open terminal. Then, run command to install the agent to install Gnome Extension from web browser.

sudo apt install chrome-gnome-shell

Then, go the link below and turn on the slider icon to install the extension:

Click the link in the page to install browser extension if you don’t see the slider icon, and refresh the page.

Method 2: Install the extension in Ubuntu 22.04 via Extension Manager

Ubuntu 22.04 defaults to Firefox as Snap which does not support installing Gnome Extensions. Besides using another browser or install back the classic .Deb package, “Extension Manager” is a good alternative.

1. Firstly, press Ctrl+Alt+T on keyboard to open terminal. When it opens, run command to install the application:

sudo apt install gnome-shell-extension-manager

2. Next, search for and open the tool from either Activities overview or app grid:

3. Finally, navigate to ‘Browse’ tab in Extension Manager app, search for and install ‘Vitals’ extension:

The indicator should appear immediately on your system panel after installation.

This simple tutorial shows how to install the GNU Emacs text editor 29.3 and keep up-to-date in Ubuntu 22.04, Ubuntu 20.04.

GNU Emacs text editor has reached v29.x release series for few months, though Ubuntu still has v27.1 in its universe repository. For those would like to install/upgrade the editor, here are 3 different ways to do the trick in Ubuntu and its based systems.

Method 1: Snap Package

Snap is an universal Linux package format that runs in sandbox. It works on most Linux, and updates automatically when a new release is published. GNU Emacs is available as Snap with support for amd64 modern PC/laptop, arm64/armhf, ppc64el and s390x processors.

Ubuntu user can simply search for and install the package from Ubuntu Software. There are multiple app packages in software center, select install the one from “Snap Store”.

Install Emacs from Ubuntu Software

For other Linux, it’s available to install via https://snapcraft.io/emacs

Method 2: Ubuntu PPA

For those do NOT like applications run in sandbox, there’s an Ubuntu PPA contains the native .deb package for Ubuntu 22.04, Ubuntu 20.04, and Ubuntu 24.04.

Like the Snap and Flatpak packages, it’s a third-party repository. Though the maintainer has been working on the PPA for more than 5 years. Also, it supports for amd64, arm64/armhf, and ppc64el CPU architecture types.

1. Firstly, press Ctrl+Alt+T on keyboard to open terminal. Run command to remove the old emacs package if any, since it conflicts to the package from PPA.

sudo apt remove --autoremove emacs emacs-common

2. Then, run the command below to add the PPA:

sudo add-apt-repository ppa:ubuntuhandbook1/emacs

Type user password (no asterisk feedback) when it asks and hit Enter to continue.

3. Then run the command to update system package cache, which should be done automatically in Ubuntu 20.04 and higher during adding PPA.

sudo apt update

4. Finally, install Emacs via command:

sudo apt install emacs emacs-common

Here you may replace emacs with emacs-nox for text-only interface.

Method 3: Emacs Flatpak

The text editor is also available as the universal Flatpak package which runs in sandbox. Like Snap, the package runs in most Linux and it’s easy to update. However, it takes more disk space due to run-time libraries.

1. First, press Ctrl+Alt+T on keyboard to open terminal. When it opens, run command to install the flatpak daemon:

sudo apt install flatpak

2. Then, install Emacs as Flatpak via command:

flatpak install https://dl.flathub.org/repo/appstream/org.gnu.emacs.flatpakref

How to Remove Emacs text editor

The Emacs Snap, Flatpak and Deb packages can be installed all together in your system. So, there may be duplicated app icons when you try to launch the editor.

To remove the Snap package, either use Ubuntu Software or run command in terminal:

sudo snap remove emacs

To remove the Flatpak package, use command:

flatpak uninstall --delete-data org.gnu.emacs

And clear useless runtime via flatpak uninstall --unused.

To remove the Deb package, run command:

sudo apt remove --autoremove emacs emac-common

And remove the Ubuntu PPA via command:

sudo add-apt-repository --remove ppa:ubuntuhandbook1/emacs

The free open-source text and source code editor, Atom, is reaching the end of life!

Github, who is behind the editor, announced on June 8:

Today, we’re announcing that we are sunsetting Atom and will archive all projects under the organization on December 15, 2022.

Atom is cross-platform code editor developed by Github, the code hosting platform itself. It’s promoted as a “hackable text editor for the 21st Century”, as it is fully customizable in HTML, CSS, and JavaScript.

The end-of-life announcement explained that Atom has no significant feature development for the past several years. The community involvement has declined significantly. So, they decided to sunset the project.

You know, Atom is a direct competitor to Microsoft’s Visual Studio (VS) Code. And, Microsoft acquired Github on June 4, 2018. That could be the real reason (IMO) though it takes 4 years 😄.

Anyhow, there are 6 months until the developer team archive the atom/atom repository. It’s time for those still using Atom to migrate to an alternative solution.

Alternative Code Editors:

There are quite a few good alternatives to Atom. Though I’m not a software developer, there are Sublime Text, Visual Studio (VS) Code, PyCharm, Brackets, Notepad++ as I know.