This simple tutorial is going to show you how to install Subsonic Music Streamer 4.8 on Ubuntu 13.04 Raring, 12.10 Quantal, 12.04 Precise.

Subsonic is open-source, web-based media streamer, providing ubiquitous access to your music and video collection. It supports most media formats, such as MP3, OGG, AAC and any other audio or video format that streams over HTTP.

Features:

  • Enjoy your music and movies no matter where you are. Share with family and friends.
  • Browse and manage your media collection with the user-friendly web interface.
  • Stream music to Android, iPhone and Windows Phone.
  • Subsonic apps available for Roku, BlackBerry Playbook and many more.
  • Convert and stream lossless music on the fly.
  • Manage 100,000+ files in your music collection without hassle.
  • Download and listen to Podcasts.
  • Get cover art, lyrics, reviews and other album info from Google, Chartlyrics, allmusic and Wikipedia.

Install Subsonic:

The official website provides the DEB installer for Ubuntu users. It can be download by clicking the below link:

Subsonic-4.8.deb

Subsonic requires Java, so first install OpenJDK from Ubuntu Software Center or Oracle Java from ppa.

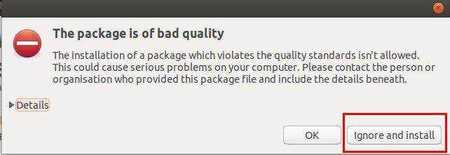
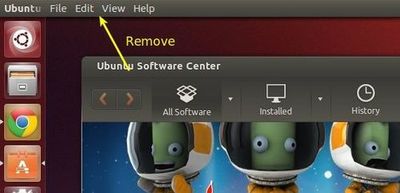
Then double-click on the downloaded DEB package and select install on Ubuntu Software Center. Click ‘Ignore and install’ if you get the below dialog.

Change user:

By default the Subsonic process is run as the root user. To improve security it is strongly advised that you run it as a dedicated user with less powerful privileges. You can specify this user by setting the SUBSONIC_USER variable in /etc/default/subsonic.

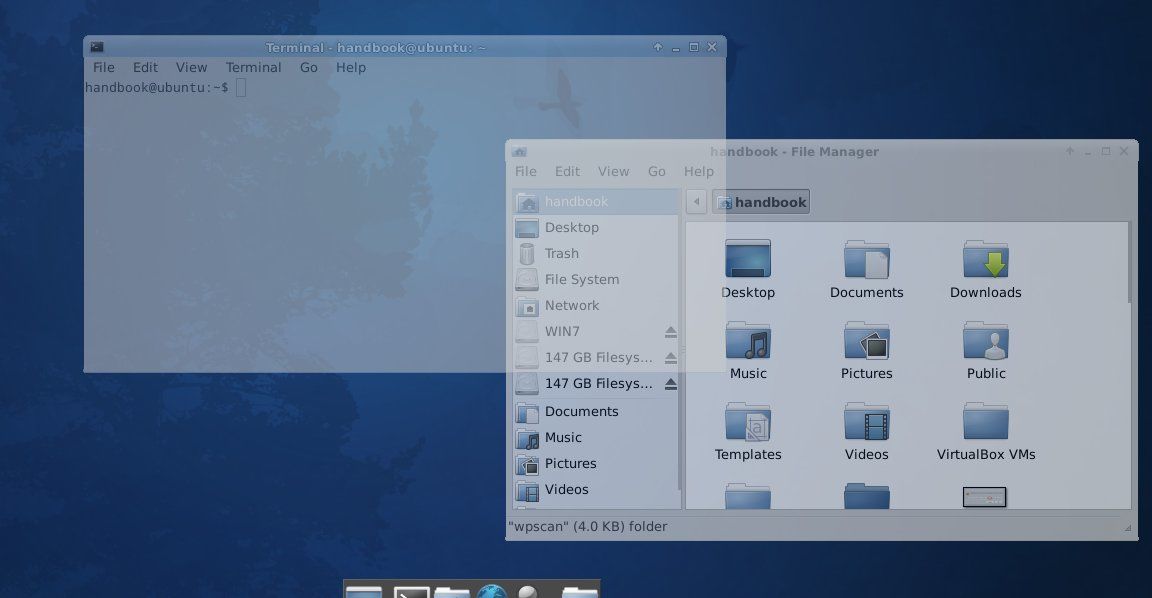
To do so, press Alt+F2, type in gksudo nautilus to open file browser with root permission. Then change username to yours in the picture.

subsonic-user

Note that non-root users are by default not allowed to use ports below 1024. Also make sure to grant the user write permissions in the music directories, otherwise changing album art and tags will fail.

After all, restart your computer and open the Subsonic web page on http://localhost:4040.

This simple tutorial shows how to install SoundConverter on Ubuntu 13.04 Raring, 12.10 Quantal, 12.04 Precise and Linux Mint via GetDeb repository.

SoundConverter is a simple sound converter application for the GNOME environment. It reads sound files in any format supported by GStreamer and outputs them in Ogg Vorbis, FLAC, or WAV format, or MP3 format if you have the GStreamer LAME plugin.

SoundConverter aims to be simple to use, and very fast. Thanks to its multithreaded design, it will use as many cores as possible to speed up the conversion. It can also extract the audio from videos.

Tutorial Objectives:

  • Install SoundConverter 2.1.1 on Ubuntu 13.04, 12.10, 12.04
  • Enjoy!

To get started, add the GetDeb repository. To do so, press Ctrl+Alt+T to open terminal. When it opens, run below commands to add the repository:

wget http://archive.getdeb.net/install_deb/getdeb-repository_0.1-1~getdeb1_all.deb

sudo dpkg -i getdeb-repository_0.1-1~getdeb1_all.deb

Then you can search for and install soundconverter via synaptic package manager. Or run below commands to update package lists and install:

sudo apt-get update; sudo apt-get install soundconverter

Once installed, open it from Unity Dash.

Klest-crossword is a game for professional compiling, editing and easy guessing american and classic the crossword puzzles.

It contains more than 1,000 crossword puzzles to guess and provides a lot of tools for creating a crossword puzzle. It a dictionary of 31 000 Russian words and a dictionary of 41 000 English words.

All functions:

  • Creating and guessing a crossword puzzle;
  • Check correctness of guessing a crossword puzzle;
  • Save state incompletely guessed crossword puzzle;
  • Automatic creation of crossword puzzle grid (beta)
  • Automatic compiling;
  • Semi-automatic compiling;
  • Creating and editing a dictionary;
  • Adding / removing words from the dictionary;
  • Saving created a crossword puzzle grid, as a template for the new;
  • Editing the font crossword;
  • Editing the grid of crossword puzzle;
  • Export crossword: RTF, PDF, PostScript(*.ps), HTML, Text format across Lite, JPG, JPEG, TIFF, BMP, XPM, PNG, XBM, PPM, OpenKlest(*.ok);
  • Import crossword: Texthttp://qt-apps.org/content/show.php/Klest-crossword?content=144254 format AcrossLite, OpenKlest(*.ok);
  • Print crossword;
  • Statistics;

Install Klest-crossword:

The source code and Deb installer are available from SourceForge.

jNetMap is a graphical network monitoring and documentation tool. It will ping all registered devices every x minutes, updating the status according to the result of the ping.

jNetMap helps you to keep an eye on you network. You can draw a graphical representation of your network, and jNetMap will periodically check if the devices are still up or a service is still running. You can also set up E-mail notifications or let jNetMap execute a script when a device goes down or comes up again. Additionally, you may attach notes to a device, initiate an RDP/VNC/SSH connection to a device and much more.

Note: jNetMap is not a network discovery/auditing tool, there are better tools out there for that. And for an enterprise grade monitoring solution, you should check out Nagios instead. The idea here is to have a mission control center-style display for networks.

Install jNetMap on Ubuntu:

The Getdeb repository provides the packages for Ubuntu and Linux Mint user. Supports Ubuntu 10.04 Lucid and higher.

To add the ppa and install jNetMap, press Ctrl+Alt+T on your keyboard to open terminal. When it opens, run below commands:

wget http://archive.getdeb.net/install_deb/getdeb-repository_0.1-1~getdeb1_all.deb

sudo dpkg -i getdeb-repository_0.1-1~getdeb1_all.deb

sudo apt-get update; sudo apt-get install jnetmap

Xfce4 Composite Editor is a simple GUI tool that allows to configure the various Xfce4 Window Manager compositor settings that are not available via the Window Manager Tweaks control panel.

The developer of Xfce Theme Manager wrote this simple tool, and it has the ability to control below settings:

  • Shadow opacity.
  • Shadow delta X, Y, width and height.
  • move window opacity.
  • inactive window opacity.
  • frame opacity.
  • resize window opacity.
  • popup opacity.

Also it provides options to swich on / off composite, dock shadow, frame shadow, pop-up shadow and Restart VM to apply changes.

Below is what the developer said in GTK-Apps, “These settings are available via the xconf settings editor but that is one of the most awkward GUI’s I have ever used as you have to select the xfwm4 channel, expand the tree, scroll to the option you want, select it, click edit, change the setting and click save, then the tree gets collapsed and you have to start again! So this nice simple GUI to control the composite manager, the settings are self explanatory.”

Install Xfce4 Composite Editor

The PPA repository has been created to make it easy to install for (X)Ubuntu users. So far, it supports 13.04 Raring, 12.10 Quantal, and 12.04 Precise.

To add the PPA and install this app, press Ctrl+Alt+T on your keyboard to open terminal. When it opens, run below commands:

sudo add-apt-repository ppa:rebuntu16/other-stuff
sudo apt-get update
sudo apt-get install xfce4-composite-editor

Once it is installed, open it from the Xfce Settings Manager.

BitDefender Anti-virus is available for Linux from its official repository. Here I’ll show you how to install it on Ubuntu 13.04 Raring Ringtail.

Ubuntu itself has few virus, you can install anti-virus program on Ubuntu Linux to scan USB devices or Windows NTFS partitions.

Objectives:

  • Install BitDefender on Ubuntu from official repository
  • Enjoy!

To get started, press Ctrl+Alt+T key combination to open terminal, then run below command to add BitDefender official repository for Linux.

sudo sh -c 'echo "deb http://download.bitdefender.com/repos/deb/ bitdefender non-free" >> /etc/apt/sources.list.d/bitdefender.list'

Then download and install the key via below command:

wget -O- -q http://download.bitdefender.com/repos/deb/bd.key.asc | sudo apt-key add -

After adding the repository, use your package manager to install BitDefender. Or run below commands to update packages list and do install:

sudo apt-get update; sudo apt-get install bitdefender-scanner-gui

Once installed, run GUI via below command. Read this tutorial to manually add a launcher.

/opt/BitDefender-scanner/bin/bdgui

Gmediafinder is a software to search stream and / or download files form youtube, dailymotion, vimeo, and others engines without flash.

It support fullscreen mode (double click on the video or f key/esc), visualisations and use the gstreamer engine to play sounds and videos.

For youtube you can select you prefered resolution and it give priority to webm(vorbis/vp8) and mp4 format for video seeking! (and lower cpu usage than flv…)

Objectives:

  • Install Gmediafinder on Ubuntu 13.04 & 12.10 via PPA
  • Enjoy!

The developer has create a ppa repository to make it easy to install for Ubuntu and Linux Mint users. So far it supports Ubuntu 10.04 and higher.

To get started, press Ctrl+Alt+T on your keyboard to open terminal. When it opens, run below commands to add the ppa:

sudo add-apt-repository ppa:s-lagui/ppa

Then update package lists and install gmediafinder:

sudo apt-get update; sudo apt-get install -y gmediafinder

Disable Global Menu on Ubuntu 13.10 Saucy

Last updated: October 23, 2013

This tutorial shows how to disable the global menu, so that each application having its own menu bar on Ubuntu 13.10 Saucy.

Before:

After:

To do it, press Ctrl+Alt+T on your keyboard to open terminal. When it opens, run the commands below to disable it.

sudo apt-get remove indicator-appmenu

Restart your computer to apply the changes.

For Firefox, go to Tools –> Add-ons –> Extensions and disable ‘Global Menu Bar integration’.

Enjoy!

This simple and brief tutorial will show you how to backup live CD or DVD to iso image on Ubuntu Linux using dd command.

dd is a command on Unix and Unix-like operating systems whose primary purpose is to convert and copy a file. On Unix, device drivers for hardware (such as hard disks) and special device files (such as /dev/zero and /dev/random) appear in the file system just like normal files; dd can also read from (and in some cases write to) these files. As a result, dd can be used for tasks such as backing up the boot sector of a hard drive, and obtaining fixed amount of random data.

To make iso image out of CD or DVD:

Insert your live CD or DVD into computer, then you can check the device name by running below command:

df -lh

You’ll get a similar output. The last line tells the device name /dev/sr0 and mount point /media/handbook/CD-Rom

Filesystem Size Used Avail Use% Mounted on
/dev/sda6 92G 47G 41G 54% /
none 4.0K 0 4.0K 0% /sys/fs/cgroup
udev 870M 4.0K 870M 1% /dev
tmpfs 176M 980K 175M 1% /run
none 5.0M 0 5.0M 0% /run/lock
none 878M 3.5M 874M 1% /run/shm
none 100M 56K 100M 1% /run/user
/dev/sr0 807M 807M 0 100% /media/handbook/CD-Rom

Now, use below command to create iso from it:

dd if=/dev/sr0 of=~/backup.iso bs=1000000 count=512 &&sync

Here if reads from file /dev/sr0, of write to file backup.iso, ~/ means user home directory. The value of ‘bs’ means read and write up to 1000000 bytes at a time.

For more, run:

man dd

CherryTree is a hierarchical note taking application, featuring rich text and syntax highlighting, storing data in a single xml or sqlite file.

CherryTree is perfectly suitable not only for taking notes, but also for managing code snippets. The application supports syntax highlighting for many popular programming languages, so you can use the application as a programmer’s scratchpad. You can also insert code snippets directly into notes using so-called code boxes.

Features:

  • rich text (foreground color, background color, bold, italic, underline, strikethrough, small, h1, h2, h3, subscript, superscript, monospace)
  • syntax highlighting (only when the rich text is disabled in the current node)
  • images handling: insertion in the text, edit (resize/rotate), save as png file
  • lists handling (bulleted, numbered, to-do and switch between them, multiline with shift+enter)
  • simple tables handling (cells with plain text), cut/copy/paste row, import/export as csv file
  • codeboxes handling: boxes of automatically highlighted text into normal rich text
  • alignment of text, images, tables and codeboxes (left/center/right)
  • hyperlinks (links to webpages, links to nodes/nodes + anchors, links to files, links to folders)
  • intra application copy/paste: supported single images, single codeboxes, single tables and a compound selection of rich text, images, codeboxes and tables
  • cross application copy/paste (tested with openoffice and gmail): supported single images, single codeboxes, single tables and a compound selection of rich text, images, codeboxes and tables
  • copying a list of files from the file manager and pasting in cherrytree will create a list of links to files, images are recognized and inserted in the text
  • print & save as pdf file of a selection / node / node and subnodes / the whole tree
  • export to html of a selection / node / node and subnodes / the whole tree
  • export to plain text of a selection / node / node and subnodes / the whole tree
  • toc generation for a node / node and subnodes / the whole tree, based on headers h1, h2 and h3
  • find a node, find in current node, find in all nodes
  • replace in node names, replace in current node, replace in all nodes
  • iteration of the latest find, iteration of the latest replace, iteration of the latest applied text formatting
  • import from basket, cherrytree, gnote, keepnote, knowit, mempad, notecase, tomboy, treepad lite, tuxcards, zim
  • export to cherrytree file of a selection / node / node and subnodes / the whole tree
  • password protection (using http://www.7-zip.org/)
  • tree nodes drag and drop

Install CherryTree on Ubuntu:

CherryTree is available in Ubuntu’s universe repository since Ubuntu 12.04 Precise. Search for and install it from Ubuntu Software Center.

For the latest version, press Ctrl+Alt+T to open terminal and run below commands:

sudo add-apt-repository ppa:vincent-c/cherrytree

sudo apt-get update; sudo apt-get install cherrytree