Archives For November 30, 1999

This simple tutorial shows how to install Nicotine plus, the graphical client for the Soulseek peer-to-peer network, in Ubuntu 20.04, Ubuntu 22.04, and Ubuntu 24.04.

Soulseek is an ad-free, spyware free, and plain free file sharing network, make it easy for you to find people with similar interests, and make new discoveries!

And, Nicotine is a lightweight, pleasant, free and open source (FOSS) alternative to the official Soulseek client, while also providing a comprehensive set of features.

The app used to be available in Ubuntu system repository, but removed due to lack of development. It’s later revived and finally added back to Ubuntu 24.04 repository.

For current Ubuntu 24.04, Ubuntu 22.04, Ubuntu 20.04, and even Ubuntu 18.04, user can install it from the official PPA.

Nicotine in Ubuntu 22.04

Continue Reading…

Got local music files in your Ubuntu PC/laptop? Here’s how to transfer them to your iPhone.

It’s NOT hard to install iTunes in Ubuntu using Wine in today’s Linux. However, iTunes running in wine does not detect my iPhone, at least in my case in 22.04.

If you just want to transfer music from PC to your iOS device, then you don’t have to struggle with iTunes in Linux. There are easy alternatives! And, VLC is a very popular one of them.

This tutorial is tested on iPhone with iOS 16.1.1, and Ubuntu 22.04 with default GNOME.

Transfer Music from PC to iOS via VLC

1. First, go to “App Store” and install the free open-source VLC media player in your iPhone or other iOS device.

VLC media player in App Store

2. Not sure if it required, but you may launch VLC in iOS for the first time to generate app folder.

3. Now, connect your iPhone or other iOS device into Ubuntu. Then, open “Files” and go to the mounted folder from left panel.

In my case, it’s a phone icon with text “Document on iphone”. In that folder, click VLC icon. Finally, drag’n’drop your music files into the VLC sub-folder.

When done, you can now open VLC in iphone/iOS, and find out the local music files under “Audio” bottom tab.

4. (Optional) If you want to use Apple Music or other app for music playback, then you can save songs to files.

First, navigate to “Songs” tab in VLC. Then, tap top right “circle with 3 dots” icon, and click “Select” to choose all the files.

Finally, use the bottom right icon to open menu to “Save to Files” for all selected music files.

How to install Zoom in Ubuntu 24.04

Last updated: April 28, 2024 — 3 Comments

This simple tutorial shows how to install Zoom video communication client in Ubuntu 24.04 desktop.

Zoom is a popular app for video/audio conferencing meetings and live chat. It works on Linux, Windows, macOS, iOS, Android, and ChromeOS.

For Ubuntu users, Zoom can be installed either via native .deb package and universal Flatpak package. Choose either one that you prefer.

Continue Reading…

There are quite a few ways to transfer files between different machines. For Ubuntu and most other Linux, here’s an easy way for choice.

Usually, I use a USB cable or a messenger app for transferring photo images between my personal PC and mobile devices.

However, my USB cable is always NOT near at hand and I hate to scan QR code again and again on PC for logging 3rd app. In this case, creating a temporary http file server with Python is an easy and good choice.

Upside and downside

Python is pre-installed in most Linux Distros. So this is an universal method for Linux. It also works in Windows and macOS with Python programming language installed.

As a simply http server, any devices with a web browser can download (or upload) files from/to the server side either over local network or internet.

However, http is NOT designed for transferring files. It’s OK to handle small files (e.g., photo images and short videos less than a few hundred MB). But for large files with a few GB or more file size, it may not work! As well, it’s NOT secure for accessing important files outside from local network.

Single command to create a Python http server:

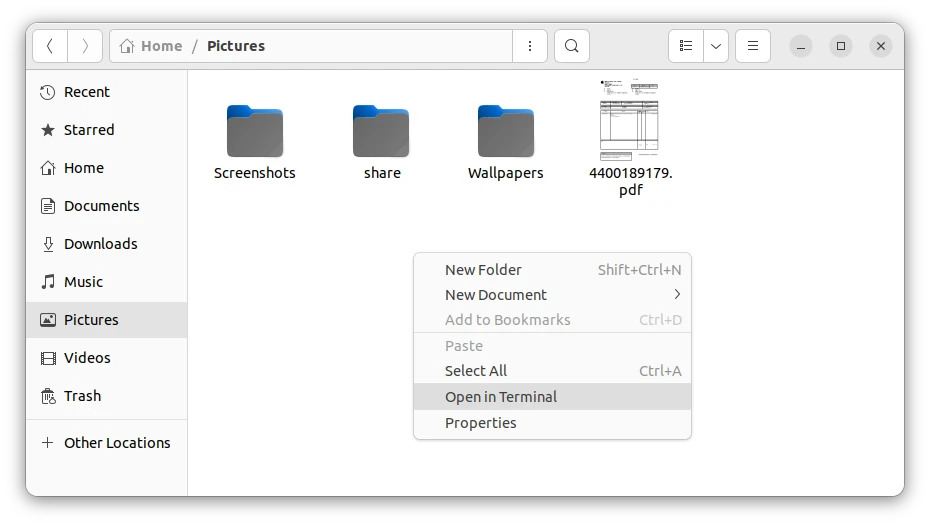
For those who are new to Linux, user may first open file manager, navigate to the folder that contains the files to share with other device, right-click on blank area and select “Open in Terminal”.

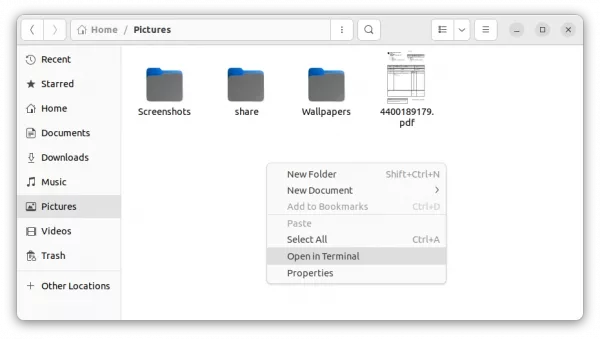
It will open a terminal window and automatically navigate to that folder as working directory.

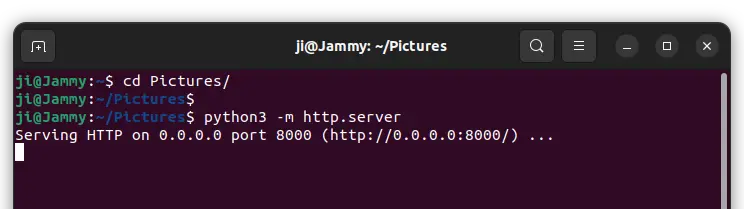
Or, you can also open terminal from start menu and run cd command to navigate directory. For example, run the command below to navigate to user’s Pictures folder:

cd ~/Pictures

Then, run the single command to start a http file server (For some Linux, replace python3 with python in command):

python3 -m http.server

By default, it listens to port 8000. If the port is already in use, use python3 -m http.server 9090 to set another port number (change number 9090 as you want).

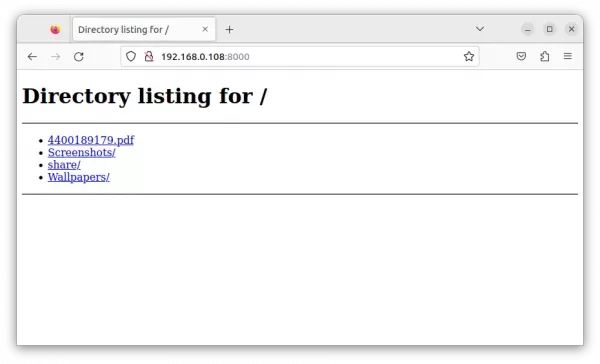
After that, visit http://ip-address:8000 (change number 8000 if you set another port) in any device via a web browser. You can then open and/or right-click save as to download any file from that folder.

Create python http server with upload support

1. If you want to send files from any device to Ubuntu Linux, open terminal and run command:

python3 -m pip install --user uploadserver

Install pip first via sudo apt install python3-pip if the command above does not work. This command will install a Python module uploadserver.

NOTE: For Ubuntu 24.04, this pip install command does NOT work due to policy change. You may either follow this tutorial for workaround, or use the command below instead:

python3 -m pip install --user uploadserver --break-system-packages

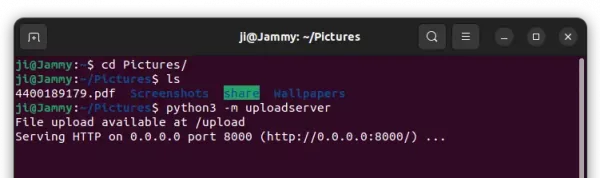
2. Then open or navigate to your desired folder in terminal window, and run command to create simple http file server with both download and upload support:

python3 -m uploadserver

Also specify port number if you want, for example, python3 -m uploadserver 9990

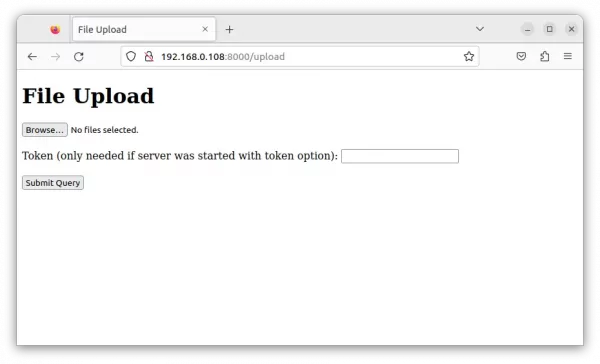
3. Finally, visit http://ip-address:8000 in any device via web browser can access and download files. Or, go to http://ip-address:8000/upload for uploading files.

For security reason, you may add a token authentication so client machines need to verify before being able to upload a file. To do so, run the command below instead in Ubuntu Linux:

python3 -m uploadserver -t password_here

Looking for a peer to peer file transfer app that works outside the local network? Warp is the stupid simple application to do the trick for Linux.

There are a few applications for LAN file transferring, such as Warpinator and Dukto. For sending date all over the world, Warp is a new GTK4 app for transferring any arbitrary-sized files and directories without struggling with Linux command or using a cloud service.

The app provides a stupid simple interface with 2 tabs: Send and Receive. Simply click on the “send file” (or folder) button and select your data, it will generate a transmit code.

On another machine with the app installed, type the code in “Receive” tab and click “Receive File” button will start transferring data.

Every file transfer is encrypted using the Magic Wormhole protocol. And, it will directly transfer files on the local network if possible. Though, an internet connection is required to connect to rendezvous server so sender and receiver can find each other over the internet.

How to Install Warp in Linux:

NOTE: The app is in early age that may have bugs. At the moment of writing, it provides binary package for most Linux systems and Chrome OS using Flatpak package.

For Ubuntu, firstly press Ctrl+Alt+T on keyboard to open terminal. When it opens, run the command to install flatpak daemon:

sudo apt install flatpak

Other Linux & Chrome OS may follow this setup guide to install the daemon.

Next, install the app using command:

flatpak install https://dl.flathub.org/repo/appstream/app.drey.Warp.flatpakref

For first time installing Flatpak app on Ubuntu 22.04, you need a system restart to make the app icon available in search result.

Once installed, either press Super/Windows key on keyboard and search for and open the app, or run command flatpak run app.drey.Warp to start it from terminal.

Remove Warp file transfer

To remove the app, run command in a terminal window:

flatpak uninstall --delete-data app.drey.Warp

And clean un-used run time via: flatpak uninstall --unused.

Want to share your files over local network or transfer file from one PC to another PC? Here are a few commonly used ways to do the job in Ubuntu 22.04 LTS.

Option 1: Share Folder Temporarily via Python scripts:

Without installing any package, user may run a built-in Python script at any time to create a http file server for temporary use. Any device (Windows, Mac, Linux PC, and mobile phones) can access or download the files via a web browser.

NOTE: This method seems to be not working good for transfer large files (1 GB+).

1. First, right-click on the folder you want to share. Then click on “Open in Terminal” option in the context menu to open terminal.

2. Next, run command to share this folder content over LAN via command:

python3 -m http.server

In case the default listening port 8000 is already in use, you may specify another port (9001 for example) via command:

python3 -m http.server 9001

Now, in any device’s web browser, go to http://ubuntu-machine-ip:9001 (change the port accordingly, default is 8000). Click to open file directly or right-click and select “save as …” to download file.

To stop sharing the folder, either press Ctrl+C in terminal window or just close it.

Option 2: Use Dukto file transfer

If you transfer files regularly from one PC to another, then the open-source “Dukto” app is a good choice that works on Linux, MacOS, and Windows machines.

Just open the app in both machines, it will detect each other automatically and offer options to transfer file/folder, and send text.

Though the app has not been updated for years, it’s still working very well! Mac and Windows users may download & install the app packages from:

For Ubuntu user, the package in previous link does not install due to dependency issue. However, the Qt6 port from this Ubuntu PPA is available for all current Ubuntu releases.

Simply open terminal by pressing Ctrl+Alt+T on keyboard, and run following commands one by one will add the PPA and install Dukto in Ubuntu:

sudo add-apt-repository ppa:xuzhen666/dukto
sudo apt update
sudo apt install dukto

Option 3: Share Folder via Samba

If you want to share a folder for long time use, it’s better to use the samba file sharing service. This can be done easily in Ubuntu, since “Files” (Nautilus file manager) provides a context menu option to do the job.

1.) Firstly, right-click on the folder you want to share. Then, click on the “Local Network Share” menu option.

2.) In the pop-up dialog, enable the checkbox which says “Share this folder”.

3.) If you’re doing this for the first time, it will prompt to install the samba sharing service.

Just click “Install service” and confirm in next dialog to install the required packages.

4.) After installing them, go back to the previous dialog in step 1.). Enable “Share this folder” and tick “Guest access” and “Allow others to create and delete …” accordingly.

If you enabled the write permission (“Allow others to create and delete …”), it will prompt to change the folder permissions.

5.) If you got “‘network share’ return 255” error, open terminal (Ctrl+Alt+T) and run command to add current user to ‘sambashare’ group should fix the issue after logged out and back in.

sudo gpasswd --add $USER sambashare

And, if you didn’t enable guest access then a separated password has to be added for authentication:

sudo smbpasswd -a $USER

To access this samba share:

For Windows user, press Window key + R on keyboard to open “Run” box, and type \\ubuntu-machine-ip. Then type username and password you set in previous step to access this folder.

For Linux user (only tested in GNOME), open “Files -> Other Locations” and type smb://ubuntu-machine-ip in button to connect.

For MacOS, press command + K on keyboard to open Connect to Server dialog, type smb://ubuntu-machine-ip and hit Enter to access.

Looking for a secure instant messaging app? Speek.Chat is a free open-source messenger based on Tor hidden network services.

No server, no metadata, no ID or phone number! With it, users are only identified via public keys. By sharing the key to others, they can send request to add you into contact list and then start chatting.

All messages and files are end-to-end encrypted and routed via the Tor network. No middleman server that could be compromised, taken down or leak user information. You can chat anonymous without exposing your identity (or IP) to anyone.

Speek.Chat messenger features:

  • Serverless, no metadata, anonymous.
  • Peer to peer encrypted using TLS/SSLv3, routed via Tor network.
  • Nothing is stored. All messages deleted on app close.

Get Speed.Chat

The app is available in Microsoft Store for Windows, and app store for macOS 10.12 or later.

For Linux, it provides the non-install Appimage available to download at the project releases page:

Grab the package from ‘Assets’ section, then right-click on it and go to file ‘Properties’. After adding permission to ‘Allow executing file as program‘, you can right-click and select run to launch the messenger.

If you don’t want to use it anymore, just remove the .appimage package and that’s all.

There’s a good NetSpeed indicator that shows the current download & upload speed in Ubuntu panel. For those would like a floating desktop widget, a new extension is available for GNOME 40.

The new ‘Screen Net Speed‘ extension adds an animated widget to your screen displays current download & upload speed. By clicking on it will toggle display its position (so far only bottom left or bottom right).

The widget is always on top. And, it automatically rises (move up) when network speed increase and sets (move down) when speed slow down. As well, a paper plane icon is present in panel to toggle display the widget.

How to Install Screen Net Speed:

The extension at the moment only supports GNOME 40. Which means, you need Ubuntu 21.10.

1. Install ‘chrome-gnome-shell’

Firstly, make sure you have installed the chrome-gnome-shell package, which is required for installing Gnome Extensions in Ubuntu viaweb browser.

To install it, press Ctrl+Alt+T on keyboard to open terminal. Then, run command:

sudo apt install chrome-gnome-shell

2. Install Network Speed Widget:

NOTE: Firefox as Snap (pre-installed in Ubuntu 21.10) so far (March, 2022) does not support for installing Gnome Extensions! Use another browser or install Firefox as classic DEB package.

Now, go to the link button below in web browser and turn on the toggle icon to install the extension:

If you don’t see the toggle icon, try installing browser extension via ‘Click here to install browser extension’ link and refresh the web page.

shell browser extension

After installation, the widget should appear immediately on your desktop. That’s all. Enjoy!

Uninstall the Extension:

To remove this extension, either click the previous link button again and turn off the slider icon, or install and use Gnome Extensions app.

1. Install Gnome Extensions app by running command in terminal (Ctrl+Alt+T):

sudo apt install gnome-shell-extension-prefs

2. Search for and open ‘Extensions’ from the Activities overview screen.

3. Finally click expand the extension via the ‘‣’ icon and click remove it.

How to Install Wireshark 2.0 in Ubuntu 15.10 Wily

Last updated: November 24, 2015

wireshark 2.0

Wireshark has reached the new table 2.0 release recently and it has been made into Ubuntu 16.04’s official repositories. Here’s how to install Wireshark 2.0 in Ubuntu 15.10 using a PPA.

Wireshark 2.0 features a completely new user interface that provides a smoother, faster user experience. It has been fully rewritten in Qt5. It also has new protocol support, new file format decoding support, new dialogs, capture options, and many other improvements. See the release note.

Wireshark 2.0 in Ubuntu

Install Wireshark 2.0 in Ubuntu 15.10:

UPDATE: The official Wireshark PPA just updated with the 2.0 packages, available for not only Ubuntu 15.10, but also Ubuntu 15.04, Ubuntu 14.04 and Ubuntu 12.04.

1. Add PPA.

Open terminal from Unity Dash, App Launcher, or via Ctrl+Alt+T key combination. When it opens, paste below command and hit enter:

sudo add-apt-repository ppa:wireshark-dev/stable

wireshark-official-ppa

Type in your password when it asks, no visual feedback so just type in mind, and hit Enter to continue.

2. Install / Upgrade Wireshark.

If you have a previous installed, launch Software Updater. After checking for updates, you’ll see this popular network protocol analyzer in the list. Install the updates and done.

upgrade-wireshark2

Or, paste below commands one by one and run to update repository cache and install/upgrade the software:

sudo apt-get update

sudo apt-get install wireshark

3. Remove PPA.

The PPA also contains many other applications for 15.10 Wily, check HERE. You can keep the PPA or select remove it via below command once Wireshark 2.0 is installed.

sudo add-apt-repository --remove ppa:nicola-onorata/desktop && sudo apt-get update