Archives For November 30, 1999

Oracle Java Ubuntu 14.04

This simple tutorial is going to show you how to easily install Oracle Java (JDK) 6, 7, or 8 in Ubuntu 14.04 Trusty Tahr via PPA.

There’s a Launchpad PPA (Personal Package Archive) maintained by webupd8.org, a popular Ubuntu Linux blog, which provides the most recent installers to automatically download and install Oracle Java JDK6 / JDK7 / JDK8 from oracle website. Note there are no actual Java files in this PPA.

To get started:

Press Ctrl+Alt+T on your keyboard to open a terminal window. When it opens, copy and paste the command below and hit enter. Input your user password when prompts and it will add the PPA repository into your system.

sudo add-apt-repository ppa:webupd8team/java

After that, update package lists via:

sudo apt-get update

To install Oracle Java 8, run:

sudo apt-get install oracle-java8-installer

Change the number 8 to 6 (or 7) in the code to install Java 6 (or 7).

While installation, you’ll be asked to agree the license and then the installer start downloading Java file from oracle website and install it on your system.

To set the default Java, run:

sudo apt-get install oracle-java8-set-default

Also change number 8 to the Java version you want.

Finally check whether everyting is OK:

java -version

It will output something like below:

java version “1.7.0_60”
Java(TM) SE Runtime Environment (build 1.7.0_60-b19)
Java HotSpot(TM) 64-Bit Server VM (build 24.60-b09, mixed mode)

digikam 4.0 PPA

The photo management software digiKam 4.0.0 has reached its third beta release just a few hours ago. There will be also beta4 and RC releases, and the digiKam 4.0.0 final will be released on May 11.

According to the release notes, following new features will be added in this version:

  • A new tool dedicated to organize whole tag hierarchies. This new feature is relevant of GoSC-2013 project from Veaceslav Munteanu. This project include also a back of Nepomuk support in digiKam broken since a while due to important KDE API changes. Veaceslav has also implemented multiple selection and multiple drag-n-drop capabilities on Tags Manager and Tags View from sidebars, and the support for writing face rectangles metadata in Windows Live Photo format.
  • A new maintenance tool dedicated to parse image quality and auto-tags items automatically using Pick Labels. This tool is relevant to anotherGoSC-2013 project from Gowtham Ashok. This tool require feedback and hack to be finalized for this release.
  • Showfoto thumbbar is now ported to Qt model/view in order to switch later full digiKam code to Qt5. This project is relevant to another GoSC-2013 project from Mohamed Anwer.
  • A lots of work have been done into Import tool to fix several dysfunctions reported since a very long time. For example, The status to indicate which item have been already downloaded from the device is back. Thanks to Teemu Rytilahti and Islam Wazery to contribute. All fixes are not yet completed and the game continue until the next beta release.
  • This release is now fully ported to Qt4 model-view and drop last Q3-Support classes. The last pending part was Image Editor Canvas ported and completed by Yiou Wang through this GoSC-2013 project. In the future, port to Qt5 will be easy and quickly done, when KDE 5 API will stabilized and released.
  •  
    Install:
    Besides building digiKam 4.0 from the source tarball. Ubuntu 13.10 Saucy users can install the beta release from the third-party PPA.

    Press Ctrl+Alt+T on your keyboard to open a terminal window. When it opens, run the commands below to add the digiKam Beta repository:

    sudo add-apt-repository ppa:msylwester/digikam-beta

    There’s also a stable PPA created by the maintainer. It will provide the digiKam 4.0.0 final build for Ubuntu 13.10 Saucy and Ubuntu 14.04 Trusty. To add this PPA, run:

    sudo add-apt-repository ppa:msylwester/digikam

    After adding the PPA, run the commands below to update package lists and install digiKam:

    sudo apt-get update 
    
    sudo apt-get install digikam

    That’s it. Check out the PPA packages on Launchpad page.

    pinta ubuntu 14.04

    This simple tutorial shows how to install the latest stable or development Pinta release in Ubuntu 14.04 Trusty Tahr.

    As you may know, Pinta is a free, open source drawing/editing program modeled after Paint.NET. Its goal is to provide users with a simple yet powerful way to draw and manipulate images on Linux, Mac, and Windows. Pinta is available in Ubuntu Software Center by default, but it’s a little old.

    pinta ubuntu 14.04

    Install Pinta Stable:

    Press Ctrl+Alt+T on keyboard to open the terminal. When it opens, run the commands below one by one:

    sudo add-apt-repository ppa:pinta-maintainers/pinta-stable
    
    sudo apt-get update
    
    sudo apt-get install pinta

    Previous commands will add the official Pinta Stable PPA and install the latest build (so far it’s version 1.4) in your system.

    Install Pinta Development

    Also open a terminal window and run the commands below one by one:

    sudo add-apt-repository ppa:pinta-maintainers/pinta-daily
    
    sudo apt-get update
    
    sudo apt-get install pinta

    This will install Pinta 1.5 dev in your system from the Pinta Daily build PPA.

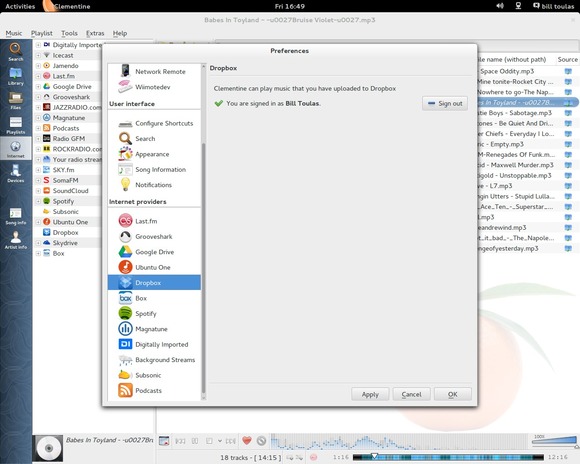
    Clementine Music Player Ubuntu 14.04

    This tutorial will show you how to install the latest Clementine music player and library organizer in Ubuntu 14.04 Trusty Tahr.

    As you may know, Clementine is a multiplatform music player inspired by Amarok 1.4, focusing on a fast and easy-to-use interface for searching and playing your music. Since version 1.2, you’re able to control Clementine remotely from an Android device and listen to your music stored in Box, Dropbox, Onedrive and Ubuntu One. Clementine 1.2.2 is the second update with following changes:

    • (Android Remote) Add kittens support.
    • Rename SkyDrive to OneDrive.
    • Don’t include the user’s IP address in the log (from the network remote settings dialog).
    • (Debian) Fix a bug with HTTPS logins to all cloud storage providers.
    • (Mac OS X) Fix a bug in the workaround for a weird font issue on 10.9.
    • (Mac OS X) Fix rendering of source icons on retina displays.
    • (Android Remote) Don’t advertise songs that aren’t available.
    • (Android Remote) Fix playing songs with special characters in filenames.

    Install:

    The official download page provides DEB packages for all supported Ubuntu releases, including Ubuntu 14.04. Just download the package for your Ubuntu and OS type, and install it via Gdebi (recommended, it’s available in Software Center) or Ubuntu Software Center.

    If you would like to keep the player update-to-date by regular system update, you may add the Clementine PPA (check out the PPA in launchpad page).

    Press Ctrl+Alt+T on keyboard to open the terminal. When it opens, run:

    sudo add-apt-repository ppa:me-davidsansome/clementine

    After that, you can install / upgrade the music player after checking for updates. For command line, run:

    sudo apt-get update
    
    sudo apt-get install clementine

    Clementine-1.2

    Postgresql ubuntu 14.04

    This simple tutorial is going to show beginners how to install the PostgreSQL 9.3 (9.2, 9.1, 9.0 or 8.4) in Ubuntu 14.04 Server via its official repository.

    The PostgreSQL Global Development Group (PGDG) maintains an APT repository of PostgreSQL packages for Debian and Ubuntu. The repository provides the PostgreSQL server packages as well as extensions and modules packages for all PostgreSQL versions supported.

    So far, the repository support:

    • Debian 6.0 (squeeze), 7.0 (wheezy), and unstable (sid) 64/32 bit (amd64/i386)
    • Ubuntu 10.04 (lucid), 12.04 (precise), and 14.04 (trusty) 64/32 bit (amd64/i386)
    • PostgreSQL 8.4, 9.0, 9.1, 9.2, 9.3
    • Server extensions such as Slony-I, various PL languages, and datatypes
    • Applications like pgadmin3, pgbouncer, and pgpool-II

    To get started installing PostgreSQL on Ubuntu 14.04, do the following steps:

    1. Create and edit the PostgreSQL repository by running the command below:

    sudo vi /etc/apt/sources.list.d/pgdg.list

    Press I on keyboard and add the below line into the file:

    deb http://apt.postgresql.org/pub/repos/apt/ trusty-pgdg main

    Press Esc on keyboard and followed by :wq to save the file.

    2. Download & import the repository key:

    wget --quiet -O - https://www.postgresql.org/media/keys/ACCC4CF8.asc | sudo apt-key add -

    3. Update your system:

    sudo apt-get update && sudo apt-get upgrade

    4. Now you’re able to install PostgreSQL via below command:

    sudo apt-get install postgresql-9.3 pgadmin3

    NOTE: This repository provides “postgresql”, “postgresql-contrib”, and “postgresql-client” meta-packages that depend on the latest postgresql-x.y, … packages, similar to the ones present in Debian and Ubuntu. Once a new PostgreSQL version is released, these meta-packages will be updated to depend on the new version. If you rather want to stay with a particular PostgreSQL version, you should install specific packages like “postgresql-9.3” instead of “postgresql”.

    via:postgresql wiki page

    install the latest filezilla ubuntu

    This simple tutorial shows you how to install the latest FileZilla Client in all versions of Ubuntu currently supported on the desktop. So far, they are Ubuntu 14.04, Ubuntu 13.10, Ubuntu 12.10, and Ubuntu 12.04.

    The current FileZilla release is version 3.7.4. It comes with below new features and bug fixes:

    • Added SOCKS4 support
    • Added Corsican and Kabyle translations
    • SFTP now supports the hmac-sha2-256 algorithm
    • Additional bugfix for site-specific bookmarks
    • Improve compatibility with servers sending directory listings in Polish language or in EBCDIC encoding
    • Handle set user id bit when populating permissions dialog.
    • MSW: Show local timestamps for old files using the correct daylight saving time (DST) offset.
    • Fix loading of transfer queue if starting FileZilla while another instance is in the process of shutting down
    • Fix interaction between site-specific bookmarks and multiple tabs
    • Don’t resume uploads when there’s zero octets left to transfer
    • Improve symbolic link detection when using MLSD
    • If processing a queue with files queued on multiple servers and not storing passwords, the password was not always asked prior to switching servers
    • Use the correct name element when importing sites
    • MSW: Show actual Windows version in about dialog regardless of app-compat settings

    Install FileZilla:

    If you don’t like PPAs, you can always follow the steps below to install the latest FileZilla Client in Ubuntu.

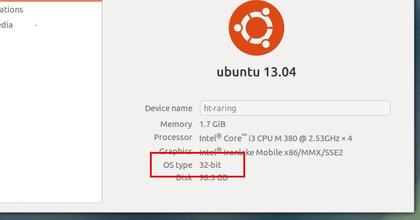
    1. First go to System Settings -> Details and check out your OS type: 32 bit or 64 bit

    System-type-32bit-64-bit

    2. Download FileZilla from the official download page.

    • 32 bit system download the “FileZilla_x.x.x_i586-linux-gnu.tar.bz2”
    • 64 bit system download the “FileZilla_x.x.x_x86_64-linux-gnu.tar.bz2”

    3. Press Ctrl+Alt+T on your keyboard to open the terminal. When it opens, run the command below to extract FilaZilla to /opt/.

    cd /opt/ && sudo tar jvxf FileZilla_*-linux-gnu.tar.bz2

    In the code, you may replace the file name to yours!

    4. Change the ownership of extracted folder:

    cd /opt/ && sudo chown -R root:root FileZill*

    5. Now, you’re able to launch FileZilla Client via the command below:

    /opt/FileZill*/bin/filezilla

    6. To create a launcher. Run the command below to edit the config file:

    sudo gedit /usr/share/applications/filezilla.desktop

    Copy and paste below lines into the file and save it.

    [Desktop Entry]
    Name=FileZilla
    GenericName=FTP client
    GenericName[de]=FTP-Client
    GenericName[fr]=Client FTP
    Comment=Download and upload files via FTP, FTPS and SFTP
    Comment[de]=Dateien über FTP, FTPS und SFTP übertragen
    Comment[fr]=Transférer des fichiers via FTP, FTPS et SFTP
    Exec=/opt/FileZilla3/bin/filezilla
    Terminal=false
    Icon=filezilla
    Type=Application
    Categories=Network;FileTransfer;
    Version=1.0

    Change the FileZilla3 to the exact folder name and done.

    Pidgin PPA Ubuntu

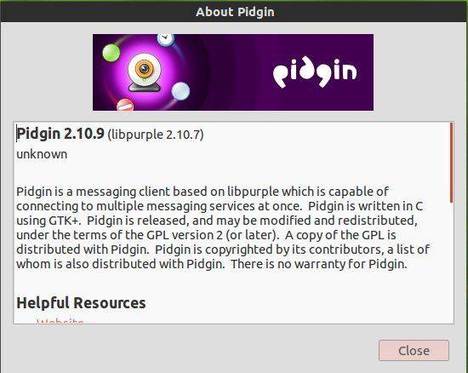
    The instant messaging program Pidgin 2.10.9 has been released recently. It mainly fixed problems logging into some servers including jabber.org and chat.facebook.com.

    The default Pidgin versions in Ubuntu universe repositories are quite old (See Pidgin changelog history). The Pidgin Developers PPA provides the most recent version of Pidgin for Ubuntu 14.04, Ubuntu 13.10, Ubuntu 12.10, and Ubuntu 12.04. Here’s how to add the PPA and install / upgrade your Pidgin from it.

    Install the latest Pidgin Release in Ubuntu

    To get started, press Ctrl+Alt+T on your keyboard to open the terminal. When it opens, run the command below to add Pidgin PPA to your system:

    sudo add-apt-repository -y ppa:pidgin-developers/ppa

    After that, update your system package lists and then you’re able to install packages from the PPA:

    sudo apt-get update

    Now install the Pidgin:

    sudo apt-get install pidgin

    That’s it. Enjoy!

    For the Off-the-Record (OTR) plug-in, which is designed for use with Pidgin ensures authenticated and secure communications between Pidgin users, just search for and install pidgin-otr from Ubuntu Software Center. Finally enable the plugin from Pidgin menu Tools -> Plugins.

    Keystroke Visualizer

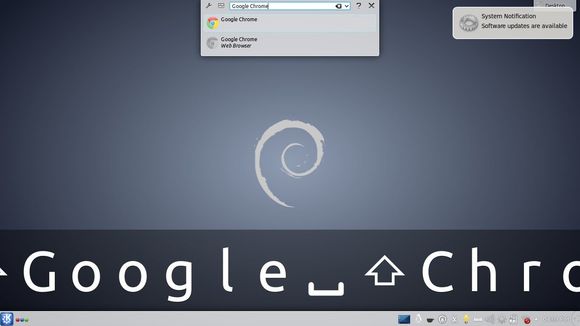
    Keystroke is a Qt based keystroke visualization tool for Linux. This is a new KDE project just created a few days ago. It is helpful when creating screencasts where you want to show what you are typing. E.g. when using vim.

    See the video:

    This keystroke visualization tool only works on K Desktop Environment (KDE). For Ubuntu users, you can easily install it by running the commands below one by one in terminal (Press Ctrl+Alt+T to open the terminal):

    sudo add-apt-repository -y ppa:samrog131/ppa
    
    sudo apt-get update
    
    sudo apt-get install keystroke

    This will install the tool in (K)ubuntu 14.04, (K)ubuntu 13.10, (K)ubuntu 12.10, and (K)ubuntu 12.04.

    Once installed, search for and run keystroke-gui in the start menu and then type anything to see the magic!

    keystroke visualization tool KDE

    keystroke on github

    android emulator ubuntu

    Want to emulate Nexus, Galaxy, or other Android Phone/Tablet on Ubuntu Desktop? Well, you may already know the handy tool Genymotion.

    Genymotion is a complete set of tools that provides a virtual environment for Android. It can be very useful for developers, testers, salesman or even gamers. Genymotion is free for personal use. For full features, you need to buy a license.

    Features:

    • OpenGL acceleration to achieve the best 3D performance
    • Enable full screen option and improve your experience
    • Be precise in your UI development with the “pixel perfect” functionality
    • Start multiple virtual device at the same time
    • Override virtual device identifiers
    • Directly command virtual devices sensors with Genymotion Shell
    • Fully compatible with ADB. You can control your virtual device from the host
    • Manage sensors: Battery level / status, GPS, Rotation, Camera

    Since 2.1:

    • supports copy/paste from the host to the virtual device, or from the virtual device to the host using Android builtin copy/paste feature.
    • Android 4.4 support

    Screenshots:

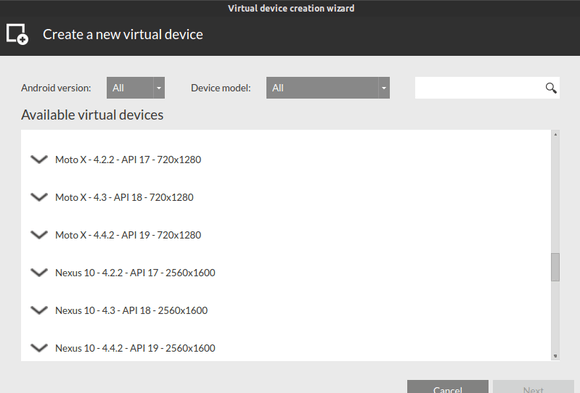
    Create a new virtual device

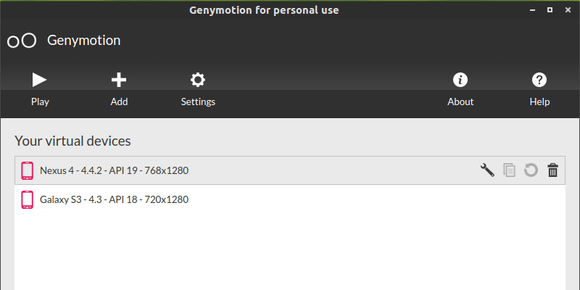
    list of installed devices

     
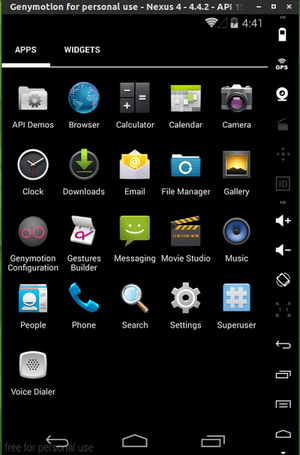
    Nexus 4 4.4.2 emulator

    Install Genymotion:

    1. This Android Emulator requires Virtualbox, so first search for and install virtualbox in Ubuntu Software Center.

    2. Register https://cloud.genymotion.com/ (free).

    3. Download the installer after your login the website. Not sure Linux 32 bits or 64 bits? Go to System Settings -> Details and you’ll see the OS type:

    System-type-32bit-64-bit

    4. If you save the installer in the default Downloads folder, press Ctrl+Alt+T to open terminal. When it opens, run below commands one by one:

    cd ~/Downloads/
    
    chmod +x genymotion-2.1.0_x64.bin
    
    ./genymotion-2.1.0_x64.bin

    It first navigate to Downloads folder, then give executable permission, and finally start the installer. Of course you need to change the file-name to yours.

    install genymotion android emulator

    5. According to the previous picture genymotion has been installed to “/home/handbook/Downloads/genymotion”.

    So run below command to start it:

    /home/handbook/Downloads/genymotion/genymotion

    charging ipad air

    If you have an Apple mobile device and want to charge it through the USB port in Ubuntu Linux machine, you’ll find a little app called ipad_charge which was originally developed by Ondrej Zary from Rainbow-Software.

    This simple app supports following devices:

    • iPad / iPad2 / iPad3 / iPad4 / iPad Mini
    • iPod Touch 2G/3G/4G
    • iPhone 3GS/4/4s/5

    The developer of super-wingpanel has done a little tweak on the code so that iPad air is supported now. This build has been made into PPA for Ubuntu 14.04, Ubuntu 13.10, Ubuntu 12.10, Ubuntu 12.04, Linux Mint and their derivatives.

    Install ipad-charge:

    Press Ctrl+Alt+T on keyboard to open the terminal. When it opens, run below commands one by one:

    sudo apt-add-repository ppa:heathbar/ipad-charge
    
    sudo apt-get update
    
    sudo apt-get install libusb-1.0-0 ipad-charge

    After that, your iPad should be automatically detected and charging enabled when you plug it in. However, if it’s not you may have to troubleshoot.

    Troubleshooting:

    If the udev rules are not automatically enabling charging when you plug in your device, you can run the program manually.

    ipad-charge

    If your iPad is still not charging you can find the device IDs of all Apple products with this command.

    ipad-charge -l

    If more than one is listed, you may have to run it with your iPad unplugged, then plugged in to find the correct ID. Once you determine the ID, report the ID to the links below.

    via: ipad_charge on github