Archives For November 30, 2020

KeePassX 2 YubiKey support

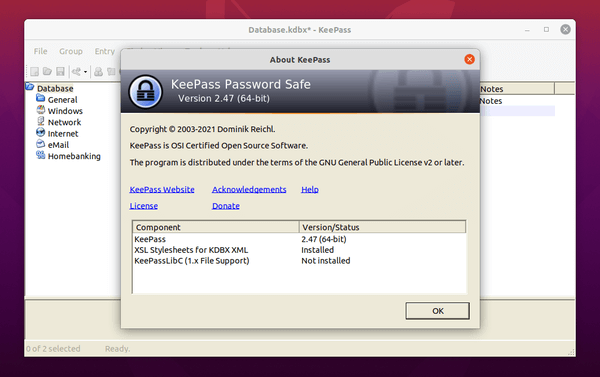
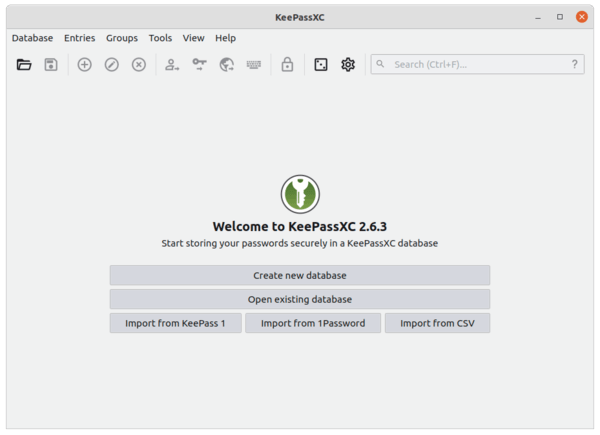
KeePassXC, cross-platform community fork of KeePass password manager, release version 2.6.3 a few days ago with new features and improvements.

KeePassXC 2.6.3 features Argon2id KDF and version 2 XML key files support. Other changes include:

  • Improve CSV Import/Export
  • Support empty area dragging of app window.
  • Display default Auto-Type sequence in preview pane.
  • Remove strict length limit on generated passwords
  • Hide key file path by default when unlocking database
  • Document support for managed Microsoft Edge
  • Prevent clipboard history and cloud sync.
  • Various bug-fixes.

How to Install KeePassXC 2.6.3 in Ubuntu:

The Latest KeePassXC is available in Ubuntu Software via Snap package. The official download page also offers non-install Appimage package.

For those prefer the classic apt method, the official upstream PPA has made the new release packages for Ubuntu 16.04, Ubuntu 18.04, Ubuntu 20.04, and Ubuntu 20.10.

1.) Open terminal either by pressing Ctrl+Alt+T on keyboard, or by searching for ‘terminal’ from system application launcher.

When terminal opens, run command to add the PPA:

sudo add-apt-repository ppa:phoerious/keepassxc

Type your password (no asterisk feedback) when it prompts and hit Enter to continue.

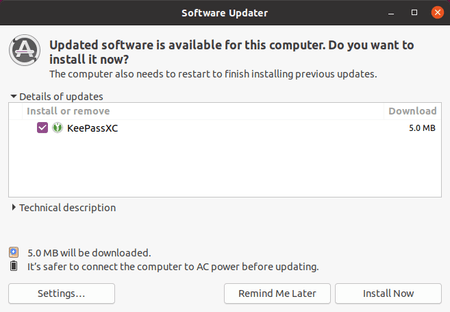
2.) Then either update the software package using Software Updater

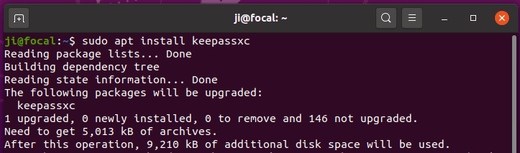
or run command to install the software:

sudo apt update && sudo apt install keepassxc
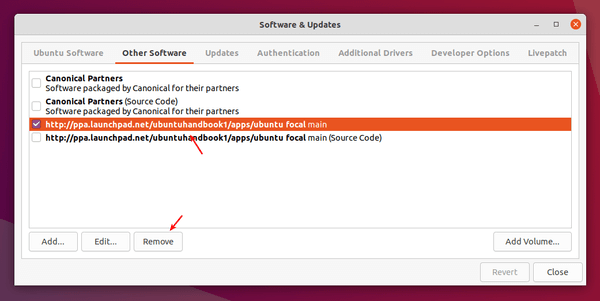
Uninstall:

You can run the PPA repository simply by running command in terminal:

sudo add-apt-repository --remove ppa:phoerious/keepassxc

And if you want, remove keepassxc password manger via command:

sudo apt remove --autoremove keepassxc

Want to try out the Cinnamon Desktop Environment? Without installing Linux Mint, you can get the desktop packages in Ubuntu via a few commands.

Cinnamon is available in Ubuntu main repositories, though the package version is however a little old. You can simply run the command in step 2 to install it if you don’t stick to the latest features.

The Wasta Linux team maintains an Ubuntu PPA that contains Cinnamon 4.8 packages for Ubuntu 20.04.

1.) Open terminal (Ctrl+Alt+T) and run command to add the Ubuntu PPA:

sudo add-apt-repository ppa:wasta-linux/cinnamon-4-8

2.) After adding the PPA and updating package cache, run command to install the desktop:

sudo apt install cinnamon-desktop-environment

There will be a large list of packages (about 400 MB download) and more disk space usage for installing the DE.

Once installed, log out and select log back with Cinnamon session.

How to Remove Cinnamon Desktop:

If something goes wrong or you just want to remove Cinnamon, paste and run the command below will remove most the components.

sudo apt remove --autoremove blueman brasero brasero-cdrkit cinnamon '~ncinnamon*' cjs desktop-base  five-or-more fonts-noto '~nfonts-noto*' fonts-quicksand four-in-a-row gedit-plugins-common gnome-chess gnome-backgrounds gnome-games gnome-klotski gnome-nibbles gnome-robots gnome-taquin gnome-tetravex gnote hexchat-common hitori hoichess hwdata iagno iso-flags-png-320x240 '~nlibcinnamon*' mate-icon-theme mate-themes muffin muffin-common nautilus-extension-brasero nemo nemo-data nemo-fileroller pidgin-data quadrapassel sound-juicer swell-foop tali vinagre wodim xapps-common

And remove the PPA either via Software & Updates under Other Software tab, or run command in terminal:

sudo add-apt-repository --remove ppa:wasta-linux/cinnamon-4-8

wifi hotspot

Miss Realtek rtlwifi drivers or get ‘No WiFi Adapter Found‘ issue? There’s now an Ubuntu PPA that contains the most recent rtlwifi drivers for Ubuntu, Linux Mint, and derivatives.

Without building from the source code, the “Linux Mint Türkiye” team maintains a PPA that contains the most recent wireless drivers with DKMS support for rtl8723bu, rtl8822bu, rtl8188eu, rtl8188fu, rtl8192cu, rtl8192du, rtl8192ee, rtl8192eu, rtl8192fu, rtl8723au, rtl8723bu, rtl8723de, rtl8723ds, rtl8723du, rtl8812au, rtl8814au, rtl8821ce, rtl8821cu, rtl8822bu devices.

If you have a RealTek USB WiFi Adapter or a laptop / notebook with built-in chipset in the previous list, do following steps may help you install the drivers in Ubuntu 18.04, Ubuntu 20.04, Ubuntu 22.04, Ubuntu 24.04, Linux Mint 20/21/22.

1.) First open terminal either from the system application launcher or by pressing Ctrl+Alt+T on keyboard.

2.) Then run command to add the Ubuntu PPA:

sudo add-apt-repository ppa:kelebek333/kablosuz

3.) Then open Synaptic package manager, click Reload button refresh package cache, search either rtl or dkms.

Scroll down to find out the list of driver packages, then right-click on the one for your chipset and select ‘Mark for Installation’, finally click on Apply button to install it.

Or you can run command in terminal to install the driver (replace rtl8723de-dkms in the code):

sudo apt install rtl8723de-dkms

4.) The wireless network should work immediately after you installed the driver. You can manually unload and re-load the kernel module via commands (replace rtl8723de-dkms in the code):

sudo modprobe -r rtl8723de

sudo modprobe rtl8723de

Uninstall the RealTek Wifi Driver:

To remove the driver, either use Synaptic package manager or run apt command in terminal:

sudo apt remove --autoremove rtl8723de-dkms

And remove the Ubuntu PPA via command:

sudo add-apt-repository --remove ppa:linuxmint-tr/wireless-ppa

How to Install gThumb 3.11.2 in Ubuntu 20.04

Last updated: April 24, 2024

Gnome photo manager and image viewer gThumb 3.11.2 was released a few days ago. Here’s how to install it in Ubuntu 20.04, Ubuntu 20.10, Linux Mint 20, Pop!_OS 20.04 via PPA.

gThumb 3.11.2 features minor UI improvements including:

  • a proportional zoom increment in image viewer
  • keep the same pixel under the pointer after zooming
  • read color profiles from png files as well.
  • Media viewer: use accurate seeking when clicking on the progress bar.
  • Media viewer: show the pointed time when hovering over the progress bar.
  • Browser: added support for back and forward mouse buttons.
  • Preferences: added option to show/hide the statusbar.
  • Rename files: added a button to revert to the last used template.

And there are some bug-fixes, new or updates translations in the release.

How to Install gThumb via PPA in Ubuntu:

The Dariusz Duma’s PPA seems not being updated except for auto-build packages. So again… I uploaded the gThumb 3.11.2 packages into the unofficial PPA, available for Ubuntu 18.04 (not tested), Ubuntu 20.04, and Ubuntu 20.10.

The packages were backported from the Debian Unstable / Ubuntu 21.04 build from this page.

NOTICE: I offer no warranty for any package in this PPA. While they may work for me, you use them at your own risk.

1.) To add the PPA, open terminal and run command:

sudo add-apt-repository ppa:ubuntuhandbook1/apps

2.) You can then either upgrade photo manager from an old version via Update Manager (Software Updater), or run command in terminal:

sudo apt install gthumb

Uninstall gThumb & the Ubuntu PPA

To remove gThumb photo manager and image viewer, run command:

sudo apt remove --autoremove gthumb gthumb-data

To remove the Ubuntu PPA, either run the apt-add-repository command with --remove flag, or use Software & Updates -> Other Software.

Run Ubuntu or other Linux with Gnome Desktop on E-Ink Displays? There’s now an E-Ink Mode Gnome Shell extension allows to easily toggle desktop appearance suitable for the monitors.

What does E-Ink Mode extension do:

  • Switch shell theme to built-in light high contrast one (User Themes extension is not required).
  • Switch GTK and icon theme to High Contrast
  • Switch Cursor theme to DMZ-White
  • Disable shell animations
  • Restore previous themes and animation settings when disable this extension

Though the things can be done manually step by step, the extension make it as easy as a toggle switch in Extensions tool. And so far only Gnome 3.36 (Ubuntu 20.04), GNOME 49 are supported.

How to Install E-Ink Mode extension:

1.) For Ubuntu, first make sure chrome-gnome-shell package is installed. And for the Extensions tool, install thethe gnome-shell-extension-prefs package:

sudo apt install chrome-gnome-shell gnome-shell-extension-prefs

2.) Go to the extension web page and turn on the toggle icon to install it.

Don’t see the toggle icon? Click the link which says “Click here to install browser extension” to install browser extension and refresh the web page.

It should enable E-Ink Mode once you installed the extension. To toggle off or remove it, use Extensions tool.

KeePass2

KeePass password manager 2.47 was released user interface and integration enhancements and minor new features and improvements.

KeePass 2.47 release highlights:

  • Save search parameters as profiles, access via menu ‘Find’->’Search Profiles’.
  • Add ‘XPath expression’ search mode.
  • Add ‘Histop’ option in Find dialog.
  • Add ‘Help’ button in Find dialog.
  • Add auto-type matching option ‘Consider similar dashes as identical’.
  • Add commands ‘Copy Group (Encrypted)’, ‘Copy Group (Unencrypted)’ and ‘Paste Group’.
  • Added {TIMEOTP} placeholder, generates a time-based one-time password.
  • Enhanced XML key file format.
  • Add command ‘Print Key File Backup’.
  • Add command ‘Create Key File’.
  • Add Argon2id key derivation function.
  • Add support for importing Dashlane 6.2039.0 JSON files.
  • Add a few more options in the import/export dialog.
  • Plugins can now disable/enable specific Mono workarounds.

How to Install KeePass 2.47 in Ubuntu via PPA:

Although there’s a Linux native community fork KeePassXC available, KeePass2 is still available to install via an Ubuntu PPA. So far, the PPA supports for Ubuntu 16.04, Ubuntu 18.04, Ubuntu 20.04, and Ubuntu 20.04.

1.) Open terminal and run command to add the PPA:

sudo add-apt-repository ppa:ubuntuhandbook1/keepass2

2.) Then refresh system package cache via command:

sudo apt update

3.) Finally install the mono based password safe package:

sudo apt install keepass2

Uninstall KeePass2:

To remove the software package, run command in terminal:

sudo apt remove --autoremove keepass2

And remove the Ubuntu PPA via command:

sudo add-apt-repository --remove ppa:ubuntuhandbook1/keepass2

Linux Mint 20.1, code-name “Ulyssa”, was officially released. It includes Linux Kernel 5.4, based on Ubuntu 20.04, and features Xfce 4.14, Cinnamon 4.8, and MATE 1.24 for each desktop edition.

Linux Mint 20.1 is a long term support release which will be supported until 2025. New features in the release include:

  • Web App manager to turn any web page into desktop application.
  • A new IPTV Player, Hypnotix
  • Favorites support in Nemo file manager, Xed, Xreader, Xviewer, Pix and Warpinator.
  • Removed ippusbxd, printing and scanning work the same way as in Linux Mint 19.x.
  • Updated to HPLIP 3.20.11.
  • Hardware video acceleration enabled by default in Celluloid.
  • The driver manager was migrated to PackageKit.
  • Added Chromium browser package to the repository.
  • Clock format in the login screen is configurable.
  • A unified filesystem layout, superb collection of backgrounds, and more.

Linux Mint 20.1 system requirements:

  • 1GB RAM (2GB recommended for a comfortable usage).
  • 15GB of disk space (20GB recommended).
  • 1024×768 resolution (on lower resolutions, press ALT to drag windows with the mouse if they don’t fit in the screen).

Download / Upgrade to Linux Mint 20.01:

For the official announcements as well as iso images download link, simply go to LinuxMint.com.

To upgrade from Linux Mint 20 to Linux Mint 20.1:

1. Use TimeShift to create a system snapshot, so you can easily restore your system if anything goes wrong.

2. Disable your screensaver, and upgrade installed Cinnamon spices (applets, desklets, extensions, themes) from System Settings.

3. Open Update Manager and click on the Refresh button. If there are updates for mintupdate or mint-upgrade-info, apply them.

Then go to menu “Edit->Upgrade to Linux Mint 20.1 Ulyssa” to launch system upgrade.

Follow the wizard and reboot once the upgrade is finished.

4. (optinal) To convert the system with usrmerge, simply run command:

sudo apt install usrmerge

Luminance HDR

Luminance HDR 2.6.1, free and open-source HDR imaging software, is available to install in Ubuntu 20.04, Ubuntu 20.10, Linux Mint 20.

Before it’s officially announced the new release source tarball now is available to download. And Luminance HDR 2.6.1 is a bug-fix release the features:

  • Better UI for last step of HdrWizard
  • Fix highlights glitch
  • Fix save/load response cure even from the command line
  • Fix scrolling of progress area in BatchHDR
  • Some other bug-fixes and translation updates.

How to Install Luminance HDR via Ubuntu PPA:

The Dariusz Duma’s PPA was maintaining the software package. It however seems not being updated except for auto-build packages.

For those sticking to an Ubuntu PPA, there’s an alternative unofficial PPA available for Ubuntu 20.04 only and you can run following steps one by one to get it in your Ubuntu.

1.) Open terminal from system application menu and run command to add the PPA:

sudo add-apt-repository ppa:ubuntuhandbook1/apps

2.) Then install the HDR creator via command:

sudo apt install luminance-hdr

Uninstall:

To remove the software package, simply run command:

sudo apt remove --autoremove luminance-hdr

And to remove the Ubuntu PPA, open Software & Updates navigate to Other Software tab and remove the relevant line.

KDE announced a new chat application NeoChat, a Matrix client for Desktop and Mobile, in its January 2021 apps update.

Matrix is an instant messaging system similar to Whatsapp or Telegram, but uses an open and decentralized network for secure and privacy-protected communications.

NeoChat is a fork of Spectral, another QML client, and uses the libQuotient library to interact with the Matrix protocol. It features an elegant and responsive user interface allows to adapt to any screen size automatically and gracefully. It works on both Desktop and Mobile, and will be installed by default on PinePhone KDE edition.

Apart from sending and responding to messages, NeoChat also features:

  • upload image, audio, video files.
  • room chat and private chat support.
  • emoji picker integration.
  • Drag and drop copying support.
  • Built-in image editor with crop and rotate images support.

The chat app so far is in version 1.0 and some features are not implemented, including encryption support, video call, editing messages.

How to Install NeoChat in Ubuntu Linux:

Besides building from the source tarball, it’s so far only available as universal Linux flatpak package.

1.) Open terminal and run command to install flatpak daemon if you don’t have it.

sudo apt install flatpak

2.) And add the flathub repository which hosts the flatpak packages:

flatpak remote-add --if-not-exists flathub https://flathub.org/repo/flathub.flatpakrepo

3.) Finally install the instant messaging app via command:

flatpak install flathub org.kde.neochat

Uninstall NeoChat:

To remove the chat app, run command:

flatpak uninstall org.kde.neochat

The Python programming language 3.10 is finally released on Oct 6. Here’s how to install it via PPA in Ubuntu 20.04, Ubuntu 18.04, Linux Mint 19.x/20, and derivatives.

Python 3.10 has 18 months support with bug-fix updates until the next 3.11 release. After that, it will be supported with 5 years of security updates until October 2026.

New major features and changes compare to Python 3.9:

  • Deprecate and prepare for the removal of the wstr member in PyUnicodeObject.
  • Allow writing union types as X | Y
  • Parameter Specification Variables
  • Precise line numbers for debugging and other tools.
  • Add Optional Length-Checking To zip.
  • Parenthesized context managers are now officially allowed.
  • Deprecate distutils module.
  • Explicit Type Aliases
  • Structural Pattern Matching
  • Require OpenSSL 1.1.1 or newer
  • Remove Py_UNICODE encoder APIs
  • Add optional EncodingWarning

Install Python 3.10 via Ubuntu PPA:

The ‘Deadsnakes’ Team PPA has build the packages for current 2 Ubuntu LTS. NOTE for Ubuntu 16.04, the package stuck at Python 3.10 alpha 6 due to old SSL library.

1.) Open terminal from system application menu, and run command to add the PPA:

sudo add-apt-repository ppa:deadsnakes/ppa

Type user password (no asterisk feedback) for sudo prompts and hit Enter to continue.

2.) Then refresh system package via command:

sudo apt update

3.) Finally install Python 3.10 via command:

sudo apt install python3.10

Once installed, check via python3.10 --version command or just run python3.10 to access the IDE in terminal.

Uninstall Python 3.10:

To remove the programming language, run command:

sudo apt remove --autoremove python3.10

And remove the Ubuntu PPA via Software & Updates utility under Other Software tab.