Free open-source video capturing, recording and live streaming software, OBS Studio, just got a big update with exciting new features!
It’s the 10th anniversary release that features 10-bit & HDR video encoding support! Thought, the new feature so far works only with AV1 and HEVC encoders, and 10-bit HEVC encoding requires NVIDIA 10-series, AMD 5000 series, or newer GPU.
OBS Studio 28.0 also adds native Apple Silicon support, many third-party plugins may not yet be ready for the native build.
The release is also porting to Qt6. Except for Ubuntu 20.04 PPA package, all others are now based on Qt6. Meaning many plugins may not work until the developers updated with Qt6 support. See most common plugins, that works with OBS Studio 28.0.
Ubuntu 18.04 is no longer officially supported though user may try the Flatpak package that run in sandbox.
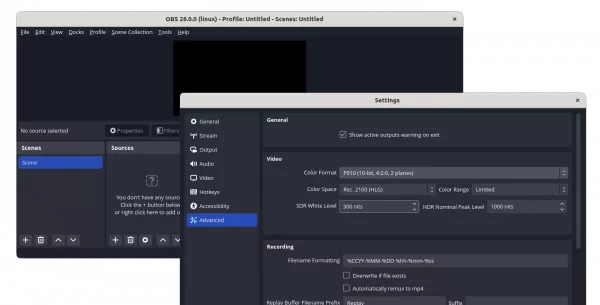
OBS Studio HDR
Other changes in OBS Studio 28.0 include:
- New, optimal AMD encoder for Windows.
- Add support for CBR, CRF, and Simple Mode to Apple VT encoder
- New default Theme “Yami”
- Native SRT/RIST outputs
- Send chat messages to YouTube from within OBS
- See more in Github releases page.
How to Install OBS Studio 28.0 in Ubuntu & Other Linux:
The OBS Studio website offers the packages for Windows and macOS.
For Linux users, it offers the official packages via both Flatpak and Ubuntu PPA.
Option 1: Install OBS Studio Flatpak in most Linux
Flatpak is an universal Linux package runs in sandbox. In case you want to install the new release in Ubuntu 18.04, try the steps below.
1.) Setup Flatpak daemon
Some Linux, such as Linux Mint, Fedora, Pop! OS has Flatpak support out-of-the-box. But, most other does not, so you may first follow this setup guide to enable it for your Linux.
For Ubuntu 18.04, press Ctrl+Alt+T on keyboard to open terminal and run command to add the Flatpak PPA
sudo add-apt-repository ppa:flatpak/stable
Then update system package cache via:
sudo apt update
Finally, run the apt command to install the daemon package:
sudo apt install flatpak
2.) Install OBS Studio as Flatpak
After setup the daemon, run the single command below will install this live streaming software:
flatpak install https://dl.flathub.org/repo/appstream/com.obsproject.Studio.flatpakref
As a containerized software packages, it may also install the run-time libraries that takes more disk spaces.
Finally, launch it either by searching from “Show Applications” screen or via command below:
flatpak run com.obsproject.Studio
Option 2: Install OBS Studio via Ubuntu PPA
The official PPA has updated the packages for Ubuntu 20.04, Ubuntu 22.04, Linux Mint 20/21 based systems.
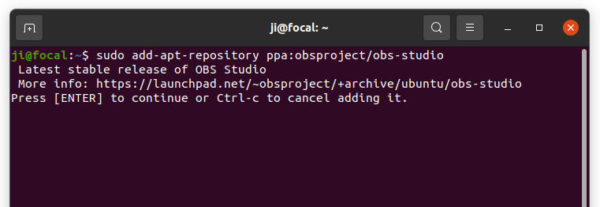
1.) First open terminal by pressing Ctrl+Alt+T on keyboard and run command to add the PPA:
sudo add-apt-repository ppa:obsproject/obs-studio
Type password (no asterisk feedback) when it asks and hit Enter to continue.
2.) Linux Mint and maybe some other Linux do not update the package cache automatically while adding PPA. So, you need to run the command below instead to do it manually:
sudo apt update
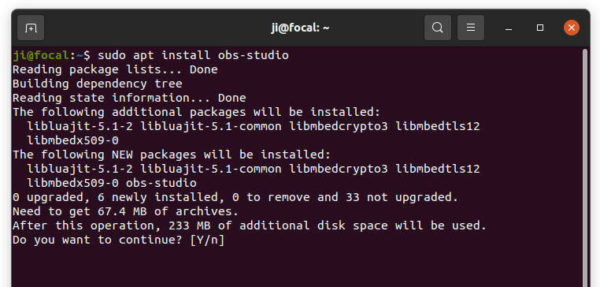
3.) Finally, either update the package via “Software Updater” (Update Manager), or run the command below to install it:
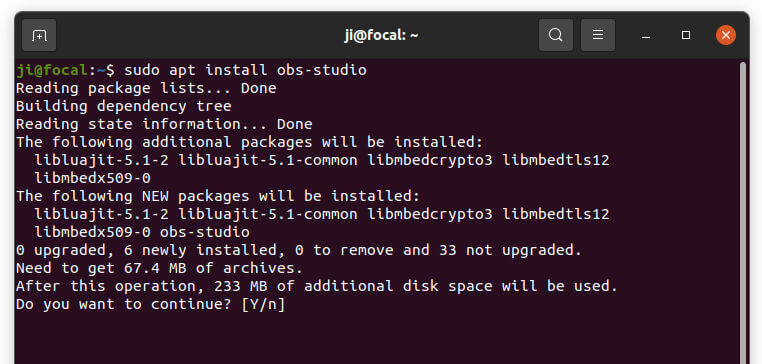
sudo apt install obs-studio
Uninstall OBS Studio:
For the Flatpak package, open terminal (press Ctrl+Alt+T on keyboard) and run command to uninstall the package:
flatpak uninstall --delete-data com.obsproject.Studio
For the Ubuntu PPA package, either install PPA purge tool and purge the PPA, which also downgrade all installed package:
sudo apt install ppa-purge && sudo ppa-purge ppa:obsproject/obs-studio
Or, remove the PPA package via apt command:
sudo apt remove --autoremove obs-studio
As well as removing the PPA repository via:
sudo add-apt-repository --remove ppa:obsproject/obs-studio