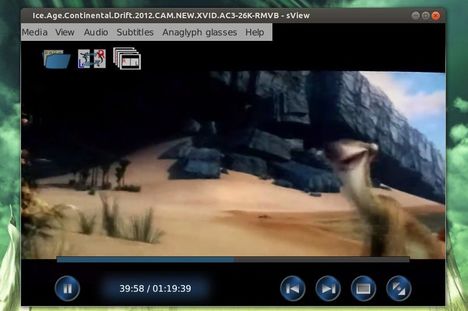
Archives For jimingkui

This simple and brief tutorial is going to show you how to install Zipwhip text messaging app in Ubuntu. As you may know, Zipwhip is a small utility that allows you to text anyone from PC, Android tablet, or web browser using your existing mobile number.

Zipwhip-starting

Tutorial Objectives:

  • Install Zipwhip Text Messaging app in Ubuntu
  • Enjoy!

To get started, press Ctrl+Alt+T on your keyboard to open terminal. When it opens, run below commands to download the app:

For 32-bit system:

wget http://zipwhip.cachefly.net/zipwhip-desktop-i586.deb

For 64-bit system:

wget http://zipwhip.cachefly.net/zipwhip-desktop-amd64.deb

Both 32-bit & 64-bit run below command to install the package:

sudo dpkg -i zipwhip-desktop*.deb

Once installed, you may need a restart to be able to open this tool from Unity Dash. Then input your phone number and a password (register for free):

Zipwhip-phone

In this tutorial I’ll introduce you a new project, FSGamer, which can improve full screen gaming in Ubuntu Linux (still in alpha).

FSGamer ubuntu game

FSGamer ubuntu

FSGamer runs games in their own X server, which can improve the speed, reduce annoying interruptions, and make switching between fullscreen games and your desktop easy and reliable.

To install this tool, click to download the deb and then follow below steps:

1.) First, install from the deb package, assuming it is in Downloads:

sudo dpkg -i ~/Downloads/fsgamer_0.1.1_all.deb

2.) Allow FSGamer to start extra X server:

sudo cp /etc/X11/Xwrapper.config /etc/X11/Xwrapper.config.backup
sudo gedit /etc/X11/Xwrapper.config

then change the line allowed_users=console to allowed_users=anybody.

3.) Allow audio to work in the new X server (change $USER to your username):

sudo usermod -a -G audio $USER

After the previous step, you may have to reboot in order for the audio settings to take effect.

NOTE: This is alpha quality software. It is also very sloppily written, and may crash everything and make you cry. So save your work! :)

Project Homepage: http://michaelb.org/projects/fsgamer/

This simple tutorial will show you how to install the Jitsi Video Calls and Chat & add its repository in Ubuntu 13.04 Raring, 12.04 Precise and 12.10 Quantal.

Jitsi call window

As you may know, Jitsi is an audio/video Internet phone and instant messenger written in Java. It supports some of the most popular instant messaging and telephony protocols such as SIP, Jabber/XMPP (and hence Facebook and Google Talk), AIM, ICQ, MSN, Yahoo! Messenger.

Jitsi contact

Install Jitsi:

The official download page provides the latest Deb installer for Ubuntu users

Press Ctrl+Alt+T on your keyboard to open terminal. When it opens, run below command to download it:

For 32-bit system:

wget https://download.jitsi.org/jitsi/debian/jitsi_2.2-latest_i386.deb

For 64-bit system:

wget https://download.jitsi.org/jitsi/debian/jitsi_2.2-latest_amd64.deb

Both 32-bit & 64-bit run below command to install the Deb:

sudo dpkg -i jitsi_2.2-latest_*.deb

It installs Jitsi as well as adds its repository to your system so that you’ll receive updates when a new release comes out.

This simple tutorial will show you how to install and use Faenza Icons 1.3.1 in Ubuntu 13.10 Saucy Salamander while the PPA is not available yet.

faenza icons 1.3.1

As I know, the Faenza icons ppa contains actually the same DEB package for Ubuntu 13.04 Raring, 12.10 Quantal, 12.04 Precise. We can also use the Deb on Ubuntu 13.10 Saucy to install this icon set. Here’s how:

1.) Click on below link to download the theme:

faenza-icon-theme_1.3.1_all.deb

2.) Press Ctrl+Alt+T on your keyboard to open terminal. When it opens, run below command to install the Deb:

sudo dpkg -i ~/Downloads/faenza-icon-theme_1.3.1_all.deb

install faenza icons

3.) To apply this theme to your system, install unity-tweak-tool in Ubuntu Software Center. Or run below command in terminal:

sudo apt-get install unity-tweak-tool

Once installed, open it from Unity Dash. You’ll be able to choose Faenza icons under Appearances -> Icons.

apply faenza icons

XnRetro is a small tool that allows you to create stunning images with vintage or instant effect on your Desktop. It allows to share the result to Flickr, Picasa, Facebook and more.

xnretro retro camera app

Features:

  • 20 color effects
  • 15 light effects such as bokeh, leak
  • 28 frame borders
  • Adjustement like contrast, gamma, saturation, …
  • Vignetting
  • Noise
  • Save or share the result to Flickr, Picasa, Facebook, Imgur, Thmblr, ImageShack, Yfrog, GlowFoto, TwitPic, and Email.

Install XnRetro:

First download the app:

XnRetro for Windows 32-bit |Windows 64-bit

XnRetro for Ubuntu Linux

For Ubuntu users, decompress the package and copy and paste the result folder into /opt/ folder. To do so, press Alt+F2 on your keyboard and type in gksudo nautilus to open file browser with root privilege.

open nautilus as root

Then drag and drop the extract folder from your ~/Downloads folder to /opt/:

move-xnretro-to-opt

Finally follow below steps to create a launcher for this tool:

1.) Press Ctrl+Alt+T on your keyboard to open terminal. When it opens, run below commands to install required package:

sudo apt-get install gnome-panel --no-install-recommends

2.) Run command to bring up Create Launcher dialog.

sudo gnome-desktop-item-edit /usr/share/applications/ --create-new

In next window type following:

name = XnRetro
command = /opt/XnRetro/xnretro.sh
select an icon from /opt/XnRetro/xnretro.png

xnretro-launcher

Once done, click Ok and you’ll see the XnRetro icon from the Unity Dash home.

yEd graph editor

This tutorial shows how to install the most recent yEd Graph Editor in Ubuntu 24.10, Ubuntu 24.04, Ubuntu 22.04, Ubuntu 20.04, and Linux Mint 21/22.

yEd is a powerful desktop application that can be used to quickly and effectively generate high-quality diagrams. Create diagrams manually, or import your external data for analysis. The automatic layout algorithms arrange even large data sets with just the press of a button.

Install yEd via its official script

The official website provides the yEd installer script for 64-bit (AMD/Intel CPU) Linux systems, which includes a suitable JRE.

To download this script, simply click the link below to go to its download page:

After downloaded the script, press Ctrl+Alt+T on keyboard to open up a terminal window, then run 2 commands below one by one:

  • First, add executable permission to the script for current user:
    chmod u+x ~/Downloads/yEd*.sh

    Here, assume you saved the downloaded script in user’s Downloads folder.

  • Then, run the script via command:
    sh ~/Downloads/yEd*.sh

    It will pop-up an installer wizard. Just follow it until done. Finally, you may launch it from system start menu or Gnome overview.

Uninstall yEd

The yEd installer script by default installs it into user’s Home directory. So, just delete that folder will remove it from your system.

To get rid of the leftovers, such as desktop entry, and app data, open terminal (Ctrl+Alt+T) and run command to remove them:

rm -R ~/.yEd && rm rm ~/.local/share/applications/*yEd*.desktop

How to Install Jupiter in Linux Mint 15

Last updated: July 29, 2013

This simple and brief tutorial is going to show you how to install Jupiter from JoliCloud PPA in Linux Mint 15 Olivia.

jupiter linux mint 15

As you may know, Jupiter is a powerful and lightweight power and hardware control applet. It has been retired and last supported release is up to Linux Mint 14 Nadia. However, Jupiter is available for Olivia from JoliCloud Desktop Environment PPA.

The webupd8team add the packages to the ppa and it’ll be used as a background program for JoliCloud session. I’ve installed it on my laptop and it’s working well.

Install Jupiter on Linux Mint 15:

Press Ctrl+Alt+T on your keyboard to open terminal. When it opens, run below command to add the PPA repository:

sudo add-apt-repository ppa:jolicloud-team/ppa

Then update package lists and install:

sudo apt-get update; sudo apt-get install jupiter

To install Jupiter support package for Eee PCs:

sudo apt-get install jupiter-support-eee

The latest stable Linux Kernel 3.10.4 has been released. This simple tutorial will show you how to install / upgrade this kernel in Ubuntu 13.04 Raring, 12.10 Quantal and 12.04 Precise.

Linux Kernel 3.10.4

Linux kernel 3.10.4 is an important release, which brings many improvements to IPv4 and IPv6 protocols, as well as many updated drivers and ARM fixes. All users of the 3.10 kernel series are urged to upgrade as soon as possible. See official announcement.

To get started, press Ctrl+Alt+T to open a terminal window, copy and paste below command into terminal and run to download the kernel:

for 32-bit system:

wget http://kernel.ubuntu.com/~kernel-ppa/mainline/v3.10.4-saucy/linux-headers-3.10.4-031004-generic_3.10.4-031004.201307282043_i386.deb http://kernel.ubuntu.com/~kernel-ppa/mainline/v3.10.4-saucy/linux-headers-3.10.4-031004_3.10.4-031004.201307282043_all.deb http://kernel.ubuntu.com/~kernel-ppa/mainline/v3.10.4-saucy/linux-image-3.10.4-031004-generic_3.10.4-031004.201307282043_i386.deb

for 64-bit system:

wget http://kernel.ubuntu.com/~kernel-ppa/mainline/v3.10.4-saucy/linux-headers-3.10.4-031004-generic_3.10.4-031004.201307282043_amd64.deb http://kernel.ubuntu.com/~kernel-ppa/mainline/v3.10.4-saucy/linux-headers-3.10.4-031004_3.10.4-031004.201307282043_all.deb http://kernel.ubuntu.com/~kernel-ppa/mainline/v3.10.4-saucy/linux-image-3.10.4-031004-generic_3.10.4-031004.201307282043_amd64.deb

After that, both 32-bit and 64-bit run below command to install the kernel

sudo dpkg -i linux-headers-3.10.4-*.deb linux-image-3.10.4*.deb

Finally apply changes to grub boot loader:

sudo update-grub

You can remove the downloaded packages after the kernel is properly installed.

This simple tutorial will show you how to convert your photos to cartoon or sketch images in Ubuntu Linux using a simple tool XnSketch.

turn to cartoon

XnSketch is a very small tool that allows you to turn your photos into cartoon or sketch images. It works on Windows, Linux, Mac OS, Apple and Android devices.

Features:

  • 18 different effects (black strokes, white strokes, pastel, pencil sketch, colored sketch, …)
  • Edge strength, and opacity adjustement
  • Contrast, brightness, saturation adjustement
  • Save or share the result to Flickr, Picasa, Facebook, Imgur, Thmblr, ImageShack, Yfrog, GlowFoto, TwitPic, and Email.

Install XnSketch

XnSketch is available to download for Linux (64-bit AMD/Intel CPUs) through the link below:

After downloaded the package, just decompress, then click run the “XnSketch” file from the extracted folder will launch the application.

If you like this app, and want to add it to system start menu or Gnome app grid, then do the following steps one by one:

  • First, move the app folder to a desired location for long time use. In my case, I created a “MyApps” folder in user home, and put these apps folders there.
  • Then, navigate into the XnSketch app folder, and click edit the “XnSketch.desktop” file.
  • When file opens, replace the values of “Exec” and “Icon” according to where you moved the app folder (press Ctrl+L in that folder then copy).
  • Finally, press Ctrl+Shift+S to open ‘Save as’ dialog, and choose save the file into .local/share/applications (press Ctrl+H to view hidden folders) directory.

If everything goes well, you’re able to launch the app from start menu or Gnome overview a few moments later.

NitroShare is a network file-sharing application that makes sending a file to another machine on the local network as easy as dragging-and-dropping.

nitroshare drag & drop transfer

NitroShare is designed to be hassle-free in every aspect. Just install the application on any machine running Ubuntu or Windows and you’re all set. Each machine should discover all of the other machines on the local network. The application integrates with the operating system, using application indicators on Ubuntu and the system tray on Windows.

nitroshare indicator

Install NitroShare:

NitroShare PPA contains the latest packages for Ubuntu 13.10 Saucy, 13.04 Raring, 12.10 Quantal, 12.04 Precise.

To add the ppa, press Ctrl+Alt+T on your keyboard to open terminal. When it opens, run below commands:

sudo add-apt-repository ppa:george-edison55/nitroshare

Then you can click ‘Reload’ on Synaptic Package Manager and then install this home network sharing software. Or you can do it via below command:

sudo apt-get update; sudo apt-get install nitroshare

For Ubuntu 14.04 and higher, download “nitroshare_0.2_amd64.deb” for 32-bit OS or “nitroshare_0.2_i386.deb” for 64-bit OS from Launchpad.net and install it via Software Center.

Once installed, open it from Unity Dash home.

nitroshare in unity

For the first time launching this application, you’ll need to follow on the setup wizard. When you’re done, you’ll see the panel indicator and the icons on bottom-right corner of your desktop.

Use indicator menu or drag and drop file onto the desktop icon to start transfering. Target machine will receive a confirm dialog.

nitroshare confirm dialog