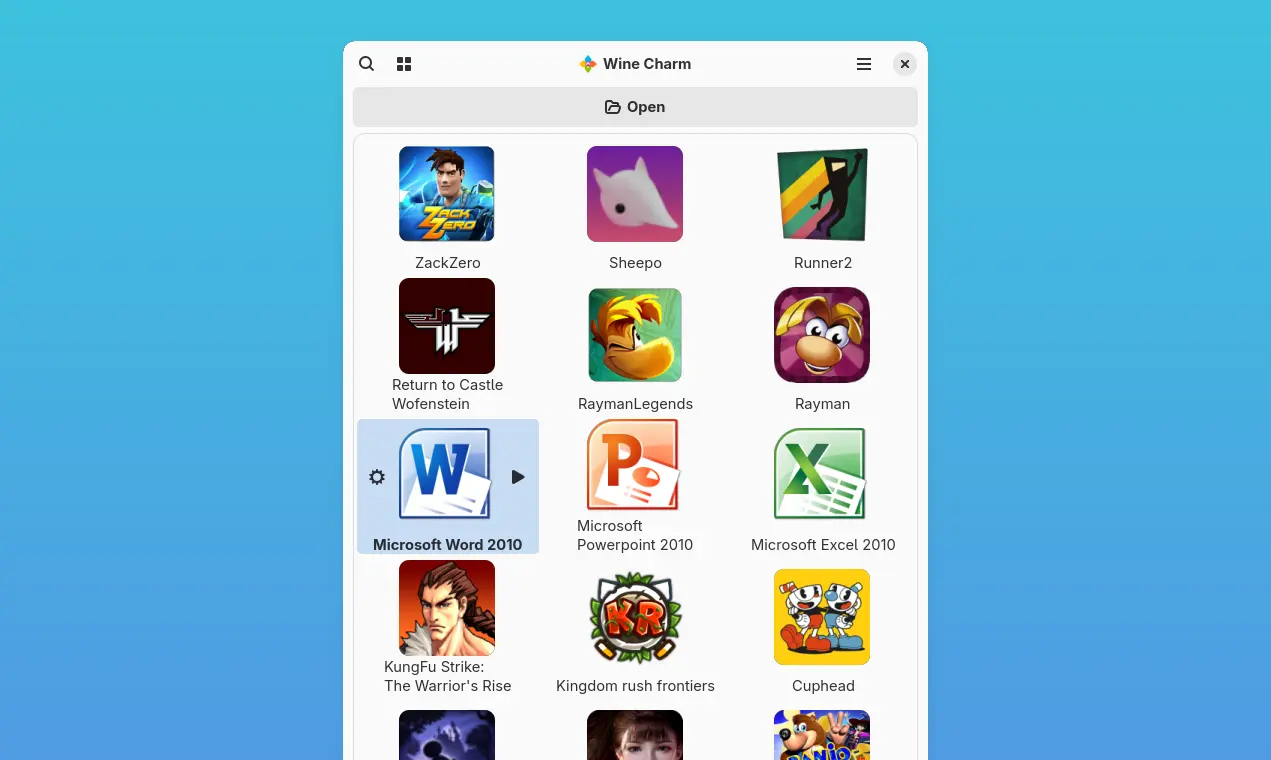
Archives For November 30, 1999

Network diagnostic is useful when you getting internet connection issue. And, here’s a brand new graphical tool for Linux beginners.

It’s PingPath, a free open-source tool written mostly in C, and use GTK4 toolkit for its user interface.

PingPath uses the popular command line tool ping to send ICMP ECHO_REQUEST to networks hosts. Simply type the host-name or IP address in header input box, hit Enter, then press Ctrl+S to get started.

It will then show you all the host IPs (if you start with host-name), as well as their autonomous system numbers and country code. For each, it shows the real time information about

  • numbers of pings set.
  • loss in percentage.
  • best, worst, last, and average delay in milliseconds.
  • as well as ping jitter (variation in delay).

Besides digital information, it also has a Graph tab to show all the info in graph lines with or without legend. This makes it easier to identify connectivity problems, measure network latency between your machine and the destination host.

The app by default sends 100 packets with 1 seconds time interval. You can change the numbers and other settings using the header-bar button menus.

How to Install PingPath in Ubuntu

The tool has an official PPA which so far supports for Ubuntu 22.04, Ubuntu 23.10, and Ubuntu 24.04.

1. First, press Ctrl+Alt+T on keyboard to open terminal. When it opens, run command to add the PPA:

sudo add-apt-repository ppa:lrou2014/pingpath

Type user password for sudo authentication, and hit Enter to continue.

2. If you’re following this tutorial on Linux Mint, then you may either use Software Manager or manually refresh package cache by running command:

sudo apt update

3. Finally, install the network diagnostic tool by command:

sudo apt install pingpath

Once installed, search for and launch it from either start menu or Gnome overview screen depends on your desktop environment, and enjoy!

Uninstall:

To uninstall the tool, open terminal (Ctrl+Alt+T) and run command:

sudo apt remove --autoremove pingpath

And, remove the PPA, either by running the command below in terminal:

sudo add-apt-repository --remove ppa:lrou2014/pingpath

Or, use the Software & Updates tool to remove the source line under Other Software tab.

Looking for an alternative to macOS Dropover utility? Collector is the one for Linux Desktop!

It’s a free and open-source tool to make drag & drop easier. Without having to open side-by-side windows, just paste or drag whatever content into the small app window, stash, gather, and then move all items to destination at once.

This is useful if you have many files to move, but they are saved in different locations. Just drag’n’drop them into Collector, then preview and/or edit them, finally drag’n’drop to destination folder at once.


Continue Reading…

Linux is getting more IPTV player applications in recent years. Here I’m going to introduce yuki-iptv, a new one with EPG support.

Personally, I prefer hypnotix which is developed by Linux Mint team, since it has a large list of built-in TV channels. But if you want more features, then yuki-iptv is a good choice to try out.

The IPTV player does NOT provide any content or TV channels. User has to manually add M3u / M3u8 / XSPF playlists (see github.com/iptv-org/iptv) and/or TV guide address via config dialog.

Yuki-iptv add playlist

Besides basic M3u / M3u8 / XSPF playlists support, the app also support viewing unencrypted streams UDP (multicast), HTTP, HLS (M3u8), XTream API, as well as TV program (EPG) support in XMLTV and JTV formats.

Continue Reading…

Need a tool to edit your apps in the start menu, main menu, or Gnome overview search results? Try MenuLibre!

In most Linux, all app icons you see in start menu, dock launcher, and the desktop, are handled by .desktop config files. By editing the file, you can change the app icon, name, hide the app, add right-click menu option, and choose which file types to be associated with.

I’m written about how to configure .desktop file using a single command.

For graphical ways, there are quite a few apps to do the job, and here are 3 of them:

  • Arronax – well known, but seems not being updated. Though, it’s still working.
  • AppEditor – Elementary OS style tool to edit desktop menu entries. However, lacks pre-build packages.
  • MenuLibre – the one I’m going to introduce in this tutorial.

MenuLibre is an advanced tool written in Python and GTK3 toolkit. With it, user can get started by either searching or browsing in left to select app to edit, or click “+” in top left to create new menu entry for your app.


Continue Reading…

Don’t remember how many tools, I’ve written about, for monitoring CPU, RAM, Network, and other system resources usage in Ubuntu. But, there’s a brand-new for GNOME, the default desktop environment.

It’s Astra Monitor, a free open-source tool provides highly customizable interface on Gnome top-panel, to monitor CPU, GPU, RAM memory, disk storage, network usage, as well as hardware temperature, voltage, and fan speed.

It supports displaying the data in real-time bar, history graph, percentage number, with user selected order, in left, center, or right corner of panel.

Aster Monitor on GNOME Panel

Besides having quick glance at system resource usage, user can also click on the indicator icon to pop-up a rich drop-down menu with detailed information. By moving cursor over the menu can also display even more about the hardware, resource load, processes, and so forth.
Continue Reading…

Looking for app to convert your photo images into other formats? Try Switcheroo.

For batch image processing, I’d recommend to use Converseen. However, stupid simple applications are always good choices for beginners.

And, Switcheroo is one stupid simple app for converting photo images, while having modern look and feel in today’s Linux desktop.

Click ‘Open Images’ or drag’n’drop files into app window

With it, just click “Open Images” button and choose your image file/files, or drag and drop files into the app window to open them.

It shows thumbnail preview of all opened images, along with delete buttons in top-right for each images.

By using top-left ‘+’ button, user can add more images (Tips: hold Ctrl or Shift can select multiple files). And, ‘≡’ menu even provides an option to paste images from clipboard.

After opening all your photo images, click the drop-down box in the right of “Export Format” to select which file format to convert to.

At the moment of writing, it support converting image to PNG, JPG, WEBP, HEIF, HEIC, BMP, AVIF, JXL, TIFF, PDF, GIF. Though, you have to either use top-right hamburger menu or press Ctrl + H to show less popular file types.

The app’s hamburger menu

Before clicking ‘Convert’, it provides few more options, such as set background color, resize with or without aspect ratio, and change image quality. There’s also “Save To Zip” to directly output images into ZIP archive.

Instead of providing an in-app option, it pops-up file chooser dialog asks to choose where to save output images or ZIP archive, once clicking “Convert” button.

How to Install Switcheroo Image Converter

The app is available as universal Flatpak package, that can be installed in Ubuntu, Debian, Fedora, Arch, Chrome OS, and most other Linux, even including the mobile device, such as PinePhone.

1. First, press Ctrl+Alt+T on keyboard to open terminal. When it opens, run command to install the Flatpak daemon:

sudo apt install flatpak

Other Linux can follow the official setup guide to get Flatpak support.

2. Then, run command to install the app as flatpak:

flatpak install https://dl.flathub.org/repo/appstream/io.gitlab.adhami3310.Converter.flatpakref

As you see in the screenshot, the downside is that a small app can have 1 GB downloading due to run-time libraries (though shared).

3. Once installed, search for and launch it from your system application launcher, start menu, or ‘Activities’ overview depends on desktop environment.

First time installing Flatpak app needs a log out and back in, to make app icon visible.

4. To enable drag’n’drop support, you need to grant access permission to the folders that contain the photo images.
To do so, install Flatseal, then use it to allow access either all user files or certain folders (by adding Other files).

Uninstall Switcheroo

To uninstall the image converting application, also open terminal (Ctrl+Alt+T), then run command:

flatpak uninstall --delete-data io.gitlab.adhami3310.Converter

Also run flatpak uninstall --unused to remove useless run-time libraries.

For Linux desktop user who want to access German-language public broadcasting live streams and archives, this can do the job for you.

It’s televido (“Television” in Esperanto), a free and open-source tool, allowing to livestream, search, play and download media from German-language public television services. Though, ORF (Austrian TV) & SRF (Swiss TV) are also supported.

The app is written in Rust programming language, and use GTK4 for its modern user interface. It has ‘Live’ tab for live TV shows, such as ZDF-Morgenmagazin, 28 Minuten, and more.

And, allows to search, play, and download media via ‘Mediathek’ tab.

The application only find and access TV shows with the power of MediathekViewWeb’s API and the Zapp backend API. The media playback is done by external video players installed on your system. So far, it supports GNOME Videos (Totem), Celluloid, Clapper, Daikhan.

How to install Televido in Ubuntu & Other Linux

Televido is easy to install in most Linux desktop through the Flatpak package.

For Linux Mint 21 and Fedora 38 + (with 3rd party repositories enabled), simply search for and install it directly from either Software Manager or Gnome Software.

Install Televido from Linux Mint software manager

For other Linux, follow the steps below one by one to install the app as Flatpak package:

  1. First, launch terminal from start menu or ‘Activities’ overview depends on your desktop environment.
  2. Then, follow the setup guide to enable Flatpak support.
    For Debian and Ubuntu based systems, just run command:

    sudo apt install flatpak

  3. Finally, install the app as Flatpak package by running the command below in terminal:
    flatpak install https://dl.flathub.org/repo/appstream/de.k_bo.Televido.flatpakref

    Tips: First time installing Flatpak app may have lots of download for run-time libraries, and user needs to log out and back in to make app icon visible.

Once installed, search for and launch the app either from start menu or ‘Activities’ overview depends on your desktop environment.

Uninstall

To remove the software package, also launch terminal and run command:

flatpak uninstall --delete-data de.k_bo.Televido

Also run flatpak uninstall --unused to remove useless run-times to free up some disk spaces.

The popular audio manipulation tool, PulseEffects, finally adds supports for PipeWire sound server by re-naming to EasyEffects.

EasyEffects is a GTK4 app designed for only PipeWire sound server. For PulseAudio, default sound service in current Ubuntu releases, PulseEffects is still available.

The UI looks almost same as before, and it may apply effects including Auto gain, Bass enhancer, Bass loudness, Compressor, Convolver, Crossfeed, Crystalizer, De-esser, Echo Canceller, Equalizer, Exciter, Expander, Filter, Gate, Limiter, Loudness, Maximizer, Multiband compressor, Multiband gate, Noise reduction, Pitch, Reverberation, Stereo tools.

Besides manipulating sound output, it may also apply effects to an input device, such as a microphone. This is, for example, useful in audio recording, but it also works well during voice conversations.

The PipeWire tab contains the options to select input & output devices, edit presets, and test signal.

How to Install EasyEffects in Ubuntu Linux:

The tool has been made into official repositories for Arch Linux, Gentoo, openSUSE and NixOS. Since Ubuntu sticks to PulseAudio, you install EasyEffects only when PipeWire is present as sound server (Read this tutorial for more).

UPDATE July 2023: For Ubuntu 23.04 +, EasyEffects has been made into the official repositories. So, either search for and install it from Ubuntu Software.

or press ‘Ctrl+Alt+T’ to open terminal and run command below to install it:

sudo apt install easyeffects

For Ubuntu 20.04 and Ubuntu 22.04, do following steps to install the app as Flatpak package:

1.) EasyEffects so far is only available as Flatpak package. Firstly, search for and open terminal either from the Activities overview screen or by pressing Ctrl+Alt+T on keyboard. When it opens, run command to install the flatpak daemon first if you don’t have it:

sudo apt install flatpak

2.) Next add the flathub.org repository, the place hosts a large amount of Flatpak apps by running command in terminal:

flatpak remote-add --if-not-exists flathub https://flathub.org/repo/flathub.flatpakrepo

3.) Finally install EasyEffects flatpak package via command:

flatpak install flathub com.github.wwmm.easyeffects

If everything goes well, you may either launch it by searching for and opening from the overview screen, or run flatpak run com.github.wwmm.easyeffects command to start it from terminal.

Uninstall EasyEffects:

To remove the tool, open terminal, copy and paste the single command below and hit run:

flatpak uninstall --delete-data com.github.wwmm.easyeffects

Looking for a personal data backup program? Pika Backup is a good choice for Ubuntu, Fedora, and other Linux with GNOME desktop.

Pika Backup is free open-source tool to backup your personal data into either local disk (e.g., an USB stick) or remote server using secure shell or sftp. It’s a modern GTK4 + libadwaita app that offers a stylish and easy to use user interface.

The utility is based on BorgBackup (aka Borg), features data de-duplication technique to save time and disk space since only changes are stored for daily backups. With the power of authenticated encryption technique, it also supports password protect for your data.

The app starts in a clean UI with a “Configure Backup” button to get started creating repositories to store backups. The top-left ‘+‘ icon is also present to do the same job.

Once click on “+” icon, it will ask you to create a new repository or select an existing repository to use in next dialog.

You may select to back your data into a remote server via ssh remote file transfer by specifying URL, e.g., “ssh://[email protected]/~/backup“, however borg need to be installed in the server side. For choice, the “sftp://” prefix can be used without borg.

Remote Location

Data can also be saved in local folder or removable devices, such as an USB drive. It will create a sub-folder in selected directory or device and save backup either encrypted or not depends on your selection.

After creation, it will recognize the USB repository automatically once you plug it in, allows you to either edit or select use the repository.

Local repository (USB Stick)

After creating / choosing the backup repository, it brings you to the file selecting screen. There you can choose any file folders, and exclude any for the backup. When you done data selection, click the green “Back Up Now” button to start. It indicates the process with how many percentage finished and how much time left.

setup backup

Backups are stored in unreadable files. You have to open the Pika Backup tool to mount the backups using “Browse saved files” under Archives tab. Then recover files or folder via opened file manager using copy & paste actions. This is not friendly in my opinion since no recover option present.

Archives tab to browser and manage your backups

Scheduled backups are not supported so far, and excluding files from a backup via regular expressions and alike is not implemented yet. Start in v0.4.0, it supports for schedule backup hourly, daily, weekly, or monthly with given time or day. It can also delete old archives automatically by keeping user selected number of last backups.

Install Pika Backup in Ubuntu Linux:

The Pika Backup software is available for most Linux via the universal Flatpak package.

Open terminal either via Ctrl+Alt+T keyboard shortcut or by searching for and opening it from ‘Activities’ overview screen. When it opens, run following commands one by one:

1.) Install flatpak daemon, if you don’t have it, by running command:

sudo apt install flatpak

For Ubuntu 18.04, users have to add the Flatpak PPA first.

2.) Next add the flathub repository, considered as official place hosts flatpak packages:

flatpak remote-add --if-not-exists flathub https://flathub.org/repo/flathub.flatpakrepo

3.) Finally install the backup utility via this command:

flatpak install flathub org.gnome.World.PikaBackup

Like normal apps, you can search for and open it from ‘Activities’ overview screen.

Uninstall Pika Backup:

To remove the software, paste the command below into terminal and hit run:

flatpak uninstall --delete-data org.gnome.World.PikaBackup

And you may clear up unused run-time by running command:

flatpak uninstall --unused

YOGA Image Optimizer is a graphical tool to batch convert photos into JPEG, PNG and WEBP, and compress file sizes while having equivalent quality.

It’s a free and open-source tool based on YOGA command line tool, which can also convert and optimize 3D models from various formats to glTF and GLB.

YOGA:

The YOGA backend uses Python Pillow library to convert images into PNG, JPEG, or WebP as you prefer. And it uses Google’s Guetzli library to generate JPEG that are typically 20-30% smaller than libjpeg while having some quality. Google’s Zopflipng and libwebp libraries are in use for optimizing other two image formats.

The command line tool also support converting and optimizing 3D models using the Open Asset Import Library (Assimp).

YOGA Image Optimizer:

The official front-end for YOGA provides an easy to use graphical interface to do converting and optimizing process in Linux and Windows.

Simply open a batch of photo images (press Shift or Ctrl while choosing files), it shows the thumbnails, input file name and size, as well as output name and file format.

Before you clicking “Optimize”, you can choose output format and set compress level for each or a selection of images.

YOGA Image Optimizer also features:

  • Multi-thread support. You can set how many CPU cores to use.
  • GTK theme support. It allows to choose between all installed GTK theme for the app only.
  • Dark Mode.
  • Custom output pattern.

Install YOGA Image Optimizer in Ubuntu Linux:

For Linux, the software can be installed either via universal Flatpak package or using pip (Python Package Installer).

1. Flatpak Package

Open terminal by pressing Ctrl+Alt+T on keyboard, you can then run following commands one by one to get the software via Flatpak in Ubuntu 20.04 and higher. For Ubuntu 18.04, you need to add this PPA before getting started.

a. ) Install the flatpak daemon if you don’t have it:

sudo apt install flatpak

b.) Add the Flathub the preferred repository hosting Flatpak package:

flatpak remote-add --if-not-exists flathub https://flathub.org/repo/flathub.flatpakrepo

c.) Finally install the image converter and optimizer via command:

flatpak install flathub org.flozz.yoga-image-optimizer

(Optional) For any reason, you can easily remove the software by running command in temrinal:

flatpak uninstall --delete-data org.flozz.yoga-image-optimizer

2. Install the package via pip3:

For those don’t like the Flatpak package, use the Python pip3 package installer. It however does NOT create app shortcut for launching it from the ‘Show Applications’ start menu.

a.) Firstly, open terminal and run command to install required libraries:

sudo apt install git build-essential python3 python3-dev python3-pip libgirepository1.0-dev libcairo2-dev pkg-config gir1.2-gtk-3.0

b.) Next install the package via command:

sudo pip3 install yoga-image-optimizer

The pip package does not has app shortcut, you need to either run yoga-image-optimizer command to start it from terminal and create a .desktop file manually.

(Optional) To remove the package, use command:

sudo pip3 install yoga-image-optimizer