Archives For Howtos

This simple tutorial will show you how to install the Jitsi Video Calls and Chat & add its repository in Ubuntu 13.04 Raring, 12.04 Precise and 12.10 Quantal.

Jitsi call window

As you may know, Jitsi is an audio/video Internet phone and instant messenger written in Java. It supports some of the most popular instant messaging and telephony protocols such as SIP, Jabber/XMPP (and hence Facebook and Google Talk), AIM, ICQ, MSN, Yahoo! Messenger.

Jitsi contact

Install Jitsi:

The official download page provides the latest Deb installer for Ubuntu users

Press Ctrl+Alt+T on your keyboard to open terminal. When it opens, run below command to download it:

For 32-bit system:

wget https://download.jitsi.org/jitsi/debian/jitsi_2.2-latest_i386.deb

For 64-bit system:

wget https://download.jitsi.org/jitsi/debian/jitsi_2.2-latest_amd64.deb

Both 32-bit & 64-bit run below command to install the Deb:

sudo dpkg -i jitsi_2.2-latest_*.deb

It installs Jitsi as well as adds its repository to your system so that you’ll receive updates when a new release comes out.

This simple tutorial will show you how to install and use Faenza Icons 1.3.1 in Ubuntu 13.10 Saucy Salamander while the PPA is not available yet.

faenza icons 1.3.1

As I know, the Faenza icons ppa contains actually the same DEB package for Ubuntu 13.04 Raring, 12.10 Quantal, 12.04 Precise. We can also use the Deb on Ubuntu 13.10 Saucy to install this icon set. Here’s how:

1.) Click on below link to download the theme:

faenza-icon-theme_1.3.1_all.deb

2.) Press Ctrl+Alt+T on your keyboard to open terminal. When it opens, run below command to install the Deb:

sudo dpkg -i ~/Downloads/faenza-icon-theme_1.3.1_all.deb

install faenza icons

3.) To apply this theme to your system, install unity-tweak-tool in Ubuntu Software Center. Or run below command in terminal:

sudo apt-get install unity-tweak-tool

Once installed, open it from Unity Dash. You’ll be able to choose Faenza icons under Appearances -> Icons.

apply faenza icons

yEd graph editor

This tutorial shows how to install the most recent yEd Graph Editor in Ubuntu 24.10, Ubuntu 24.04, Ubuntu 22.04, Ubuntu 20.04, and Linux Mint 21/22.

yEd is a powerful desktop application that can be used to quickly and effectively generate high-quality diagrams. Create diagrams manually, or import your external data for analysis. The automatic layout algorithms arrange even large data sets with just the press of a button.

Install yEd via its official script

The official website provides the yEd installer script for 64-bit (AMD/Intel CPU) Linux systems, which includes a suitable JRE.

To download this script, simply click the link below to go to its download page:

After downloaded the script, press Ctrl+Alt+T on keyboard to open up a terminal window, then run 2 commands below one by one:

  • First, add executable permission to the script for current user:
    chmod u+x ~/Downloads/yEd*.sh

    Here, assume you saved the downloaded script in user’s Downloads folder.

  • Then, run the script via command:
    sh ~/Downloads/yEd*.sh

    It will pop-up an installer wizard. Just follow it until done. Finally, you may launch it from system start menu or Gnome overview.

Uninstall yEd

The yEd installer script by default installs it into user’s Home directory. So, just delete that folder will remove it from your system.

To get rid of the leftovers, such as desktop entry, and app data, open terminal (Ctrl+Alt+T) and run command to remove them:

rm -R ~/.yEd && rm rm ~/.local/share/applications/*yEd*.desktop

This simple tutorial will show you how to convert your photos to cartoon or sketch images in Ubuntu Linux using a simple tool XnSketch.

turn to cartoon

XnSketch is a very small tool that allows you to turn your photos into cartoon or sketch images. It works on Windows, Linux, Mac OS, Apple and Android devices.

Features:

  • 18 different effects (black strokes, white strokes, pastel, pencil sketch, colored sketch, …)
  • Edge strength, and opacity adjustement
  • Contrast, brightness, saturation adjustement
  • Save or share the result to Flickr, Picasa, Facebook, Imgur, Thmblr, ImageShack, Yfrog, GlowFoto, TwitPic, and Email.

Install XnSketch

XnSketch is available to download for Linux (64-bit AMD/Intel CPUs) through the link below:

After downloaded the package, just decompress, then click run the “XnSketch” file from the extracted folder will launch the application.

If you like this app, and want to add it to system start menu or Gnome app grid, then do the following steps one by one:

  • First, move the app folder to a desired location for long time use. In my case, I created a “MyApps” folder in user home, and put these apps folders there.
  • Then, navigate into the XnSketch app folder, and click edit the “XnSketch.desktop” file.
  • When file opens, replace the values of “Exec” and “Icon” according to where you moved the app folder (press Ctrl+L in that folder then copy).
  • Finally, press Ctrl+Shift+S to open ‘Save as’ dialog, and choose save the file into .local/share/applications (press Ctrl+H to view hidden folders) directory.

If everything goes well, you’re able to launch the app from start menu or Gnome overview a few moments later.

How to Install Areca Backup in Ubuntu Linux

Last updated: July 28, 2013

This simple and brief tutorial shows you how to download and install Areca Backup utility in Ubuntu Linux Unity Desktop.

Areca Backup in ubuntu unity

As you may know, Areca Backup is an Open Source personal backup solution which is released under the General Public License (GPL) v2. It basically allows you to select a set of files / directories to back-up, choose where and how (as a simple file copy, as a zip archive, …) they will be stored, and configure post-backup actions (like sending backup reports by email or launching custom shell scripts).

Download & Install Areca Backup

The acrca backup depends on Java, so first install OpenJDK from Ubuntu Software Center or Oracle Java from ppa.

The last stable version can be downloaded from below link:

download areca backup

Choose to download the areca-*-linux-gtk.tar.gz. You may check 32-bit or 64-bit by opening Details from Unity Dash.

download areca backup

Once downloading process finished, decompress the package and put the result folder to /opt/ directory. To do so, press Alt+F2 and type in gksudo nautilus to open file browser with root privilege.

open nautilus as root

Then move the extracted folder to computer -> /opt/ folder.

move-to-opt

Now you’re able to open this backup utility via command: /opt/areca/areca.sh

To create a launcher for Areca Backup

Press Ctrl+Alt+T on your keyboard to open terminal. When it opens, run below command to install required package:

sudo apt-get install gnome-panel --no-install-recommends

After that, run below commands to create the .desktop launcher file:

sudo gnome-desktop-item-edit /usr/share/applications/ --create-new

It brings up a dialog, where you can set the icon, name, and command of new launcher.

launcher for areca backup

Once done, you’ll see areca backup in Unity Dash.

areca backup in unity

Install Gyachi in Ubuntu 13.04 Raring via PPA

Last updated: July 28, 2013

This simple and brief tutorial is going to show you how to install Gyachi Yahoo! client in Ubuntu 13.04 Raring Ringtail via the ppa repository.

gyachi unity

GyachE Improved (GyachI) is a fork from Gyach Enhanced Yahoo! client for Linux operating systems. This Yahoo! client supports almost all of the features you would expect to find on the official Windows Yahoo! client: Voice chat, webcams, faders, ‘nicknames’, audibles, avatars, display images, and more. Yet, it remains very light-weight and memory-friendly.

NOTE: The latest version of Gyachi was released on 2011-09-03, so it may or may not work. Use it at your own risk!

Install Gyachi:

There’s a PPA repository contains the latest Gyachi packages for Ubuntu 10.04 Lucid and higher.

To add the ppa, press Ctrl+Alt+T to open terminal. When it opens, run below commands:

sudo add-apt-repository ppa:adilson/experimental

Then you can update your system package lists and install it via:

sudo apt-get update; sudo apt-get install gyachi

Run gyachi command to launch it first time, then click its icon and choose “lock to launcher”.

gyachi

pin gyachi to unity launcher

Install Shutter 0.90 in Ubuntu 13.04 via PPA

Last updated: March 11, 2015

This simple tutorial shows you how to install the latest Shutter 0.90 on Ubuntu 13.04 Raring Ringtail using its PPA repository.

shutter 0.90

This release fixes bugs and removes some error prone (or unused) features. Some of the error prone features has been removed in order to keep Shutter’s codebase easier to maintain.

Due to licensing issues it was necessary to remove three plugins (3Dreflection, 3Drotate, bordereffects). The plugins are based on scripts written by Fred Weinhaus and he asked to remove them from Shutter.

Shutter 0.90 indicator adds a new option to show the main window, it’s convenient for Unity users.

shutter show main window

This release removes the following dependency: libgnome2-gconf-perl (Gnome2::GConf)

Install Shutter from PPA:

The Shutter PPA is ready for Ubuntu 13.04, 12.10, 12.04 and 10.04 users. Press Ctrl+Alt+T on your keyboard to open terminal. When it opens, run below command to add the ppa:

sudo add-apt-repository ppa:shutter/ppa

Then you can install it via below command:

sudo apt-get update; sudo apt-get install shutter

This simple tutorial shows how to reduce / increase the number of workspaces on Ubuntu 12.04, 12.10, 13.04 and upcoming 13.10 Unity Desktop.

6 number of workspaces

There are quite a few Ubuntu configuration tools that allow to manage number of workspaces on Unity Desktop, such as Ubuntu Tweak, Unity Tweak Tool, Unsettings, CompizConfig Settings Manager, etc.

NOTE: For Ubuntu 13.04 and higher, you may first enable workspaces from System Settings -> Appearances -> Behavior tab -> Enable Workspaces.

To change number of workspaces via Ubuntu Tweak:

Ubuntu Tweak is very popular Ubuntu Configuration tool which was started in 2008. The first supported release is Ubuntu 7.10 Gutsy Gibbon.

To install Ubuntu Tweak, first download the .deb file from launchpad.net/ubuntu-tweak. Or use below command to download it (Press Ctrl+Alt+T to open terminal for running commands):

cd ~/Downloads/ && wget https://launchpad.net/ubuntu-tweak/0.8.x/0.8.5/+download/ubuntu-tweak_0.8.5-1_all.deb

To install Ubuntu Tweak, run:

sudo dpkg -i ~/Downloads/ubuntu-tweak_*.deb; sudo apt-get -f install

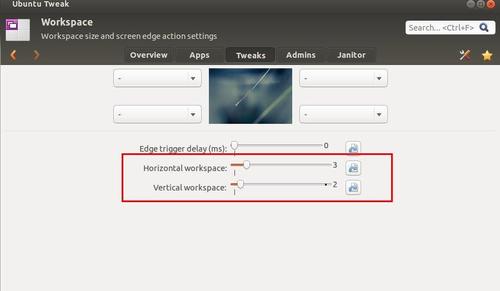
Once installed, open the tool and navigate to Tweaks -> Workspace. Change the value of horizontal and vertical workspace and that’s it!

number of workspaces via ubuntu tweak

To change number of workspaces via Unity Tweak Tool:

Unity Tweak Tool is a settings manager for Unity Desktop. It has a user friendly GUI. If you’re running on Ubuntu 13.04 Raring and higher, this can be a good way to add or remove virtual workspaces. Because Unity Tweak Tool is available in Ubuntu Software Center by default. You can click the link below to launcher USC and install it.

Install Unity Tweak Tool

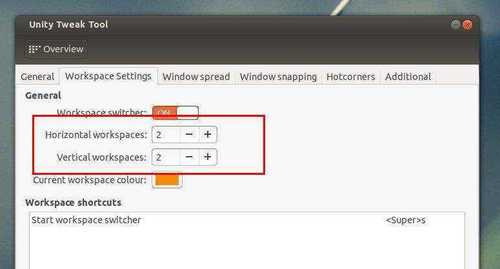
Once installed, open it. Under Window Manager click Workspace Settings. Then you’ll be able to change the number of workspaces:

number of workspaces tweak tool

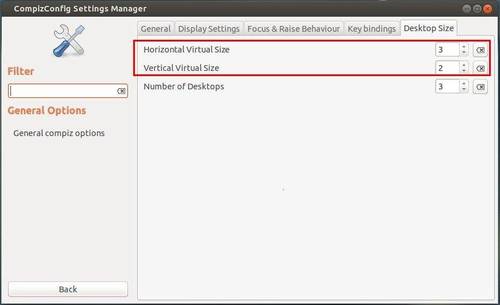
Use CompizConfig Settings Manager to Change number of Workspaces:

Compiz is a compositing window manager for the X Window System. It’s the default in Ubuntu system. CompizConfig Settings Manager (CCSM) is the GUI tool for configuring Compiz effects.

To install CCSM, click link below to launch Ubuntu Software Center and click install button.

install CCSM

Once installed, open it from Unity Dash. Navigate to General -> General Options -> Desktop size tab, there you’ll see the options to change number of horizontal and vertical workspaces.

number of workspaces CCSM

This tutorial shows you how to install the latest Midori (0.5.4) from Midori PPA on Ubuntu 13.10 Saucy, 13.04 Raring, 12.04 Precise and also 12.10 Quantal.

midori 0.5.4

Midori is a lightweight, fast, and free web browser. It is also the default browser of the beautiful elementary os. Midori is release under the GNU Lesser General Public License, version 2.1, which makes it suitable for inclusion in both proprietary and free, open-source programs.

Highlights in Midori 0.5.4:

  • Error pages are looking quite a bit nicer now and also try to be more informative.
  • Bookmarks are also improving at an increasing pace thanks to André. Several bigger changes are already in the pipeline for the next cycle.
  • Glib 2.23.3, GTK+ 2.24, Vala 0.16.0 and WebKit 1.8.3 are required now.

Install Midori:

The Midori PPA contains the latest packages for Ubuntu 13.10 Saucy, 13.04 Raring, 12.10 Quantal, and 12.04 Precise.

To add the ppa, press Ctrl+Alt+T on your keyboard to open terminal. When it opens, run below commands:

sudo add-apt-repository ppa:midori/ppa

add midori ppa

Then update system package lists and install the browser via commands:

sudo apt-get update; sudo apt-get install midori

install midori

midiro in unity dash

LibreOffice 4.1 has been officially released. It’s available for Ubuntu 13.04 Raring and 12.04 Precise users from the main LibreOffice PPA repository.

LibreOffice 4.1 main window

LibreOffice 4.1 features a large number of improvements in the area of document compatibility, which increases the opportunities of sharing knowledge with users of proprietary software while retaining the original layout and contents.

New Features:

  • Rotate images in Writer in 90 degree increments
  • Writer, Calc and Impress now allow embedding fonts in their documents.
  • It is now easy to include a series of photos in Impress with the “Photo Album” feature.
  • Add a Stepped Lines line type to Line and XY (Scatter) graphs
  • Especially for migrations, LibreOffice adds a number of significant improvements of interoperability with MS Office formats.
  • A very large number of bugs have been fixed
  • More.

Install LibreOffice 4.1

Press Ctrl+Alt+T on your keyboard to open terminal. When it opens, run below commands to add the LibreOffice Main repository.

sudo add-apt-repository ppa:libreoffice/libreoffice-4-1

After that, update your package lists and install the office suit. To do so, run below command:

sudo apt-get update; sudo apt-get install libreoffice

LibreOffice 4.1 about

Now you can start LibreOffice 4.1 from the Unity Dash. Enjoy!