Archives For November 30, 1999

Unity is the default desktop environment since Ubuntu 11.04 Natty.

This tutorial shows you how to enable transparent top panel and titlebar in Unity Desktop, tested in Ubuntu 13.10 Saucy, 13.04 Raring.

transparent panel and titlebar

Transparent Panel in Unity:

The CompizConfig Settings Manager has the opition to set panel opacity. It’s a little different to Ubuntu 12.04 Precise. Now the option is under Ubuntu Unity Plugin -> General tab.

To get totally transparent panel:

      Set the value of Panel Opacity to 0
      Click to edit Background Color, change Opacity to 1

full transparent panel

To install CompizConfig Settings Manager, click the link below to bring up Ubuntu Software Center and click install button.

click to install CCSM

compizconfig settings manager

Transparent titlebar in Unity:

Without installing special themes, you can directly adjust window titlebar transparency in Ubuntu Unity via Dconf Editor which is installed by default.

dconf editor in unity dash

Open dconf editor, then navigate to org/compiz/gwd. Change the value of “metacity-theme-active-opacity” and “metacity-theme-inactive-opacity” to set transparent titlebar for both focus & un-focus windows.

change titlebar transparency

As you may know, ClassicMenu Indicator is a notification area applet that displays classic GNOME-style application menu on top panel of Unity Desktop.

classic menu indicator

While the PPA repository is not available for Ubuntu 13.10 Saucy Salamander, you can directly download and install the Deb from its official website. Here I’ll tell you how to do it!

To get started, press Ctrl+Alt+T to open terminal. When it opens, run below commands to download the installer:

wget http://www.florian-diesch.de/software/classicmenu-indicator/dist/classicmenu-indicator_0.07_all.deb

download classic menu indicator

Then install the applet and fix dependency problem if any:

sudo dpkg -i classicmenu-indicator_*.deb; sudo apt-get -f install

install classic menu indicator

Once installed, you can open it from Unity Dash. That’s it!

Enable Nautilus Preview in Ubuntu 13.04, 13.10

Last updated: August 4, 2013

Want to preview documents on Nautilus file browser? Well, here I’m going to show you how to do it. As well as preview files folders, you’ll be able to previewing Pictures, Movies, Music, and everything that can be opened in your system.

nautilus preview folder nautilus preview mp3
nautilus preview movie nautilus preview files

To get started, install the Sushi plugin for Nautilus in Ubuntu. You can search for and install the gnome-sushi from Ubuntu Software Center. Or just click the link below to bring up USC:

click to install sushi preview

That’s it!

You may need to install multi-media codecs to enable previewing movies. Press Ctrl+Alt+T to open terminal. When it opens, run below commands to install media codecs:

sudo apt-get install gstreamer0.10-plugins-ugly gstreamer0.10-ffmpeg libxine1-ffmpeg gxine mencoder libdvdread4 totem-mozilla icedax tagtool easytag id3tool lame nautilus-script-audio-convert libmad0 mpg321 gstreamer1.0-libav

Restart Nautilus to apply the changes:

nautilus -q

You’re done. Enjoy!

This tutorial shows you how to install Cisco VPN on Ubuntu 13.04 Raring or 13.10 Saucy. You don’t have to do anything special to install Cisco VPN client, because network manager supports Cisco IPSec VPNs after installed the vpnc plugin.

To get started, search for and install network-manager-vpnc package from Ubuntu Software Center. It installs the Cisco-compatible VPN client as well as the plugin for network manager.

Cisco VPN for network manager

Once installed, you can follow below steps to setup Cisco VPN for Ubuntu:

1.) Move your cursor to right-top corner system tray area, click on Network Manager icon and choose VPN Connections -> Configure VPN

setup Cisco VPN for Ubuntu

2.) In next window, click on Add button to add a new connection and then choose Cisco Compatible VPN (vpnc) from the drop-down menu.

setup cisco vpn connection

3.) Click on Create and you’re able to type in your Cisco VPN details in next window. After all, check off “Use this connection only for resources on its network” otherwise your traffic significantly slowed down

configure cisco vpn connection

Want to watch Live TV Channels on your Ubuntu desktop? Well, here I’ll give a list of free software to do it. I’ve tested them in my 32-bit Ubuntu 13.04 laptop. Feel free to leave a comment if you have a good suggestion.
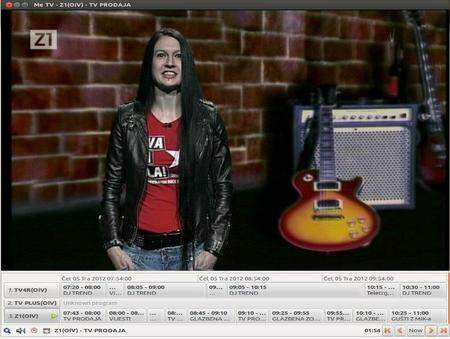
1. Me TV

Me TV is a user-friendly desktop application for watching digital television services that use the DVB standard. It works with DVB-T, DVB-S, DVB-C and ATSC devices that are supported by Linux kernel drivers. Application uses GTK+ libraries for user interface and VLC or Xine libraries for DVB TV.

Me TV is available in Ubuntu Software Center by default. Just search for and install the package. Or click the link below:

click to install Me TV

Me TV DVB viewer

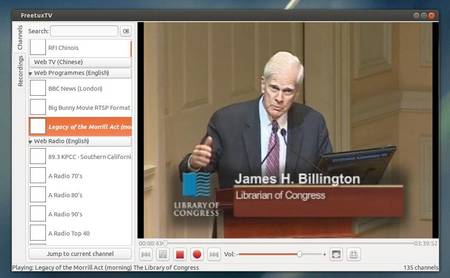
2. FreetuxTV television channels player

FreetuxTV is a free GTK+ WebTV and Web Radio player for Linux. It can be used by french people to watch ADSL TV on the PC with ISPs or by other people to watch WebTV and Web Radio in many languages. The GUI is developed in GTK2+ and is using the VLC engine to display the channels.

FreetuxTV is available in Ubuntu Software Center. Just search for and install the package. Or click the below link:

Click to install FreetuxTV
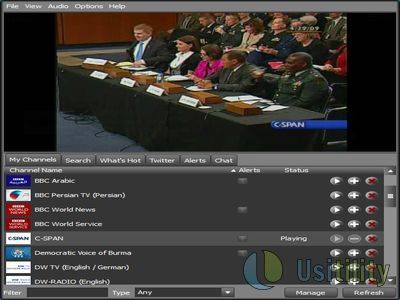
FreetuxTv live TV

3. Livestation

Livestation is a platform for distributing live television and radio broadcasts over a data network. A number of channels can be watched for free on the Livestation website or on their desktop player, a freely downloadable video application that presents all the channels through one interface. You need to register (for free) to use this software.

To install it in Ubuntu:

For 32-bit, run below 2 commands:

wget http://updates.livestation.com/releases/Livestation-3.2.0-i386.deb
sudo dpkg -i Livestation-3.2.0-i386.deb

For 64-bit, run below 3 commands:

wget http://updates.livestation.com/releases/Livestation-3.1.0.run

chmod +x Livestation-3.1.0.run

./Livestation-3.1.0.run
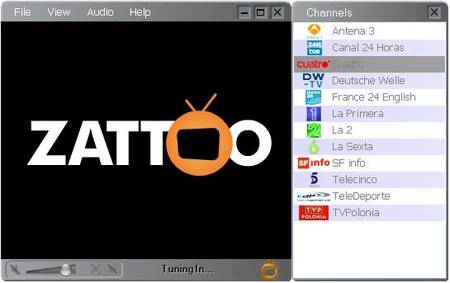
Livestation TV streaming

4. Zattoo

Zattoo is a free Live TV on PC and Mac. Zattoo service is currently restricted to Switzerland, Denmark, Spain, Germany, Norway (closed again in 2008), United Kingdom and France, but was in 2007 expected to expand to other European countries, (with Austria and Poland being at the top of that list) then to Canada and the US while adding fee-based channels to its list.

Zattoo only provides 32-bit app , download and install it via below 2 commands:

wget http://download.zattoo.com/zattoo-4.0.5-i386.deb
sudo dpkg -i zattoo-4.0.5-i386.deb

zattoo live tv

5. Sopcast Player

Sopcast is a free P2P internet service. It is a simple, free way to broadcast video and audio or watch the video and listen to radio on the Internet. Adopting P2P(Peer-to-Peer) technology, It is very efficient and easy to use. Let anyone become a broadcaster without the costs of a powerful server and vast bandwidth.

Sopcast is available from the PPA repository, but only support from Ubuntu 8.04 to Ubuntu 12.04:

sudo add-apt-repository ppa:jason-scheunemann/ppa
sudo apt-get update
sudo apt-get install sopcast-player

I can install this player in Ubuntu 13.04 by downloading and installing the sopcast-player and sp-auth packages from the ppa, but it doesn’t player channels for me.

sopcast p2p live tv

This simple tutorial shows you how to properly enable the 3D Desktop Cube effect in Ubuntu 13.04 Raring Ringtail.

Note that you need a video card that can render this and to have the drivers correctly installed.

desktop-cube-ubuntu

1.) Ubuntu 13.04 by default has only one workspace, so first we need to enable multi workspaces to get started. To do so, go to Unity Dash -> Appearance -> Behavior tab. Check the box which says ‘Enable workspaces’

enable workspaces 13.04

2.) Then installed required packages which allows you to configure Unity desktop effects. Search for and install compizconfig-settings-manager, compiz-plugins, compiz-plugins-extra from Ubuntu Software Center. Or you can run below command in terminal (Ctrl+Alt+T) to install these packages:

sudo apt-get install compizconfig-settings-manager compiz-plugins compiz-plugins-extra

3.) Open CompizConfig Settings Manager from Unity Dash Home. Let’s do some settings via this tool.

compizconfig settings manager

4.) Go to Preferences in left bar.

ccsm-preferences

5.) Under Plugin List tab, uncheck “Automatic plugin sorting” and accept the warning that will appear after trying to disable it.

From the Disable Plugins List, Enable the following plugins: cube, rotate
From the Enable Plugins List, Disable the following plugins: wall

enable 3d desktop cube

6.) Go back from the Preferences menu to the Main Compiz Menu and select General Options -> Desktop Size tab and change the Horizontal Virtual Size to 4, and Vertical size to 1.

enable-desktop-cube1

You can also add background, top and bottom colors for the cube from Desktop Cube configuration window.

Now you can press down Ctrl+Alt, and drag your mouse to see the magic!

(Optinal) To revert back to default, press Ctrl+Alt+T to open terminal. When it opens, run below commands:

dconf reset -f /org/compiz/; setsid unity

Done!

This simple tutorial shows you how to add ‘File Compare’ option on Nautilus’ context menu in Ubuntu 13.04 Raring Ringtail.

file compare in nautilus

There are a few tools in Ubuntu allow to compare files or folders, such as Meld Diff Viewer, Kdiff3. Nautilus-compare is a simple plugin that integrates them with Nautilus file browser.

Press Ctrl+Alt+T on your keyboard to open temrinal. When it opens, run below command to install this plugin:

sudo apt-get install nautilus-compare

Once installed, open “Nautilus Compare Extension Preferences” from Unity Dash and choose your diff veiwer:

nautilus file compare extension

Finally, restart Nautilus by below command to apply changes:

nautilus -q

For Ubuntu 13.04, due to bugs you need to run below command to get it work:

for 32-bit:

sudo ln -s /usr/lib/i386-linux-gnu/libpython2.7.so.1 /usr/lib/libpython.2.7.so

for 64-bit:

sudo ln -s /usr/lib/x86_64-linux-gnu/libpython2.7.so.1 /usr/lib/libpython.2.7.so

This brief tutorial shows you how to change your laptop touchpad tap actions in Ubuntu, including single tap, two and three finger tap as well as tap on corners..

touchpad tap actions

I’m only using single tap and touchpad scrolling feature on my laptop. As you may know, Ubuntu acts as middle click when tapping on top-right corner of touchpad. It is annoying that I was always ‘corner-tapping’ on my Google Chrome tabs, and they vanished all of a sudden. More over, two finger tap brings up righ-click menu, quick tapping twice on title-bar, browser tabs allows to move items. Due to these useless and annoying tap actions (only for me), I’m determined to tweak my touchpad settings. That’s why I’m writting this tutorial.

The default Mouse & Touchpad utility in Ubuntu Unity is getting better now, but it’s not powerful enough. So far it only has the ability to switch on / off touchpad, Tap to click, Disable while typing, Two finger scroll, Contents sticks to fingers as well as point speed settings.

default touchpad tapping utility

I found synaptiks, which is a simple utility that covers almost all settings of Synaptics Touchpad, including multi-tapping, tapping on corners. It is available on Ubuntu Software Center by default since Ubuntu 12.04 Precise. Click link below to install it:

Install Synaptiks Touchpad Configuration

When installed, open the tool and go to Touchpad Configuration -> Tapping. There provides options to change tapping on 4 corners, single tap, two finger tap, three finger tap, drag items by tapping, etc.

synaptiks touchpad tap configurations tool

BitDefender Anti-virus is available for Linux from its official repository. Here I’ll show you how to install it on Ubuntu 13.04 Raring Ringtail.

Ubuntu itself has few virus, you can install anti-virus program on Ubuntu Linux to scan USB devices or Windows NTFS partitions.

Objectives:

  • Install BitDefender on Ubuntu from official repository
  • Enjoy!

To get started, press Ctrl+Alt+T key combination to open terminal, then run below command to add BitDefender official repository for Linux.

sudo sh -c 'echo "deb http://download.bitdefender.com/repos/deb/ bitdefender non-free" >> /etc/apt/sources.list.d/bitdefender.list'

Then download and install the key via below command:

wget -O- -q http://download.bitdefender.com/repos/deb/bd.key.asc | sudo apt-key add -

After adding the repository, use your package manager to install BitDefender. Or run below commands to update packages list and do install:

sudo apt-get update; sudo apt-get install bitdefender-scanner-gui

Once installed, run GUI via below command. Read this tutorial to manually add a launcher.

/opt/BitDefender-scanner/bin/bdgui

bitdefender

Gmediafinder is a software to search stream and / or download files form youtube, dailymotion, vimeo, and others engines without flash.

It support fullscreen mode (double click on the video or f key/esc), visualisations and use the gstreamer engine to play sounds and videos.

For youtube you can select you prefered resolution and it give priority to webm(vorbis/vp8) and mp4 format for video seeking! (and lower cpu usage than flv…)

Gmediafinder

Objectives:

  • Install Gmediafinder on Ubuntu 13.04 & 12.10 via PPA
  • Enjoy!

The developer has create a ppa repository to make it easy to install for Ubuntu and Linux Mint users. So far it supports Ubuntu 10.04 and higher.

To get started, press Ctrl+Alt+T on your keyboard to open terminal. When it opens, run below commands to add the ppa:

sudo add-apt-repository ppa:s-lagui/ppa

Then update package lists and install gmediafinder:

sudo apt-get update; sudo apt-get install -y gmediafinder

gmedia-finder-unity-dash