Archives For November 30, 1999

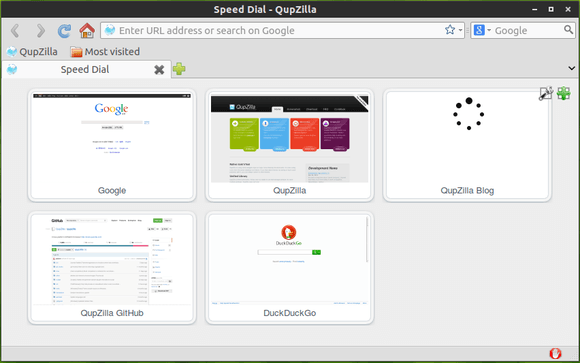
Qupzilla browser Ubuntu

QupZilla is a lightweight and very fast QtWebKit browser. It has been originally started only for educational purposes. But from its start, QupZilla has grown into a feature-rich browser.

The latest version 1.6.1 added option to enable tab switching using the mouse scroll wheel; a toggle to disable inline URL completion in the address bar; and the ability to launch full-screen mode using the command line.

There are also other changes and a few bug fixes in QupZilla 1.6.1:

  • added undo/redo context menu actions in editable web elements
  • speedup loading rules from subscriptions in AdBlock dialog
  • fixed speed dial with disabled javascript
  • fixed showing tooltips on tabs when tab previews are disabled
  • fixed search shortcuts longer than one character in locationbar
  • fixed building issues on OS X and OS/2
  • fixed disabling tab previews from preferences
  • fixed building new Gnome/KDE keyring passwords
  • fixed building StatusBarIcons plugin on Windows
  • win: add new jumplist option to open private window

qupzilla web browser

Install QupZilla in Ubuntu:

Press Ctrl+Alt+T on your keyboard to open the terminal. When it opens, run the commands below one by one:

sudo add-apt-repository ppa:nowrep/qupzilla

sudo apt-get update

sudo apt-get install qupzilla

These commands will install the QupZilla from its official PPA. Supports Ubuntu 14.04, Ubuntu 13.10, Ubuntu 12.10, Ubuntu 12.04, Linux Mint and their derivatives.

BTW: The developer announced in the release note that:

QupZilla will in future be ported to QtWebEngine, which will (amongst other improvements) bring multi-process architecture.
With QtWebEngine comes dependency on Qt 5, which means older platforms may not be supported.
QupZilla on QtWebEngine will be new major version 2.x.x and I hope it will be ready with Qt 5.3 (or Qt 5.4), depending on Qt devs.

Clementine OS

Hello dear readers. As you may know, Pear Linux OS, the Ubuntu based distribution that mimics Apple’s OS X completely, is discontinued because the developer David Tavares has sold this distribution to an undisclosed company that will develop the Linux-based operating system for its own products.

All the download links have been removed from the official website, which is no longer active. Fortunately, a new team will continue the Pear OS by developing a new OS called Clementine OS.

pear_os_8_wallpaper

Clementine OS 10.8 will start development in April of 2014 based on the upcoming Ubuntu 14.04 LTS. The official website is out and now provides iso images for Pear OS 8.

Clementine OS WebSite:clementineos.hj.cx.

UPDATE 1: The developer received a letter from an American company that forced him to abandon the project. He later said that it was not Apple, but another major company. He could not disclose its name, however.

UPDATE: I found that the website is down after I spread this news around. If you’re interested in this OS, you can follow the developer on Google +

Ubuntu 14.04 Alpha 2

Ubuntu 14.04 Trusty Tahr, the next Long Term Support hits alpha 2 release. Though regular Ubuntu doesn’t take part in the alphas , the following flavours are participating in this second round of alphas:

  • Edubuntu
  • Kubuntu
  • Ubuntu GNOME
  • Ubuntu Kylin
  • Xubuntu
  • Ubuntu Cloud

Download Links: releases.ubuntu.com

  • Ubuntu Gnome 14.04 Alpha2
  • Kubuntu 14.04 Alpha2
  • Edubuntu 14.04 Alpha2
  • Ubuntu Cloud 14.04 Alpha2
  • Xubuntu 14.04 Alpha2
  • Ubuntu Kylin Alph2

If you’re on Ubuntu 13.10, you can also upgrade to Ubuntu 14.04 Alpha to help testing this development release via this post. Note that don’t do this on production machines.

The Ubuntu 14.04 will hit its first beta release at next month, see the release schedule:

  • Alpha 1 – December 19th (for flavours) – released
  • Alpha 2 – January 23rd (for flavours) – released
  • Beta 1 – February 27th (for flavours)
  • Final Beta – March 27th
  • Release Candidate – April 10th
  • Ubuntu 14.04 LTS Final – April 17th

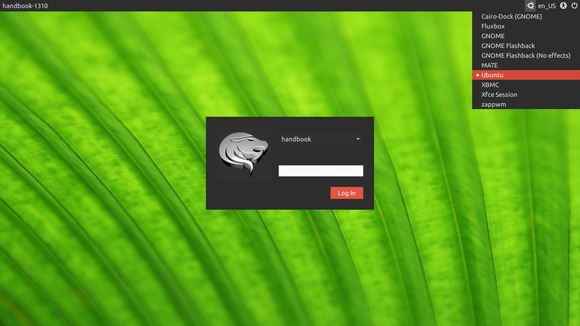
unity gtk greeter

 
LightDM GTK+ Greeter brings a quick, reliable, and GTK+ 2/3 support login screen. It is used by a number of Ubuntu’s flavours, including Xubuntu.

The latest version 1.7.1 has been released a few hours ago with below changes:

  • Username tooltip tweaks
  • Language applet now displays country code labels
  • Login windows can no longer be positioned ‘off screen’
  • Improvements to handling of xscreensaver timeout
  • Login button set as “default” widget

LightDM gtk greeter

Install:

Press Ctrl+Alt+T on keyboard to open terminal. When it opens, run below commands one by one:

sudo add-apt-repository ppa:lightdm-gtk-greeter-team/stable

sudo apt-get update

sudo apt-get install lightdm-gtk-greeter

This will install the latest package for Ubuntu 14.04, Ubuntu 13.10, Ubuntu 13.10, Ubuntu 12.10 and their derivatives.

If you don’t like Launchpad PPAs, download & install the .deb from this page.

Usage:

After installation, your login screen should changed at next boot. If not, edit the config file via:

sudo gedit /etc/lightdm/lightdm.conf

Make sure its content looks like:

[SeatDefaults]
greeter-session=lightdm-gtk-greeter

Edit the /etc/lightdm/lightdm-gtk-greeter.conf file via below command to change the theme, icon, etc.

sudo gedit /etc/lightdm/lightdm-gtk-greeter.conf

In below config file I used the Numix gtk theme:

#
# background = Background file to use, either an image path or a color (e.g. #772953)
# theme-name = GTK+ theme to use
# icon-theme-name = Icon theme to use
# font-name = Font to use
# xft-antialias = Whether to antialias Xft fonts (true or false)
# xft-dpi = Resolution for Xft in dots per inch (e.g. 96)
# xft-hintstyle = What degree of hinting to use (none, slight, medium, or full)
# xft-rgba = Type of subpixel antialiasing (none, rgb, bgr, vrgb or vbgr)
# show-language-selector (true or false)
# show-indicators = semi-colon “;” separated list of allowed indicator modules (e.g. libsoundmenu.so)
# show-clock (true or false)
# clock-format = strftime-format string, e.g. %H:%M
# keyboard = command to launch on-screen keyboard
#
[greeter]
background=/usr/share/backgrounds/mate/nature/Blinds.jpg
theme-name=Numix
icon-theme-name=LoginIcons
default-user-image = /usr/share/pixmaps/griffon_icon.png
font-name=Ubuntu 11
xft-antialias=true
xft-dpi=96
xft-hintstyle=slight
xft-rgba=rgb
show-language-selector=true

Upgrade From Ubuntu 13.10 to Ubuntu 14.04

This simple tutorial shows how to upgrade your system from Ubuntu 13.10 Saucy to Ubuntu 14.04 Trusty Tahr for both Desktop and Server editions.

Ubuntu 14.04 Trusty is scheduled to be released on April 17th. At the moment of writing this article, the alpha release is available to upgrade in Saucy’s updater for testing purpose.

Important: Production machines please wait until the Ubuntu 14.04 final is released. By then, we can follow below steps to upgrade our systems.

Before starting any upgrades, you need to:

  • Backup important files, documents, bookmarks and other data.
  • If you’ve manually installed proprietary drivers directly from the manufacturer’s website, then before upgrading I recommend removing these drivers first and reverting to the open-source drivers
  • Open Software & Updates utility from Unity Dash. Disable all third-party repositories under Other Software tab.

Desktop Upgrade:

Press Ctrl+Alt+T on keyboard to open the terminal. When it opens, run the commands below to update your system:

sudo apt-get update; sudo apt-get dist-upgrade

Now start the updater via -d option:

sudo update-manager -d

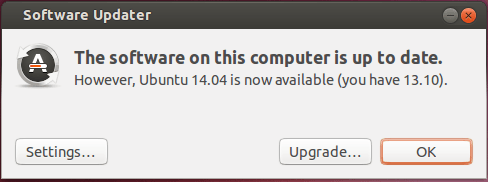
The Software Updater will open and tell you your system is up to date and a new release Ubuntu 14.04 is available.

upgrade from Ubuntu 13.10 to Ubuntu 14.04

Click on the Upgrade button and confirm again in next window. Software Updater will fetch and install the files and prompt you to remove unnecessary applications.

Finally you’ll be asked to restart your computer to finish the upgrade. That’s it.

Upgrade Ubuntu Server:

NOTE: Please backup your configuration files if you’re running any services on Ubuntu server.

For Ubuntu Server edition, we need to install the update-manager-core first by executing the command below:

sudo apt-get install update-manager-core

Then edit the config file:

sudo vi /etc/update-manager/release-upgrades

Make sure there’s a line that says “Prompt=normal” or “Prompt=lts”.

Start the upgrade process by:

sudo do-release-upgrade -d

Follow the on-screen prompts and you’re done!.

Qupzilla browser Ubuntu

QtWebKit browser QupZilla 1.6.0 has been released a few days ago. Here’s how to install it via PPA in Ubuntu 13.10, Ubuntu 13.04, Ubuntu 12.10, Ubuntu 12.04, Linux Mint and their derivatives.

This release comes with new TabBar implementation that supports scrolling through all tabs when tabs don’t fit at all into TabBar. So it means, no more overflowing of tabs!

LocationBar received new completion feature – inline completion. You can now write only first letter and the most used domain will be completed. Once you see the completion, you can just press Enter and load the site.

qupzilla inline completion

For details, see the changelog:

  • added support for Proxy Auto-Config (PAC)
  • added option to open another private window from private window
  • added option to detach tabs from window
  • added delete action in edit context menu on page
  • added possibility to remove EasyList from AdBlock
  • added inline domain completion to urlbar
  • added KWallet password backend plugin
  • added Gnome-Keyring password backend plugin
  • added StatusBar Icons plugin that adds extra icons to statusbar
  • added support for POST method in search engines manager
  • added context menu for translating webpage
  • added possibility to export bookmarks to html file
  • great performance improvement for matching basic rules in AdBlock
  • themes can now be loaded from profile directories
  • pagescreen can now save output into number of formats, including PDF
  • proxy exceptions now supports wildcards (*, ?)
  • cancel upload when trying to upload non-readable files
  • select previous / next engines with ctrl+up/down in websearchbar
  • ask user first before closing all but the current tab from tabbar
  • last 2 sessions are now backuped in profile directory
  • always show tab previews after a small delay
  • GreaseMonkey: added icon in statusbar
  • GreaseMonkey: added support for GM_Settings
  • GreaseMonkey: fixed userscripts when first loading plugin
  • GreaseMonkey: run userscripts in all frames on page
  • oxygen: set rounded corners for tooltips
  • oxygen: workaround for transparent background of tooltips
  • X11: Set correct WM_CLASS property to windows
  • fixed: size of preferences dialog on low-res screens
  • fixed: loading plugins with relative paths in portable build
  • fixed: displaying a lot of RSS feeds in RSS widget in locationbar
  • fixed: enabling disabled rules in AdBlock now works everytime
  • fixed: parsing OpenSearch files with XML declaration
  • fixed: don’t show urls multiple times in url completer
  • fixed: drag & drop moving folders under bookmarks toolbar
  • fixed: files with relative paths can now be opened from command line
  • fixed: issues with overflowing tabs, it is now possible scroll through all tabs

Install QupZilla Browser:

Press Ctrl+Alt+T on keyboard to open terminal. When it opens, run commands below one by one:

sudo add-apt-repository ppa:nowrep/qupzilla

sudo apt-get update

sudo apt-get install qupzilla

For Ubuntu 14.04 Trusty, the latest version is available in Ubuntu Software Center.

latest gmusicbrowser ubuntu

Gmusicbrowser is an open-source jukebox for large collections of mp3/ogg/flac/mpc/ape files. This tutorial will show you how to install the latest version, so far it’s gmusicbrowser 1.1.11, in Ubuntu via PPA.

Gmusicbrowser 1.1.11 was released a few days ago, and here’s the changelog:

  • improve search responsiveness (improve responsiveness of SimpleSearch)
  • add auto-update mode that keeps browser lists sorted and filtered (on by default, can be disabled in the songlist/songtree option menu)
  • picture finder plugin: update google image, add bing and yahoo, various small changes
  • albuminfo plugin: update and fix parsing of Allmusic’s pages
  • various improvements to song properties and mass-tagging dialogs
  • gstreamer : add option to monitor pulseaudio’s volume, off by default as it is unstable due to thread problems with the libraries
  • close-to-tray option no longer depends on the use-tray option
  • various improvements and small fixes to error dialogs asking to retry
  • fix default filters “added today” and “played today” doing the opposite of what they say (only fixed for new users, if you were affected you have to edit them to fix it)
  • add a new-page button on TabbedLists/Context/NB (can be disabled with newbutton=0)
  • better handling of vertical scripts in vertical tabs
  • fix combo boxes for setting artist options in the misc tab of preferences
  • fix dialog for selecting label icons up-scaling small icons
  • dbus API: make CurrentSong output more fields
  • songtree: add $discname group variable
  • translation updates: Chinese(Taiwan), Finnish, German, Korean, Russian, Spanish

Install gmusicbrowser in Ubuntu:

Press Ctrl+Alt+T on keyboard to open terminal. When it opens, run below commands one by one. It will always install the latest packages from launchpad PPA:

sudo add-apt-repository ppa:andreas-boettger/gmusicbrowser-daily

sudo apt-get update

sudo apt-get install gmusicbrowser

Currently the PPA supports Ubuntu 13.10, Ubuntu 13.04, Ubuntu 12.10, Ubuntu 12.04, Linux Mint and their derivatives.

If you don’t like PPAs, download & install the .deb package from launchpad page

gThumb 3.3.1

GNOME image viewer and browser utility gThumb 3.3.1 has been released recently, which is the first release of the development series that will lead to the next major version 3.4.

gThumb 3.3.1 contains below new features and user visible changes:

  • Use a GtkHeaderBar instead of a menu and a toolbar.
  • Use the dark theme.
  • Better raw image support, using libraw instead of libopenraw.
  • Image viewer: show a frame around the image; use an overview window to scroll the image instead of the scrollbars;
  • better quality for zoomed out images.
  • Faster image loader for big images.
  • Media player: hide the mediabar after a timeout.
  • Filterbar: added buttons to view the selections.
  • File properties: show only the basic properties, allow to
    show all of them.
  • Image tools: use a grid layout for the buttons
  • Use a separate dialog for the file tool options.
  • Use symbolic icons everywhere.
  • Added a custom tiff loader.
  • Add a rating-based filter. (Louis-Marie Mouton)
  • App menu: removed ‘keyboard shortcuts’.
  • Histogram view: save and restore the scale type.

It also fixed below bugs:

  • Help: fix calling help from withing the application. (Dominique Leuenberger)
  • Fixed saving of TGA files
  • Fixed the video player stopping after saving a screenshot.
  • Rotating image destroys XMP and IPTC metadata
  • Command line ignored for the second window
  • Empty Options dialog after Canceling it once
  • Buttons with label toolbutton1 and toolbutton2 in Bookmark window
  • Default parameters for image resizing are misleading (Christian Krause)
  • Fixed broken window layout with gtk+ 3.10
  • Find duplicates: fixed crash when using a predefined directory (Christian Krause)
  • gThumb crashes when attempting to play a video. (Christian Krause)
  • Flickr: allow to use a facebook or google account
  • Thumbnail list: images drawn with wrong offset
  • Facebook: fixed authentication.
  • configure: fixed unrecognized option –disable-libjson-glib
  • Removed the use of many deprecated functions.

The Source Tarball is available at:

https://download.gnome.org/sources/gthumb/3.3/

If you’re on Ubuntu 14.04 Trusty Tahr, you can try gThumb 3.3.1 by adding Andrew’s test PPA (Only for test purpose!).

Press Ctrl+Alt+T on keyboard to open terminal and run below command to add the PPA:

sudo add-apt-repository ppa:nilarimogard/test

Then install the image viewer after checking for updates:

sudo apt-get update

sudo apt-get install gthumb

Once installed, you may remove the PPA via:

sudo add-apt-repository -r ppa:nilarimogard/test

NOTE: This PPA is maintained by Webupd8 Team and is only for test purpose. Packages will be moved or removed at any time. Use it at your own risk!

This simple tutorial is going to show you how to install and apply the latest Faenza icon theme in Ubuntu 14.04 while the PPA is not available yet.

It’s pretty easy to install an icon theme on Ubuntu Linux. Because Ubuntu stores icons in /usr/share/icons for global and user’s .icons folder for single use, all you need to do is put your icon theme folder into one of previous location and that’s it.

Ubuntu Icons Theme Folder

To install Faenza icons:

1. Download the latest package at Google Code. So far, it is Faenza 1.3.

2. Extract the package and you’ll see Faenza-Radiace, Faenza-Darkest, Faenza-Darker, Faenza-Dark, Faenza-Ambiance and Faenza packages.

3 Unpack all of them and move the result folders to:

  • For single use, move them to .icons folder. Under your home folder, press Ctrl+H to view/hide hidden folders. Create one if .icons is not exist.
  • For global use, move them to /usr/share/icons/ folder. You’ll need to press Alt+F2 and run gksudo nautilus to open file browser with root to do copy and paste things.

To make the installation easy:

Download the Deb package below:

faenza-icon-theme_1.3.1_all.deb

Double-click the package and click Install button in pop-up Ubuntu Software Center will install the theme into /usr/share/icons/.

Apply Faenza Icons:

Open Unity Tweak Tool or Gnome Tweak Tool. The faenza icons should be in the icons list.

apply faenza icons

boot into command line ubuntu


This simple tutorial will show you how to boot your Ubuntu system directly into command line (text mode or console). If you just want a console for temporary use, press Ctrl+Alt+F1 on keyboard will switch your desktop to tty1.

Update: Thanks to August Karlstrom, before getting started, make a backup by running the command below:

sudo cp -n /etc/default/grub /etc/default/grub.orig

If for some reason you want to revert to original settings, just run command below in terminal:

sudo mv /etc/default/grub.orig /etc/default/grub && sudo update-grub

To get started, press Ctrl+Alt+T to open terminal. When it opens, follow the below steps:

1. Copy and paste below command into terminal and hit enter:

sudo gedit /etc/default/grub

This opens Grub boot loader config file with text editor.

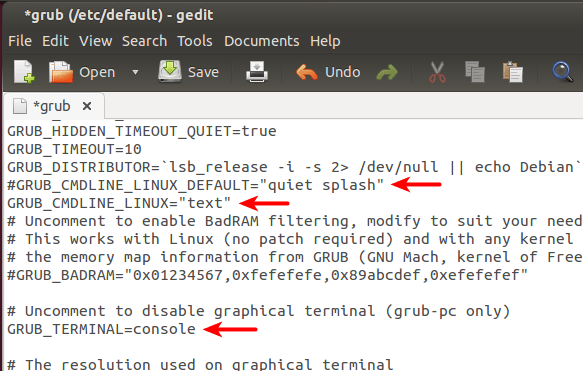
2. Do below changes:

  • Comment the line GRUB_CMDLINE_LINUX_DEFAULT=”quiet splash”, by adding # at the beginning, which will disable the Ubuntu purple screen.
  • Change GRUB_CMDLINE_LINUX=”” to GRUB_CMDLINE_LINUX=”text”, this makes Ubuntu boot directly into Text Mode.
  • Uncomment this line #GRUB_TERMINAL=console, by removing the # at the beginning, this makes Grub Menu into real black & white Text Mode (without background image)

Ubuntu boot into text mode

3. After saved the changes, update grub via command:

sudo update-grub

Restart your computer and see the result.