Archives For November 30, 1999

Have multiple monitors connected into your Ubuntu machine? Here’s the quick tip shows you how to configure which one to display the login screen.

It’s quite easy to set primary display in Ubuntu with default GNOME desktop. However, the login screen is always sticking to the built-in display in my laptop. In case you use the external monitor for the most time, you may also set it as primary display for the GDM login screen by following this tutorial.

NOTE: This tutorial is tested only in Ubuntu with default GNOME desktop! Though, it may also work in other Linux with GNOME (e.g., Fedora, Debian and Arch) or Linux with GDM display manager.

Step 1: Set Primary Display in Gnome Control Center

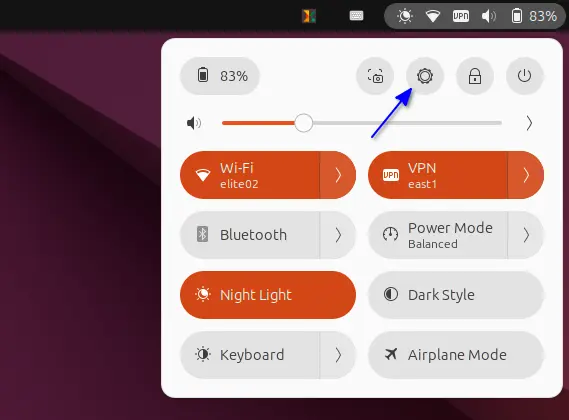
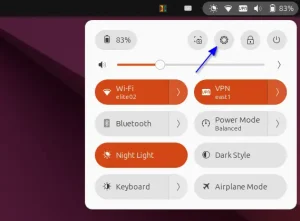
First of all, open Settings (aka Gnome Control Center) from the top-right corner system tray menu.

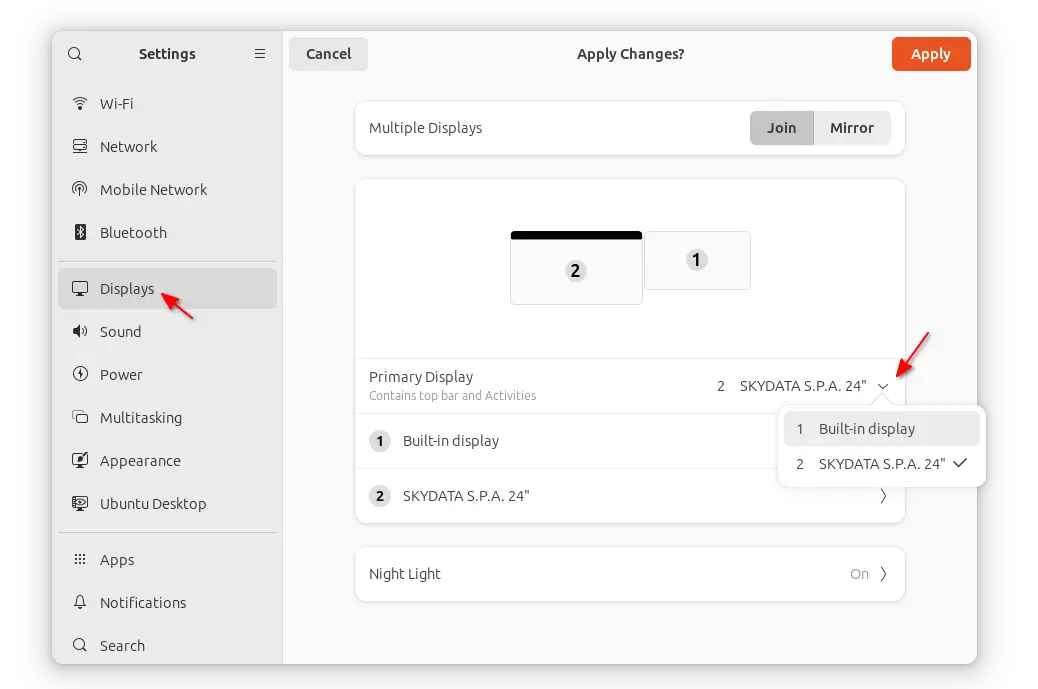
Then, navigate to Displays in the left, and choose the monitor in the right you want to use it as primary.

This step is required to generate a XML config file under user’s ‘.config‘ folder. Though, you may switch to another display as primary at anytime as you want.

Step 2: Apply Primary Display for GDM Login Screen

As mentioned above, the previous step generates a XML config file automatically. By copying the file into GDM’s config folder will make it also work for the login screen.

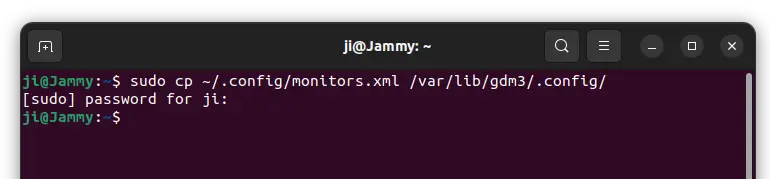
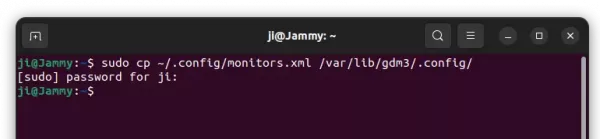
To do so, press Ctrl+Alt+T on keyboard to open terminal. Then, run command:

sudo cp ~/.config/monitors.xml /var/lib/gdm3/.config/

Type user password (no asterisk feedback) when it asks and hit Enter. For other Linux, you may have to replace gdm3 in command with gdm.

Now, save your work and log out to see the magic!

(Optional) Disable the built-in display on startup

Another annoying thing when using multiple monitor in Ubuntu Linux is that the Grub boot menu screen is always displaying in built-in monitor. I can’t figure out how to make it work in external screen as it seems to be responsible to BIOS.

However, you can disable the built-in display on startup and use the external screen only by adding a Kernel parameter.

NOTE: After this step, Grub boot-menu still shows in built-in display, though it goes always blank after that, even after disconnected the external monitor.

1. First, boot up and log into your Ubuntu desktop. Open terminal by pressing Ctrl+Alt+T shortcut on keyboard.

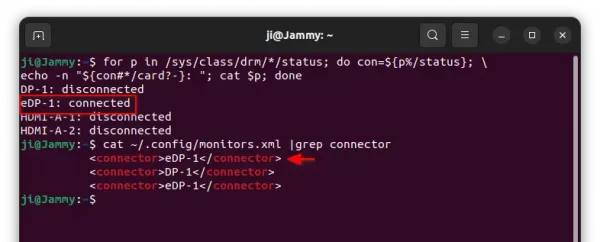
2. Disconnect the external monitor, and run command to get the device ID of built-in display:

for p in /sys/class/drm/*/status; do con=${p%/status}; \
echo -n "${con#*/card?-}: "; cat $p; done

Some said the last command does not work. If so, you may run command below instead. Usually, the first one is the ID of built-in display.

cat ~/.config/monitors.xml |grep connector

Or, just log out and choose login via ‘Ubuntu on Xorg’ via bottom right gear button. And, run xrandr -q to see the display device name.

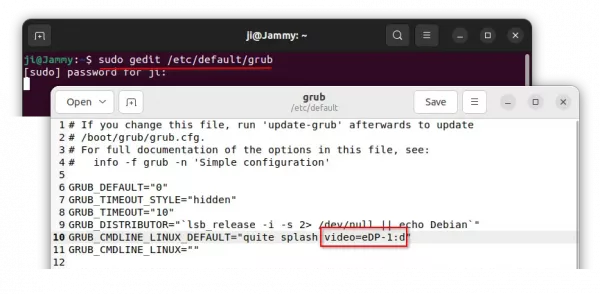
3. Re-connect your external monitor, and run command to edit the configuration file for Grub:

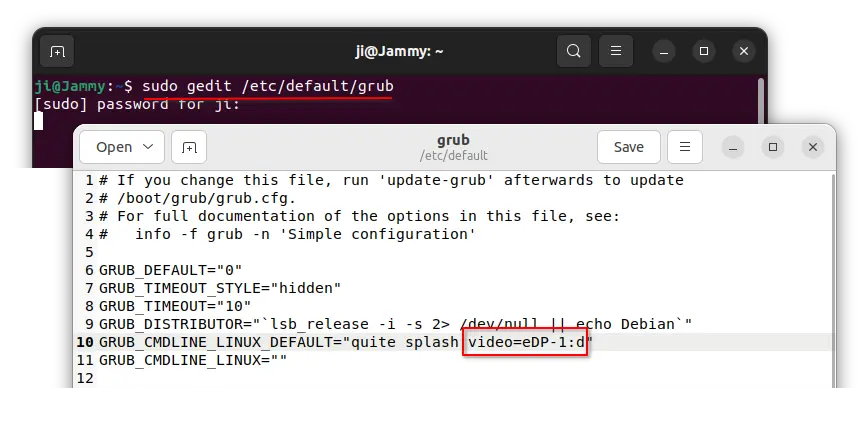
sudo gedit /etc/default/grub

Replace gedit with nano for Ubuntu 22.10 or other Linux. When file opens, add video=eDP-1:d as value of ‘GRUB_CMDLINE_LINUX_DEFAULT’. So the line will look like:

GRUB_CMDLINE_LINUX_DEFAULT="quite splash video=eDP-1:d"

Here ‘d‘ will disable the device. Though you have to change eDP-1 to your device name you got in last step.

After saving the change, run sudo update-grub to reload the Grub settings and done!

In addition, you may add video=Device-Name:e or video=Device-Name:D kernel parameter to force enable external monitor on startup if need.

This simple tutorial shows how to hide user list and/or enable touchpad tap clicking in login screen of Ubuntu 22.04 LTS.

GNOME, the default desktop environment, has some hidden keys to configure the login screen options. However, you need gdm (Gnome Display Manager) user privilege who handles the default login.

After following this tutorial, Ubuntu will no longer display usernames in login screen. Instead, you need to manually type user-name and then password to login.

Option 1: Single command to hide user list from login screen

Firstly press Ctrl+Alt+T keyboard shortcuts to open terminal. When it opens, run the commands below as you need.

1.) Install dbus-x11 inter-process messaging system by running command:

sudo apt install dbus-x11

Without the package, you’ll get following output when running command in step 2.) to hide user list or enable tap to click.

dconf-WARNING **: 15:23:16.101: failed to commit changes to dconf: Failed to execute child process “dbus-launch” (No such file or directory)

2.) To hide your usernames from login screen, use command:

xhost SI:localuser:gdm && sudo -u gdm gsettings set org.gnome.login-screen disable-user-list true

This command will first add user gdm into access control list. Then toggle the hidden ‘disable-user-list’ key via that user privilege.

For choice, you may also run the command below to enable tap-clicking in login screen.

xhost SI:localuser:gdm && sudo -u gdm gsettings set org.gnome.desktop.peripherals.touchpad tap-to-click true

To undo the changes, simply re-run the commands in step 2.) by replacing value ‘true‘ to ‘false‘.

Option 2: Use a graphical tool to configure login screen

There’s a new configuration tool, gdm-settings, under development for Ubuntu, Debian, Fedora, Arch and other Linux using GNOME Desktop.

The tool provides an elegant user interface specifically for configuring the GDM login screen, including:

  • change login screen background. (Not work for Ubuntu 22.04 so far, at least in my case)
  • Change fonts, scaling factor.
  • Configure login screen top bar.
  • Configure sound, touchpad behavior, nightlight, and more.

1.) Firstly, download gdm-settings from its project releases page:

So far, it’s AppImage package that works on most Linux!

2.) Right-click on the ‘AppImage’ package, and open its “Properties” dialog. Then enable ‘Allow executing file as program‘ under Permissions tab. Finally, right-click and select run it to launch the tool.

3.) When it opens, enable ‘tap-to-click’ under Touchpad tab, and disable user list under Miscellaneous.

After clicking ‘Apply’ and typing user password for authentication, you’ll see the changes in next login.

Ubuntu lists all the available user accounts in the GDM login screen. You can however remove them to protect your privacy.

Gnome, the default desktop environment, has a hidden option to force users to type the username and then password to login. If you’re working on public places, it will be good to enable this option for privacy concern.

1.) Firstly open terminal either from system app launcher or by pressing Ctrl+Alt+T on keyboard. Because the login screen is handled by gdm, you have to firstly run command to allows it to make connections to X server.

xhost SI:localuser:gdm

Though it says for X, you also need to run the command in Wayland session to avoid error to disable user list.

2.) Now run gsettings command to disable user list via user gdm:

sudo -u gdm gsettings set org.gnome.login-screen disable-user-list true

Type user password, no asterisk feedback, for sudo prompt and hit Enter.

In next boot, you will no longer see the user accounts. Instead, you need to type username and then password to login.

How to Reset:

To restore the login screen setting, also run both xhost and gsettings commands in a terminal window.

To be lazy, I’ll combine the two commands into single, so it will be:

xhost SI:localuser:gdm && sudo -u gdm gsettings reset org.gnome.login-screen disable-user-list

In addition for more Login Screen settings, e.g, disable ‘Power Off’ menu option, toggle authentications, you can open Dconf Editor (install it first from Ubuntu Software) via user gdm:

xhost SI:localuser:gdm && sudo -u gdm dconf-editor

gnome shell

Boring with the default purple login screen background in Ubuntu 17.10? Well, here’s how to make a change by hacking the css file.

Ubuntu 17.10 switches to Gnome 3 Desktop and GDM display manager. Although there are options to change desktop wallpaper and lock screen background (it’s actually screen saver with date & time displayed), the login screen is always purple.

GDM login background

In the picture above, I’ve changed the login background to the image “Aardvark_Wallpaper_Grey_4096x2304.png” locate in /usr/share/backgrounds.

1. Move your favorite image to /usr/share/backgrounds:

It’s better to move the image you want to set as login background to system pictures folder: /usr/share/backgrounds.

To do so, open terminal via Ctrl+Alt+T, then either run command:

sudo cp PATH/TO/YOUR/IMAGE /usr/share/backgrounds/

or run command to open file browser via root and then do copy and paste in that window:

xhost +local: && sudo nautilus /usr/share/backgrounds/

2. Edit the css file that define GDM login background:

Open terminal (Ctrl+Alt+T) and run command to edit file /etc/alternatives/gdm3.css, which is linked to /usr/share/gnome-shell/theme/gdm3.css:

xhost +local: && sudo gedit /etc/alternatives/gdm3.css

Input your password (no visual feedback while typing) when it prompts and hit Enter. And of course back up the file before editing.

3. When the file opens, go to menu (right after ‘Save’ button) -> find and find out following section:

#lockDialogGroup {
  background: #2c001e url(resource:///org/gnome/shell/theme/noise-texture.png);
  background-repeat: repeat; }

change the lines into:

#lockDialogGroup {
  background: #2c001e url(file:///usr/share/backgrounds/Aardvark_Wallpaper_Grey_4096x2304.png);
  background-repeat: no-repeat;
  background-size: cover;
  background-position: center; }

Replace Aardvark_Wallpaper_Grey_4096x2304.png with your picture file name.

Finally save the file and restart your computer to apply changes.

NOTE: these changes may be overwritten in case of an system update with GDM packages. Please let me know if you find a good way to change the GDM3 login background in Ubuntu 17.10.

capture login screen

This simple tutorial shows you how to capture screenshot of the LightDM / GDM login screen in Ubuntu, Elementary OS, or Pear OS.

Besides installing your system as Virtualbox or Vmware Guest OS, we can follow the steps below to capture and share our login screens.

1. Press Ctrl+Alt+T on your keyboard to open terminal. When it opens, run command blow to check out your display manager:

cat /etc/X11/default-display-manager
handbook@handbook-1310:~$ cat /etc/X11/default-display-manager 
/usr/sbin/lightdm

By default:

  • Ubuntu Unity and Elementary OS Luna uses LightDM
  • Pear OS 8 and Ubuntu Gnome uses GDM

2. Check out the value of $DISPLAY:

echo $DISPLAY
handbook@handbook-1310:~$ echo $DISPLAY
:0

3. Now create a simple script

echo 'sleep 20; DISPLAY=:0 XAUTHORITY=/var/run/lightdm/root/$DISPLAY xwd -root' > /tmp/shot.sh

You may change:

  • 20 : the seconds of delay.
  • :0 : the value of $DISPLAY. In my Pear OS 8, the value of $DISPLAY changes every login ($DISPLAY=$DISPAY +1).
  • lightdm : the display manager.

4. Press Ctrl+Alt+F1 and log into TTY1.

5. Run command below to start the script:

sudo bash /tmp/shot.sh >/tmp/shot.xwd

6. Return to GUI mode by pressing Ctrl+Alt+F1.

7. Logout by normal way. While you can see login screen, wait for some seconds.

8. Login by normal way. Install imagemagick if you don’t have it installed yet.

sudo apt-get install -y imagemagick

9. Run command below and finally you can check out the image under user Pictures folder.

convert /tmp/shot.xwd ~/Pictures/loginscreen.png