Archives For November 30, 2015

Battery Monitor

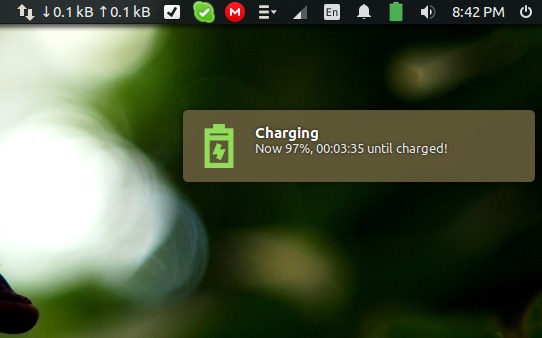
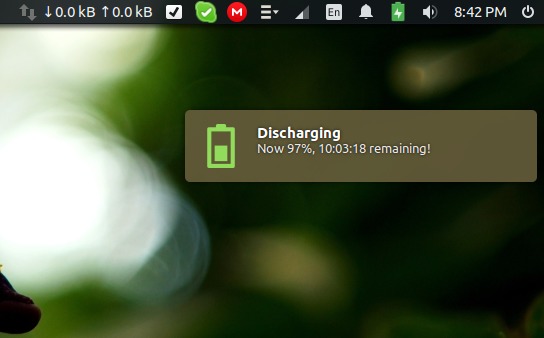
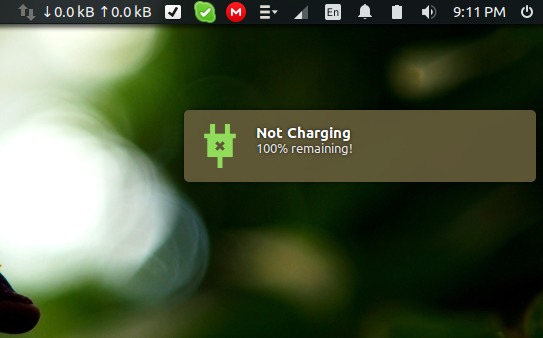
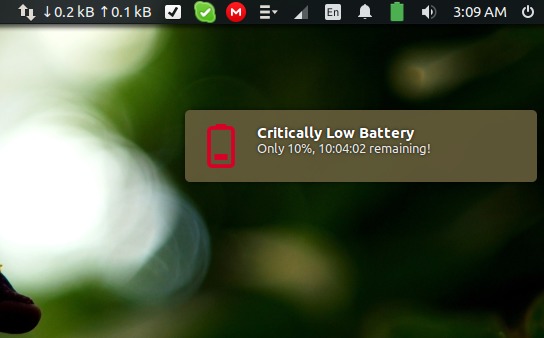
Battery Monitor is a simple tool written in Python3 and PyGTK3. It notifies battery status of charging, discharging, fully charged through desktop notifications. When the battery is below 10%, it plays a sound and pops up a notification bubble.

No command typing on terminal, no extra indicator, the tool just pop notifications when the battery status changes.

Battery charging battery discharging
battery is fully charged battery low

How to Install Battery Monitor in Ubuntu:

1. Use PPA.

Open terminal (Ctrl+Alt+T) and run the commands below one by one to install it from the PPA:

sudo add-apt-repository ppa:maateen/battery-monitor

sudo apt update

sudo apt install battery-monitor

So far, Ubuntu 16.04 and Ubuntu 14.04 are supported.

2. For those who don’t want to add PPA, grab the .deb installer from the release page.

Once installed, launch the tool via command battery-monitor for the first time. Or just restart, it will start in background automatically at login.

NOTE: The software is in very earlier stage, it may have bugs. Report issues and ask requests at https://github.com/maateen/battery-monitor/issues

To uninstall it, just run command:

sudo apt remove battery-monitor

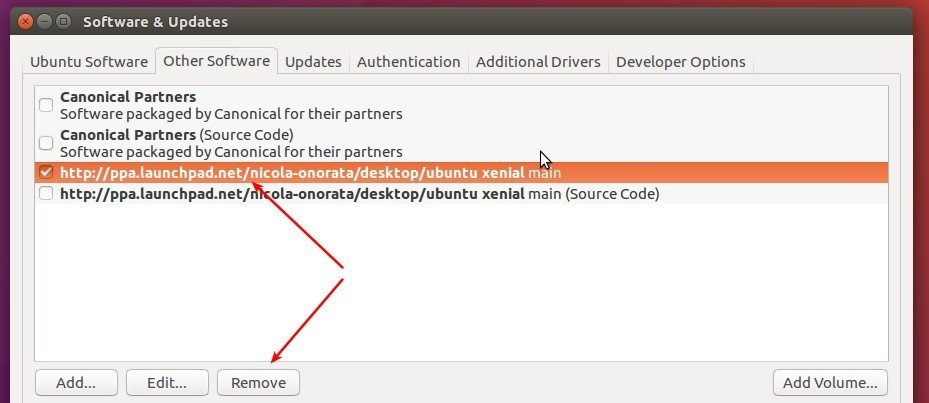
And remove the PPA if added via Software & Updates -> Other Software tab.

Ubuntu 16.04.1

The first point release of Ubuntu 16.04 LTS was released today with so many fixes, improvements, and Kernel and hardware support updates.

Updated CD images for Ubuntu 16.04.1 are available for download, including fixes for many hardware-specific bugs.

According to the change summary, Ubuntu 16.04.1 brings:

  • Some apt, systemd, dpkg and xinit bugs has been fixed in this release to fix upgrade issues.
  • some LibreOffice crash fixes.
  • Lots of fixes and improvements to Gnome Software (Ubuntu Software)
  • Enable the Snappy back-end for Gnome Software (Ubuntu Software)
  • Many many fixes to Unity, Unity Settings Daemon, compiz, lightdm display manager, oxide-qt browser engine, etc.
  • See the change summary for more details.

How to Upgrade to Ubuntu 16.04.1:

For Ubuntu 16.04, running a regular system update using Software Updater will bring you to Ubuntu 16.04.1.

update-ubuntu

Or run commands in terminal via:

sudo apt update && sudo apt upgrade

For Ubuntu 15.10 and Ubuntu 14.04, you may follow this guide to upgrade to 16.04.1.

You can upgrade directly from 14.04 to 16.04.1. Just make sure you have selected to notify LTS only in Software & Updates settings:

notify-lts

Cumulus Desktop Weather App

StormCloud, a stylish desktop weather app, now is resurrected! And it’s called Cumulus.

Cumulus is forked from Typhoon which is a community version forked from StormCloud 1.1. While Typhoon is not in active development, Daryl Bennett resurrect the weather app with the help of Typhoon developer in their spare time and its Cumulus.

Cumulus so far features:

  • temperature & wind speed support.
  • custom background color
  • adjust opacity
  • Unity Launch count that shows current temperature.

Cumulus weather app settings

cumulus

Known Bugs:

  • There are a few grey clouds spoiling an otherwise bright first run, including some opacity issues on first-run, dead links, broken support pages, and credits panel that credits the old developers.
  • Cumulus so far does not save location settings.

Download Cumulus:

The 64-bit .deb installer is available in the link below (PPA and snap package may be available in near future):

Download Cumulus Desktop Weather App

Click install the .deb package via Ubuntu Software and launch Cumulus from Unity Dash.

For those who have problem launching the app, try the command below to install gir1.2-webkit-3.0 in terminal (Ctrl+Alt+T):

sudo apt install gir1.2-webkit-3.0

via: OMG!Ubuntu!

MPV media player logo

MPV is a free and open-source media player forked from MPlayer2. It was started to modernize MPlayer by adding modern features, and removing unmaintainable code and dropping support for very old systems.

MPV uses FFmpeg or Libav for decoding, it can be used as a library in other applications (e.g., SMPlayer, and Gnome MPV).

Notable changes from MPlayer:

  • Through youtube-dl, MPV natively supports playback of HD content on YouTube and over 300 other supported sites.
  • include customizable video output driver based on OpenGL that supports for controlling playback quality
  • MPV can be used directly by other applications through a library interface called libmpv.
  • a new video encoding mode that can save playing files under different formats.

MPV

How to Install MPV in Ubuntu:

MPV is available in official Ubuntu repositories, but it’s old and Canonical does not provide updates for it. Besides building from the source code, you can install the latest version from this PPA.

1. To add PPA, open terminal (Ctrl+Alt+T) and run the command:

sudo add-apt-repository ppa:mc3man/mpv-tests

mpv-ppa

2. Then upgrade Mpv using Software Updater or just run the command in terminal to install/upgrade it:

sudo apt update && sudo apt install mpv

3. (Optional) To remove the PPA, go to Software & Updates -> Other Software tab. And remove mpv via command:

sudo apt remove mpv && sudo apt autoremove

Nvidia 367.35

Nvidia has recently announced the Linux driver 367.35 with GeForce GTX 1000 performance improvements and support for 8K H.265 video decoding.

Nvidia 367.35 release highlights:

  • Fixed a regression that could cause console corruption when resuming from suspend.
  • Improved buffer write performance of the nvidia-drm DRM KMS driver by using write-combined DRM Dumb Buffers where available
  • Fixed a bug that caused X to crash when applying changes to the RandR CscMatrix property while VT-switched away from X.
  • Fixed a bug that caused a crash when exiting nvidia-settings on displays with 8 or 15 bit color depths.
  • Added support for VDPAU Feature Set H to the NVIDIA VDPAU driver. GPUs with VDPAU Feature Set H are capable of hardware-accelerated decoding of 8192×8192 (8k) H.265/HEVC video streams.
  • Fixed a bug that caused the X server to sometimes skip displaying Vulkan frames when the Composite extension is enabled.
  • Added support for querying clock values on Pascal GPUs.
  • Removed the Base Mosaic configuration option from nvidia-settings on systems where the feature is not actually supported.
  • Fixed a bug that caused nvidia-smi to report an inaccurate version number.
  • Fixed a bug that could lead to a system crash if there was a peer-to-peer mapping still active during CUDA context teardown.
  • Fixed a bug that prevented nvidia-bug-report.sh from finding relevant messages in kernel log files.

How to Install Nvidia 367.35 in Ubuntu:

Graphics Driver Team has made the new driver release into PPA, available for Ubuntu 16.04, Ubuntu 15.10, Ubuntu 14.04, Ubuntu 12.04, and the next Ubuntu 16.10.

Follow the steps below to add PPA and install the driver:

1. Add Graphics Drive PPA, by opening terminal (Ctrl+Alt+T) and running the command:

sudo add-apt-repository ppa:graphics-drivers/ppa

nvidia-ppa
2. After that, install nvidia-367 driver using Additional Drivers utility.

additional-drivers

Or run the commands below one by one in terminal:

sudo apt update

sudo apt install nvidia-367

Finally restart your computer and done.

3. For any issue you may remove the driver via the steps below, and then install a different version of the driver.

  • press Ctrl+Alt+F1 to switch to command console and login
  • purge Nvidia driver via command sudo apt purge nvidia-*
  • reboot via command sudo reboot

GIMP 2.8.18 Released with Security Fix to XCF

Last updated: July 14, 2016

GIMP 2.8.18

GIMP image editor 2.8.18, a new point release in the stable branch, has been released to fix a vulnerability in the XCF loading code. With special XCF files, GIMP can be caused to crash, and possibly be made to execute arbitrary code provided by the attacker.

Besides this security fix, GIMP 2.8.18 also brings following changes:

  • Fix “GIMP is not responding” on initial startup on Windows and OS X.
  • Fix GUI crashed on OS X
  • Fix gamut warning color for lcms display filter
  • Fix unbolding of bold font on edit
  • Decrease installer size by changing compression settings
  • Many other fixes, translation and documentation updates.

GIMP image editor 2.8.18

How to Install GIMP 2.8.18 in Ubuntu:

GIMP does not provide official Linux binary package. But Otto Meier is maintaining a PPA with most recent packages. So far, Ubuntu 16.04, Ubuntu 15.10, Ubuntu 14.04, Ubuntu 12.04 and their derivatives are supported.

Check the PPA web page before starting following steps. It can take a little time to make the latest release into PPA.

1. Add the PPA.

Open terminal (Ctrl+Alt+T) and run command:

sudo add-apt-repository ppa:otto-kesselgulasch/gimp

add GIMP PPA

2. Upgrade GIMP using Software Updater.

Or run the command below one by one:

sudo apt update

sudo apt install gimp

3. (Optional) For any reason, you want to downgrade to stock version of GIMP in your Ubuntu. Install ppa-purge and purge the PPA:

sudo apt install ppa-purge && sudo ppa-purge ppa:otto-kesselgulasch/gimp

Ubuntu Input Method

As a Chinese user, I have never used iBus PinYin in Ubuntu. For me, one of the first things to do after a new Ubuntu installation is to install a Input Method.

As I know, there are two best Chinese IM for Ubuntu:

  • Fcitx – A flexible Input Method framework
  • Sogou PinYin – the most popular Chinese IM.

Install and Setup Fcitx:

Fcitx is an open-source and powerful IM framework that provides: Google PinYin, ShuangPin, SunPinYin, Wubi, ZhengMa, Hong Kong and TaiWan Traditional Chinese input methods, and more.

fcitx-googlepinyin

1. Fcitx is available in Ubuntu universe repository, so you can easily install it by opening terminal (Ctrl+Alt+T) and run:

sudo apt install fcitx fcitx-googlepinyin fcitx-table-wbpy fcitx-pinyin fcitx-sunpinyin

By typing sudo apt install fcitx- and hit TAB key, it will show you many other available plugins for fcitx.


2. After installed fcitx, launch Language Support utility and select use Fcitx:

3. Finally restart your computer and you’ll see a keyboard icon in panel. Go to Configure (see menu in the top picture) and do:

  • click the bottom left plus icon.
  • uncheck “only show current language” if you running the desktop with non-Chinese language.
  • scroll down and choose an IM you want
  • finally click OK.

To switch between English keyboard and Fcitx, use Ctrl+Space and then Ctrl+Shift to switch between installed Fcitx IMs.

Install and Setup SouGou PinYin:

SouGou PinYin for Linux is developed by Ubuntu Kylin Team and Sougou company. Its Windows version is one by the most popular IMs in China.

1. Sougou for Linux conflicts with some Fcitx libraries, so open terminal (Ctrl+Alt+T) and remove fcitx via command:

sudo apt remove fcitx* && sudo apt autoremove

2. Download the official Linux package from (run uname -m to tell your OS type):

Click install the .deb package via GDebi or Ubuntu Software. Or use command:

sudo apt install ~/Downloads/sogoupinyin*.deb 

3. After installing the IM, restart your computer and Sogou’s ready for use at next login.

sougou input method

Like Fcitx, you can press Ctrl+Space to switch between English keyboard and Sogou PinYin.

UPDATE: Installing SoGou PinYin will add a Kylin repository into your system, you may keep it and install the key so that apt update won’t boring you with missing GPG issue Recent version does no longer add any other source repositories.

virtualbox-icon245

Oracle Virtualbox has just reached a new major 5.1 release. Here’s how to install it in Ubuntu 16.04.

Virtualbox 5.1 ports its UI to Qt5, brings better Python 3 support, HDA (High Definition Audio) support for newer Linux guests, various VMM and other improvements and fixes.

Virtualbox release highlights:

  • VMM: new APIC and I/O APIC implementations that result in significantly improved performance in certain situations
  • VMM: added support for Hyper-V paravirtualized debugging of Windows guests
  • VMM: emulate even more MMIO and shadow pagetable exits without going back to user mode
  • GUI: overall migration to Qt5
  • GUI: passive API event listener improving the VM GUI performance and response time
  • Audio: added HDA (High Definition Audio) support for newer Linux guests
  • Audio: added on-demand timers which should improve the overall performance and reduce the CPU consumption
  • Audio: more fine-grained volume control for the AC’97 emulation, which now also takes the master volume control into account
  • better support for Python 3
  • For more details, see the ChangeLog.

Virtualbox 5.1

How to install Virtualbox 5.1 in Ubuntu:

1. The 5.1 release conflicts with the old 5.0 or 4.x releases, so first open terminal (Ctrl+Alt+T) and run command to remove the previous VBox installation:

sudo apt remove virtualbox virtualbox-5.0 virtualbox-4.*

2. Download Virtualbox 5.1 for your OS (i386=32bit, amd64=64bit):

Download Virtualbox for Linux

Then click install via Ubuntu Software.

3. For those who want to install VBox 5.1 from official Linux repository and receive future updates via Software Updater. Run the commands below one by one in terminal:

sudo sh -c 'echo "deb http://download.virtualbox.org/virtualbox/debian xenial contrib" >> /etc/apt/sources.list.d/virtualbox.list'

wget -q https://www.virtualbox.org/download/oracle_vbox_2016.asc -O- | sudo apt-key add -

sudo apt update

sudo apt install virtualbox-5.1

According to your Ubuntu codename, replace xenial with wily, trusty, or precise.

vlc_logo_icon

The latest stable VLC media player has reached the 2.2.4 release. While Ubuntu 16.04 provide the old 2.2.2 release in its universe repository, you may install / upgrade VLC via a PPA.

VLC 2.2.4 release highlights:

  • Fix crash in G.711 wav files
  • Fix mp3 crash in libmad
  • Fix out-of-bound write in adpcm QT IMA codec (VideoLAN-SA-1601, CVE-2016-5108)
  • Fix overlay creation on Windows XP for DirectDraw video output
  • Improve compilation support for GNU/HURD
  • Minor UI improvements for the Qt interface on Windows, Linux, BSD, …

VLC 2.2.3 release highlights:

  • Notable number of improvements, like green lines in the Windows video output and resuming where you left off.
  • It also improves our codec support by adding new formats and providing faster decompression.
  • More than 30 fixes for issues reported for 2.2.2.
  • You can finally open more than 15 elements from the Windows’ Explorer.

VLC 2.2.4 in Ubuntu 16.04

How to Install VLC 2.2.4 in Ubuntu 16.04:

1. Open terminal (Ctrl+Alt+T) and run the command below to add PPA:

sudo add-apt-repository ppa:nicola-onorata/desktop

Type in password (no visual feedback) when it asks and hit Enter.

VLC 2.2.4 PPA

2. Upgrade VLC via Software Updater, or run the commands below one by one:

sudo apt update

sudo apt install vlc

3. The PPA also contains a group of other apps, so you may remove the PPA after installing VLC by launching Software & Updates -> Other Software.

remove-vlc224-ppa

Change Folder Color

Want to make a difference on your file folders? There’s a simple Nautilus, Caja, Nemo extension called “Folder-Color” that allows to change the color or emblem of a folder, or set the global folder color from context menu.

Linux Mint has integrated this feature into its Cinnamon and MATE Desktops. All you have to do is to right-click on a folder and choose a color or emblem from “Folder’s color” menu:

Folder Color

Only for changing Folder Color:

For Ubuntu 16.04, the tool has been made into the universe repository, but it only allows to change the color of folder icons.

Open terminal (Ctrl+Alt+T) and run the command below to install it for Unity or Gnome:

sudo apt install folder-color

Install folder color

For MATE Desktop, use the command below instead:

sudo apt install folder-color-caja

Apply changes by running command nautilus -q or caja -q.

For Full Feature version:

For full feature version that changes the color or emblem and global folder color, use the developer’s PPA.

Open terminal and run commands to remove previous version and install the extension from PPA:

sudo apt remove folder-color folder-color-caja folder-color-common

sudo add-apt-repository ppa:costales/folder-color

sudo apt update

sudo apt install folder-color folder-color-caja

Also restart your file browser via command nautilus -q or caja -q.

For Ubuntu MATE, if this does not work for you, try the commands below and finally restart Caja browser:

sudo ln -s /usr/lib/i386-linux-gnu/girepository-1.0/Caja-2.0.typelib /usr/lib/girepository-1.0/Caja-2.0.typelib

sudo ln -s /usr/lib/x86_64-linux-gnu/girepository-1.0/Caja-2.0.typelib /usr/lib/girepository-1.0/Caja-2.0.typelib