![]()
This simple tutorial shows how to install get-iplayer and use it to download TV and radio programmes from BBC iPlayer/BBC Sounds for offline playback.
get-iplayer is a free and open-source app for Windows, macOS, and Linux. With it, you can searches and downloads your favorite BBC TV / radio programmes. Then play locally and legally in 30 days.
NOTE: For legal reason, you need a TV licence to download BBC TV/radio programmes! And, you have to delete them after 30 days of legal play!
Install get-iplayer in Ubuntu/Linux Mint
The project release page offers Windows and macOS installer. For Ubuntu and its based systems, it refers to a PPA repository, which so far supports Ubuntu 16.04, Ubuntu 18.04, Ubuntu 20.04, Ubuntu 22.04 and Ubuntu 22.10.
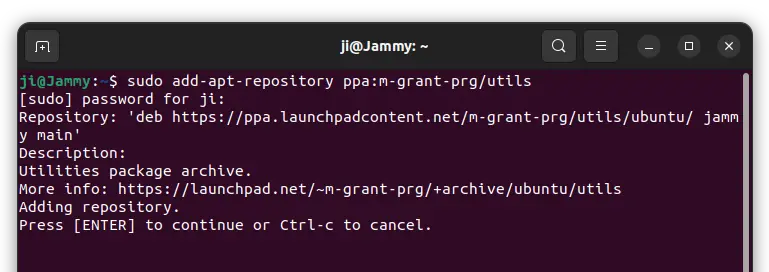
1. First, press Ctrl+Alt+T on keyboard to open terminal. When it opens, run command to add the PPA:
sudo add-apt-repository ppa:m-grant-prg/utils
Type user password (no asterisk feedback) when it asks and hit Enter to continue.
2. Then, run command to install the app package:
sudo apt install get-iplayer
For old Ubuntu and Linux Mint, run sudo apt update first to refresh package cache.

Use get-iplayer to download TV programmes
This is a command line tool! After installing it, run following commands at any time in a terminal to search and/or download your favorite programmes.
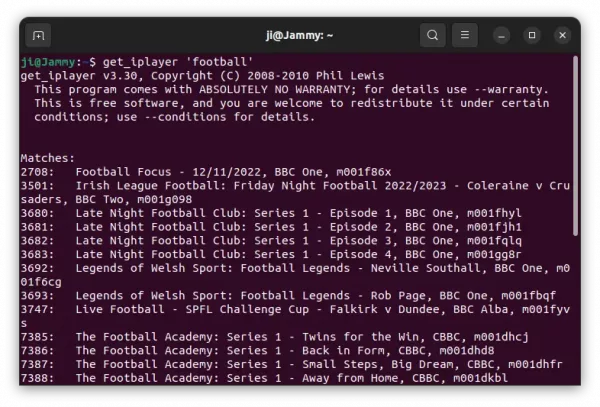
- To search for something, use command:
get_iplayer 'keyword here'
NOTE: get_iplayer can only search for programmes that were scheduled for broadcast on BBC linear services within the first 30 days! Those present more than 30 days can be downloaded directly via PID or URL
- To start downloading a programme, use command:
get_iplayer --get NUMBER_HERE
Replace NUMBER_HERE with the number in the search result. And, you can download more programmes at same time via multiple numbers. For example:
get_player --get 2708 3501 3680
- You may also download directly via an URL address, for example::
get_iplayer https://www.bbc.co.uk/programmes/b04n9p9c
- Or use PID, which is usually the random characters in URL address:
get_iplayer --pid b04n9p9c
Also, it supports downloading via multiple PIDs:
get_iplayer --pid id1 id2 id3 ...
The tool also has many other command line options, run man get_iplayer in terminal to read more.
Uninstall get-iplayer
To remove get-iplayer from Ubuntu/Linux Mint, open terminal and run command:
sudo apt remove --autoremove get-iplayer
Also, remove the Ubuntu PPA repository by running command:
sudo add-apt-repository --remove ppa:m-grant-prg/utils
That’s all. Enjoy!