Archives For November 30, 1999

bittorrent syncThis tutorial shows how to install BitTorrent server and desktop packages in Ubuntu 13.10 Saucy, 13.04 Raring, 12.10 Quantal, 12.04 Precise, 10.04 Lucid and Linux Mint via PPA repository.

As you may know, BitTorrent Sync is a proprietary peer-to-peer file synchronization tool available for Windows, Mac, Linux, and Android. It can sync files between devices on a local network, or between remote devices over the Internet via secure, distributed P2P technology.

Now there’s PPA repository offers ready to use server and desktop packages of the BitTorrent Sync application for Ubuntu and Linux Mint users.

Install BitTorrent Sync Server:

Press Ctrl+Alt+T to open terminal. When it opens, run below command to add the PPA:

sudo add-apt-repository ppa:tuxpoldo/btsync

Then run below commands to update package lists and install the server package:

sudo apt-get update; sudo apt-get install btsync

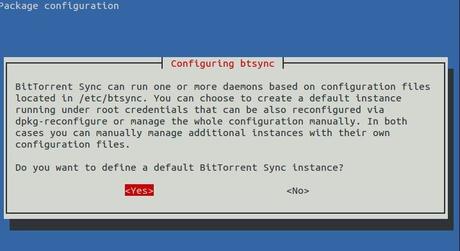
While the installation, you’ll get the configuration promts to setup download rate, listening ip and port, username and password to access the server.

bittorrent sync configuration

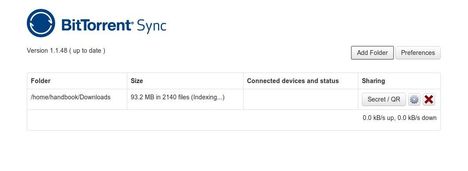
When everything is done, you can access it in your PC or Mobile Phone by going to http://ipaddress:8888/gui/

bittorrent sync client

banshee media playerWant to install or upgrade the latest version of Banshee Music Player? Well, here I’ll show you how to do it in Ubuntu and Linux Mint via its PPA repository.

At the moment of writing this tutorial, the latest release is Banshee 2.6.1 and it’s available for Ubuntu 13.10 Saucy, Ubuntu 13.04 Raring, Ubuntu 12.10 Quantal, Ubuntu 12.04 Precise, Ubuntu 11.10 Oneiric, and Linux Mint 15, 14, 13, 12.

Add Banshee PPA:

Press Ctrl+Alt+T to open terminal window for running commands. When it opens, copy below command and paste in terminal (Ctrl+Shift+V) and hit enter:

sudo add-apt-repository ppa:banshee-team/ppa

It will add the Banshee PPA repository to your system so that you can install and receive updates via package manager or apt-get command.

Install / Upgrade Banshee

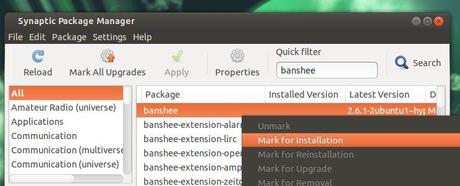
For Linux Mint users (and Ubuntu users with Synaptic installed), open Synaptic Package Manager from the start menu. Click Reload to update package lists, search banshee and mark for installation or upgrade by right-clicking on result. Finally click Apply to install / upgrade.

install / upgrade banshee synaptic

Both Linux Mint and Ubuntu can run below commands instead:

sudo apt-get update; sudo apt-get install banshee

Enjoy!

Firefox Logo

Mozilla finally announced the stable released of Firefox 23. Ubuntu users will receive updates very soon. Here’s a guide to upgrade your Firefox to latest in Ubuntu 13.04 Raring, 12.04 Precise and 12.10 Quantal.

In the new release, the mixed content blocking has been enabled to protect users from eavesdroppers and man-in-the-middle attacks on HTTPS pages, the about:memory’s functional UI (user interface) has been improved, the notifications of plugin installation has a simpler interface, and social share functionality has been added. (Release note)

Upgrade to Firefox 23 in Ubuntu:

Synaptic Package Manager provides a graphical way to upgrade to the latest Firefox web browser.

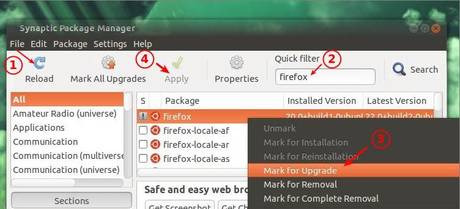
To get started, open the tool and click Reload button to update package lists, search firefox in the box, right-click and choose “Mark for Upgrade”, and finally click the Apply to start upgrading.

upgrade firefox

To install Synaptic Package Manager, click the link below to launch Ubuntu Software Center and click to install the package.

Click to install Synaptic

This tutorial shows you how to enable transparent top panel and titlebar in Unity Desktop, tested in Ubuntu 13.10 Saucy, 13.04 Raring.

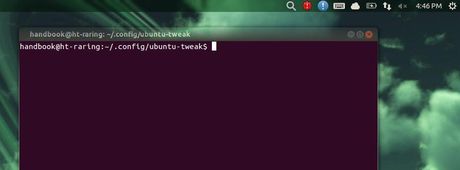
transparent panel and titlebar

Transparent Panel in Unity:

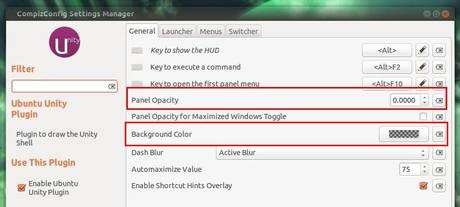
The CompizConfig Settings Manager has the opition to set panel opacity. It’s a little different to Ubuntu 12.04 Precise. Now the option is under Ubuntu Unity Plugin -> General tab.

To get totally transparent panel:

      Set the value of Panel Opacity to 0
      Click to edit Background Color, change Opacity to 1

full transparent panel

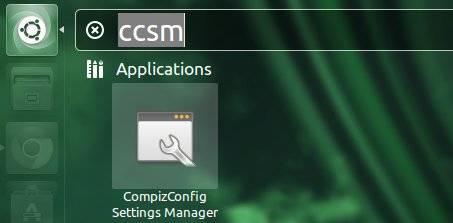
To install CompizConfig Settings Manager, click the link below to bring up Ubuntu Software Center and click install button.

click to install CCSM

compizconfig settings manager

Transparent titlebar in Unity:

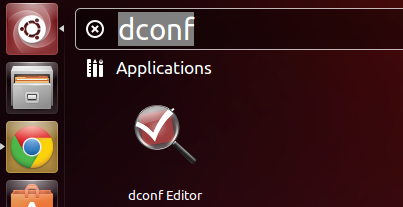
Without installing special themes, you can directly adjust window titlebar transparency in Ubuntu Unity via Dconf Editor which is installed by default.

dconf editor in unity dash

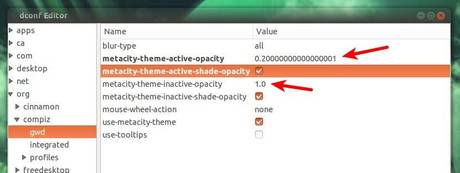
Open dconf editor, then navigate to org/compiz/gwd. Change the value of “metacity-theme-active-opacity” and “metacity-theme-inactive-opacity” to set transparent titlebar for both focus & un-focus windows.

change titlebar transparency

The Netflix Desktop App has updated to version 0.8.0. This tutorial shows you how to install / upgrade it in Ubuntu 13.10 Saucy, 13.04 Raring, 12.04 Precise and 12.10 Quantal.

netflix desktop app

In this release, it updated the French, Uyghur, Spanish translation, fixed some bugs and also added some new features. Here’s the details:

  • Added support for beesu sudo GUI.
  • Added a new package for loading Katsomo.
  • Updated the British English translation.
  • Updated the icon for the Maxdome package.
  • Replace test-xattr binary with python script.
  • Fixed tab characters in the command-line help.
  • Updated to the latest release of Firefox (22.0).
  • Now using a workaround for Katsomo locking up on exit.
  • Moved downloaded files to /var/lib/wine-browser-installer.
  • Disabled the client side graphics workaround on new Wine versions.
  • Disabled screensaver/suspend operations while the browser is running.
  • Added an override for the User Agent string so that Netflix always sees Firefox 18.0.
  • Now using fontconfig, in addition to debconf, to establish that msttcorefonts is installed.
  • Fixed dependencies so that the services could not get out of sync with wine-browser-installer

The Netflix PPA has updated for Ubuntu 13.10, 13.04, 12.10, 12.04 and 10.04 users. To add this repository, press Ctrl+Alt+T to open terminal. When it opens, run below commands:

sudo add-apt-repository ppa:ehoover/compholio

add netflix ppa

After that, you can install the Netflix desktop app or receive updates when a new release comes out via below commands:

sudo apt-get update; sudo apt-get install netflix-desktop

install netflix desktop app

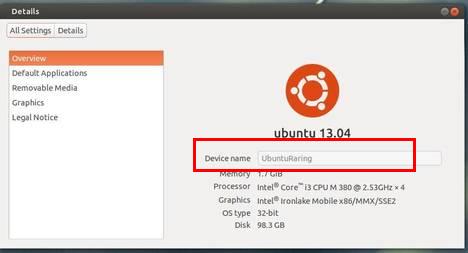
Here’s a beginners’ guide to change your hostname or computer name in Ubuntu 13.04 Raring Ringtail. The default PC name was set when you were installing Ubuntu. You can easily change it to whatever you want both in Ubuntu Server and Desktop with this tutorial. To check your current name, go to top-right corner “gear” button -> About This Computer.

ubuntu hostname

Change Hostname in graphical way:

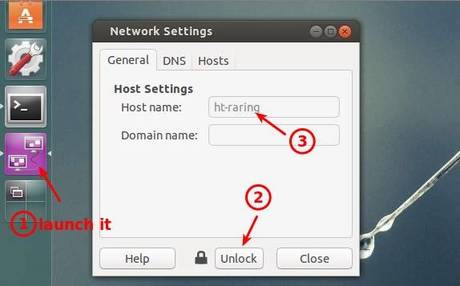
There’s a graphical tool called gnome-network-admin, it provides a simple way to change your computer name in Ubuntu Desktop.

change hostname in gui

You can search for and install this tool from Ubuntu Software Center. Or click the link below to launch it:

click to install gnome-network-admin

Change Hostname in Command Line:

If you’re comfortable with editing a configuration file and running some terminal commands it’s not difficult to change your PC name manually.

To check current hostname, run below commands:

hostname

To set a hostname until you restart, run:

sudo hostname YOUR_NEW_NAME

To change your computer name permanently, edit both /etc/hostname and /etc/hosts with your favorite editor and change your previous name to whatever you want.

If you’re dual booting Ubuntu with Windows 7 or other Operating Systems, you may wish to change boot order to set which OS starts by default. Well, In this tutorial I’ll show you how to do it in Ubuntu 13.10 Saucy and 13.04 Raring.

grub2 boot loader

There’s a GUI (graphical user interface) tool for editing Grub 2 boot loader, it called Grub-Customizer. You can install it in Ubuntu using the PPA repository. To do so, press Ctrl+Alt+T to open terminal, then run below commands one by one:

sudo add-apt-repository ppa:danielrichter2007/grub-customizer

sudo apt-get update

sudo apt-get install grub-customizer

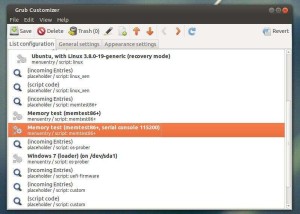
With Grub-Customizer, highlight the OS entry and click up / down arrow button to change its order. Or set the default OS in General Settings tab.

change boot order via grub customizer

If you’re comfortable with running some terminal commands, it’s not difficult to change default OS without installing any third-party program.

1.) Press Ctrl+Alt+T to open terminal. Edit the “/etc/default/grub” via below command and change GRUB_DEFAULT=0 to GRUB_DEFAULT=saved. This will make it easy to change default OS later.

sudo gedit /etc/default/grub

2.) Update grub to apply changes to grub configuration:

sudo update-grub

3.) After that, you can run sudo grub-set-default with the number of menu entry to boot (the first entry is 0) at any time, which will set the entry as default OS permanently. Or run sudo grub-reboot only for next boot.

For example, below command will set Windows 7 as default OS (Windows 7 is 4 in picture at top) permanently.

sudo grub-set-default 4

The latest stable Linux Kernel 3.10.5 has been released. All users of the 3.10 kernel series are urged to upgrade as soon as possible. Here’s how to install / upgrade in Ubuntu 13.04 Raring, 12.04 Precise and 12.10 Quantal.

install kernel 3.10.5 ubuntu

UPDATE: The 3.10 kernel series has reached 3.10.6, see this tutorial.

Linux kernel 3.10.5 contains lots of fixes and improvements, such as updated video drivers (Radeon, i915, Nouveau, etc.), updated iSCSI, MD, RAID, Wireless, ATA, SATA, ACPI and USB drivers, as well as sound improvements.

Install / Upgrade Kernel 3.10.5

Press Ctrl+Alt+T to open terminal for running commands. When it opens, follow below steps:

For 32-bit system, run below commands to download the Debs:

wget http://kernel.ubuntu.com/~kernel-ppa/mainline/v3.10.5-saucy/linux-headers-3.10.5-031005-generic_3.10.5-031005.201308040618_i386.deb

wget http://kernel.ubuntu.com/~kernel-ppa/mainline/v3.10.5-saucy/linux-headers-3.10.5-031005_3.10.5-031005.201308040618_all.deb

wget http://kernel.ubuntu.com/~kernel-ppa/mainline/v3.10.5-saucy/linux-image-3.10.5-031005-generic_3.10.5-031005.201308040618_i386.deb

For 64-bit system, run beloww commands instead:

wget http://kernel.ubuntu.com/~kernel-ppa/mainline/v3.10.5-saucy/linux-headers-3.10.5-031005-generic_3.10.5-031005.201308040618_amd64.deb

wget http://kernel.ubuntu.com/~kernel-ppa/mainline/v3.10.5-saucy/linux-headers-3.10.5-031005_3.10.5-031005.201308040618_all.deb

wget http://kernel.ubuntu.com/~kernel-ppa/mainline/v3.10.5-saucy/linux-image-3.10.5-031005-generic_3.10.5-031005.201308040618_amd64.deb

After downloading the packages, both 32-bit & 64-bit can run below commands to install them:

sudo dpkg -i linux-headers-3.10.5*.deb linux-image-3.10.5*.deb

Once installed, update grub to apply changes:

sudo update-grub

(Optional) To remove Linux Kernel 3.10.5, run below commands in terminal:

sudo apt-get purge linux-image-3.10.5*

The desktop publishing app Scribus has reached version 1.4.3, this tutorial will show you how to install it in Ubuntu 13.04, 12.04, 12.10, 10.04, Linux Mint via its official repository.

Scribus Ubuntu

UPDATE: Latest Stable Scribus 1.4.4 Now is available in PPA for Ubuntu 14.04, Ubuntu 13.10, and Ubuntu 12.04.

Like the previous version, this is mostly a bugfixing release, but there are also some important enhancements:

  • Scribus has been ported to the Haiku operating system. For more information see: Installing_Scribus_on_Haiku
  • The Barcode Writer has been updated and supports many more barcodes, including QR.
  • The Galaxy Gauge™ color matching system and color tools have been included.
  • New color palettes from government agencies (Canada, Germany, The Netherlands, United Kingdom) have been included.
  • More Open Source color palettes have been included.
  • Improvements to the build system.
  • Improvements to the Preflight Verifier.
  • The A4 page size limit of TeX-rendered graphics in Render Frames has been removed.
  • The Short Words plug-in now supports Danish.
  • Many updates to the Online Manual.

Most important bugfixes:

  • Disabled hyphenation on some Linux distributions is working again.
  • Some unit conversion issues have been fixed.
  • Display issues related to Ubuntu’s Unity interface have been fixed.
  • Some fixes to wrong or irritating UI behavior.
  • Memory management in connection with the new Hyphenator has been optimized.
  • Issues with the Clang compiler have been fixed.
  • Scribus now supports Pillow as an alternative to the Python Imaging Library.
  • Many translation updates.

Install Scribus from Official Repository:

Press Ctrl+Alt+T to open terminal for running commands. When it opens, follow below steps:

1.) Run command to add the Scribus repository:

sudo add-apt-repository "deb http://debian.scribus.net/debian/ $(lsb_release -cs) main non-free"

2.) Get the key:

gpg --keyserver wwwkeys.pgp.net --recv-keys EEF818CF

Export the key and add it to the apt keyring:

gpg --armor --export EEF818CF | sudo apt-key add -

3.) update and install the packages:

sudo apt-get update; sudo apt-get install scribus

That’s it! After this tutorial, you can redo step 3.) to receive updates when a new release comes out.

Enable Nautilus Preview in Ubuntu 13.04, 13.10

Last updated: August 4, 2013

Want to preview documents on Nautilus file browser? Well, here I’m going to show you how to do it. As well as preview files folders, you’ll be able to previewing Pictures, Movies, Music, and everything that can be opened in your system.

nautilus preview folder nautilus preview mp3
nautilus preview movie nautilus preview files

To get started, install the Sushi plugin for Nautilus in Ubuntu. You can search for and install the gnome-sushi from Ubuntu Software Center. Or just click the link below to bring up USC:

click to install sushi preview

That’s it!

You may need to install multi-media codecs to enable previewing movies. Press Ctrl+Alt+T to open terminal. When it opens, run below commands to install media codecs:

sudo apt-get install gstreamer0.10-plugins-ugly gstreamer0.10-ffmpeg libxine1-ffmpeg gxine mencoder libdvdread4 totem-mozilla icedax tagtool easytag id3tool lame nautilus-script-audio-convert libmad0 mpg321 gstreamer1.0-libav

Restart Nautilus to apply the changes:

nautilus -q

You’re done. Enjoy!