Archives For March 31, 2017

Ubuntu 12.04 LTS Has Reached the End of Life

Last updated: April 29, 2017

Ubuntu 12.04

Ubuntu 12.04 Precise Pangolin LTS (Long-Support Term) reached the end of its life yesterday on April 28 2017.

The news team announced on the Ubuntu Fridge a month ago:

Ubuntu announced its 12.04 (Precise Pangolin) release almost 5 years ago, on April 26, 2012. As with the earlier LTS releases, Ubuntu committed to ongoing security and critical fixes for a period of 5 years. The support period is now nearing its end and Ubuntu 12.04 will reach end of life on Friday, April 28th. At that time, Ubuntu Security Notices will no longer include information or updated packages for Ubuntu 12.04.

If you want to upgrade your Ubuntu 12.04 LTS installation, you may first upgrade to Ubuntu 14.04 LTS, supported until April 2019, and then to Ubuntu 16.04 LTS, supported supported until April 2021.

For users who can’t upgrade immediately, Canonical has announced an extended support package for Ubuntu Advantage customers:

Following the end-of-life of Ubuntu 12.04 LTS, Canonical is offering Ubuntu 12.04 ESM (Extended Security Maintenance), which provides important security fixes for the kernel and the most essential user space packages in Ubuntu 12.04. These updates are delivered in a secure, private archive exclusively available to Ubuntu Advantage customers.

All Ubuntu 12.04 LTS users are encouraged to upgrade to Ubuntu 14.04 LTS or Ubuntu 16.04 LTS. But for those who cannot upgrade immediately, Ubuntu 12.04 ESM updates will help ensure the on-going security and integrity of Ubuntu 12.04 systems.

Users interested in Ubuntu 12.04 ESM updates can purchase Ubuntu Advantage at http://buy.ubuntu.com/

The LiVES video editor and VJ tool has reached the 2.8.5 release. The new release features experimental support for Wayland.

Besides the Wayland support, LiVES 2.8.5 includes following changes

  • Fix audio loss when inserting without audio in clip editor (regression).
  • Fix compiler error and warnings for gcc 7
  • Fix regression in mkv_decoder.
  • Fix compiler warnings for openGL plugin.
  • Change max seek allowed from 1 second to 2 seconds in avformat decoder.
  • Update css state selectors for gtk 3.18+
  • Updated translation to Ukranian (thaks Yuri).

LiVES 2.85

How to Install LiVES 2.8.5 in Ubuntu:

For Ubuntu 14.04, Ubuntu 16.04, Ubuntu 16.10, Ubuntu 17.04, and derivatives, you can install LiVES 2.8.5 from the unofficial PPA.

1. Open terminal via Ctrl+Alt+T or by searching for “Terminal” from start menu. When it opens, run command:

sudo add-apt-repository ppa:ubuntuhandbook1/lives

Type in your password (no visual feedback due to security reason) and hit Enter.

2. If you have a previous release installed, launch Software Updater (Update Manager) to upgrade LiVES after checking for updates:

Or just run commands to install the editor for the first time:

sudo apt update && sudo apt install lives lives-plugins

Uninstall:

To remove LiVES video editor, either use your system package manager or run command in terminal:

sudo apt remove lives lives-plugins && sudo apt autoremove

And remove the PPA by going to System Settings -> Software & Updates -> Other Software tab.

The Budgie desktop environment 10.3 was released a few days ago. Here’s how to install it in Ubuntu 16.04, Ubuntu 16.10, and/or Ubuntu 17.04.

The Ubuntu Budgie team announced the release of Budgie 10.3 as the final release of the 10.x series. And the Qt 5-based Budgie Desktop 11 is now under development.

Budgie 10.3 features:

  • Supports the downloading of artwork for the MprisClient.
  • New and improved Alt-Tab keyboard app switcher.
  • Adds a couple of customization options for the Clock Applet.
  • Option to choose a left or right window button layout.
  • Various Budgie applets bug fixes and more.

How to Install Budgie 10.3 in Ubuntu:

For Ubuntu 16.04 & Ubuntu 16.10:

The budgie-remix PPA contains the Budgie Desktop 10.3 for Ubuntu 16.04, Ubuntu 16.10 and derivatives.

1. Open terminal via Ctrl+Alt+T or by searching for “Terminal” from start menu. When it opens, run command to add the PPA:

sudo add-apt-repository ppa:budgie-remix/ppa

Type in your password (no visual feedback due to security reason) when prompts and hit enter.

2. Then check updates and install the desktop environment via commands:

sudo apt update && sudo apt install budgie-desktop budgie-indicator-applet

3. After that, you may remove the PPA repository because it contains a newer version of Nautilus for Ubuntu 16.04. To do so, go to System Settings -> Software & Updates -> Other Software tab.

For Ubuntu 17.04:

For Ubuntu 17.04 Zesty, the backports PPA is available.

1. To add the PPA, open terminal via Ctrl+Alt+T and run command:

sudo add-apt-repository ppa:ubuntubudgie/backports

2. Then check updates and install the desktop via commands:

sudo apt update && sudo apt install budgie-desktop budgie-indicator-applet

Once installed, log out and choose log in back with Budgie.

Uninstall:

To remove the Budgie desktop environment, simply run following command in terminal:

sudo apt remove budgie-desktop budgie-indicator-applet && sudo apt autoremove

To remove the PPAs, go to System Settings -> Software & Updates -> Other Software tab.

Luminance HDR

Luminance, a complete workflow for HDR imaging, finally got a new release more than three years after the last.

Luminance HDR is a graphical user interface (based on the Qt5 toolkit) that provides a complete workflow for HDR imaging. It supports following HDR formats: OpenEXR (exr), Radiance RGBE (hdr), Tiff formats: 16bit, 32bit (float) and LogLuv (tiff), Raw image formats (various), PFS native format (pfs). And it supports JPEG, PNG, PPM, PBM, TIFF, FITS LDR formats.

The latest Luminance HDR 2.5.0 features:

  • Two brand new tonemapping operators: ferradans and mai
  • Optional automatic adjustment of LDRs levels
  • Greater EV values range in HDR Creation Wizard
  • Restore load/save curves in HDR Creation Wizard
  • Better HiDPI support
  • Better CLI interface
  • Fix various crashes
  • “Fast Export”, which renders current image in full size
  • List version of supported cameras for RAW files (and some libraw info)
  • Export to HTML (Create a webpage with embedded HDR viewer)
  • Better printing support and print preview in Help Browser
  • A new “Dark Theme” (beta) and native platform icons support
  • Switch UI full screen (F11), show LDRs and HDRs images full screen (F10)
  • Portuguese (Brazilian) translation
  • Other small impovements and bugfixing as usual

For Ubuntu 16.04, Ubuntu 16.10, Ubuntu 17.04, and their derivatives, the 2.5.0 release is available via the PPA repository.

To install it, open terminal via Ctrl+Alt+T or by searching “Terminal” from start menu, and then do following steps:

1. Run command to add the PPA repository:

sudo add-apt-repository ppa:dhor/myway

Type in your password (no visual feedback due to security reason) when prompts and hit Enter.

2. If you have a previous release installed, now launch Software Updater (Update Manager) to upgrade it:

Or run following commands to check updates and install Luminance HDR:

sudo apt update && sudo apt install luminance-hdr

How to Uninstall:

The PPA repository can be removed by going to System Settings -> Software & Updates -> Other Software tab. To remove the software, either use your system package manager or run command:

sudo apt remove --autoremove luminance-hdr

MPV media player logo

MPV, an open-source MPlayer and MPlayer2 based media player, has reached the 0.25 release two days ago. Here’s how to install it in Ubuntu 16.04 LTS.

MPV 0.25 drops support for OS X 10.7 and earlier. Support for some optical media functionality (DVD/CD) is now disabled by default. More parts of the player are now licensed under LGPL. New features include:

  • TOOLS: add acompressor.lua script for runtime acompressor ffmpeg filter control
  • dvb: add support for DVB-T2
  • lavfi: support hwdec filters for –lavfi-complex
  • macOS: initial Touch Bar support
  • osc: add volume button (mouse wheel to change volume)
  • sub: add SDH subtitle filter
  • vo_opengl: add experimental vdpauglx backend
  • vo_opengl: implement videotoolbox hwdec on iOS

There are also lots of bug-fixes, minor enhancements, and other changes in this release. See the release note for details.

MPV

How to Install MPV 0.25 in Ubuntu 16.04:

MPV does not provide official Linux binaries, but it refers to a third-party PPA which so far offers the 0.25 release for Ubuntu 16.04, Linux Mint 18, and derivatives.

To install it, open terminal via Ctrl+Alt+T or by searching for “Terminal” from start menu. When it opens, do:

1. add the PPA repository via command:

sudo add-apt-repository ppa:mc3man/mpv-tests

Type in your password (no visual feedback due to security reason) when prompts and hit Enter.

2. If you have a previous release installed, you can now launch Software Updater and upgrade the software after checking for updates:

Or just run commands to install it for the first time:

sudo apt update && sudo apt install mpv

Uninstall:

For any reason, you can remove the PPA easily by going to System Settings -> Software & Updates -> Other Software tab. And remove the player via command:

sudo apt remove mpv && sudo apt autoremove 

How to Install Google Earth in Ubuntu 17.04

Last updated: April 23, 2017

This quick tutorial is going to show you how to install the latest Google Earth in Ubuntu 17.04 Zesty Zapus by adding the Google Earth Linux repository.

Although you can download Google Earth, Google Earth Pro, or Google Earth Enterprise Client packages from their direct web pages, here’s how to add the single Linux repository, select install one of them, and receive automatic updates via update manager.

Open terminal by pressing Ctrl+Alt+T or searching for “Terminal” from the start menu. When it opens, run following commands one by one:

1. Run command to download and install the Google keyring:

wget -q -O - https://dl.google.com/linux/linux_signing_key.pub | sudo apt-key add -

Type in your password (no visual feedback due to security reason) when it asks and hit Enter.

2. Then run command to add Google Earth for Linux repository:

sudo sh -c 'echo "deb http://dl.google.com/linux/earth/deb/ stable main" >> /etc/apt/sources.list.d/google-earth.list'

3. Finally, you can search for and install google-earth via Synaptic Package Manager after clicking Refresh.

Or run command to check updates and install Google Earth:

sudo apt update

sudo apt install google-earth-stable

For choices, you may replace google-earth-stable in command with:

  • google-earth-pro-stable for Google Earth Pro edition.
  • google-earth-ec-stable for Google Earth Enterprise Client.

Uninstall:

To remove the repository, simply go to System Settings -> Software & Updates -> Other Software tab.

To remove Google Earth, either use Synaptic Package Manager or run command:

sudo apt remove google-earth-* && sudo apt autoremove

Firefox 53

Mozilla Firefox has reached the 53.0 release. It features two new ‘compact’ themes and separate process for graphics compositing.

Firefox 53.0 release highlights:

  • Graphics stability for Windows users with compositor process separation (Quantum Compositor)
  • Two new ‘compact’ themes available, dark and light
  • Reader Mode now displays estimated reading time for the page
  • New visual design for audio and video controls
  • Drop Windows XP, Vista, and 32-bit Mac OS X support.
  • Drop Linux support for processors older than Pentium 4 and AMD Opteron
  • Various security fixes. See the release note

Firefox Compact Themes

Install Firefox 53 in Ubuntu:

The new release will be made into official Ubuntu repository soon, available for Ubuntu 12.04, Ubuntu 14.04, Ubuntu 16.04, Ubuntu 16.10, Ubuntu 17.04, and derivatives.

Just keep your Ubuntu up-to-date by installing regular updates via Software Updater, and you’ll get Firefox 53 once it’s published in THIS PAGE.

For non-install version, go to the official FTP download page:

Download Firefox 53

Grab the Linux package, extract and run executable file to launch Firefox 53.

Wire, an open source, encrypted instant messaging client created by Wire Swiss, finally gets an official APT repository for Debian-based distributions to make it easy to install and receive automatic updates to the app.

The team announced the APT repository for Wire Desktop:

Today we’re happy to take a big step forward — Debian-based distributions (like Ubuntu or Mint) can now get Wire Desktop via APT. You can receive updates of Wire through the update mechanism of your own package management system. Updates are automatic and more secure as we sign the repositories with a PGP key.

Open terminal by pressing Ctrl+Alt+T, and get started by following steps to add Wire repository and install Wire for Desktop:

1. If you already installed Wire, uninstall it (don’t worry, your history will be kept):

sudo apt-get remove wire

2. Install apt-transport-https to receive the package via HTTPS

sudo apt-get install apt-transport-https

3. Import the PGP signing key to be able to verify the downloaded package:

sudo apt-key adv --fetch-keys http://wire-app.wire.com/linux/releases.key

4. Add our repository address to your sources list:

echo "deb https://wire-app.wire.com/linux/debian stable main" | sudo tee /etc/apt/sources.list.d/wire-desktop.list

5. Finally update and install wire-desktop:

sudo apt-get update

sudo apt-get install wire-desktop

After that, you can receive automatic updates to this app via Software Updater utility.

Uninstall:

To uninstall Wire desktop client, run command:

sudo apt-get remove wire-desktop && sudo apt-get autoremove

To remove the APT repository, go to Software & Updates -> Other Software tab.

remove wire repository


Your preferred screen resolution is not available in the Display settings? Well, here I’m going to show you how to add a custom screen resolution in your Ubuntu desktop.

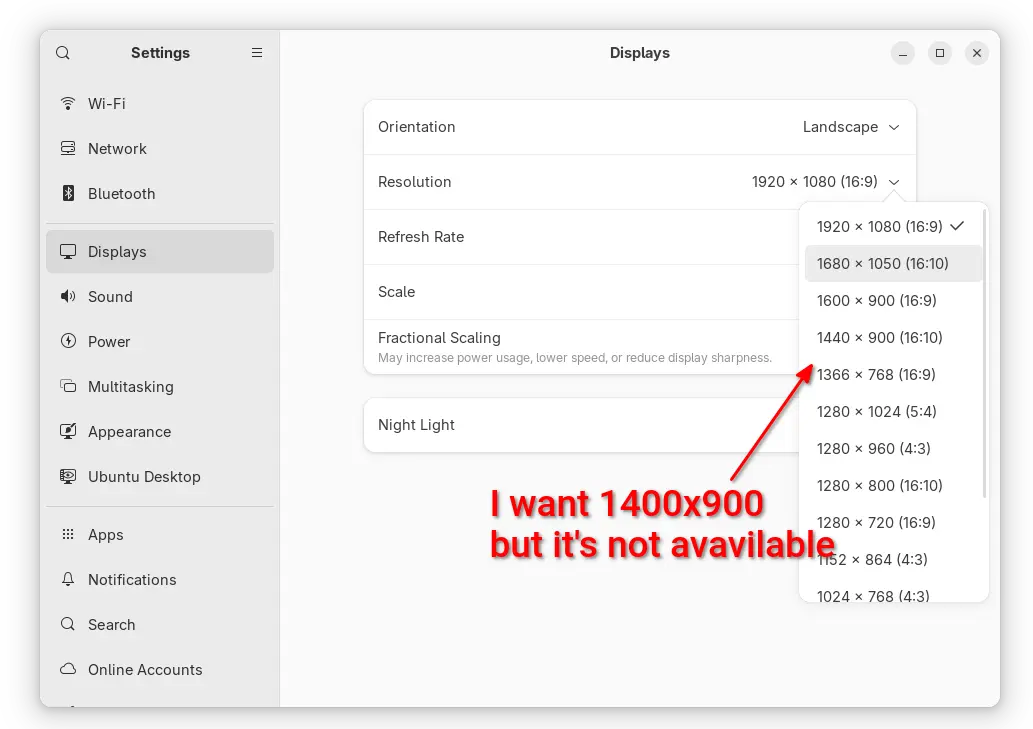
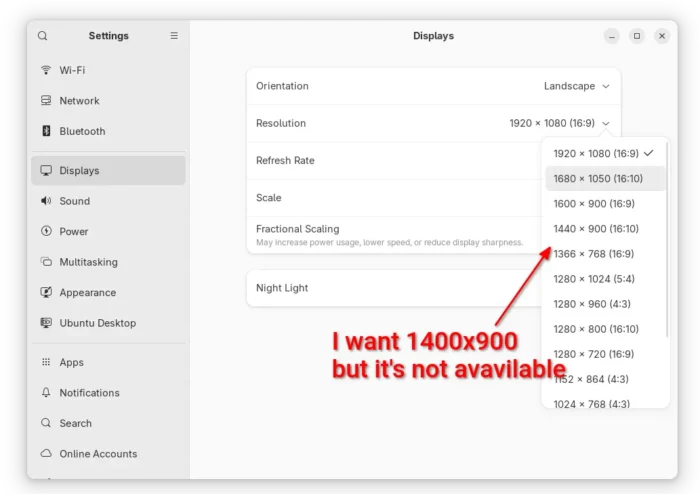
On my Ubuntu Desktop, the default 1920X1080 (16:9) resolution is kinda high for me. Though there are options to scale for menu, title bars, and text, I prefer 1400X900 (3:2) which however is not available to choose from display setting panel.

To do the job, I found 2 solutions that work in all current Ubuntu releases:

  • add Kernel parameter at startup, which works in both Wayland and Xorg sessions.
  • use xrandr, but it works for X11/Xorg session only.

And they are tested and work in my case in Ubuntu 18.04, 20.04, 22.04, 24.04, and 25.04.

Method 1: Add custom screen resolution as Kernel parameter

1. Find out display device name.

Before getting started, you need to find out the device name of your displays.

For X11/Xorg session, simply press Ctrl+Alt+T to open terminal. Then, run the command below:
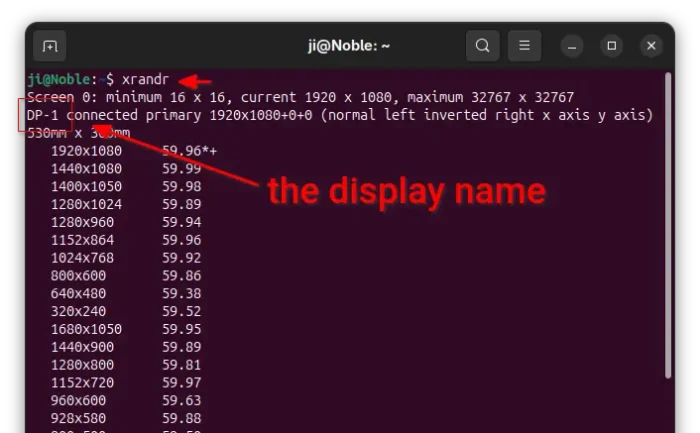
xrandr

It will output all connected displays as well as available screen resolutions. Here you need to find out and remember the display names. In my case as the screenshot shows, it’s DP-1.

For Wayland, which is the default session since Ubuntu 22.04, open terminal and run the command below instead:

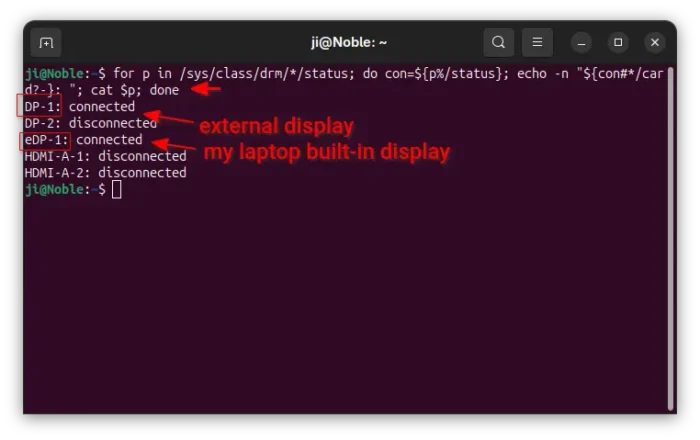
for p in /sys/class/drm/*/status; do con=${p%/status}; echo -n "${con#*/card?-}: "; cat $p; done

This command will look for all devices under /sys/class/drm directory, print the names and their status (connected or not). In my case, I have 2 displays connected. They are eDP-1 laptop built-in display, and DP-1 external display.

2. Add Kernel Parameter.

For Ubuntu booted with its built-in Grub boot-loader, user can edit the /etc/default/grub file to add kernel parameters.

First, press Ctrl+Alt+T on keyboard to open terminal, and run command to edit that file:

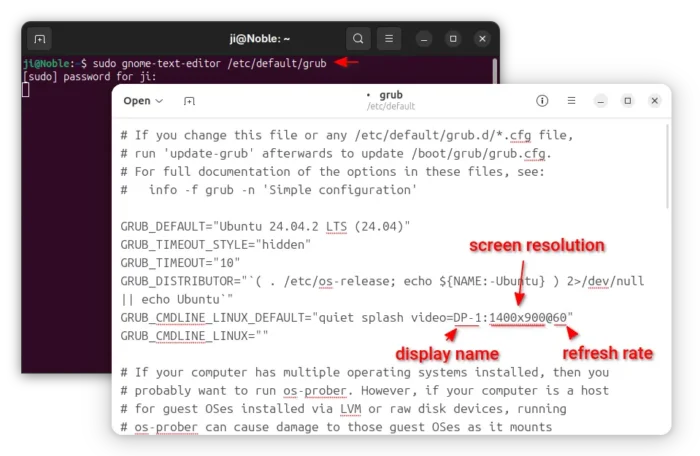
sudo gnome-text-editor /etc/default/grub

For non-GNOME desktop, replace gnome-text-editor with your desktop text editor, or use nano cli tool that works in most Linux

When file opens, add video=DP-1:1400×900@60 value for GRUB_CMDLINE_LINUX_DEFAULT. And, here:

  • DP-1 is the device name of target display.
  • 1400×900 is the desired screen resolution.
  • 60 is the refresh rate.

NOTE: You can’t set a resolution higher than the one your physical display can handle.

And, for multiple display, add either:

  • video=1400x900@60 (skip device name) that works for all connected displays,
  • or video=eDP-1:1360x700@60 video=DP-1:1600x900@60 to set video size separately.

3. Update Grub to apply change

After edited the file, save it (for nano press Ctrl+S to save, then Ctrl+X to exit), and run the command below to apply change:

sudo update-grub

Finally, restart computer and go “Display” setting page for the new screen resolution.

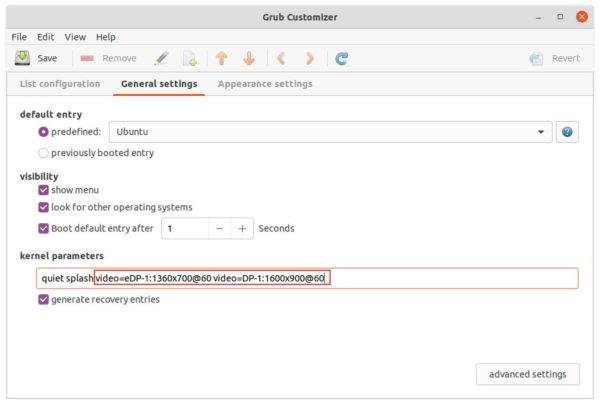
Tips: For users who have Grub Customizer installed, then just launch the tool and navigate to General Settings page to add kernel parameters.

Method 2: Use xrandr command

For the classic X11/Xorg session, that’s default in current MATE, XFCE, etc desktop environments, there’s a built-in xrandr command line tool to set screen size.

1. First open terminal by pressing Ctrl+Alt+T key combination on keyboard. When it opens, run command:

xrandr

As mentioned above, this command output all connected displays as well as their screen resolutions. You need to find out and remember the target display name

2. Run command to calculate VESA CVT mode lines by given resolution:
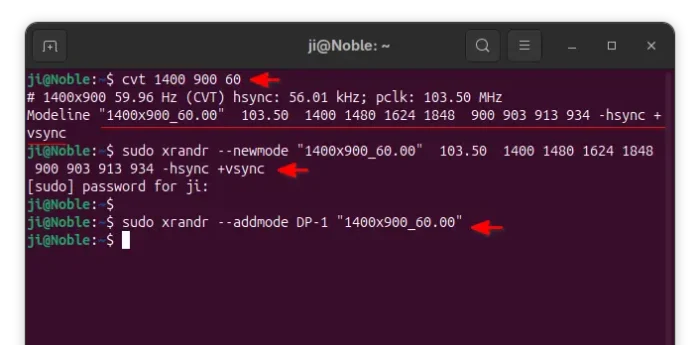
cvt 1400 900 60

Here replace 1400 900 with your desired screen resolution. The refresh rate 60 is optional, though you may replace it with yours.

3. Copy the Modeline in the last command output, and run command to add new mode:

sudo xrandr --newmode "1400x900_60.00"  103.50  1400 1480 1624 1848  900 903 913 934 -hsync +vsync

NOTE here you need to replace the section in red after --newmode with the output in last command.

4. Finally add the new created mode for your display device:

sudo xrandr --addmode DP-1 "1600x900_60.00"

Replace DP-1 (see step1) and "1400x900_60.00" (Step 2 or 3) in the command.

After that, you can open Settings and navigate to Display pane, finally choose the new “1400×900” screen resolution and apply.

5. The steps above work only for current login.

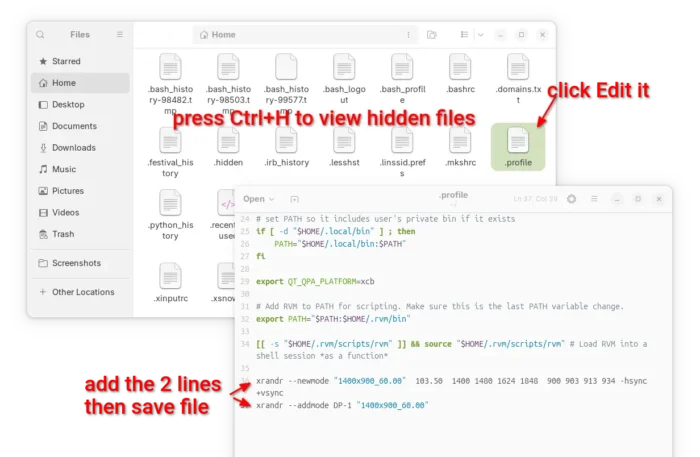
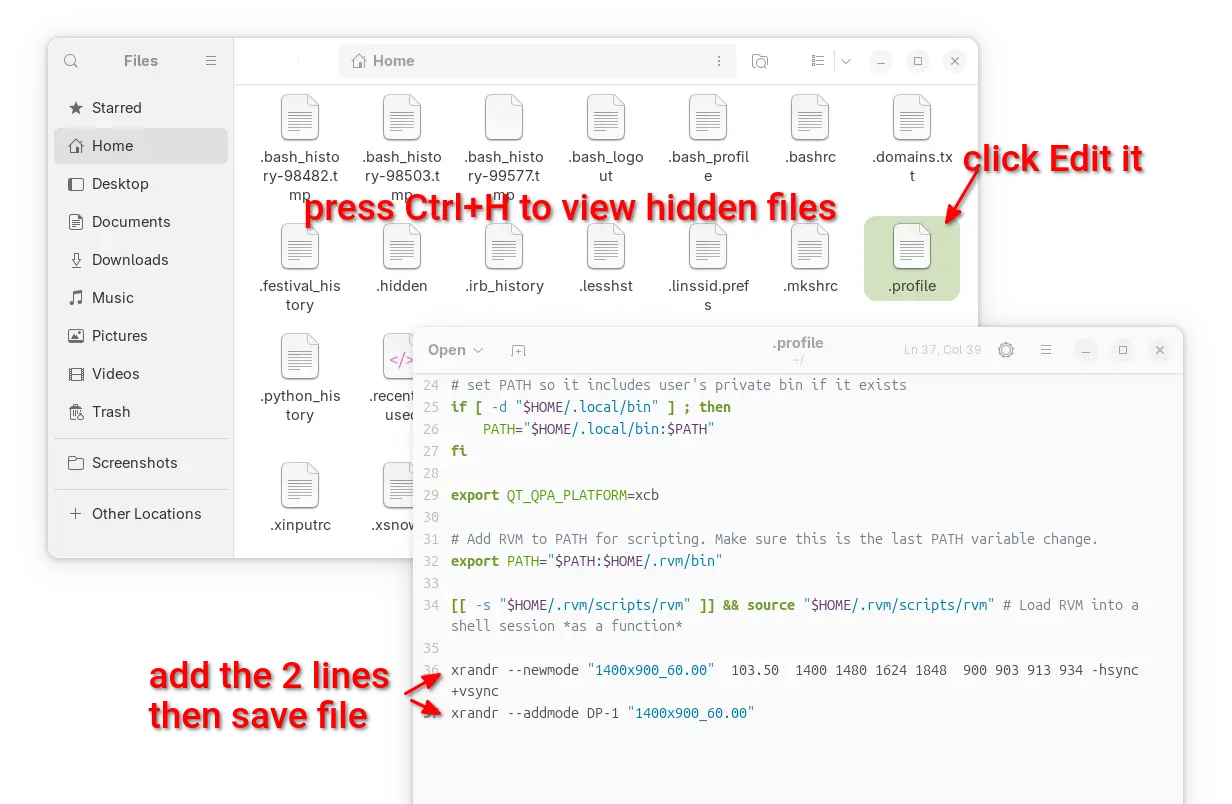
To make it permanent, open HOME folder and press Ctrl+H to show hidden files. Next, find out and click edit .profile file.

When the file opens, add the commands in step 3 & 4 (skip sudo) and save.

While Ubuntu 17.04 includes the latest GNU Emacs 25.1 in its main repository, here’s how to install the editor in Ubuntu 16.10, Ubuntu 16.04, Ubuntu 14.04, and Ubuntu 12.04 via PPA.

Emacs 25.1 was released months ago with a wide variety of new features. I’ve written about how to build it from the source. However, a PPA repository will make things easier.

Kevin Kelley has created a PPA with Emacs 25 packages for all current Ubuntu releases. A patch was made into the packages to fix for an `xinput`-related bug that, when triggered, causes `emacs` to enter an infinite loop; the process will then be unresponsive and will consume 100% of a single CPU core until you kill it.

1. Open terminal by pressing Ctrl+Alt+T or searching for “Terminal” from start menu. When it opens, run command to add the PPA:

sudo add-apt-repository ppa:kelleyk/emacs

Type in your password (no visual feedback due to security reason) when prompts and hit Enter.

2. Then update and install Emacs 25 via commands:

sudo apt update

sudo apt install emacs25

For text-only interface, replace emacs25 with emacs25-nox in the last command.

Don’t know why, but I need to log out and back in to be able to launch Emacs 25 from the Dash.

How to Remove:

To remove Emacs25, open terminal and run commands:

sudo apt remove emacs25 emacs25-nox && sudo apt autoremove

The PPA can be removed by going to System Settings -> Software & Updates -> Other Software tab.