Archives For November 30, 1999

The popular Gnome 3 desktop session for Linux. Available in Ubuntu Software Center.

Looking a graphical tool to manage users and groups in Ubuntu Desktop? Try the classic Gnome user settings tool.

A user is anyone who uses a computer, and users may be grouped together into a “group”. Users and groups are used to control access to the system’s files, directories, and peripherals.

For those hate Linux commands, the classic GUI tool, which was default in Ubuntu when it was Gnome 2, allows to add, remove, edit users and groups.

Like system default User Settings, it offers options to add, remove, and edit all user accounts. Though there are a few differences:

  • It can generate random password for user account.
  • Automatic login option seems not working.
  • Custom user privileges under Advanced Settings.

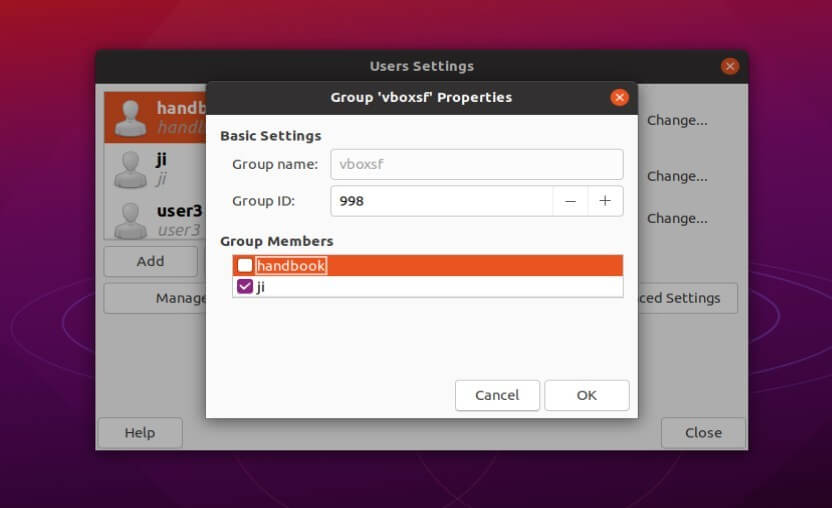
By clicking on “Manage Groups” button, you can then add, remove, edit groups.

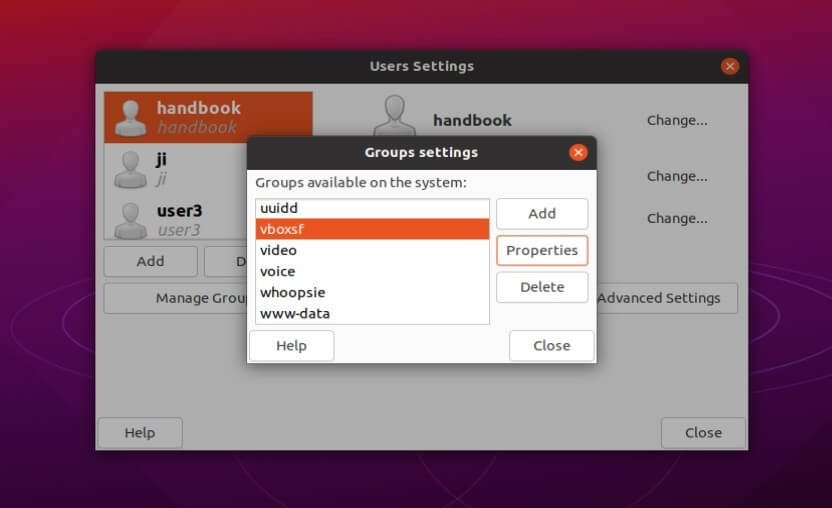
To add or remove a user from a group, simply go to group properties, and check or un-check the user name under Group Numbers.

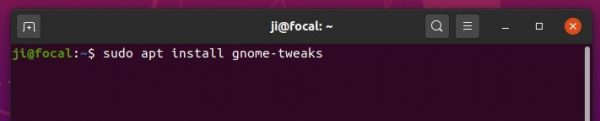
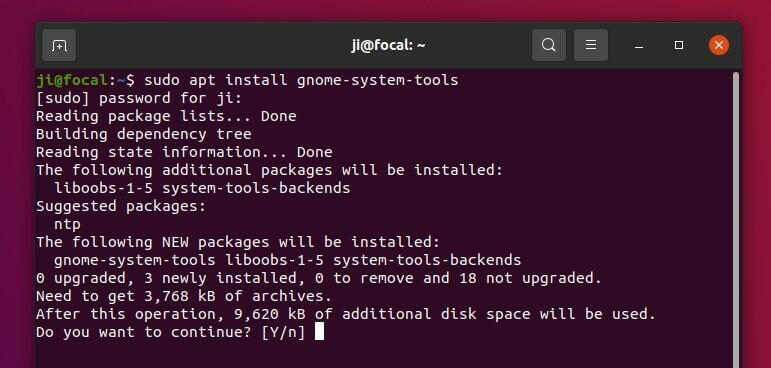
To install the GUI user and group managing tool, open terminal from system app launcher and run command:

sudo apt install gnome-system-tools

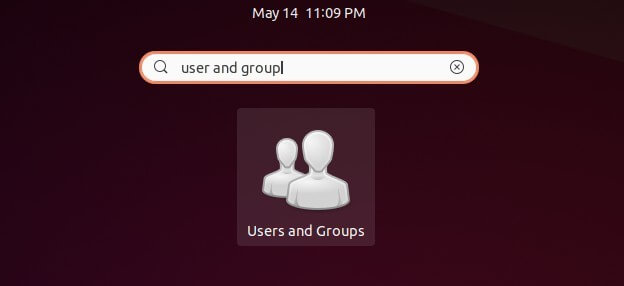
Then search for and open “Users and Groups” from system app launcher and enjoy!

Run Ubuntu or other Linux with Gnome Desktop on E-Ink Displays? There’s now an E-Ink Mode Gnome Shell extension allows to easily toggle desktop appearance suitable for the monitors.

What does E-Ink Mode extension do:

  • Switch shell theme to built-in light high contrast one (User Themes extension is not required).
  • Switch GTK and icon theme to High Contrast
  • Switch Cursor theme to DMZ-White
  • Disable shell animations
  • Restore previous themes and animation settings when disable this extension

Though the things can be done manually step by step, the extension make it as easy as a toggle switch in Extensions tool. And so far Gnome 3.36 is supported.

How to Install E-Ink Mode extension:

1.) For Ubuntu, first make sure chrome-gnome-shell package is installed. And for the Extensions tool, install thethe gnome-shell-extension-prefs package:

sudo apt install chrome-gnome-shell gnome-shell-extension-prefs

2.) Go to the extension web page and turn on the toggle icon to install it.

Don’t see the toggle icon? Click the link which says “Click here to install browser extension” to install browser extension and refresh the web page.

It should enable E-Ink Mode once you installed the extension. To toggle off or remove it, use Extensions tool.

gnome shell

Fancy some 3D effects on your Ubuntu Desktop? There’s a gnome shell extension that enables Windows 7 Aero Flip 3D style ‘Alt+Tab’ app window switcher in Ubuntu.

Coverflow Alt-Tab is the extension works on Ubuntu 20.04, Ubuntu 20.10, Ubuntu 18.04, and all other editions with Gnome 3 desktop.

1. If you’re first time installing a Gnome Shell extension, open terminal (Ctrl+Alt+T) and run command to install the chrome-gnome-shell package:

sudo apt install chrome-gnome-shell

You may also install gnome-shell-extension-prefs, an utility to manage Gnome extensions.

2. Go to extensions.gnome.org/…/coverflow-alt-tab/. Click the link to install browser extension if it prompts.

3. Finally refresh the web page and turn on the toggle icon to install the Gnome Shell extension.

Once installed, press Alt+Tab and enjoy! For the preferences, use Gnome Tweaks or Extensions utility.

gnome shell

For those who have Philips Hue compatible lights, now it’s easy to control them via a Gnome Shell Extension.

Hue-lights is an extension that offers a system tray indicator to control Philips Hue compatible lights using Philips Hue Bridge. The extension groups the lights in zones and rooms, allows you to control the state, the brightness, and the color.

How to Install Hue-lights Gnome Shell Extension:

In your web browser, go to the extension web site and turn on the toggle icon to install it.

Once you installed the extension, the system tray indicator starts automatically and discovers Philips Hue bridges in your home network. For choice you may add the IP manually.

Don’t see the toggle icon? Follow the link to install the browser extension (if it prompts):

Then open terminal (Ctrl+Alt+T) and run command:

sudo apt install chrome-gnome-shell

And finally refresh the extension web page!

Uninstall the Extension:

To remove the extension, either turn off the toggle icon in the web page or use Extensions tool (install gnome-shell-extension-prefs package if you don’t have it).

gnome shell

Since the desktop icons are handled by an extension instead of Nautilus file browser, drag’n’drop action between desktop and file browser does no longer work.

Fortunately, a fork of the original Desktop Icons extension now is available with several enhancements, including Drag’n’Drop.

It’s called Desktop Icons NG, and features:

  • Drag’n’Drop, both inside the desktop, between desktop and applications, and nautilus windows
  • Allows to use “Open with…” option with several files
  • When hovering or clicking on an icon with a name too large to fit, it shows the full name
  • Doesn’t hang the compositor when there is too much activity in the desktop folder

Install Desktop Icons NG extension:

The extension is still (Oct 2020) in alpha development, so it may have a lot of bugs. Use with care.

1. If you’re first time installing a Gnome Shell extension, first open terminal (Ctrl+Alt+T) and run command to install recommended packages:

sudo apt install chrome-gnome-shell gnome-shell-extension-prefs

2. Then go to extensions.gnome.org/…/desktop-icons-ng. Turn on the toggle icon and install the extension.

Don’t see the toggle icon? Click the link to install browser extension and refresh the web page.

3. Open Extensions tool from app launcher. Disable the built-in ‘Desktop Icons’ extension and enable the new installed ‘Desktop Icons NG’ extension.

For the extension settings, simply right-click on Ubuntu Desktop and select the last option.

gnome shell

This simple tutorial shows how to apply a blur effect to GNOME Shell UI elements in Ubuntu 20.04 LTS, Ubuntu 20.10, and Ubuntu 21.04.

Since the previous Blyr extension is no longer updated. Here’s the new “Blur my Shell” extension, which adds blur effects to:

  • top panel
  • dash
  • activities overview
  • and lock screen.

To install the extension, do following steps one by one:

1.) Open terminal by pressing Ctrl+Alt+T on keyboard, then run command:

sudo apt install chrome-gnome-shell

2.) Go to extensions.gnome.org, and click the link to install the browser integration.

3.) Finally go to Blue my Shell web page, toggle on the slider icon to install the extension.

4.) Install the ‘Extensions’ utility to toggle blur effect:

sudo apt install gnome-shell-extension-prefs

Once installed, search for and open ‘Extensions’. Then click on the gear icon to change the extension settings.

Gnome’s top bar can auto-hide itself like the left dock panel does via a Gnome Shell extension.

In Ubuntu 18.04, you can enable the feature by installing the gnome shell extension easily from Ubuntu Software.

In Ubuntu 20.04, it’s still easy to install the hide top bar extension, though the Software utility does not longer handle the extension packages.

For Ubuntu 22.04 user, please scroll down and see the update section.

1.) Press Ctrl+Alt+T on keyboard to open terminal. Then run the apt command to install the extension:

sudo apt install gnome-shell-extension-autohidetopbar

Type user password (no asterisk feedback) for sudo prompt and hit Enter.

2.) Once installed, restart Gnome Shell by pressing Alt+F2 and type r in the pop-up “Run a Command” box and hit Enter.

3.) Finally open either Extensions or Gnome Tweaks (both available to install in Software), and enable “Hide Top Bar” extension.

That’s it. Enjoy!

Update for Ubuntu 22.04 LTS

The extension works for Ubuntu 22.04 with GNOME 42, though it’s not available in system repository anymore.

Firstly, press Ctrl+Alt+T on keyboard to open terminal. When it opens, run the command below to install required packages first:

sudo apt install chrome-gnome-shell gnome-shell-extension-prefs

Next, go to the link page below, install browser extension if prompt and turn on the slider icon to install the extension:

NOTE: The pre-installed Firefox (Snap) does not support installing Gnome Extensions! Use another browser or install Firefox as classic Deb.

It will work immediately after you installed it. To manage its behavior, search for and open “Extensions” app and click the related “Settings” button.

App to Manage your extensions

gnome shell

This is a step by step guide shows how to enable the old Compiz alike Wobbly windows effect in Ubuntu 18.04, Ubuntu 19.10, and Ubuntu 20.04 with default Gnome Desktop.

So far there are two Gnome Shell Extensions that can enable Wobbly Windows effect in Ubuntu:

  • Compiz alike Wobbly Windows Effect: Just do the job.
  • Compiz Wobbly Windows Effect: For those prefer an effect more similar to the original. However, you need to install the libanimation library first.

Preparation:

If you previously installed a Gnome Shell extension, you may skip this step.

1.) Open terminal by pressing Ctrl+Alt+T on keyboard, then run command:

sudo apt install chrome-gnome-shell

2.) Go to extensions.gnome.org, and click the link to install the browser integration.

Install the Gnome Shell Extension:

Do either step 1.) or step 2.) to install one of the two extensions.

Extension 1.) To install the one that simply do the job, go to extensions.gnome.org/extension/2950, and turn on the switch to install the extension.

Wobbly windows effect works immediately after installed this extension.

Extension 2.) If you prefer an effect more similar to the original, do:

  • (You can skip this step as the library now is optional) To make life easier, I’ve uploaded the libanimation library into this PPA repository, open terminal (Ctrl+Alt+T) run following commands one by one to install it:
    sudo add-apt-repository ppa:ubuntuhandbook1/libanimation
    
    sudo apt update
    
    sudo apt install libanimation0 libanimation-glib0 gir1.2-animation-glib-0
  • Then go to the extension web page, and turn on the switch to install it.

Uninstall Wobbly Windows extension:

To remove the extensions, use either Extension utility or Gnome Tweak tool.

To remove libanimation library as well as the PPA, run commands:

sudo add-apt-repository --remove ppa:ubuntuhandbook1/libanimation

sudo apt remove libanimation0 libanimation-glib0 gir1.2-animation-glib-0

Ubuntu 20.04 Gnome 3.36 brings a little change on the top-right corner system tray menu. Log Out, Switch User, Suspend, and Power Off are now sub-menu options of a new ‘Power Off / Log Out‘ button.

For those don’t prefer the new sub-menu, a Gnome Shell Extension is available to bring out the submenu of ‘Power Off / Log Out‘ and rearrange the order of system menu.

Install the Extension in Ubuntu 20.04

1. Open Firefox or Google Chrome and go to https://extensions.gnome.org.

If you’re first time installing a Gnome Shell extension on your system, you may first click the link text “click here to install browser extension” and follow the pop-ups to install the browser extension:

shell browser extension

2. Then open terminal via Ctrl+Alt+T and run command:

sudo apt install chrome-gnome-shell

3. After that, you’re able to install the Gnome Shell extension by going to https://extensions.gnome.org/extension/2917/bring-out-submenu-of-power-offlogout-button/.

If everything’s OK, system tray menu should change. And you can manage the extension either via Extensions utility or Gnome Tweaks.

Install the Gnome Extension in Ubuntu 22.04

Ubuntu 22.04 defaults to Firefox as Snap which does not support installing Gnome Extensions. Besides using another web browser, here’s another way to install the extension to bring out “Power Off / Log Out” sub menu.

1.) Firstly press Ctrl+Alt+T on keyboard to open terminal. When it opens, run the command below to install Extension manager:

sudo apt install gnome-shell-extension-manager

2.) Once installed, press Windows/Super key on keyboard or click the top-left “Activities” button. Then search for and launch the tool:

3.) Finally, search for and install the “Bring Out Submenu Of Power Off/Logout Button” extension in ‘Browser’ tab will do the trick in Ubuntu 22.04:

gnome shell

Ubuntu 20.04 introduces new dark mode in the Settings utility. It is however not full dark when you turn it on in Gnome Shell.

System tray menu, top-bar calendar, notification popups, and desktop context menu are not dark but always light when you switching between light, dark, and standard modes.

Enable Full Dark Theme in Ubuntu 20.04:

1.) First install user themes Gnome Shell extension.

It was able to install the extension simply via Ubuntu Software when I was in Ubuntu 18.04. Ubuntu 20.04 however shows me “No Application Found” when I searching for user themes in the new Ubuntu Software (Snap Store).

  • As a workaround, open Firefox web browser and go to https://extensions.gnome.org:

    Click the link text “click here to install browser extension” and follow the pop-ups to install the browser extension:

    shell browser extension

  • Then open terminal via Ctrl+Alt+T and run command:
    sudo apt install chrome-gnome-shell

  • Finally go to https://extensions.gnome.org/extension/19/user-themes/.

    Turn the switch on and then select install the Gnome Shell extension:

    User Themes extension

2.) Install Gnome Tweaks if you have it.

sudo apt install gnome-tweaks

3.) Finally launch Gnome Tweaks and navigate to Appearance in the left pane, choose Yaru-dark as the Shell theme and done!

And of course select Dark in System Settings -> Appearance to get dark applications if you don’t have it.