Archives For November 30, 1999

minecraft ubuntu 13.10

This simple tutorial shows you how to easily install minecraft sandbox indie game in Ubuntu 13.10 or Linux Mint 16 via PPA.

The package in this unofficial PPA is only a script that automatically connects to Mojang’s servers and downloads the files.

Pay attention on the PPA description before getting started:

If your computer has issues running Minecraft with OpenJDK 7, then it will have issues running this. Because that’s what this is. I’ve tested this on multiple machines and it’s worked fine, but your mileage may vary. That said, one of the main black screen issues I’ve seen is people not running it with OpenJDK 7. ;)

To get started, press Ctrl+Alt+T on keyboard to open terminal. When it opens, run commands below one by one:

sudo add-apt-repository ppa:minecraft-installer-peeps/minecraft-installer

sudo apt-get update

sudo apt-get install minecraft-installer

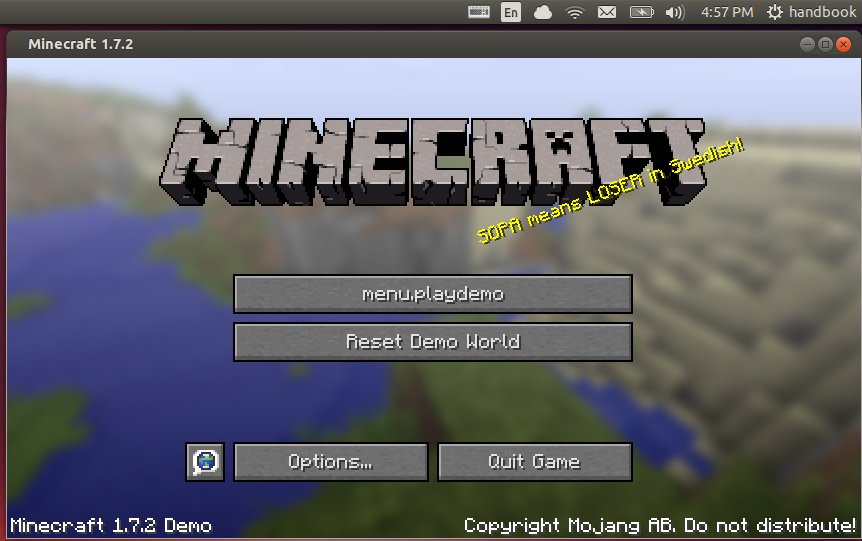
Once installed, open MineCraft from Unity Dash, login with your Minecraft account and the installation should start automatically.
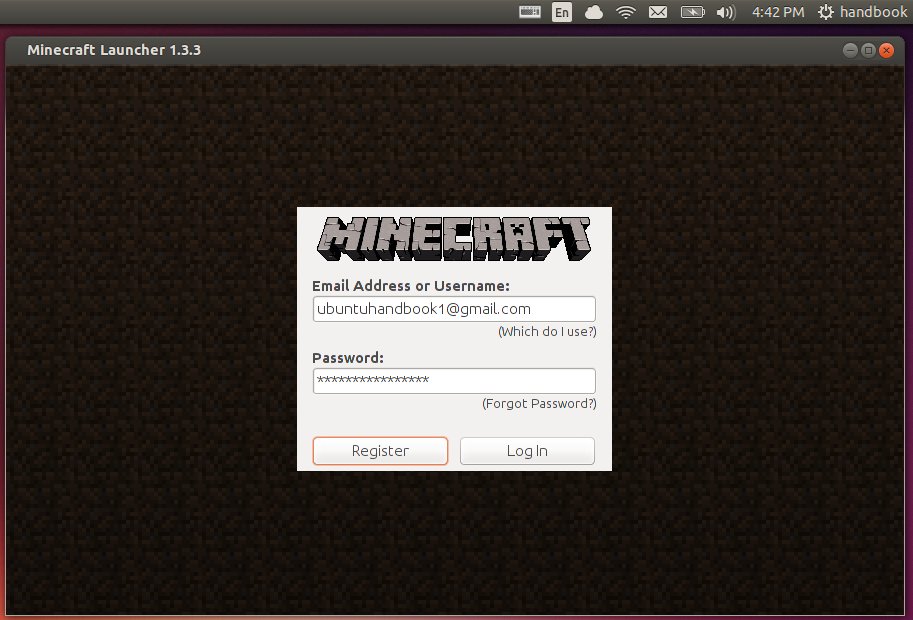
minecraft login

minecraft login

minecraft updates

minecraft game window

install speed dreams ubuntu 13.10

Speed Dreams, formerly known as Torcs-NG, is a free and open source 3D racing video game. This tutorial shows you how to install it in Ubuntu 13.10 or Linux Mint 16 Petra

Speed Dreams 2.0 features :

  • visually reworked menus by Brian Gavin, Eckhard M. Jäger, Andrew Sumner and Jean-Philippe Meuret,
  • 3 amazing fine tuned and balanced new car sets by Andrew Sumner and Haruna Say:Super Cars, 36 GP and LS-GT1,
  • an updated TRB1 car set (well balanced, more realistic behaviour),
  • 3 exciting new tracks and many visually improved ones,
  • smashing liveries for all these cars, by Eckhard M. Jaeger and Haruna Say,
  • 2 new TRB first-class robot for the Supercars, 36 GP and TRB1 car sets :USR by Andrew Sumner and Simplix by Wolf-Dieter Beelitz (at last real AI opponents !),
  • animated driver by Andrew Sumner on 36GP cars, 3D wheels for all cars by Eric Espie,
  • 2 new leader-board modes by Gabor Kmetyko, smoke on spinning tires by Andrew Sumner,
  • brand new gauges by Eckhard M. Jaeger, and many many other small visual improvements,
  • experimental Simu V3 physics engine by Christos Dimitrakakis,
  • many menu improvements (support for grid shifting, optimized track select load time,category filter when selecting driver, more infos in results and standings boards),

and much more …

Install Speed Dreams:

The PPA is not available for Ubuntu 13.10 so far. Here I use the Playdeb repository.

1. Press Ctrl+Alt+T on keyboard to open terminal. When it opens run commands below to add the Playdeb repository:

sudo sh -c 'echo "deb http://archive.getdeb.net/ubuntu saucy-getdeb games" >> /etc/apt/sources.list'

2. Get the key:

wget -q -O- http://archive.getdeb.net/getdeb-archive.key | sudo apt-key add -

3. Check for updates and install the game:

sudo apt-get update; sudo apt-get install -y speed-dreams

The installing process will take a few minutes downloading the DEBs.

speed dreams in ubuntu 13.10

speed dreams in ubuntu 13.10

This quick tutorial is going to show you how to display or re-hide ‘hidden’ startup applications in Ubuntu 13.10 Saucy Salamander.

There’s a built-in utility in Ubuntu, which allows to add, remove, and edit additional startup applications. By default the system auto-start services are hidden, here’s how to show it in the box.

Before:

no apps startup applications utility in ubuntu 13.10

no apps in startup applications utility in ubuntu 13.10

After:

show hidden apps in startup applications

show hidden apps in startup applications

To get started, press Ctrl+Alt+T on your keyboard to open terminal. When it opens, run command below:

sudo sed -i 's/NoDisplay=true/NoDisplay=false/g' /etc/xdg/autostart/*.desktop

Then re-open the utility and you’ll see all ‘hidden’ apps.

If you just want to change some settings and then hide them again, run this command in terminal:

sudo sed -i 's/NoDisplay=false/NoDisplay=true/g' /etc/xdg/autostart/*.desktop

That’s it. Enjoy!

zim desktop wiki ubuntu

Zim is a graphical text editor used to maintain a collection of wiki pages. Each page can contain links to other pages, simple formatting and images. Pages are stored in a folder structure, like in an outliner, and can have attachments. Creating a new page is as easy as linking to a nonexistent page. All data is stored in plain text files with wiki formatting. Various plugins provide additional functionality, like a task list manager, an equation editor, a tray icon, and support for version control.

Zim can be used to:

  • Keep an archive of notes
  • Take notes during meetings or lectures
  • Organize task lists
  • Draft blog entries and emails
  • Do brainstorming

Zim handles several types of markup, like headings, bullet lists and of course bold, italic and highlighted. This markup is saved as wiki text so you can easily edit it with other editors. Because of the autosave feature you can switch between pages and follow links while editing without worries.

zim desktop wiki in Ubuntu

zim desktop wiki in Ubuntu

Install Zim Desktop Wiki:

We can easily download & install latest Zim Desktop Wiki in Ubuntu 13.10, Ubuntu 13.04, Ubuntu 12.04, Ubuntu 12.10 and Linux Mint from the links below:

Zim Desktop Wiki DEB & Source Code

So far, the latest is Zim 0.60 which is also available in Ubuntu Software Center for Ubuntu 13.10 and higher.

audacious 3.4.2

Audacious 3.4.2 has been released with annoying bugs fixed. This tutorial shows how to install it via PPA in Ubuntu 13.10 Saucy, Ubuntu 13.04 Raring, Ubuntu 12.04 Precise, Ubuntu 12.10 Quantal, Linux Mint and Elementary OS.

Audacious fixed following bugs:

  • Opening an Internet channel takes too long at the first time
  • SDL error: Failed to open audio stream: XAudio2: XAudio2Create() failed at open..
  • incorrect playtime length
  • NULL pointer segfault due to vfs async race
  • some opus file won’t play
  • Time label shows wrong time if slider is dragged beyond its upper limit

To get started installing Audacious 3.4.2, press Ctrl+Alt+T on your keyboard to open terminal. When it opens, run command below to add the PPA:

sudo add-apt-repository -y ppa:nilarimogard/webupd8

Then you can install it from Ubuntu Software Center after checking for updates. Or run commands below instead:

sudo apt-get update; sudo apt-get install -y audacious audacious-plugins
audacious 3.4.2 in ubuntu 13.10

audacious 3.4.2 in ubuntu 13.10

Linux Kernel 3.11.7

Linux Kernel 3.11 series has reached v3.11.7. It’s recommended to upgrade as soon as possible if you’re on Kernel 3.11.

Linux Kernel 3.11.7 has lots of updates and bugfixes for USB, wireless drivers, ARM and ext3/4. See the changelog.

This tutorial shows you how to install / upgrade this Kernel in Ubuntu 13.10 Saucy, Ubuntu 13.04 Raring, Ubuntu 12.04 Precise, Ubuntu 12.10 Quantal, Linux Mint and Elementary OS.

To get started, press Ctrl+Alt+T on your keyboard to open terminal. When it opens:

1. Run commands below one by one to download DEBs for Kernel 3.11.7:

For 32 bit system:

wget http://kernel.ubuntu.com/~kernel-ppa/mainline/v3.11.7-saucy/linux-headers-3.11.7-031107-generic_3.11.7-031107.201311040853_i386.deb

wget http://kernel.ubuntu.com/~kernel-ppa/mainline/v3.11.7-saucy/linux-headers-3.11.7-031107_3.11.7-031107.201311040853_all.deb

wget http://kernel.ubuntu.com/~kernel-ppa/mainline/v3.11.7-saucy/linux-image-3.11.7-031107-generic_3.11.7-031107.201311040853_i386.deb

For 64 bit system:

wget http://kernel.ubuntu.com/~kernel-ppa/mainline/v3.11.7-saucy/linux-headers-3.11.7-031107-generic_3.11.7-031107.201311040853_amd64.deb

wget http://kernel.ubuntu.com/~kernel-ppa/mainline/v3.11.7-saucy/linux-headers-3.11.7-031107_3.11.7-031107.201311040853_all.deb

wget http://kernel.ubuntu.com/~kernel-ppa/mainline/v3.11.7-saucy/linux-image-3.11.7-031107-generic_3.11.7-031107.201311040853_amd64.deb

2. Both 32 bit & 64 bit install them via:

sudo dpkg -i linux-headers-3.11.7-*.deb linux-image-3.11.7-*.deb

Once done, restart your computer.

If for some reason it does not work properly for you, remove Linux Kernel 3.11.7 via:

sudo apt-get purge linux-headers-3.11.7-* linux-image-3.11.7-*

gimp 2.8.8 ubuntu

GIMP (GNU Image Manipulation Program), the popular image editing tool is now at version 2.8.8 stable. This tutorial shows how to install GIMP 2.8.8 via PPA in Ubuntu 13.10, Ubuntu 13.04, Ubuntu 12.04, Ubuntu 12.10, Linux Mint.

Changes from GIMP 2.8.6 to GIMP 2.8.8:

Core:

  • Make sure indexed images always have a colormap
  • Fix language selection via preferences on Windows
  • Don’t crash on setting a large text size

GUI:

  • Keep the same image active when switching between MWM and SWM
  • Make sure all dockables are properly resizable (particularly shrinkable)
  • Add links to jump directly to Save/Export from the Export/Save
  • file extension warning dialogs

Libgimp:

  • Fix GimpPickButton on OSX

Plug-ins:

  • Properly document plug-in-autocrop-layer’s PDB interface
  • Fix importing of indexed BMPs

General:

  • Fix lots of places to use GIO to get proper file sizes and times on windows
  • Add an AppData file for GIMP
  • Backport lcms2 support from master, because lcms1 is not getting bug fixes any longer
  • Lots of bug fixes
  • Lots of translation updates

Install GIMP 2.8.8

The latest DEB packages for Ubuntu >= 12.04 and Linux Mint >= 13 are in the process of being built, and will be appear soon available in GIMP PPA.

To add the PPA, press Ctrl+Alt+T on your keyboard to open terminal. When it opens, run commands below:

sudo add-apt-repository ppa:otto-kesselgulasch/gimp

After that, you can install latest gimp from Ubuntu Software Center after checking for updates. Or run commands below instead:

sudo apt-get update; sudo apt-get install -y gimp

Can’t wait? You can also build the gimp 2.8.8 source code by yourself.

google calendar ubuntu 13.10

Calendar-indicator is a system tray applet which integrates Google Calendar into Ubuntu Unity Desktop. It allows to quickly add new calendar / event, sync with Google Calendar, and more.

The developer has made this app with Ubuntu 13.10 Saucy support, and this tutorail shows you how to install it via PPA repository.

Tutorial Objectives:

  • Install Google Calendar indicator in Ubuntu 13.10
  • Enjoy!

To get started, press Ctrl+Alt+T on your keyboard to open terminal. When it opens, run command below to add the PPA:

sudo add-apt-repository ppa:atareao/atareao

Then update system package lists:

sudo apt-get update

Finally install the indicator:

sudo apt-get install calendar-indicator

Once installed, open calendar-indicator from Unity Dash. Turn on “Allow access to Google Calendar” and authenticate with your Google account.

Google Calendar indicator ubuntu 13.10

Google Calendar indicator ubuntu 13.10

repair, reinstall, restore grub

Grub 2, the Ubuntu and Linux Mint’s default bootloader typically gets overridden when you install Windows as a dual-boot OS. To make Ubuntu and its derivatives boot again, you need to reinstall (repair/restore) Grub using a bootable Ubuntu/LinuxMint CD or USB.

Typically you’ll get the following error boot screen:

error: no such partition.

grub rescue> _

Tutorial Objectives:

  • Reinstall Grub 2 when Ubuntu or Linux Mint won’t boot
  • Enjoy!

To get started, insert your Ubuntu USB into computer and boot up. When you’re in, follow the steps below to reinstall grub 2:

1. Open Gparted Partition Editor from Unity Dash to check out which partition your Ubuntu/Linux Mint system installed. It is usually a EXT4 Partition.

In my case, there’re 3 Ext4 partitions. We can check the user names on each partition after step 2 by command cd /mnt/ && ls home/

gparted partition editor

gparted partition editor

2. Press Ctrl+Alt+T on keyboard to open terminal. When it opens, run command below to mount the partition:

sudo mount /dev/sda7 /mnt

3. Now reinstall Grub2 via command below:

grub-install --root-directory=/mnt /dev/sda

If the installation is successful, you will get the similar output:

Installation finished. No error reported.

4. Finally update grub boot loader and done!

sudo update-grub