Archives For November 30, 1999

install latest GIMP in Ubuntu

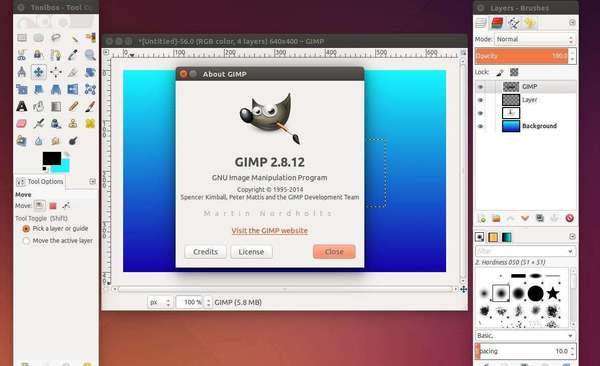
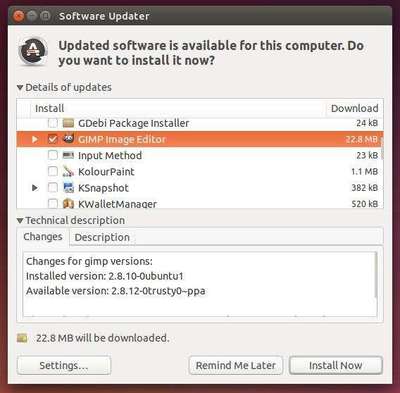
GIMP team just announced the release 2.8.14 the day after the previous release 2.8.12 with the broken library versioning fixed.

Yesterday’s 2.8.12 release had broken library versioning, so we had to roll out GIMP 2.8.14 today. The only change is the fixed libtool versioning. Please do not distribute any binaries of yesterday’s broken 2.8.12 release, and get GIMP 2.8.14 using the torrent: http://download.gimp.org/pub/gimp/v2.8/gimp-2.8.14.tar.bz2.torrent

via:gimp.org

GIMP image editor

Install / Upgrade to GIMP 2.8.14:

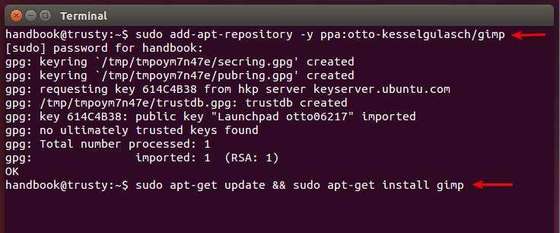
The GIMP PPA has been updated with the latest packages for Ubuntu 14.10, Ubuntu 14.04, and Ubuntu 12.04.

Press Ctrl+Alt+T on keyboard to open the terminal. When it opens, run the command below to add the PPA:

sudo add-apt-repository ppa:otto-kesselgulasch/gimp

After that, receive GIMP updates via Software Updater or run the commands below instead:

sudo apt-get update && sudo apt-get install gimp

hide or show desktop shortcuts in Ubuntu

Want an option in your desktop’s context menu (right-click menu) that hides or un-hides all your desktop shortcuts in Ubuntu Unity or Gnome?

Ramvignesh, the guy sent me two simple scripts with this great idea. If you are interested, below will show you how to do it step by step.

1. How to Create Desktop Shortcuts in Ubuntu 14.04

Due to bug, you can’t drag and drop an application shortcut icon from Unity Dash result to desktop in Ubuntu 14.04 LTS.

But it’s still easy to create a desktop shortcut, all you need to do is:

  1. Open your file browser, navigate to Computer (from left sidebar)-> user -> share -> applications.
  2. Right click on a shortcut icon and select ‘Copy’
  3. Right-click on blank area of your desktop and select ‘Paste’

Create Desktop Shortcuts Ubuntu

Finally you’re able to click the desktop shortcut to launch the application without worrying about user permission issue.

2. Create the scripts to show/hide desktop shortcuts

Thanks to Ramvignesh for the simple scripts.

  • Create a new folder called bin in user’s Home folder.
  • Go into bin folder and create 2 empty documents: show-desktop-shortcuts, hide-desktop-shortcuts
  • Edit 2 documents one by one and paste below contents into them. IMPORTANT: Replace handbook in red with your user name.
    • for show-desktop-shortcuts file:
      #!/bin/bash
      #
      cd /home/handbook/Desktop
      for f in .* ; do 
      new=`echo "$f" | cut -c 2-`
      mv "$f" "$new"
      done
    • for hide-desktop-shortcuts file:
      #!/bin/bash
      #
      cd /home/handbook/Desktop
      for f in * ; do
      mv "$f" ".${f#.}"
      done
  • show-hide-desktop-shortcuts2

    Finally make the 2 scripts executable by going to their context menu (right-click menu) -> Properties -> Permissions tab -> check the box where it says 'Allow executing file as program'.

    allow-execute

    3. Add The 2 Scripts As Options Into Desktop's Context Menu

    Click the button below to bring up Ubuntu Software Center and install nautilus-actions, a graphical tool for configuring Nautilus' context menu.

    Click install nautilus-actions

    Now open nautilus-actions from Launcher and do:

    1. Create 2 new actions in Items list, name them to Show Desktop Shortcuts & Hide Desktop Shortcuts
    2. Under Action tab of both items, check the box says "Display item in location context menu"
    3. Type a name in Context label

      create-context-menu-items

    4. Under Command tab of both items, type in (browser) path to the two scripts in Path box.
      create-context-menu-items2
    5. (Optional) Go the menu Edit -> Preferences, in first tab un-check the two boxes under Nautilus menu layout.

    Finally, your desktop's context menu will look like below after reboot.

    desktop-context-menu

    Enjoy!

    install latest GIMP in Ubuntu

    The popular GIMP image editor has been updated to version 2.8.12 with a lot of bug fixes. Here is how to install or upgrade it in Ubuntu 14.10, Ubuntu 14.04, Ubuntu 12.04 and their derivatives.

    GIMP, GNU Image Manipulation Program, is a raster graphics editor[5] used for image retouching and editing, free-form drawing, resizing, cropping, photo-montages, converting between different image formats, and more specialized tasks.

    GIMP image editor

    Changes in GIMP 2.8.12:

    Core:

    • OSX: Fix migration code for old GIMP directories
    • Fix brush sizes when used from plug-ins
    • Windows: Allow to Explorer-open files with UTF-8 characters in the filename
    • Make XCF loading more robust against broken files

    GUI:

    • Make sure the widget direction matches the GUI language
    • Remove the option to disable the warning when closing a modified image
    • Fix canvas overlay widgets (like the text options) for tablets
    • Make DND work between images in one dockable

    Libgimp:

    • Make gimp_image_get_name() return the string used for the image title

    Plug-ins:

    • Make script-fu-server more secure by listening to 127.0.0.1 by default and add a warning about changing that IP. This breaks the procedure’s API, but for security reasons.
    • Bring back proper script-fu translations

    General:

    • Massively clean up and fix the OSX build and bundle
    • Add Jenkins tutorial
    • Documentation updates
    • Bug fixes
    • Translation updates

    Install / Upgrade GIMP in Ubuntu:

    GIMP packages are available in PPA for all current support Ubuntu releases, Ubuntu 14.10, Ubuntu 14.04, and Uubntu 12.04.

    As the PPA description says, you can always install or upgrade to the latest GIMP in Ubuntu by running below commands one by one in terminal (press Ctrl+Alt+T to open terminal):

    sudo add-apt-repository ppa:otto-kesselgulasch/gimp
    
    sudo apt-get update
    
    sudo apt-get install gimp

    GIMP PPA

    After you added the PPA, you can receive updates using Software Updater

    upgrade-gimp

    That’s it. Enjoy!

    Gnome sound converter

    Gnome sound converter application has been updated to version 2.1.4 with 3 important bug fixes. Ubuntu 14.04 user can upgrade it from Getdeb repository.

    SoundConverter is the leading audio file converter for the GNOME Desktop. It reads anything GStreamer can read (Ogg Vorbis, AAC, MP3, FLAC, WAV, AVI, MPEG, MOV, M4A, AC3, DTS, ALAC, MPC, Shorten, APE, SID, MOD, XM, S3M, etc…), and writes to Opus, Ogg Vorbis, FLAC, WAV, AAC, and MP3 files, or use any GNOME Audio Profile.

    gnome sound converter

    The latest 2.1.4 was released with below important fixes:

    1. Fixed the error when converting a video to an audio file: Python (v2.7) requires to install plugins to play media files of the following type: H.264

    2. Fixed the issue that converts things with same filename at the same time doesn’t work. When trying to convert all the music of one artist at the same time. The problem arose when the first track on an EP was also the first track on an album.

    3. Fixed SoundConverter can’t export to a folder on an MTP device.

    Install or Upgrade to SoundConverter 2.1.4:

    Getdeb repository has built the package based on Ubuntu 14.04 LTS. Go to the link below and download the “soundconverter_2.1.4-1~getdeb1_all.deb” package.

    Download SoundConverter DEB

    Then double-click on the package to open it with Ubuntu Software Center and click the install button to install the Sound Converter.

    How to Play Your PSP Games in Ubuntu 14.04/14.10

    Last updated: August 24, 2014

    psp emulator ubuntu

    This simple tutorial is going to show you how to play your PSP games in Ubuntu desktop with ppsspp Sony PSP emulator.

    Install PPSSPP psp emulator:

    PPSSPP can run your PSP games on your PC in full HD resolution. It can even upscale textures that would otherwise be too blurry as they were made for the small screen of the original PSP.

    All trademarks are property of their respective owners. The emulator is for educational and development purposes only and it may not be used to play games you do not legally own.

    PPSSPP is available in its official PPA for Ubuntu 14.10, Ubuntu 14.04 and their derivatives. To install it, press Ctrl+Alt+T on keyboard to open the terminal. When it opens, run the commands below one by one:

    sudo add-apt-repository ppa:ppsspp/stable
    
    sudo apt-get update
    
    sudo apt-get install ppsspp-qt

    Replace the last command if you want to install the sdl version:

    sudo apt-get install ppsspp-sdl

    install ppsspp emulator in Ubuntu

    Load psp game via the emulator:

    Start the psp emulator, under Games tab navigate to the folder that saves your PSP games (.iso files).

    psp-emulator1

    Use arrow keys to choose and hit enter to load the game:

    psp-emulator

    shotwell photo manager

    Gnome 3 photo manager shotwell 0.19.0, an unstable pre-release of the upcoming version 0.20, has been released with support for Rajce.net and Gallery 3 photo services.

    Shotwell is a popular photo manager for Gnome 3 with below great features:

    • Import from disk or camera
    • Organize by time-based Events, Tags (keywords), Folders, and more
    • View your photos in full-window or fullscreen mode
    • Crop, rotate, color adjust, straighten, and enhance photos
    • Slideshow
    • Video and RAW photo support
    • Share to major Web services, including Facebook, Flickr, and YouTube

    shotwell-photo-services

    The latest 0.19.0 has been released as a pre-release of the upcoming version 0.20 with below changes:

    • Support for Rajce.net and Gallery 3 photo services added
    • Set background image for lock screen
    • Better detection of corrupt images during import
    • Various bug fixes
    • Updated translations

    The .deb installer is available in Yorba’s daily build PPA for Ubuntu 14.04 and Ubuntu 14.10. Check your OS type: 32-bit = i386 or 64-bit = amd64, and download & install the appropriate package from the link below:

    Download Shotwell .deb

    The .deb package can be installed by double-click on it to open with Ubuntu Software Center and click the install button.

    handbrake ubuntu 14.04

    HandBrake, a free and open source video transcoder, finally gets an update by releasing 0.10 beta. It has been such a long time since the last v0.9.9.

    Today we are releasing the first of several beta’s for the 0.10 release with the hope of releasing a final build sometime in the next couple of months.
    The 0.10 release will give us the opportunity to push out many improvements, but allow us to continue working on the new API we have planned for the 1.0 release.

    Handbrake 0.10 beta in Ubuntu 14.04

    Changes in HandBrake 0.10:

    Core:

    • Intel QuickSync Video Encode / Decode support.(Windows only currently)
    • DXVA Hardware Decode support (Experimental and Windows only)
    • Choice of Scalers: Lanczos, Bicubic (OpenCL) (Experimental)
    • hqdn3d filter now accepts individual settings for both chroma channels (Cr, Cb)
    • New NlMeans? denoiser. This is very slow, but results are significantly better than hqdn3d.
    • Added Windows Phone 8 Preset
    • Updated Libraries: x264 r2431-ac76440, Libav v10.1, libbluray 0.5.0
    • Libavformat is now used for muxing instead of mp4v2 and libmkv
    • The LibAV AAC encoder is now the default as FAAC has been removed.
    • H.265 encoder (Experimental – available when compiled from source with –enable-x265)
    • Added VP8 Encoder (using libvpx), available in MKV files only.
    • Removed mcdeint deinterlace and decomb modes. This relied on the snow encoder in libav which has been was removed by upstream.
    • Bug fixes and Misc Improvements

    Linux:

    • Automatic audio and subtitle track selection behaviours which can be stored per preset.
    • Improvements to Auto-Naming feature.
    • Batch Add to queue by list selection.
    • Russian and Czech Translations
    • Bug fixes and Misc Improvements
    • Requires GTK3

    Install HandBrake 0.10 beta in Ubuntu 14.04:

    The new release is available in the snapshots PPA for Ubuntu 14.04 and its derivatives. To install it, press Ctrl+Alt+T on keyboard to open the terminal. When it opens, run the commands below one by one:

    sudo add-apt-repository ppa:stebbins/handbrake-snapshots
    
    sudo apt-get update 
    
    sudo apt-get install handbrake-gtk

    Or you can grab the .deb package directly from the launchpad page.

    via: handbrake.fr

    KDE 4.14 Ubuntu 14.04

    The KDE Community has just announced the KDE Applications 4.14. The new release offers more software stability, with little emphasis on new and less-proven stuff.

    The KDE Community announces the latest major updates to KDE Applications delivering primarily improvements and bugfixes. Plasma Workspaces and the KDE Development Platform are frozen and receiving only long term support; those teams are focused on the transition to Plasma 5 and Frameworks 5.

    KDE Applications 4.14

    Changes in KDE 4.14 Applications:

    • Kopete: supports for SOCKS5 proxy in ICQ protocol (before only HTTP type was supported)
    • Kopete: supports for audio calls (both protocols Google libjingle and real jingle) for *all* jabber accounts, enabled by default
    • a new Lua backend has been added to Cantor
    • the VI mode for Kate has been improved in Kate
    • Dolphin now shows thumbnails of .gpx, .kml and other file types supported by Marble, and various KML improvements have been implemented for Marble.
    • detailed changes, see the release note.

    Install / Upgrade to KDE SC 4.14:

    KUbuntu Backports PPA has made the packages for Ubuntu 14.04 LTS and its derivatives.

    Press Ctrl+Alt+T on keyboard to open the terminal. When it opens, paste the command below and hit enter to add the PPA:

    sudo add-apt-repository ppa:kubuntu-ppa/backports

    Add Kubuntu Backports PPA

    After that, upgrade your system to get the latest applications:

    sudo apt-get update && sudo apt-get upgrade

    Or run below command if you don’t have Kubuntu desktop environment:

    sudo apt-get install kubuntu-desktop

    That’s it. Enjoy!

    Install Gnoduino IDE Ubuntu

    This simple tutorial shows how to install Gnoduino IDE, implementation of well-known Arduino IDE for GNOME, in Ubuntu 14.04 & Ubuntu 12.04.

    Why Gnoduino?

    The original Arduino IDE is written in Java however, and that makes for poor integration on the Linux platform, particularly with Ubuntu Unity. Luckily enough someone has been busy to do a simple rewrite of the original IDE in Python and GTK, making a fully Linux native IDE, and it’s called Gnoduino. This implementation is targeted at GNOME and its purpose is to be light.

    Gnoduino IDE

    How to Install Gnoduino IDE in Ubuntu:

    Besides building from source, the IDE is available in PPA for Ubuntu 14.04 and Ubuntu 12.04.

    Press Ctrl+Alt+T on keyboard to open the terminal. When it opens, paste the command below and hit enter to run. Type in your password when prompt.

    sudo add-apt-repository ppa:pmjdebruijn/gnoduino-release

    This will add the Gnoduino PPA into your system.

    Add Gnoduino IDE PPA

    After that, run commands below to update package lists and install the IDE:

    sudo apt-get update; sudo apt-get install gnoduino

    Once installed, open it from menu or Unity dash and enjoy!

    video-editor-icon

    LiVES, a free video editing system and VJ tool, now is at version 2.2.6, which updates for gtk+ >= 3.10.0.

    LiVES is designed to be simple to use, yet powerful. It is small in size, yet it has many advanced features.

    • cross-platforms.
    • Support multiple video formats via mplayer, mplayer2.
    • Extendable video and audio effects via plugins.
    • Support for remote control via OSC protocol.
    • Video capture from FireWire cameras and TV cards.
    • Lossless backup and crash recovery.

    LiVES video editing system

    The latest release 2.2.6 was released on Aug 16, with below changes:

    • Fix startup bug (regression) creating config file incorrectly.
    • Libav compatibility fixes.
    • Updates for gtk+ >= 3.10.0
    • Show warning when configured with gtk+ 3.10.x
    • Add support for freenect camera.
    • Minor code cleanups.

    Install / Upgrade to LiVES 2.2.6 in Ubuntu:

    For Ubuntu 14.04, Ubuntu 12.04 and their derivatives, press Ctrl+Alt+T on keyboard to open terminal. When it opens, run the commands below one by one to get this release from PPA:

    sudo add-apt-repository ppa:ubuntuhandbook1/lives
    
    sudo apt-get update
    
    sudo apt-get install lives

    (Optional) If for some reason you want to remove it, run below commands one by one:

    sudo apt-get remove lives
    
    sudo add-apt-repository -r ppa:ubuntuhandbook1/lives
    
    sudo apt-get update

    Above commands will remove LiVES as well as the PPA from your system and update the package lists.