Archives For November 30, 2015

Museeks Music Player

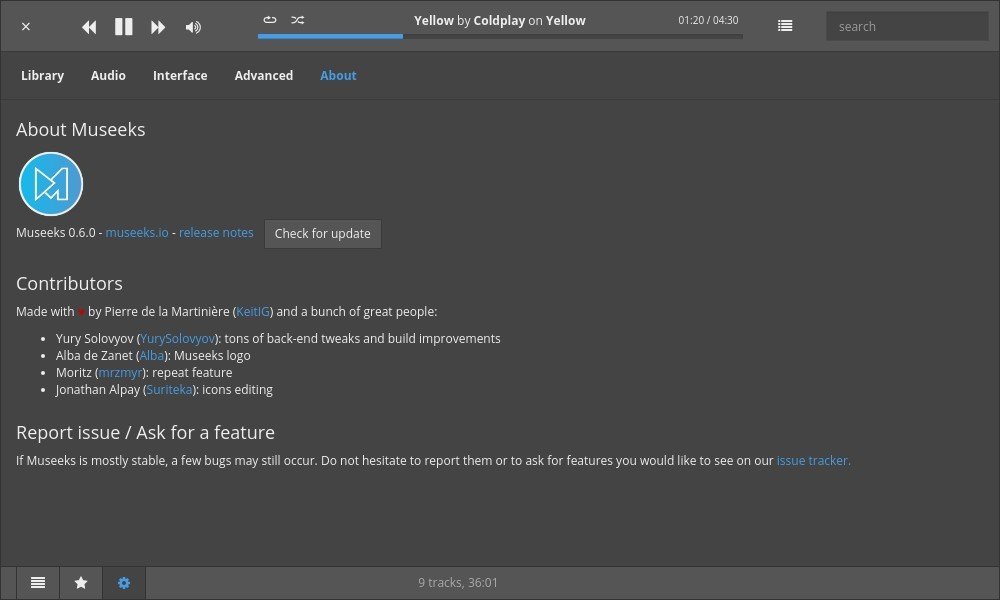
Museeks is an open-source music player written with Node.js, Electron and React.js. It’s free, lightweight, and works on Linux, OS X, and Windows.

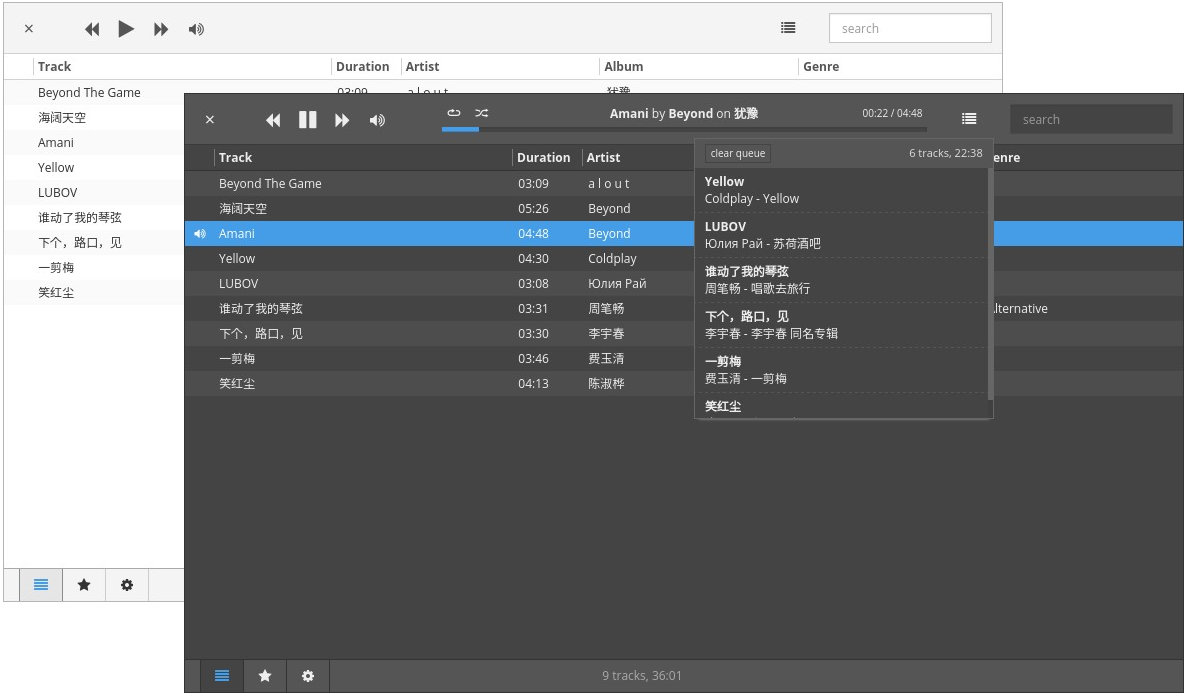
The Museeks music player offers a light and dark user interface, and supports mp3, mp4, m4a/aac, wav, ogg, 3gpp file formats. And it also features:

  • Playlists
  • Queue management
  • Shuffle, loop
  • Playback speed control
  • Sleep mode blocker

Museeks dark and white UI

Museeks playlist

museeks about page

Download Museeks music player:

The pre-compiled Linux binaries are available for download at its release page:

Download Museeks (zip)

grab the museeks-linux-ia32.zip for 32-bit, and museeks-linux-x64.zip for 64-bit OS.

To start the player, just extract and run the executable file from the result folder.

Install Museeks with desktop shortcuts:

If you like this music player, you can install it to /opt and create a shortcut so that you can launch it from Unity Dash or App Launcher.

1. Open terminal (Ctrl+Alt+T) and extract the downloaded zip archive to /opt:

sudo unzip ~/Downloads/museeks-linux-*.zip -d /opt && sudo mv /opt/museeks-linux* /opt/museeks

Type in your password when it asks and hit Enter.

install Museeks to opt

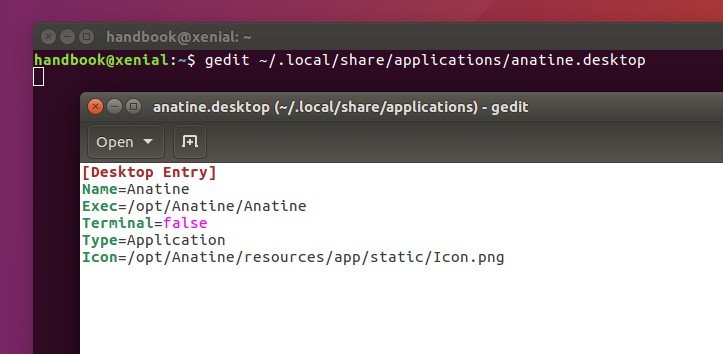
2. Create the .desktop file for the software:

gedit ~/.local/share/applications/museeks.desktop

This command creates and then opens the .desktop file with Gedit text editor. Paste below lines when it opens, and save the file.

[Desktop Entry]
Version=1.0
Name=Museeks
Exec=/opt/museeks/museeks
Terminal=false
Type=Application
Icon=/opt/museeks/resources/app/src/images/logos/museeks.png
Categories=AudioVideo;Player;Audio;

museeks-desktop

After that, you should be able to launch the player from Unity Dash, or App Launcher.

3. (Optional) To uninstall it, simply remove the /opt/museeks directory and the desktop file.

sudo rm -rf /opt/museeks && rm ~/.local/share/applications/museeks.desktop

upgrade Ubuntu 14.04.5

The Ubuntu Team has announced the release of Ubuntu 14.04.5 LTS. It’s the fifth and final point release that includes new hardware enablement stack (HWE) from Ubuntu 16.04 LTS.

The Ubuntu team is pleased to announce the release of Ubuntu 14.04.5 LTS (Long-Term Support) for its Desktop, Server, Cloud, and Core products, as well as other flavours of Ubuntu with long-term support.

We have expanded our hardware enablement offering since 12.04, and with 14.04.5, this point release contains an updated kernel and X stack for new installations to support new hardware across all our supported architectures, not just x86.

As usual, this point release includes many updates, and updated installation media has been provided so that fewer updates will need to be downloaded after installation. These include security updates and corrections for other high-impact bugs, with a focus on maintaining stability and compatibility with Ubuntu 14.04 LTS.

Ubuntu 14.04.5 image

Upgrade to Ubuntu 14.04.5:

Ubuntu 14.04 users can easily upgrade to the 14.04.5 point release by running a regular system update via Software Updater.

Or run the commands in terminal:

sudo apt-get update && sudo apt-get upgrade

Note that the updated hardware enablement stack, Kernel 4.4 and X graphics stack from 16.04, will be available through the update only for those who installed Ubuntu 14.04 using the 14.04.2 or newer disc image.

Those who installed Ubuntu 14.04 from the original or 14.04.1 disc image will keep the original Trusty stack. Anyone wishing to opt into the new Kernel and X graphics stack may do so by running the command below in terminal:

sudo apt-get install --install-recommends linux-generic-lts-xenial xserver-xorg-core-lts-xenial xserver-xorg-lts-xenial xserver-xorg-video-all-lts-xenial xserver-xorg-input-all-lts-xenial libwayland-egl1-mesa-lts-xenial

For Sever edition, run this command instead:

sudo apt-get install --install-recommends linux-generic-lts-xenial

FileZilla FTP Client

FileZilla client has recently reached the 3.20 release. While Ubuntu 16.04 offers the old 3.15.0 release in its main archive, you can easily upgrade to FileZilla 3.20 by following this tutorial.

FileZilla 3.20 now depends on ibfilezilla >= 0.6.1, it brings some crash fixes, error message improvements, and other bug-fixes. See details at this page.

FileZilla 3.20

Install FileZilla 3.20 in Ubuntu 16.04:

It is recommended to install FileZilla using the package manager, although the project page offers pre-compiled Linux binaries. And below is how to install it from the GetDeb repository.

1. Open terminal from Unity Dash or via Ctrl+Alt+T shortcut keys. When it opens, run commands to:

add Getdeb repository:

sudo sh -c 'echo "deb http://archive.getdeb.net/ubuntu xenial-getdeb apps" >> /etc/apt/sources.list.d/getdeb.list'

install the key:

wget -q -O - http://archive.getdeb.net/getdeb-archive.key | sudo apt-key add -

GetDeb repository for Ubuntu 16.04

2. Launch Software Updater and upgrade the FTP client.

upgrade to FileZilla 3.20

For those who don’t have a previous release installed, just run commands to update package index and install FileZilla:

sudo apt update

sudo apt install filezilla

Firefox 48

Mozilla Firefox 48.0 was released on Tuesday. The biggest change is that Electrolysis (E10S), the multiple processes architecture, is beginning to be enabled by default.

Electrolysis is the project name for Mozilla’s efforts to split Firefox into multiple processes to improve responsiveness, stability, and security. The first phase of this work was to split Firefox into a UI process and a content process.

Besides enabling E10S for some users. Firefox 48 also features:

  • Download Protection: potentially unwanted software and uncommon downloads.
  • Add-ons that have not been verified and signed by Mozilla will not load
  • Better Canvas performance with speedy Skia support for Linux
  • WebRTC embetterments:
    • Delay-agnostic AEC enabled
    • Full duplex for GNU/Linux enabled
    • ICE Restart & Update is supported
    • Cloning of MediaStream and MediaStreamTrack is now supported
  • Searching and various security improvements, and more at release page.

How to upgrade to Firefox 48 in Ubuntu:

The new Firefox release will be made into Updates/Security repositories very soon, available for Ubuntu 16.04, Ubuntu 14.04, and Ubuntu 12.04. (Check out THIS PAGE)

At that time, just launch Software Updater and install available updates after checking for updates.

upgrade firefox 46

If for some reason you don’t receive the updates for Firefox 48, launch Software & Updates and:

  • select Download from “Main Server” in first tab.
  • make sure the security and updates repositories enabled in Updates tab.

enable-security-repo

How to Install Deluge 1.3.13 in Ubuntu 16.04

Last updated: August 2, 2016

Deluge 1.3.13

While Ubuntu 16.04 offers Deluge 1.3.12, the BitTorrent client has recently reached the 1.3.13 release with an extremely large set of bug fixes.

Deluge 1.3.13 now includes libtorrent 1.0.9 for all platforms. Python 2.6 is not supported for Windows. So if you were using py2.6 when you upgrade your 3rd party plugins will disappear from the plugins list.

For the full list of changes in Deluge 1.3.13, see this page.

Deluge 1.3.13

How to install or upgrade Deluge in Ubuntu:

The official Deluge PPA has made the binary packages for Ubuntu 16.04, and also Ubuntu 14.04, Ubuntu 12.04, Ubuntu 16.10, and derivatives.

1. add PPA:

Open terminal and run the command:

sudo add-apt-repository ppa:deluge-team/ppa

Type in your password (no visual feedback) when it prompts and hit Enter.

Deluge PPA

2. Upgrade Deluge via Software Updater:

upgrade-deluge

Or you can run the commands below in terminal to install the software for the first time:

sudo apt update && sudo apt install deluge

3. (Optional) For any reason, you can easily switch back to Deluge 1.3.12 by installing ppa-purge and purge the PPA.

sudo apt install ppa-purge && sudo ppa-purge ppa:deluge-team/ppa

Native GTK+3 Twitter App Corebird 1.3 Released

Last updated: November 28, 2019

Corebird Twitter Client

Corebird discontinued! Try Cawbird as an alternative.

Corebird, an open-source GTK+3 twitter app, has reached the 1.3 release with some new features and build system improvements.

Corebird 1.3 changelog:

  • The build system will now check for gtksink
  • Remove libgee dependency
  • The compose tweet window will now save the current text on cancel
  • Allow self-retweeting
  • Fade loaded inline media in
  • Twitter wont send mp4 urls for their videos anymore starting August 1st, so support HLS videos
  • Query full-length DMs
  • Support muting in profiles

Corebird Twitter Client 1.3

How to install Corebird 1.3 in Ubuntu 16.04:

Besides building the software from source, you can install the latest release from third-party PPA, Ubuntu 16.04 and its derivatives are supported.

1. Add PPA

Open terminal (Ctrl+Alt+T) and run the command below to add the PPA:

sudo add-apt-repository ppa:ubuntuhandbook1/corebird 

Type in your password when it prompted and hit Enter.

corebird-ppa

2. If you have a previous release installed, just launch Software Updater and upgrade it after checking for updates.

upgrade corebird 1.3

Or run the commands below one by one in terminal to update and install Corebird Twitter client:

sudo apt update

sudo apt install corebird

3. (Optional) For those who want to revert to Corebird 1.1, the stock version in Ubuntu 16.04, purge the PPA via ppa-purge:

sudo apt install ppa-purge && sudo ppa-purge ppa:ubuntuhandbook1/corebird

That’s it. Enjoy!

Anatine Twitter App

Anatine is a new open-source Desktop Twitter App for Linux, Windows, and OS X. It offers mobile Twitter interface with keyboard shortcuts support and extended features.

Anatine is only 3 months old and so far it features:

  • Hides promoted tweets
  • Dark Mode (Ctrl+Shift+D)
  • Context menu for save images.
  • system tray icon to toggle the window.

Anatine Twitter App

Install Anatine in Ubuntu:

A non-install Linux package is available from the link below, just download, extract, and run Anatine executable from result folder.

Download Anatine for Linux (.zip)

For those who want to install the software, so it can be launched from Unity Dash / App Launcher, do:

1. Open terminal (Ctrl+Alt+T) and run command to extract downloaded package to /opt:

sudo unzip ~/Downloads/Anatine-linux-*.zip -d /opt/Anatine

install anatine to opt

2. Create a shortcut for the app by running command:

gedit ~/.local/share/applications/anatine.desktop

The command creates and opens a .desktop file with Gedit text editor. Just paste below lines into the file and save it.

[Desktop Entry]
Name=Anatine
Exec=/opt/Anatine/Anatine
Terminal=false
Type=Application
Icon=/opt/Anatine/resources/app/static/Icon.png

anatine shortcut

3. Finally launch Anatine from Unity Dash and enjoy!

Launch Anatine twitter app

4. (Optional) For any reason you want to remove the software, simply run command:

sudo rm -rf /opt/Anatine && rm ~/.local/share/applications/anatine.desktop

Ubuntu 16.10 Alpha 2 Available for Download

Last updated: September 29, 2017

Ubuntu 16.10 Yakkety Yak

Ubuntu 16.10 Yakkety Yak now reaches the Alpha 2 release, features images for Lubuntu, Ubuntu MATE and Ubuntu Kylin.

The second alpha of the Yakkety Yak (to become 16.10) has now been released!

This milestone features images for Lubuntu, Ubuntu MATE and Ubuntu Kylin.

Pre-releases of the Yakkety Yak are *not* encouraged for anyone needing a stable system or anyone who is not comfortable running into occasional, even frequent breakage. They are, however, recommended for Ubuntu flavor developers and those who want to help in testing, reporting and fixing bugs as we work towards getting this release ready.

Alpha 2 includes a number of software updates that are ready for wider testing. This is still an early set of images, so you should expect some bugs.

Ubuntu 16.10 Alpha 2 release highlights:

  • This Yakkety Yak snapshot still includes the v4.4 kernel
  • Lubuntu still uses LXDE since LXQt is still in development
  • MATE Tweak adds option to enable Heads-Up Display (HUD)
  • new Ubuntu MATE start page.
  • MATE Dock Applet drag and drop icons support

Ubuntu 16.10 Release Schedule:

June 30th Alpha 1 (for opt-in flavors)
July 28th Alpha 2 (for opt-in flavors)
August 18th Feature Freeze, Debian Import Freeze
August 25th Beta 1 (for opt-in flavors)
September 22nd Final Beta
October 6th Final Freeze, Release Candicate
October 13th Final release of Ubuntu 16.10

Download Ubuntu 16.10:

Lubuntu 16.10: cdimage.ubuntu.com/lubuntu/releases/yakkety/

Ubuntu Mate 16.10: cdimage.ubuntu.com/ubuntu-mate/releases/yakkety/

UbuntuKylin 16.10: cdimage.ubuntu.com/ubuntukylin/releases/yakkety/

Gradio

There are a few applications available for listening internet radio stations in Ubuntu Desktop. Gradio is new one that allows users to find radio stations by typing a keyword in the search box, and then listen to one internet radio by clicking on it.

The simple tool requires GTK3 >= 3.18, so it works on Ubuntu 16.04, Ubuntu 16.10, and their derivatives, e.g., Linux Mint 18 and Elementary OS 0.4 Loki.

Gradio Internet Radio App

How to install Gradio in Ubuntu 16.04:

The pre-compiled binary packages are available for download at the link below:

Download Gradio (.deb)

Choose amd64.deb for 64-bit system and i386.deb for 32-bit system, and then click install the package via Ubuntu Software.

For those who want to add the PPA and receive future updates via Software Updater, open terminal (Ctrl+Alt+T) and run commands to add the PPA repository (so far supports for Ubuntu 16.04 and 16.10):

sudo add-apt-repository ppa:haecker-felix/gradio-daily

sudo apt update

sudo apt install gradio

(Optional) To remove the software, simply run apt command with remove flag:

sudo apt remove gradio

And the PPA can be remove by launching Software & Updates utility and navigating to Other Software tab.

Linux Kernel

Linus Torvalds finally announced the release of the Linux Kernel 4.7. He wrote on lkml.org:

So, after a slight delay due to my travels, I’m back, and 4.7 is out.

Despite it being two weeks since rc7, the final patch wasn’t all that big, and much of it is trivial one- and few-liners. There’s a couple of network drivers that got a bit more loving. Appended is the shortlog since rc7 for people who care: it’s fairly spread out, with networking and some intel Kabylake GPU fixes being the most noticeable ones. But there’s random small noise spread all over.

Kernel 4.7 release highlights:

  • open source support for Radeon RX 480 GPUs
  • async discard support by the core block code
  • support for upgrading firmware using the EFI Capsule
  • New Linux Security Module (LSM) “LoadPin”
  • support for generating virtual USB Device Controllers in USB/IP
  • numerous drivers updates and lots of bug-fixes.

How to Install / Upgrade Kernel 4.7 in Ubuntu:

Not recommended for common users, unless there’s must upgrade reasons and you know exactly what you’re doing and how to solve problems.

Ubuntu Kernel Team has made the binary packages for the new kernel release, available for download at the link below:

Download Kernel 4.7 Packages [.deb]

Depends on your OS type, grab and install the packages below one by one:

  1. linux-headers-4.7.0-xxxxxx_all.deb
  2. linux-headers-4.7.0-xxx-generic(/lowlatency)_xxx_amd64(/i386).deb
  3. linux-image-4.7.0-xxx-generic(/lowlatency)_xxx_amd64(/i386).deb

Select generic for common system, and lowlatency for a low latency system (e.g. for recording audio), amd64 for 64bit system and i386 for 32bit system.

You may also download these .deb packages in terminal / command console by running following commands one by one:

For 64-bit system:

cd /tmp/

wget http://kernel.ubuntu.com/~kernel-ppa/mainline/v4.7/linux-headers-4.7.0-040700_4.7.0-040700.201607241632_all.deb

wget http://kernel.ubuntu.com/~kernel-ppa/mainline/v4.7/linux-headers-4.7.0-040700-generic_4.7.0-040700.201607241632_amd64.deb

wget http://kernel.ubuntu.com/~kernel-ppa/mainline/v4.7/linux-image-4.7.0-040700-generic_4.7.0-040700.201607241632_amd64.deb

sudo dpkg -i *.deb

For 32bit system:

cd /tmp/

wget http://kernel.ubuntu.com/~kernel-ppa/mainline/v4.7/linux-headers-4.7.0-040700_4.7.0-040700.201607241632_all.deb

wget http://kernel.ubuntu.com/~kernel-ppa/mainline/v4.7/linux-headers-4.7.0-040700-generic_4.7.0-040700.201607241632_i386.deb

wget http://kernel.ubuntu.com/~kernel-ppa/mainline/v4.7/linux-image-4.7.0-040700-generic_4.7.0-040700.201607241632_i386.deb

sudo dpkg -i *.deb

Finally restart your computer.

Uninstall Kernel 4.7:

For any reason you want to remove this Kernel, start/restart your machine and select boot with the previous kernel in Grub2 -> Advanced menu. Then remove the 4.7 kernel via Ubuntu Tweak, or just follow this tutorial.