FFmpeg multimedia libraries 4.2 was released a few weeks ago. Here’s how to install it in Ubuntu 18.04, Linux Mint 19.x.
FFmpeg 4.2, codename “Ada”, is a major release that features:
- tpad filter, dedot filter, freezedetect filter, lagfun filter, asoftclip filter, colorhold filter, xmedian filter, asr filter, derain filter, deesser filter, anlmdn filter, maskfun filter
- chromashift and rgbashift filters, truehd_core bitstream filter, AV1 frame split bitstream filter, showspatial multimedia filter
- dhav demuxer, vividas demuxer, KUX demuxer, IFV demuxer
- hymt decoder, ARBC decoder, agm decoder, lscr decoder, VP4 video decoder, hcom demuxer and decoder
- PCM-DVD encoder
- GIF parser
- removed libndi-newtek
- libaribb24 based ARIB STD-B24 caption support (profiles A and C)
- Support decoding of HEVC 4:4:4 content in vdpau, nvdec and cuviddec
- AV1 decoding support through libdav1d
- mov muxer writes tracks with unspecified language instead of English by default
- added support for using clang to compile CUDA kernels
How to Install FFmpeg 4.2 in Ubuntu:
Updated with new PPA, since the previous PPA has been removed as a protest against the abuse of open-source projects by large companies.
The unofficial PPA has built the packages for Ubuntu 18.04 and its derivatives.
1. Open terminal either via Ctrl+Alt+T keyboard shortcut, or by searching for ‘terminal’ from application menu. When it opens, run command to add the PPA:
sudo add-apt-repository ppa:savoury1/ffmpeg4
Type user password (no asterisk feedback) when it prompts and hit Enter.

2. Two more PPAs are required for the dependencies. Run following commands one by one in terminal:
sudo add-apt-repository ppa:savoury1/graphics
sudo add-apt-repository ppa:savoury1/multimedia
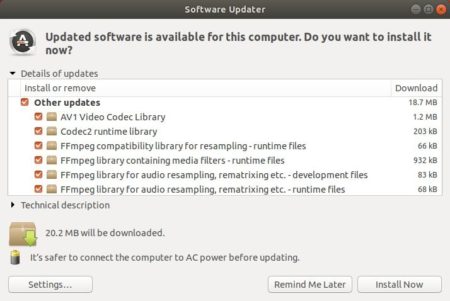
3. You can then upgrade FFmpeg libraries via Software Updater (Update Manager):
Or run commands in terminal:
sudo apt-get update

sudo apt-get install ffmpeg
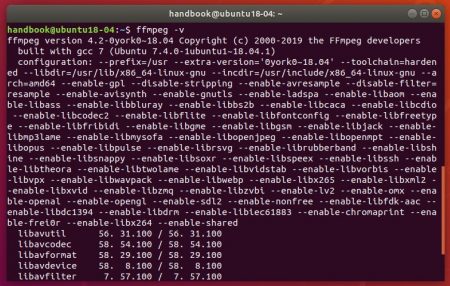
Once installed, you may check the software version via command ffmpeg -v
How to Restore:
The two dependencies PPAs contain many other application packages, you may remove them either via Software & Updates -> Other Software or by running command:
sudo add-apt-repository --remove ppa:savoury1/graphics
sudo add-apt-repository --remove ppa:savoury1/multimedia
For any reason, you can downgrade FFmpeg to the stock version in Ubuntu universe repositories by purging the PPA via command:
sudo apt-get install ppa-purge && sudo ppa-purge ppa:savoury1/ffmpeg4