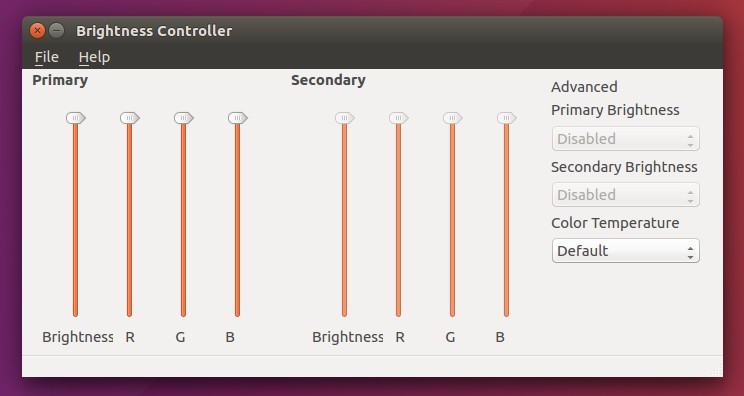
Archives For jimingkui

nvidia-logo-1

Nvidia announced the 352.30 release of its Linux driver yesterday with GeForce 910M support and various important fixes.

Release highlights of Nvidia 352.30:

  • Fixed a bug that caused poor video post-processing performance in VDPAU when operating on a large number of video streams simultaneously.
  • Fixed a bug that could cause an Xid error when terminating a video playback application using the overlay presentation queue in VDPAU.
  • Updated nvidia-installer to avoid recursing too deeply into kernel source trees under /usr/lib/modules, mirroring an existing restriction on recursion under /lib/modules.
  • Fixed a rare deadlock condition when running applications that use OpenGL in multiple threads on a Quadro GPU.
  • Fixed a kernel memory leak that occurred when looping hardware – accelerated video decoding with VDPAU on Maxwell-based GPUs.
  • Fixed a bug that caused the X server to crash if a RandR 1.4 output provided by a Sink Output provider was selected as the primary output on X.Org xserver 1.17 and higher.
  • Fixed a bug that caused waiting on X Sync Fence objects in OpenGL to hang indefinitely in some cases.
  • Fixed a bug that prevented OpenGL from properly recovering from hardware errors or sync object waits that had timed out.

Install Nvidia 352.30 from PPA:

For Ubuntu 15.10, Ubuntu 15.04, Ubuntu 14.04 and derivatives (e.g., Linux Mint 17.x, and Elementary OS Freya), the new driver can be easily installed from an PPA repository:

1. To add the PPA, open terminal from the Dash/Launcher/Ctrl+Alt+T. When it opens, run command:

sudo add-apt-repository ppa:graphics-drivers/ppa

nvidia-ppa

2. After adding the PPA, install nvidia-352 package via Synaptic Package Manager or upgrade from previous release through Software Updater. Or run below commands one by one in terminal:

sudo apt-get update

sudo apt-get install nvidia-352 nvidia-352-uvm nvidia-settings

For the official binaries, go to www.nvidia.com/object/unix.html

Relay IRC Client

Relay is a new IRC client designed for Elementary OS that aims to be small, fast, and elegant. It’s written in Vala and also works in Ubuntu and other Linux.

Relay uses very few libraries and takes less memory (<30mb usually). The project was created in June of 2015 so as of now it is a young project with functionality rapidly being added to it. So far, it features:

  • drag and drop to Hastebin – drag files to the paste icon will upload all of them and put the URL’s in the output window.
  • A missed message count.
  • Highlighting tabs with activity from IRC servers.
  • Drag and drop reordering of tabs.
  • Automatic IRC channel connecting
  • URL parsing and the ability to open your browser when clicked
  • Highlights the name of your or anyone else when mentioned in a chat
  • Right click tab switching.
  • The ability to switch channels through tabs or the sidebar.
  • It supports languages that use UTF-8 characters.
  • Although Relay was built on Elementary OS it will switch the theme depending on what operating system you are using.
  • The ability to search users
  • The ability to see where you left off since you last visited a tab
  • The ability to control many settings and set colors in the UI
  • Click a user name to have their name placed in the text entry
  • Private messaging and ability to block users
  • The ability to turn on or off joining or exiting messages
  • Creates a datestamp every 5 minutes to give you a timeline of what has happened

Screenshots:

Relay IRC start window

Relay IRC client in Elementary OS Freya

Relay IRC client in Unity

Relay Irc client in Gnome

At the moment of writing this tutorial there are two bugs for Ubuntu user and I’ve reported them to the project page:

  1. In Unity desktop, when you try to minimize Relay window by clicking its icon on left Launcher, session crashes immediately and brings you back to login screen. – Bug with Compiz
  2. In Gnome Shell, there’s a reading issue (Picture 4) – Fixed

Install Relay IRC client from PPA:

The developer has created a PPA repository for the project. So far, Ubuntu 15.10, Ubuntu 15.04, Elementary OS Freya are supported.

NOTE: Ubuntu 14.04 needs updated version of libgranite (>= 0.3.0) and GTK+3.0 (>= 3.14). You can get them from Gnome Testing PPA and Elementary Stable PPA. But using the PPAs could break your system or make it unstable! Do it at your own risk!

1. To add the PPA, open terminal from the Dash, Launcher, or via Ctrl+Alt+T shortcut keys. When it opens, run command:

sudo add-apt-repository ppa:agronick/relay

relay-irc-client-ppa

2. After added the PPA, install the software via Synaptic Package Manager. Or just run below commands one by one in terminal:

sudo apt-get update

sudo apt-get install relay

For those who don’t want to add PPA, grab the .deb package from the launchpad page.

Feature requests and issues please report at github.com/agronick/Relay

How to Install PyCharm IDE in Ubuntu 14.04/15.04

Last updated: November 28, 2016

PyCharm Ubuntu

Quick tutorial shows how to install the PyCharm, a Python IDE, in Ubuntu 14.04, Ubuntu 15.04, Linux Mint 17, or Elementary OS Freya via PPA.

PyCharm is an intelligent Python IDE with unique code assistance and analysis, for productive Python development on all levels. It features (community version):

  • Intelligent Editor, with code completion, on-the-fly error highlighting, auto-fixes, etc.
  • Automated code refactorings and rich navigation capabilities
  • Integrated debugger and unit testing support
  • Native VCS integrations
  • Customizable UI and key-bindings, with VIM
  • emulation available
  • And much more, all available under the Apache 2 license

PyCharm in Ubuntu

Install PyCharm from PPA:

Update Nov, 2016: The PPA now supports Ubuntu 16.04 and Ubuntu 16.10. The packages for Ubuntu 15.10 and older have been removed.

There’s a PPA repository for Ubuntu based users that contains both professional (30-day free trial) and community version of PyCharm packages. So far, Ubuntu 15.04, Ubuntu 14.04, Ubuntu 12.04 and their derivatives are supported.

1. To add the PPA, open terminal from the Dash, Launcher, or via Ctrl+Alt+T shortcut keys. When it opens, run command:

sudo add-apt-repository ppa:mystic-mirage/pycharm

pycharm-ide-ppa

2. After adding the PPA, update system package cache and install the IDE via Synaptic Package Manager. Or just run below commands one by one in terminal:

sudo apt-get update

sudo apt-get install pycharm

You may replace last command via sudo apt-get install pycharm-community to install the community version which is free.

For those who don’t want to add PPA, grab the .deb installer for either professional or community version from the launchpad page.

Ubuntu 14.10 logo

Ubuntu 14.10 Utopic Unicorn finally reached the end of its life on July 23, 2015. No more package updates will be accepted to 14.10. That means 14.10 users won’t get latest software (e.g, Firefox, Thunderbird), security notices/fixes through Software Updater. And Launchpad PPAs will no longer update for 14.10.

Ubuntu 14.10 was released 9 months ago, on October 23, 2014. As a non-LTS release, it has a 9-month month support cycle and, as such, the support reached the end of life on last Thursday. Users of Ubuntu 14.10 may upgrade to Ubuntu 15.04 (ends on January 2016), or install Ubuntu 14.04 LTS which has a 5-year support (until 2019).

To upgrade to Ubuntu 15.04, see:

https://help.ubuntu.com/community/VividUpgrades

To download Ubuntu 14.04 LTS, go to:

http://releases.ubuntu.com/trusty/

Here’s the support period of the current Ubuntu releases includes the next Ubuntu 15.10 Wily:

Version Code name Release Date End of Life Date
Ubuntu 15.10 Wily Werewolf October 22, 2015 July, 2016
Ubuntu 15.04 Vivid Vervet April 23, 2015 January 2016
Ubuntu 14.04 LTS Trusty Tahr April 17, 2014 April, 2019
Ubuntu 12.04 LTS Precise Pangolin April 26, 2012 April, 2017

audacity-logo1

The 2.1.1 release of Audacity audio editor and recorder was released more than a week ago with some new features and fixes. Now it’s ready in PPA for Ubuntu users (unofficial).

Release highlights of Audacity 2.1.1:

  • The most visible new feature is scrubbing and seeking, including backwards play. Updates to Quick-Play also help with finding a precise position in the audio.
  • You can now install plug-ins without restarting Audacity or add and remove any effect or generator from the menus.
  • Over 50 bugs have been addressed with this release. Edits are now processed much faster in longer projects of a few hours duration.
  • Effects now have presets. A new Limiter replaces the Hard Limiter effect. There’s a new version of Vocal Removal, a cross-fade effect for combining clips on the same track and ‘classic filters’ available as an opt-in effect.
  • There’s also been lots of work behind the scenes, including VI usability enhancements and upgrade to new libraries.

For more, see the wiki page.

audacity-211

How to Install Audacity 2.1.1 in Ubuntu:

The 2.1.1 release is available in PPA for Ubuntu 15.10, Ubuntu 15.04, Ubuntu 14.04 and their derivatives. Due to the old libsuil-0-0 library, Ubuntu 12.04 is excluded but the 2.1.0 release is available.

1. To add the PPA repository, open terminal from the Dash, Launcher, or via Ctrl+Alt+T shortcut keys. When it opens, run command:

sudo add-apt-repository ppa:ubuntuhandbook1/audacity

add-audacity-ppa

2. After adding the PPA, you can install/upgrade the editor either via below commands:

sudo apt-get update

sudo apt-get install audacity

or by using Software Updater if you’ve a previous release installed:

upgrade-audacity

Hope this helps those who are not good at compiling from source tarball.

Kodi Media Center (XBMC)

The 15.0 release of Kodi media center, formerly known as XBMC, was released yesterday with quite a lot of new features. Codename is Isengard

According to the official release note, Kodi 15.0 features:

  • A new chapter selector window allows you to visually browse and select chapters from mkvs and other containers that support chapters.
  • Adaptive seeking (aka Skip Steps). The more times you press a button to seek in a period of time, the larger the jump forward or backward will be.
  • Audio and Subtitle Lists. For content that includes multiple audio and subtitle choices, you can select from a full list of choices, rather than manually searching through a spinner.
  • Language Add-ons and Expanded International Preferences. Now language translations get regularly updated to all users as the add-ons themselves update.
  • Improved Add-on Manager to make finding the add-ons you are looking for easier.

kodi-hd

The new release also brings other improvements include: ffmpeg 2.6.3 update, improved Closed Captioning support in Live TV, fixed music video queuing, allow scanning of new sources and marking as watched, and Windows DXVA HEVC hardware decoding support.

Install / Upgrade Kodi 15.0 in Ubuntu:

Ubuntu 12.04 support has been dropped in Kodi PPA. Packages for Ubuntu 15.04, Ubuntu 14.10, Ubuntu 14.04, Linux Mint 17 and Elementary OS Freya will be made into PPA very soon.

1. To add PPA, open terminal from the Dash, Launcher, or by pressing Ctrl+Alt+T on keyboard. When it opens, run command:

sudo add-apt-repository ppa:team-xbmc/ppa

Install Kodi from PPA

2. After adding PPA, you can install or upgrade Kodi as well as the encoder, addons via commands:

sudo apt-get update

sudo apt-get install kodi kodi-audioencoder-* kodi-pvr-*

Or using Synaptic Package Manager to install/upgrade the software:

install-kodi-synaptic

How to Install SopCast Player in Ubuntu 15.04

Last updated: July 21, 2015

sopcast player

Quick tutorial shows how to install SopCast Player, GUI for SopCast p2p TV streaming, in Ubuntu 15.04 Vivid using PPA.

SopCast Player is designed to be an easy to use Linux GUI front-end for the p2p streaming technology developed by SopCast. It features an integrated video player (VLC), a channel guide, and bookmarks. Once SopCast Player is installed it simply “just works” with no required configuration.

Sopcast Player in Ubuntu Unity

Install SopCast Player in Ubuntu:

There’s a PPA repository available for Ubuntu 15.04, Ubuntu 14.04, Ubuntu 12.04, Ubuntu 10.04 and their derivatives (e.g., Mint 13/17, and Elementary OS Freya).

1. To add the PPA, open terminal from the Dash, Launcher, or by pressing Ctrl+Alt+T. When it opens, run command:

sudo add-apt-repository -y ppa:lyc256/sopcast-player

sopcast ppa

2. After that, you can install the player either from Synaptic Package Manager after clicking Reload button or by running below commands one by one:

sudo apt-get update

sudo apt-get install sopcast-player

For those who don’t want to add PPA, download and install the .deb packages of sp-auth and then sopcast-player for your OS from this page.

Corebird GTK+ 3 Twitter Client

Corebird, a native Gtk+ Twitter client for Linux desktop, gets a new release recently though there’s even not a release note.

Corebird 1.0.1 was released silently without a release note and even changelog file in its source tarball. The only change I can tell is that it now provides minimize, maximize, and close at top-left corner in Ubuntu 15.04 both Unity and Gnome Shell.

corebird-in-unity-gnome

For Elementary OS Freya, the global menu (gear button) has been merged into header bar.

corebird-in-freya

Install Corebird 1.0.1 in Ubuntu:

For Ubuntu 15.10 and Ubuntu 15.04 user, open terminal from the Dash, Launcher, or by pressing Ctrl+Alt+T on keyboard. When it opens, run below commands one by one to get it from PPA:

sudo add-apt-repository ppa:ubuntuhandbook1/corebird 

sudo apt-get update

sudo apt-get install corebird

For Elementary OS Freya and those who don’t want to add PPA, grab the .deb installer from launchpad page.

UPDATE: Ubuntu 14.04 is not supported! If you REALLY want this app, first add Gnome Testing PPA (USING THE PPA COULD BREAK YOUR SYSTEM OR MAKE IT UNSTABLE!) and update your system cache, finally install the .deb from the previous link.

ubuntu-tips

Gnome Terminal used to have an “Open Tab” option allows to open new terminal windows in tabs. Now the option is gone in Ubuntu 15.04.

The “Open Tab” option has been merged into “Open Terminal” option in Ubuntu 15.04, so it opens new terminals in either new windows or new tabs depends on the Preferences settings under General tab:

new terminal in tab

The shortcut key does not change, so you can now open Gnome Terminal in a new tab via either Ctrl+Shift+T or “Open Terminal” option:

terminal-tabs

FileBot Ubuntu

Quick tutorial shows how to install latest FileBot, the ultimate tv renamer / subtitle downloader / sfv validator, in Ubuntu, and Linux Mint.

FileBot is the ultimate tool for organizing and renaming your movies, tv shows or anime, and music well as downloading subtitles and artwork. It’s smart and just works.

FileBot provides a simple user-interface tuned for drag-n-drop, renames and moves hundreds of media files in a matter of seconds, fetches episode info from TheTVDB, AniDB or TVRage, and auto detects names for Series/Anime and Movies.

It also features:

  • Powerful and full-featured cmdline interface and scripting interface for any kind of automation
  • Accurate and robust and simply awesome file / episode matching logic
  • Powerful and highly customizable episode naming scheme
  • Supports language preferences for series and episode titles
  • Supports movie identification and renaming via TheMovieDB
  • Reverse rename files using internal history or the original torrent file
  • Download subtitles from OpenSubtitles
  • Advanced logic for matching files to most suitable subtitles
  • Find exact subtitles on OpenSubtitles
  • Upload subtitles with movie hash to OpenSubtitles
  • Integrated subtitle viewer for srt, ass and sub files
  • and more …

Install FileBot in Ubuntu:

FileBot is available in Ubuntu Software Center, but it costs $9.95. To install the latest release (4.6 so far) for free, follow below steps.

1. Install Oracle Java. Since version 4.5, Oracle Java >= 8 is required for this software.

Open terminal from the Dash, Launcher, or by pressing Ctrl+Alt+T on keyboard. When it opens, paste and run below commands one by one:

sudo add-apt-repository -y ppa:webupd8team/java

sudo apt-get update

sudo apt-get install oracle-java8-installer

Above commands add the Webupd8 PPA and install an installer script which automatically downloads and installs oracle java from its official website.

install-java

After that, you may run below command to set Java 8 as default java environment on your system:

sudo apt-get install oracle-java8-set-default

2. Download & install FileBot package.

Depends on your OS type, 32bit (i386) or 64-bit (amd64), select download the Debian package from its official web page:

Download FileBot

download-filebot

Once the download process finish, click to open the package with Software Center (or Gdebi) and finally install the software.