![]()
This quick tutorial shows you how to install UberWriter, a free word processor for markdown, via the official PPA in Ubuntu 14.04.
UberWriter is free and open source word processor, text editor for Ubuntu with markdown support. It provides a very clean interface with out of box spellcheck.
The UI now is based on GTK3 with client-side decorations support. If offers Focus, Fullscreen, Dark, and preview mode and allows to search and replace texts.
Through pandoc, it is possible to export to PDF, HTML, ODT and even more formats through the Advanced Export option.
Watch the video to see it in action:
Install UberWriter in Ubuntu:
UberWriter is available in Ubuntu Software Center, but it costs $5.
For the latest release and receiving future updates, the developer offers a launchpad PPA for Ubuntu 14.04. The PPA also provides old versions for Ubuntu 13.10, Ubuntu 12.04.
Press Ctrl+Alt+T to open the terminal. When it opens, paste the commands below and run one by one:
sudo add-apt-repository ppa:w-vollprecht/ppa

sudo apt-get update

sudo apt-get install uberwriter
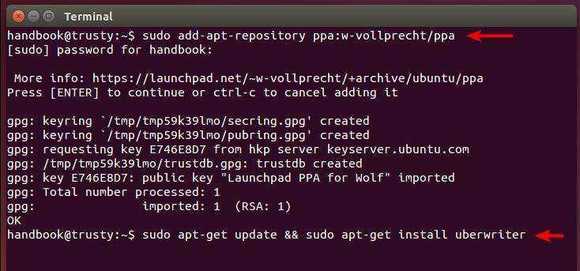
Above commands will add the developer’s PPA and install UberWriter in your system for free.
Note: UberWriter uses client-side decorations. The Unity integration is not entirely done yet. (Adwaita theme looks much better and inconsolata is missing in the dependencies.)